-
Posts
2,372 -
Joined
-
Last visited
Content Type
Profiles
Forums
Events
Blogs
Gallery
Store
Everything posted by immiketoo
-
Thats what I say about top tier tools. The eliminate any excuses!
-
Amen. I have never bought a tool thinking of what my customer would think of it. I mean, who in their right mind would think that? I buy them because I like them. Period. I had Terry make me a knife with a special handle because its an amazing tool. I have respect for the maker and at the end of the day, the best tool on the market takes away any excuses I may have regarding skill. You can't hide from your own inadequacies with the best tool looking gat you and saying, "Is that the best you've got?" I learned this from guitars. Its easy to blame a shitty guitar. You simply CANT do some things with them. On a top end axe, all your excuses are just whining because you didn't practice. Same analogy applies to tools. Now, can a gifted pro make that shitty tool perform better than you? Of course they can. They circle of life! can also make the top tier tool perform better than you. That's part of the challenge.
-
Yes on this one I did.
-
At least 4. I can't remember.
-
You didn't offend me in the slightest, and I can't see any reason that you think I would be. And what I mean about tandy stamps is that they lack crispness compared to the other makers I mentioned. You basically want to spend smart money so rather than spend it on 100+ of SK when 28 will give you an excellent knife, an you can spend the change on a good stamp. I was in the exact same boat as you a while back, and after bending a few Tandy stamps, I bought a barry king. The difference is clear. Especially when it comes to good looking geometric stamps. For general carving you should look at pre-letter craftool (Tandy) as they are quite good, just as crisp and modern tools and VERY affordable. I still use several of them today on account of the quality they produce. Frankly, I wish I had focused more on function than show when I started. I have so many tools I don't ever use now its ridiculous, and I'm not even that big a collector. I just like sparkly things. My friend Serge gives me a cookie whenever I walk away from something sparkly. It took seeing all kinds of tools to know the difference though, and since you have already identified the desire to have better stamps. All of the money on a stamp goes into the design they stamp. The rest of it could be a nail and the cost difference of the materials isn't enough to justify the price difference. The business end is.
-
-
Bend the hooks so they fit your tools?
-
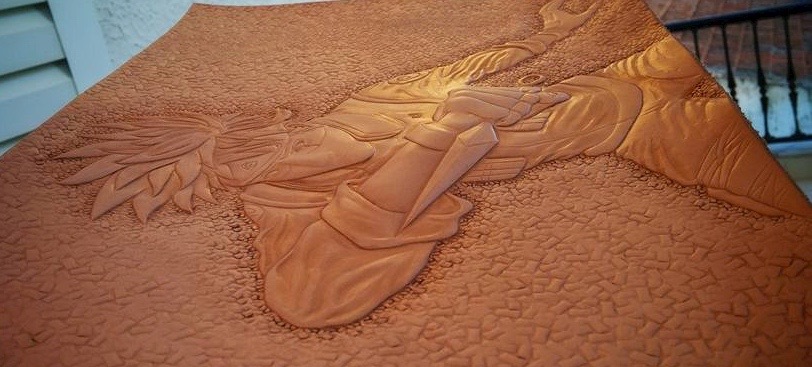
One other thing. When it comes to stamps, i.e. basket weave or geometric, you get what you pay for. Crispness, depth, burnish and symmetry all come at a price, and that price starts around $30 bucks per tool. Wayne Jueschke makes some of the finest geometric stamps in the business. They are amazingly crisp and the have perfect alignment. They are 100 a piece. Barry King makes amazing geometric stamps as well. In addition to sharp, accurate stamping, what you're really paying for is tools that don't bend, rust or look like every other craft level maker on the market. I can tell a tandy tooler a mile away in most cases. The ability to create your own combinations of less common tools makes your work stand out from the crowd, and that what we all really want when it comes time for someone to hand over their hard earned cash to us as makers, right? Just food for thought. Here's a pic of something Tandy can't do.
-
An age old discussion! I am an admitted tool whore in recovery. I have spent a lot of money on a lot of tools that are beautiful and work well. I have some cheap tools that suck ass. I have a lot of tools in the middle that are functional and average looking. I got caught up in the hype of collecting and had some extra cash at the time. Until you try some tools, learn a few things, you won't know what's worth while and what's not. I'll use bevelers as an example. Its the most important tool in a carver's arsenal, and I have close to 50 different ones. They each have their use. However, I could narrow down 90% of my carving to seven or ten tools. That's it. They are all Robert Beard bevelers, and they are worth every penny. I'd sell all my guns (Except one) before I sold those 10 tools. Nobody else on the market can touch them for quality and ease of use, and they make my life easier. Sure, you can scrape along with Tandy tools and do an adequate (Sometimes exceptional) job with them, but the Beard tools made me a better leather worker. They taught me things I couldn't have learned with any other tool. Same thing goes for a swivel knife. Now that I've tried dozens of them, I have settled onto one that I could use the rest of my life. In fact, I could probably get along just fine without a swivel knife. I sharpened up a screw driver and it can carve leather just fine. You get a lot more hand fatigue, but it can be done. Now, WHY do tools have exotic hard wood handles? Or stag handles? Why do SK have fancy barrels? Because a lot of makers are artists just like us. They take pride in what they do and add a little art to the tool. If you don't appreciate that, don't buy it. If it makes you happy, go for it. There are a lot of manufacturers right now making good quality, affordable tools. Take a look at Rickert Werkzeuge as they have a new line of Japanese tools that are true performers without the cost. No, I don't get anything from them and I don't work there.
-
If you want gold, this is the only way to make it look good and have it be durable. It will do the trick though. https://shop.leatheredgepaint.com/en/leather-edge-metal-effect/
-
I always like the jiggle method On those long cuts, don't try and do it all at once. Draw your line and do an initial cut into the fibers, then go back and do it again. Way easier.
-
I would only use fine grit sand paper to sharpen these. Files are a bit rough. I roll sand paper in a little tube and put it inside the punch to clean up the inside. On a piece of thick veg tan, I lay the sand paper on top of the leather and pull the punch toward me, rolling it as I go to clean up the edge. If you haven't damaged it, it shouldn't take much work. Then I strop it the same way.
-
it works for me. I'm not knocking the purists and I use exactly the Stohlman method for the rest of the stitching, including holding the awl to open difficult holes. I just find I get good consistency this way. Now this would be impossible sewing a cantle binding on a saddle and you'd HAVE to do it the other way, but I don't make saddles.
-
The problem is time, expense and refinement. Most printers leave subtle lines on the surface of the finished item and those would transfer to the leather. Acrylic is cheaper.
-
Agreed. Fantastic service even to Europe. Far better than other suppliers out there.
-
I have read and re-read that book many times. I still do it differently. I mark my holes with a stitch wheel. Then I poke all my holes with the leather piece flat on the surface using a piece of leather and a cutting board to stop my awl from going through to the table. I have become pretty good at keeping it aligned properly, and it works for me. Then, when I go to the stitching horse, all I need to do is stitch, although sometimes I do keep the awl in my hand in case theres a difficult hole. I know it's not traditional and I don't care. It was how I was able to get consistent, good looking stitches on my work. Now, I have tried a lot of awls by a lot of makers, and I finally found one that is exceptional. It's not fancy, but it does the trick. Sharp, but not TOO sharp. One maker makes them so sharp they cut the leather and that makes for ugly stitching. Sure, it goes through a mile of leather with ease, but the holes are ugly. So, the one I have been using and will likely add another one or two is made by LederLouis in Switzerland. He ships to the states and they are well worth the money. He makes prepared blades that will fit existing hafts and he makes finished awls with very plain handles. https://shop.leder-louis.ch/product/Diamond-awl-ready-to-use-45-mm-S/1595 Here's some stitching I was able to do using the methods described above and with this awl. Hope this helps. Just a different approach.
-
If you split, I'd like that M&P shield please
-

WIP. The first attempt to emboss the human face
immiketoo replied to ABHandmade's topic in Figure Carving
My pleasure, sir. -
Or Diamond Dave
-
The best advice I can give you is to start at the top and tool the parts closest to the surface of the leather first and work your way down doing the background last. So, foreground to background. Then, with many vehicles, there are a lot of straight lines. Careful tracing or transfer to the leather is essential. You can print your image onto vellum and transfer it to the leather before it dries, but that has as many issues as traditional transfer, just different. Best to queue up some practice pieces with an image you like. Remember a lot of detail is hard to do, so a stylized image or simplified one might be best. This one is free.
-

WIP. The first attempt to emboss the human face
immiketoo replied to ABHandmade's topic in Figure Carving
One thing I do that may help is I play with the contrast and exposure in my photo editor to ensure I can see all the details I want. Sometimes detail is lost in photos and our brains filter the info to make the pic look correct. In other words, we see what isn't there. Photo editing allows that info to be printed and therefore transferred to the paper. -
What kind of inspiration? Pictures? How to? I took some cool bulldozer pics a few years back if you want them...otherwise google!
-

WIP. The first attempt to emboss the human face
immiketoo replied to ABHandmade's topic in Figure Carving
Yes, we shall see how the finish fares. Hopefully you've found a solution. As for your background, that's doubly impressive. Ian more than happy to offer whatever help I can, but I doubt you'll need much in the future. Stay in touch and we can talk about hair and eyebrows! -
This. My video is just showing the guy I sharpened the for that it works the way he uses is. The technique is terrible, but he skives sandal straps on the sole while the shoe is still in the last. He complained that the angle of the blade wouldn’t work for pulling it toward him. I was just showing him that it would work. Disregard the shitty technique.
- 23 replies
-
- skiving
- skiving knife
-
(and 1 more)
Tagged with:
-

WIP. The first attempt to emboss the human face
immiketoo replied to ABHandmade's topic in Figure Carving
Andrew, if you have found a UV protective finish that works, you might not experience the darkening, or maybe it will delay it for a long time. I don’t use a product like that so I can’t offer any opinion other than I’d like to see your results over the course of time. In the piece with the braid, you can see my struggle with the lips (well, all of it really) and how badly I mangled it. Do you have some sort of art background? Most people that can pull off a first piece have some sort of familiarity or artistic history. Again, well done.


