Halitech
-
Posts
1,229 -
Joined
-
Last visited
Content Type
Profiles
Forums
Events
Blogs
Gallery
Store
Everything posted by Halitech
-
I swear by the plasti-dip. I gave mine 3 dips and no marks at all. It also seems to have a bit more grip now as well thanks to the rubber in the dip
-
Key Fob
Halitech replied to neilyeag's topic in Purses, Wallets, Belts and Miscellaneous Pocket Items
Be careful with the oil, you don't need that much and if you have too much, your leather will end up being soft and mushy. You;d be better off giving it a light coat and then just wetting the area you'll be bending about 10 minutes before you want to bend it over to rivet. -
Key Fob
Halitech replied to neilyeag's topic in Purses, Wallets, Belts and Miscellaneous Pocket Items
Looks good. I've seen his tutorial before, just been too cheap to buy the template lol Only comment is on the leather where it bends around the snap. Before you folded it over, it would have helped prevent the leather from cracking if you had wet the leather and waited a bit before bending. -
Of course, leave it to the Aussie to show off with the knives Those look great Rocky. Those croc/gator pieces are cool with the way the edges lift up down the middle.
-
If you try to stamp after you've molded it, you'll end up with anger management issues Do your stamping but try to avoid the areas where the bend will be. If you can do your stamping fast enough that you can do your bend while the leather is still wet, it won't distort the stamping too bad
-
How long did it take you to buy a sewing machine? And a press?
Halitech replied to JC2019's topic in Leatherwork Conversation
https://www.tandyleather.ca/en/category/3-d-leather-stamps You can also have them printed on a 3D printer or some people make them on Delrin rods with CNC machines -
How long did it take you to buy a sewing machine? And a press?
Halitech replied to JC2019's topic in Leatherwork Conversation
about 4 years for the used Adler 67 sewing machine, 6 years for the Chinese patcher bought the 1T arbor press in the first year but I only use it for 3D stamps. I've been living in a house for 4 years so no worries about my neighbors -
If you put it where the first rivet in the handle is and keep it tight enough that the blade won't pop up, should be fine. Going with the option you did in the last pic would also keep it from popping up. Hopefully the blade has more weight then the handle so it should keep the knife and sheath hanging basically straight down. 1/4" is 2/8 so if you only added 1/4" and want to use a 3/8" welt, either the welt will be sticking outside the sheath or your blade space will be too small. Normally whatever I want to use for a welt, I add the same amount
-
I'd personally put the retainer lower on the handle to keep it from jumping out and possibly cutting your fingers when you grab for the handle. And like Hildebrand said, you need to allow more room at the opening for the wideness of the blade to come out. Allow 1/4" more for the welt as well Maybe this will give you a little more insight into putting it together http://www.knifenetwork.com/forum/showthread.php?t=41280
-
What kind of snaps did you use? If they were basic line 20/24 snaps from Tandy, instead of using the dome cap on 1 end, use the flat end on both. Will still have a bit of a hard spot but won't be as noticeable as the dome. If it's segma or glove snaps, pretty much SOL unless you want to start adding layers to hide them
-
Another option wold be to make them with no holes punched and cut and punch holes to order as people buy them. Makes for a potential large amount of waste but use the cut offs for bracelets to sell the next week
-
I agree. I've watched so many of the "Gods" on youtube and tried to make sense of why they were doing things in the order they do and decided that once I've figured things out for myself, that's the way I'm doing things. Just because it's been done a certain way for 200 years, doesn't mean a newer and better way can't come along. These people that think only the old ways are right are the ones that if they had their way, we'd still be riding around on horse and buggy, whale oil would be lighting our homes and kids would still be using slate boards to write their homework on
-
According to one of the best, you should burnish before dying the edges The link to his actual PDF doesn't seem to be working anymore but you can read the info and comments. Personally, I dye then burnish.
-
What really gets to me is how crackbook can be so hypocritical. Okay, you don't want animal pelts/skins sold to prevent the poachers from being able to sell there but they are completely fine with hosting cock fighting (209k results) and dog fighting (2.3M results). Now hard to say what percentage is pro/against dog fighting, google doesn't say but the cock fighting, are 95% for and have lots of graphic photos to look at. Maybe we need to direct PETA to go after the dog and cock fighting groups. Would still like to give most of them a tap between the eyes with a 2x4. And as has been pointed out, in the majority of cases, we are using the hides after the animals were killed for food. Of course there are probably some, like snake skins, that are killed simply for their skins because the meat has no value or use. And most leather will decompose within 50-75 years compared to centuries for the pleather that they would rather we use.
-
I bought mine hoping it would and it didn't disappoint. You do need to make sure you have it mounted high enough so it allows the wallet to fold under the arm but other then that, works fine. One thing I did with mine was I picked up some plasti-dip and coated the pressor foot to stop it from marking the leather.
-
I just bought a Yaetek version and mostly love it. The supplied metal base was garbage from the start so built a wooden one that fits on my bench. Bonded 92 nylon thread works good, haven't had a chance to test the size 20 needles and 138 thread yet so can't say for sure but based on the 92, you might have enough to do smaller belts but anything bigger, you'll have to reload. It beats hand stitching 100" of belt but powered would be better
-
question on doing a mexican round braid
Halitech replied to Windrider30's topic in How Do I Do That?
I agree but they were his intellectual property so he's allowed to do whatever he wants with them -
Looks good, I really like the snake skin. Did you line the holster or just sew the snake in the cutout? Now that you've had it for 2 months, how do you find it for wearablility with the belt slots being so far below the majority of the gun weight?
-
I think the bigger issue is finding software to convert a color photo into a b&w image. I've seen some that have burned them onto wooded cutting boards and they looked really good. Part of that could be the more solid nature of the wood compared to leather
-
Never thought to try a padding, might need a second liner but be interesting to see what you come up with
-
Yes, add a thin liner to the back (2/3oz), mark where the cut out will go and glue it in place. Put your snakeskin over top of that, making sure you have enough to go under the top piece, and glue that down. Put your top piece back on and glue and stitch everything together.
-
If he can get the size and angles right, he could almost flip it so it's flesh side out. Would have to be really steady when cutting it out but it is doable
-
Are you trying to burnish them or are you using that black stuff as some kind of edge coat? As Danne said, if you don't start with good straight, flush edges, no matter what you do, your edges will never turn out good. If that is an edge paint of some sort, you need to do 1 coat, let it dry and then sand. Then apply another coat, let dry, sand again. Repeat until you get the smoothness your are looking for.
-
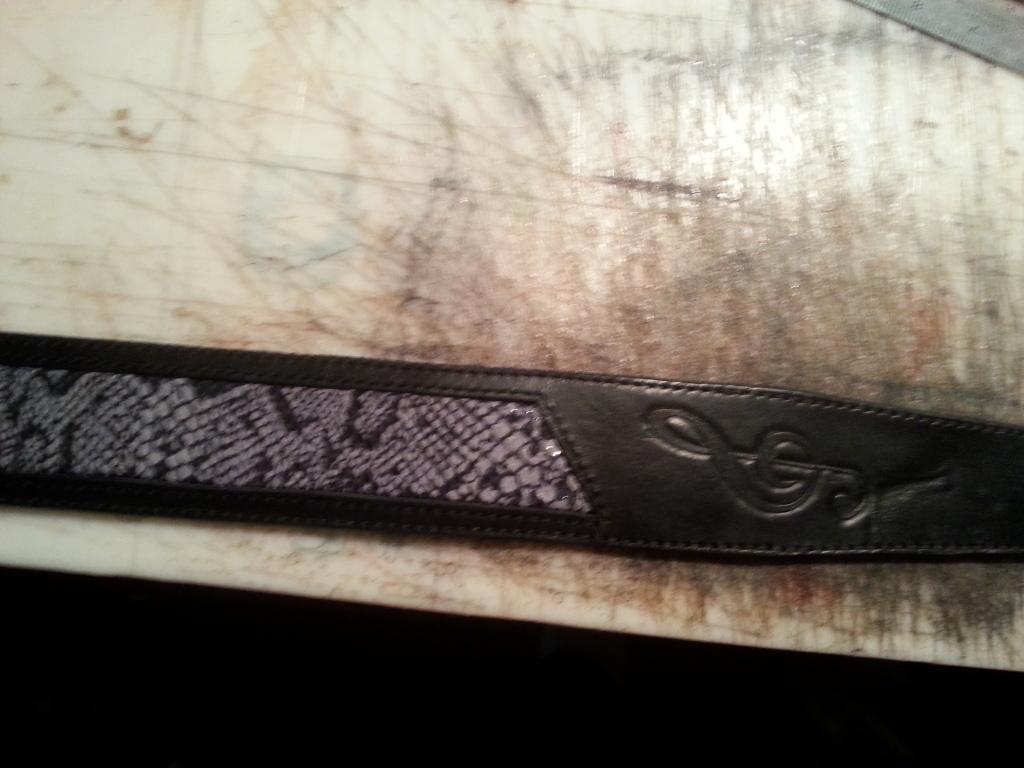
Another option, depending on the tooling area, is to cut out the tooling, put the snakeskin behind it, then put a backing on it. I did a boo boo on a guitar strap and did the same thing. I also took the piece I cut out and trimmed it by ~3/16" and used it to make the snakeskin stand back up

-
Exactly. Just because it was stitched by hand, doesn't mean it was done well or done properly. I talk to a lot of people that seem to think saddle stitch is basically a running stitch done with 2 threads. The way I was taught, saddle stitch actually locks in because of the knot that gets tied in the middle of the hole. And when done properly, hopefully you can't tell if it's by hand or machine