


plinkercases
-
Posts
1,369 -
Joined
-
Last visited
Content Type
Profiles
Forums
Events
Blogs
Gallery
Everything posted by plinkercases
-
I had to use some black pipe for something else and so I though I would try banging a piece of it into a slot punch for belt slots. as the math would have it 1"ID flattens to just about 1.5 long and .75 wide. the shape worked well and with what I have on hand for sharpening... hand wheel grinder , some files and 600 paper it work but needs some professional sharpening help. tomorrow I will temper it (torch heat and then oil dunk) and then when the sharpening guy comes by in his little van next time I will ask him if he can do a better job.... I also need to take some material off to lessen the slant away from the edge but hey for a butcher it makes me happy... two whacks and it goes through hard 12oz..almost 1/4" harness leather as seen here. I kept the pre-threaded end and will put a cap on it to help the hammering and also it will keep the off cuts inside for a while. And its long enough to get a full wrap on it and still not have to hit myself (heard that happens..) Amy suggestion what to do next other than my plan?
.jpg.b6167287d9005c42812c1f7609414e25.jpg)
.jpg.5bc9245639e9512e5cd781e4914c2e62.jpg)
.jpg.57946cb1f6edce7aca6330448421b0f8.jpg)
.jpg.7839b3ef9046883811b946580efde4ac.jpg)
.jpg.f06cd6cb1490abc976cc23954e0a5055.jpg)
-
Several factor cause offset when setting: (all of which I ran into and have to correct once they were pointed out to me) holes too big in leather - 2 size punches needed for the two posts on the male or female snap - will cause issues even with press post too long fro leather thickness - yes often you will need to snipe the post down a little - good side snipers then open the post up again with a nail setter or modelling tool etc. - will cause issues even with press When using hand set you need to angle the setter a little off plum and rotate it around the post with continuous light tapes (thin of the setter following a conical path - check out the how to video on Tandy as this is well demonstrated. Hope this helps
-
Mauser broomhandle holster pattern help
plinkercases replied to PutnamLeather's topic in How Do I Do That?
found this data sheet which give an over all length so you could take an image of a stock and scale it to this length and get a profile in scale... then mock one up out of a hunk of 2x12... mind you there were stock variations so... I would make the straps adjustable a inch or two each way. Hope this helps and like to see what you build.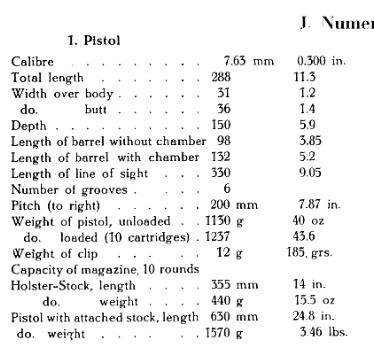
-
Wallet with coin pocket
plinkercases replied to ABHandmade's topic in Purses, Wallets, Belts and Miscellaneous Pocket Items
Fantastic. Super balance if the detail of the figure and simple clean lines of a well layed out wallet. -
Help with Avenger style holster
plinkercases replied to Hildebrand's topic in Gun Holsters, Rifle Slings and Knife Sheathes
try this: (assuming when you wanted a forward cant you meant butt forward as in an FBO cant not barrel forward as in a quick draw cant.) new slot as indicate recut the trailing edge (with a better lien than I indicated quickly) and add new stich line cut back stiches for the old tunnel where the "belt line" crosses them... looks like you can leave the pouch main seem the gun will feel a little "lower" as the hammer will closer to the belt line . If you want really lower then mod the rear slot as indicated and cut off the old tunnel leather (leave the stitches) and add a new tunnel higher up. this is what I would try anyhow...just for fun... it is the least invasive first pass.
-
Custom Book Cover
plinkercases replied to JBryan's topic in Purses, Wallets, Belts and Miscellaneous Pocket Items
I really like those! Well done. -
tri-weave padded rifle sling
plinkercases replied to plinkercases's topic in Gun Holsters, Rifle Slings and Knife Sheathes
Albob go ahead..as Willy and Waylon sing "lets settle down and steal each others songs." The one thing that changed before this went out the door is a smaller rectangle "D" to help keep the sections in line. -
tri-weave padded rifle sling
plinkercases replied to plinkercases's topic in Gun Holsters, Rifle Slings and Knife Sheathes
Classic! -
Dopp it Inspired by YinTx
plinkercases replied to Rossr's topic in Purses, Wallets, Belts and Miscellaneous Pocket Items
That's what I often use for things like this. And I will often run a stitch line alone the "corner"/Edges the give it more rigidity if needed. when I skin couches the leather from the backs is usually not all that soft. Give it a go and see what you can do. -
Triweave Belt, Black OVER Tan
plinkercases replied to Albob's topic in Purses, Wallets, Belts and Miscellaneous Pocket Items
Albob that look great all round and thanks fro the new technique. I am a tri-weave fan myself and yours is stellar.. -
OK thanks and I will do some experiments this weekend hopefully with dye and stain.
-
Albob ksut soni am.clear you use it 50/50 as a dye resist? This is what i am curious about and how well it works esxpecially when applying dark dyes over it. I already use it 50/50 as a top finish and am pleased with it.
-
tri-weave padded rifle sling
plinkercases replied to plinkercases's topic in Gun Holsters, Rifle Slings and Knife Sheathes
Thanks mutt. -
Any experience out there using M&G as a resist (perhaps at 100% strength versus 50/50 for a finish)?
-
tri-weave padded rifle sling
plinkercases replied to plinkercases's topic in Gun Holsters, Rifle Slings and Knife Sheathes
That's 10-11 harness leather (not sure of the tannery as I get it from a friend with a production shop in Guelph at cost - not he usually gets his leather from south American tanneries) and thanks for the compliment. -
Commander 1911 belt and holster
plinkercases replied to Albob's topic in Gun Holsters, Rifle Slings and Knife Sheathes
Nice to have a one stop shop available. Looks good. I am sure the new sights are a big help. -
Apparently corn starch will draw the oils out and not leave a residue. Will not damage like some solvents might. Here is an article on how to remove an over oiled "spot" (olive oil used to clean/condition but applied to heavily) but I think may work buy extension to the whole chap leathers BUT you will need a lot load of cornstarch and time.... https://www.hunker.com/13423113/how-to-get-olive-oil-out-of-leather Good luck and you must have a heck of time staying in the saddle.....
-
Sheath for my bowie
plinkercases replied to Albob's topic in Gun Holsters, Rifle Slings and Knife Sheathes
ooohhhh aaahhhhh -
Commander 1911 belt and holster
plinkercases replied to Albob's topic in Gun Holsters, Rifle Slings and Knife Sheathes
Did you get it ceracoated? -
Sheath for my bowie
plinkercases replied to Albob's topic in Gun Holsters, Rifle Slings and Knife Sheathes
Well done with the stitching. The carving isn't bad and other than practice all I can suggest is working to keep the pattern as "centred" in the piece as possible so there is a balance between background and tooled across the piece and top to bottom around the pattern as far as possible. General rule of course and some times you want to have more background for hardware reasons etc. Now of course we need to see the blade..... -
Commander 1911 belt and holster
plinkercases replied to Albob's topic in Gun Holsters, Rifle Slings and Knife Sheathes
Nice rig and you will love a Commander if you are a 1911 fan. I have a Springfield stainless 45acp and LOVE it. -
Another Stohlman floral HW75 pnuematic airgun and F1 sheath
plinkercases replied to plinkercases's topic in Leather Tools
Thanks Eddie. -
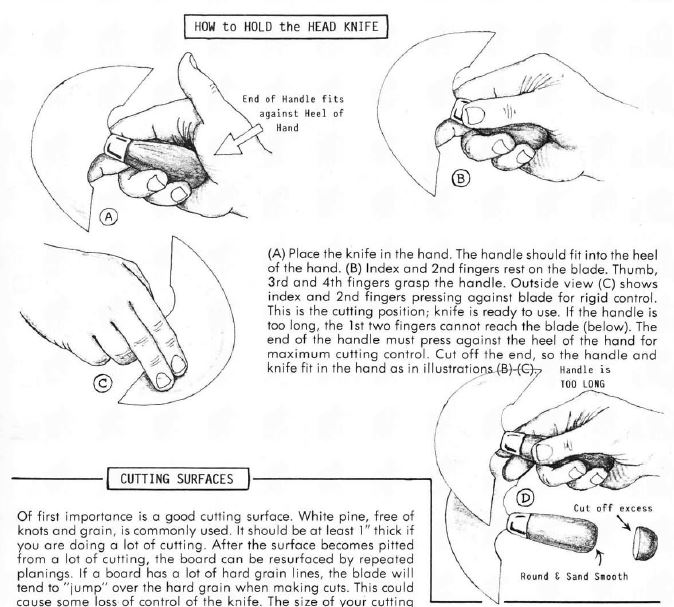
Aven has a good idea there... if you go 3/4 and still need a little more then working it down slowly on a belt sander clamped in a vice would be better than trying to cut a 1/4 off with a saw. Looking forward to seeing your first tool "mod"!
-
You should be able to cut it down yourself with wood saw of anytype and round/sound the end to fit your palm. I followed these directions from a Stohlman book and it worked just fine. No special tools needed.
-
Sewing machine thread looper for thread stand
plinkercases replied to RockyAussie's topic in 3D Printers and Lasers
Well this is exciting and I don't think I will be able to sleep tonight!! Time to try anyhow. 1130 here in Ontario.