Ole South
-
Posts
237 -
Joined
-
Last visited
Content Type
Profiles
Forums
Events
Blogs
Gallery
Store
Everything posted by Ole South
-
Try using a bone awl as a test. The steel awl blade may be leaving metal in the stitch slot as it does when you polish it and then that transfers to the wax in the thread.
-
YinTx was selling surplus Tiger Thread just before Christmas. I got some it's great! Good price, shipped fast! (my satisfied customer feedback)
-
Leather Knot...what Is It Called? How To Make It?
Ole South replied to kheart's topic in How Do I Do That?
Bruce Grant called it a Roll Button Leather Braiding book pg 31. At least that's what it looks like. Sorry I don't have a scanner handy atm, I'll try and scan that page tomorrow. -
@ Tor: Yep, Harrison N.J. stamped. @ Kulafarmer: grinder spark test will get you in the ballpark. Friend of mine has plasma cut blanks from old large diameter lumber mill saws.
-
What Is This Style, Technique, Or Method Called?
Ole South replied to brayden's topic in Getting Started
In cloth I've heard it referred to as "Reverse Applique" -
I've got Oblong Punch Sharpening blues too. Inexpensive Chinese punches... appear to be hardend only on the inside, using a wet grinder every time I get close to a decent edge it chips somewhere. To protect all my chisel punches I use the end grain of a 4x4 block of pine. Clean it up with your band or table saw when it gets too ate up.
-
Doesn't mix back in just sits there under a layer of mineral spirits. About the consistency and color of refrigerated bacon grease. I've got about 10oz under an inch or so of spirit currently. It is quite humid here but jar never sits open long. I'll work some into a piece of scrap pine and some veg tan to see what happens. I've always experienced evaporation but this is equal volume or expanding. Been happening for last 2-3years. Maybe just HD brand dunno.
-
Consew 100 - Unable To Find Walking Feet Or Manual
Ole South replied to maersdet's topic in Leather Sewing Machines
Forgive the terminology but compare the parts breakdown, the drive mechanism and the lack of reverse (needle feed only), the stitch length regulator between a Consew 28 and a Singer 78-3 and perhaps you'll see why I mistakenly referred to it as a clone. -
Yeah today I found the nut on the back of the adjustment screw and it was locked down hard . Yep Darren, It's a threaded rod terminating in a turnbuckle and an eccentric screw. I'm having trouble relating the timing instructions for the 29-71 to this machine. When I drop the needle to bottom dead center it stops and starts to rise I bring the hook to it and then it drops and sits there before it rises again. By this time the hook is well past the needle scarf and breaks the top thread. I finally timed it dynamically and it only drops a stitch occasionally and stopped breaking thread. I'll go back tomorrow with some 69 bonded and try again.
-
I dropped into a local alteration shop today and found one of these SewLine SL-29 patchers with a servo motor. A knock off of a 29k71 I'm assuming. The little lady that owned the shop said she'd had it over a year (ebay purchase) and had never been able to get it to sew. Breaking top thread, dropped stitches ect... She said she'd had three sewing machine repairmen out but all were unsuccessful. I got it sewing, incorrect threading, bad bobbin, wrong tension everywhere. Had to slow the motor down as slow as it would go and jury-rig an actuator limiter. It won't do anywhere near 500 stm... 200 max as near as I can tell before it begins to drop stitches. Okay here's where I need our experts advice: The timing is marginal at best, eye is scarcely ascending as the hook centers on the needle scarf. I've never worked on a patcher before but it seems pretty straight forward except... I can't get the timing screw to turn!!! This is the screw head visible through the hole in the base... yes/no? I spoke with an experience industrial sewing machine repairman (the last guy to work on it) and he said he couldn't get it to budge either. Am I missing something here? Also, the handwheel has a v-belt size groove in it... is there a tire that is supposed to go in there? Other patchers I've seen all have been solid, no groove.
-
Consew 100 - Unable To Find Walking Feet Or Manual
Ole South replied to maersdet's topic in Leather Sewing Machines
Parts Manual 101, first item, first column. (Made in Japan) Look at the bottom of the machine... my 70's Consew has "Seiko" cast in the body your's probably will too. you can look for comparable Seiko of that vintage. I have the original user manual for my Consew 28 (Singer 78-3 clone)... it's pretty sparse. Same website... download the 103 or 105 user manual -
Patcher, Refurb Or Go Inexpensive Chinese
Ole South replied to Ole South's topic in Leather Sewing Machines
Kinda funny, Trox and Constabulary's area are "Patcher rich", you're Patcher poor, and we're in the middle. But I gotta give it to those-that-dwell-down-under ya are a resourceful bunch. I ran across a Ron Edwards book on the net (probably from a link here) and the philosophy seems to embody, "If ain't available or ya can't afford it, Make It!! I like that. -
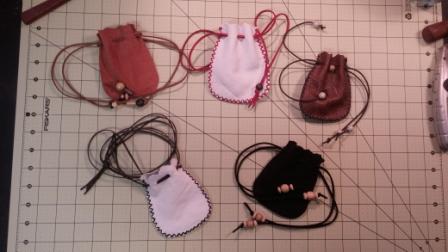
Easy Inexpensive Christmas Gifts
Ole South replied to tboyce's topic in Purses, Wallets, Belts and Miscellaneous Pocket Items
I like that Tb! In the spirit of easy gifts... from scraps laying around and a few beads: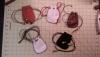
-
Problems With #14 Copper Rivets
Ole South replied to nycnycdesign's topic in Hardware and Accessories
Sorry Tinker, I just realized the copper washer is referred to as the "burr" not the mushroomed head. *blush* I always called them "backup washers". Yeah... hammering the burr should not only harden it but close the i.d. a bit. As you say, a real pita. -
I've knocked the tops off of dogs (and feet) with wet/dry paper and/or diamond files but has anyone ever tried cross hatching dogs rather than just grinding the peaks? You'd end up with more of a knurled surface without giving up dimension, might give a nicer texture, make it look like we intended to do it.
-
Problems With #14 Copper Rivets
Ole South replied to nycnycdesign's topic in Hardware and Accessories
My thought was that they were already too brittle to hold a peened head, thus the softening. The more you work copper the more brittle it becomes and it doesn't take much. Copper riviets should harden as you peen them! I just experience something like this in steel with a set of inexpensive import oblong punches. Hardened only on the inside it's almost impossible to sharpen them to usable without the edge chipping away. Now I understand why slot punches are so much more expensive than round punches. -
Singer 29K58, 29K62, 29K71 Instruction Manual
Ole South replied to Constabulary's topic in Leather Sewing Machines
Thanks Cons!! -
Problems With #14 Copper Rivets
Ole South replied to nycnycdesign's topic in Hardware and Accessories
Rather than waste them... have you tried anealing a few? Set them tail up in a pan and play a torch across the tails until they light up, then let them cool slowly. You may have to do this a couple times. Worst case would be to have to bury the heads in sand with the tails exposed to hold the heat and slow the cooling. -
Singer Needle Bar - I Could Use Some Help
Ole South replied to Constabulary's topic in Leather Sewing Machines
I'm sorry Conny, I just saw your thread last night :/ I was guessing they were originally designed around the same time so might share similar traits. -
Patcher, Refurb Or Go Inexpensive Chinese
Ole South replied to Ole South's topic in Leather Sewing Machines
Esthetics are a factor as is the practicality of having a functioning device when you need it. An old machine has not only a history but a track record, I wonder if our imports will last or if they are a disposable solution. For me, without an urgent, economic or immediate need the equation is pretty balanced: I have a small work area but can make room, more than enough capital to afford an import but can't justify new, price and portability offset esthetics and pride of ownership. I admit, the challenge of motorizing one of these little cricket pitchers is enticing (Darren's solution is appropriately ingenious but I'm thinking more flat belt and flange) which of course defeats the portability of the device but hey... Hot rodding is fun. So is rescuing and restoring. I'm no purist, my table saw is a restored 1938 Sears/Atlas as is my floor stand drillpress, my lathe... an import like my bandsaw. The crickets are cute but old iron is beautiful. I don't Do this for a living so I can linger in the luxury of indescion for a while. There are merits on both sides. @dikman I've seen 5 or 6 patchers in vatious states on the market locally in the last couple years. So they're out there. I saw a youtube vid of a guy that was modifying the thread path in the bobbin area on a cricket; is this a common mod or was that just correcting a manufacturing flaw? @Constabulary I admire and respect what you do and really appreciate what all you guys share here. Even at 3x the price/cost if I can get a machine with a legacy... Warum Nicht? -
Patcher, Refurb Or Go Inexpensive Chinese
Ole South replied to Ole South's topic in Leather Sewing Machines
Thanks Wiz! Yeah those were my thoughts and concerns. $500-600.00 to get it sewing and still need a stand/motor and what ever else rears it's ugly head. I've got a line on a unknown name clone patcher with servo-motor that's breaking thread that the owner just wants to be rid of. Shop's closed til Dec 1st. I'll check that one out til then I put the word out to an older saddle/harness maker acquaintance in a nearby town to be on the lookout for me. If the need gets too urgent I can always get a Chinese machine... but but they're soooo uuuugly! Do you shooting them with hammer black would help???? At least they don't weigh a ton! -
Patcher, Refurb Or Go Inexpensive Chinese
Ole South replied to Ole South's topic in Leather Sewing Machines
It figures... search the forums, get no joy, post, then find: http://leatherworker.net/forum/index.php?showtopic=31220 . I'm guessing the fix probably applies to -71's as well. Sorry... (I did a search first I promise!) -
Singer 29K58, 29K62, 29K71 Instruction Manual
Ole South replied to Constabulary's topic in Leather Sewing Machines
Links to manuals broken 404 error -
I started out looking at the Portable Chinese Patchers (Ebay, Able ect...) as I don't really NEED one, then I started looking at the old Singer 29K's. Found two locally plus an Adler 105-64 Cylinder Arm. 29K-71's (mid '50s vintage) both have stitch length issues. The best of the two sews fine with 69 thread but stitch length is 11-sti to like 25 sti. Lots of play in the presser foot bar (2+ mm) if I put a bit of back pressure on the foot bar I can get it to about 9sti. No stand, no motor, no front hand-wheel option but all the pieces seem to be there. Both need a deep clean and lube job. At $350usd per is it worth working thru the issues or should I just wait for a better deal? Seller won't negotiate at all on price nor will he probably move any of the three units but he'd rather sit than sell. My need isn't pressing but a patcher would be nice to have for those tight spaces and repairs. Not sure what parts or the ball park cost to get one of these sewing to spec so that's what/why I'm asking. Thanks for any advice.
-
Singer Needle Bar - I Could Use Some Help
Ole South replied to Constabulary's topic in Leather Sewing Machines
I know it's not on your list but Consew 28 (Singer 78-3 clone, circa 1973) diam - 7. 24 mm and roughly 21.5mm length. Diameter is digital mic'd the length is eyeball and ruler.