Uwe
-
Posts
2,220 -
Joined
-
Last visited
Content Type
Profiles
Forums
Events
Blogs
Gallery
Everything posted by Uwe
-
 Sewing sheep skin on a domestic sewing machine like the Singer 70R8 may be an exercise in futility, meaning it’s unlikely to work well, no matter how you adjust your machine. The bottom-only feed machines often struggle to feed multiple layers of material evenly. Sewing skin-on leather like sheep skin and fur often requires specialty machines to obtain satisfactory results. The hair makes it difficult to keep the two layers aligned and feed them uniformly. This video shows the type of sewing machine you’ll need to sew Sheepskin with professional results. They’re sometimes referred to as Bonis or Strobel machines, two of the major manufacturers of these types of a machines.
 -
If the thread snags for some reason at any point during the stitch cycle and pulls more thread from the spool, it will be impossible for the machine to pull the knot tight, regardless of needle size or thread tension settings. Take some pictures or better yet post a video snippet via YouTube so we can see what’s going on. The problem with you telling us what you see is that you may not even know what to look for.
-
I just spent some quality time with my own Cowboy CB-3200 to figure out how that walking foot linkage works, and how it should be adjusted. The Juki TSC-441 engineering manual doesn’t really address this for some reason. I made a video that shows how I adjusted my machine and the small modification I had to make to avoid a bind in the linkage. Hopefully it gives you enough information to adjust your machine as well.
-
To get somebody’s attention here on LW, you have to use their handle like this: @Uwe (type the @ followed by the username and then select the handle from the drop-down menu). Otherwise it’s just coincidence that somebody reads your post. Usually the good-forward but bad-reverse is tied to hook timing. Forward stitching is much more forgiving compared to reverse due to the relative movements of hook and needle. A machine that makes a nice stitch in reverse will nearly always make a nice stitch going forward. The converse is not always true. Noise usually indicates parts touching or thread snapping. Make sure that hook timing is spot-on and that the needle guard is actually touching the needle at the moment of hook timing. Also make sure that the bobbin case opener actually does its job. A few very slow hand-turned stitches while observing thread , needle, and hook usually tell me all that I need to know. I usually set hook timing by the book for forward first, then I tweak hook timing slightly (advance/retard) to also make it also work smoothly for reverse. I don’t have a Pfaff 345, so I can’t check directly, but I am guessing the hook mechanism is very similar to that of the Adler 269 or Juki 341. Pictures and video snippets linked via Youtube are always a great help. Practice that to increase your odds of meaningful remote crowd-sourced service advice.
-
Those loops at the bottom indicate to me that the thread snags somewhere during the stich cycle and the machine never gets a chance to pull the knot tight. Usually that has to do with either hook timing, burrs, or the bobbin case opener function. Double-check your thread path and do a few very slow hand-turned stitches while observing how the thread gets wrapped around the hook. If the thread snaps or snags anywhere, that’s what you need to fix. If the machines pulls more thread form the spool in the middle of the stitch cycle, that’s a sure sign of trouble. The machine should ONLY pull thread form the spool when the thread take-up lever is at the very top of its movement.
-
In the cylinder arm side it gets even more obscure: https://www.chinafoxsew.com/zigzag-sewing-machine/53971930.html
-
Machines with that set of specs are rare, I’d say. Here’s one example you might be able to source through a Cowboy/HighTex dealer. Chances of finding somebody with hands-on experience with this machine are slim. You’ll likely be the first. Report back! This Hightex 9204ZZ design appears to be based on the Durkopp Adler 204, which is definitely in the same class as your CB3200 in terms of capability:
-
Trouble getting started with Seiko STW 8 help please
Uwe replied to bigsig11010's topic in Leather Sewing Machines
Just about any servo motor will work with your machine. There’s dozens of topics about motors on this forum. Don’t be afraid to start a new topic for a new question, it keeps the topics targeted and easier to navigate. One popular choice for servo motors is the “family sew” style motor with a small dial to adjust speed. It’s cheap and adequate. It’s available under various brands and model names from vendors on this forum and online (e.g. Consew Premier SM550, Family Sew FS550s, etc.) Available in many places, including here: https://www.tolindsewmach.com/motors.html One of my personal favorites is this motor: https://store.keysew.com/sp-1100-npfl Or pick a vendor from the ads in the header. Please start a new topic if you have more questions about any particular motor. -
Trouble getting started with Seiko STW 8 help please
Uwe replied to bigsig11010's topic in Leather Sewing Machines
If the check spring is broken, you can replace the entire tension unit. They’re readily available online or from our resident vendors. I recommend getting an original Seiko tension unit (or the Juki LU-562 tension unit, which should also fit your machine.) The super cheap Chinese versions on Ebay are not worth bothering with in my opinion (I ordered a few and decided not to use them). -
Trouble getting started with Seiko STW 8 help please
Uwe replied to bigsig11010's topic in Leather Sewing Machines
The threading looks right as they said but your check spring is either stuck or broken. Here’s a little video that’ll go over the check spring function and how to adjust it. @MtlBiker The part about going around the little pin is not quite right. Some YouTube video started this years ago and it’s being repeated all over the place ever since. I’ve not seen a single manufacturer manual that shows the thread path going around the pin. The pin is simply there to keep the tension discs from spinning. -
I’m not sure where you got that 3/16” needle rise figure from, but it’s not correct. The Juki LU-563 manual states 3/32” needle rise from BDC for hook timing. Timing your machine using the correct needle rise figure will likely make reverse work properly, along with everything else. Those videos don’t really play in my browser and downloading them individually is kind of a pain. YouTube is the place to share videos. Here’s the relevant page from the Juki LU-563 manual:
-
All things Pfaff 145 (info, tidbits, maintenance, etc.)
Uwe replied to laether's topic in Leather Sewing Machines
There is no standard per se, only variations between subclasses. Pfaff built many subclasses (different versions) of this design. Depending on the subclass, the machine was fitted with two, one, or none of the springs blades across the top. -
The company I saw at the trade show a few years ago was actually Zünd, a Swiss company. They make high end cutting systems for the big production companies, unlikely to fit hobby and garage shop budgets. Here’s one of their machines at work cutting and punching leather:
-
They actually make combo CNC machines that have both a laser head and a separate oscillating knife head. The knife heads might be available separately, but I’m not sure. You’ll need a special cutting bed that the knife can cut into, and perhaps a vacuum system to hold the leather down.
-
I’ve used a water jet to cut leather before. It worked okay, cutting four or so layers at a time sandwiched between foam board, but still was messy. That was when I had access to a water jet at my local maker space.It’s a monstrous machine and a maintenance nightmare. This will never exist in my garage. If I were to start cutting custom shapes out of leather, I’d invest in a oscillating knife CNC cutting machine. I’ve seen these at trade shows and was utterly impressed. They can be large enough for an entire hide, or much smaller. They’re definitely easier to maintain and less messy than a water jet. I can see a 2’x4’ version this living in my garage, for around $15K on Alibaba.com
-
Singer class 7-33 leather sewing, which needle ???
Uwe replied to Jadu's topic in Leather Sewing Machines
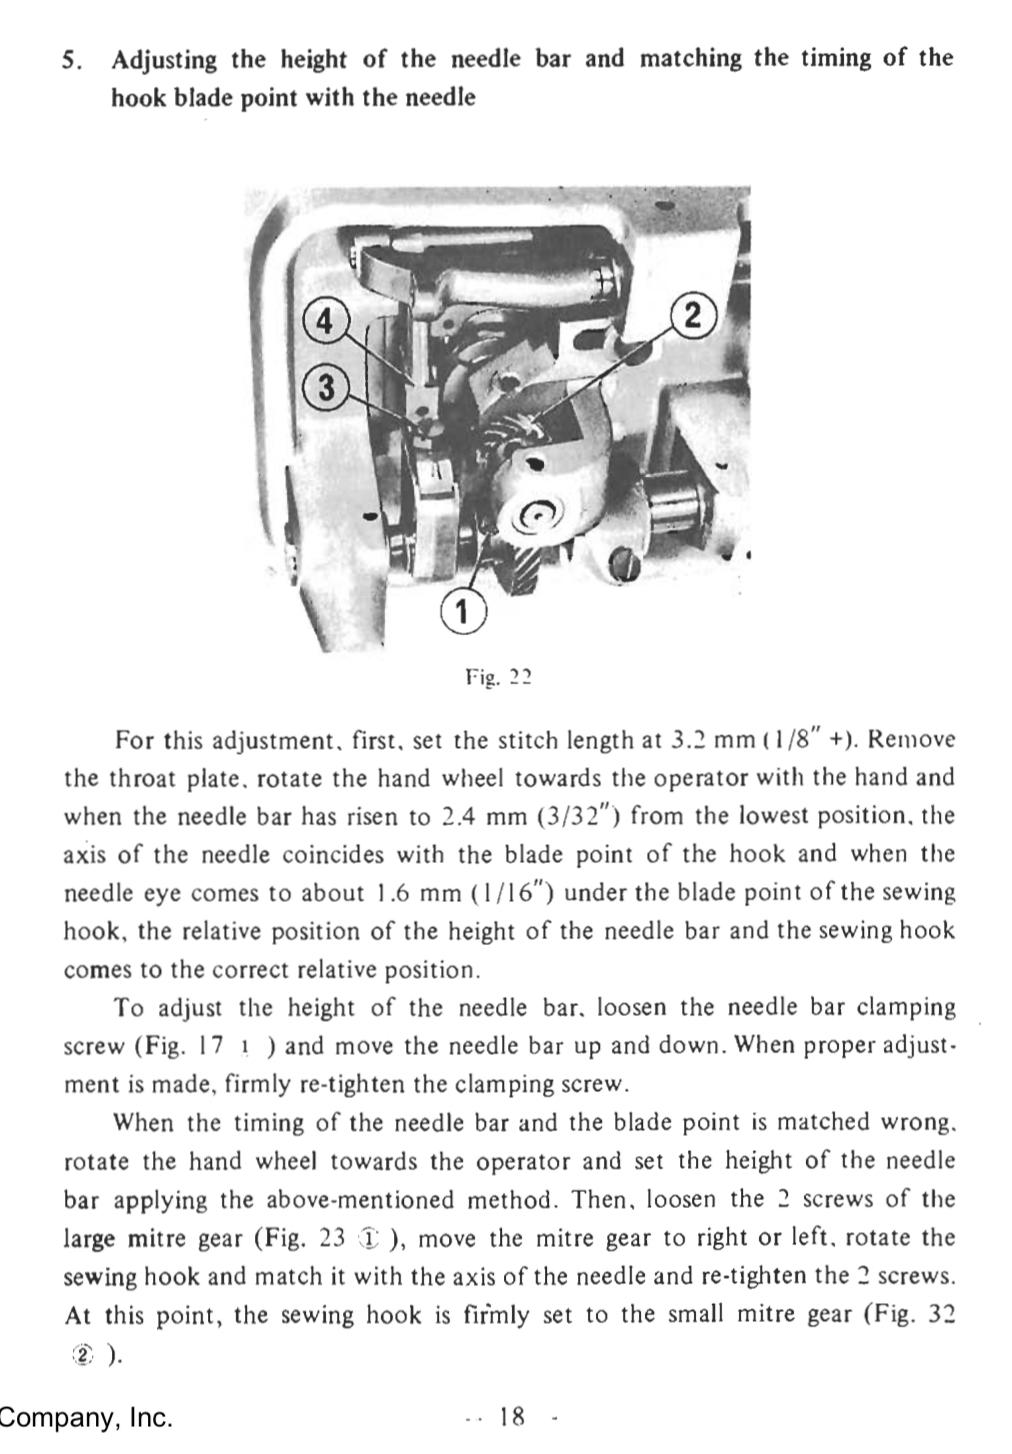
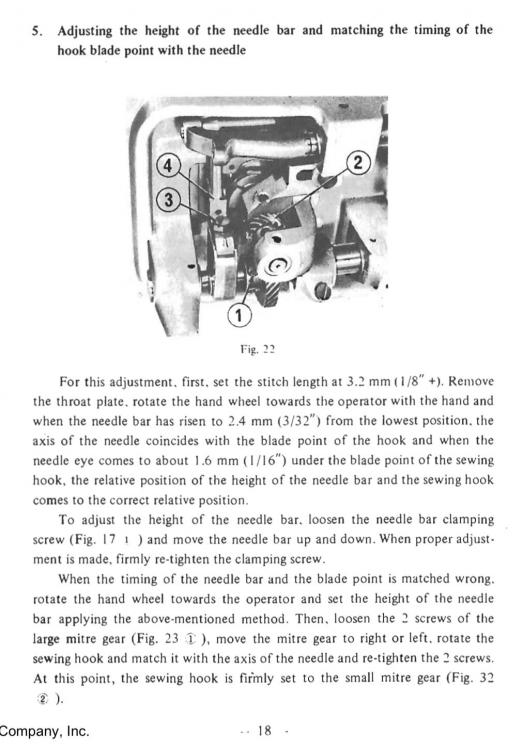
You can raise or lower the needle bar so that the EYE of the 794 needle (or system 7x1, 7x3, etc.) is at the exact same height as it was with the Singer 26gy needle. You can loosen the two screws the red arrows point at in the picture below and then slide the needle bar to the correct height. One way to accomplish this: 1. Turn hand wheel to bring needle bar to highest position. 2. Measure distance from throat plate to top of EYE of the needle 3. Insert 794 needle 4. Loosen needle bar clamping screws 5. Adjust needle bar height so that EYE of the 794 needle is same distance above throat plate. 6; .Tighten clamp screws again. I sold a Singer 7-31 a few years ago. My for-sale post still has some useful info regarding parts manual and difference between the 7-31 and 7-33 models.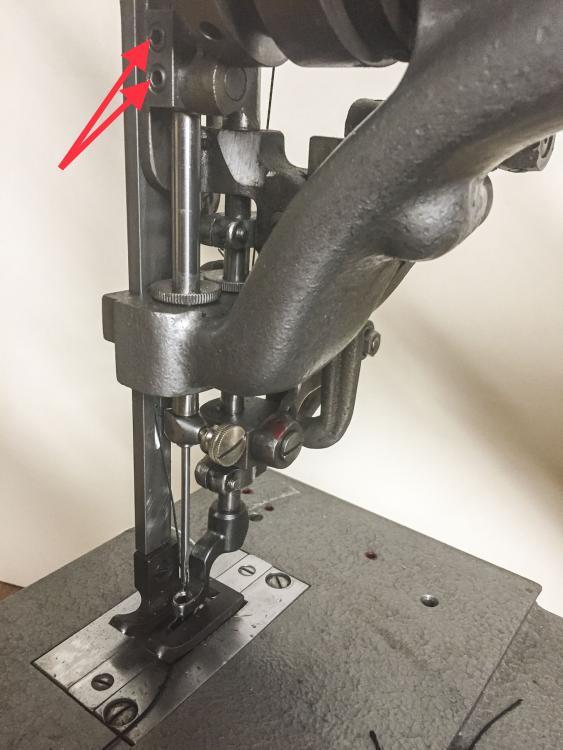
-
Singer class 7-33 leather sewing, which needle ???
Uwe replied to Jadu's topic in Leather Sewing Machines
That 76mm long needle might be a System 1000H needle, which is 73mm long butt to eye. Either that, or some ancient needle system that’s long out of production. The 794 Needle system is very common, readily available, and has many more variations available, especially for leather.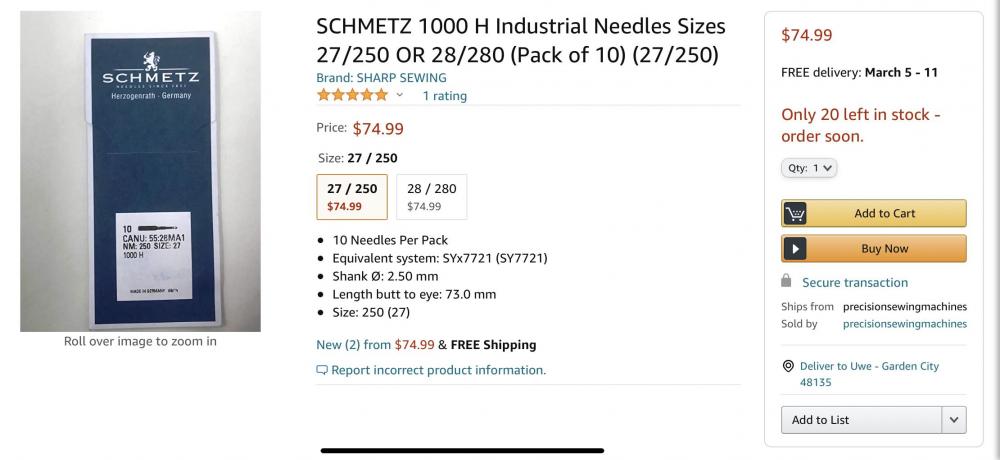
-
Singer class 7-33 leather sewing, which needle ???
Uwe replied to Jadu's topic in Leather Sewing Machines
Here’s a topic that goes into detail about needles for the Singer 7-33: -
You really do have to step up your communication skills if you expect meaningful help here. You’re the one looking at the machine and observing HOW it’s not sewing (needle breaks, birds nest, skipped stitches, loops, a dozen other ways to “not sew”.) If you can’t bring yourself to give us more details then there’s not a whole lot we can do to help.
-
Consew 206RB-1 Adjust Reverse Stitch Length
Uwe replied to jackalopes's topic in Leather Sewing Machines
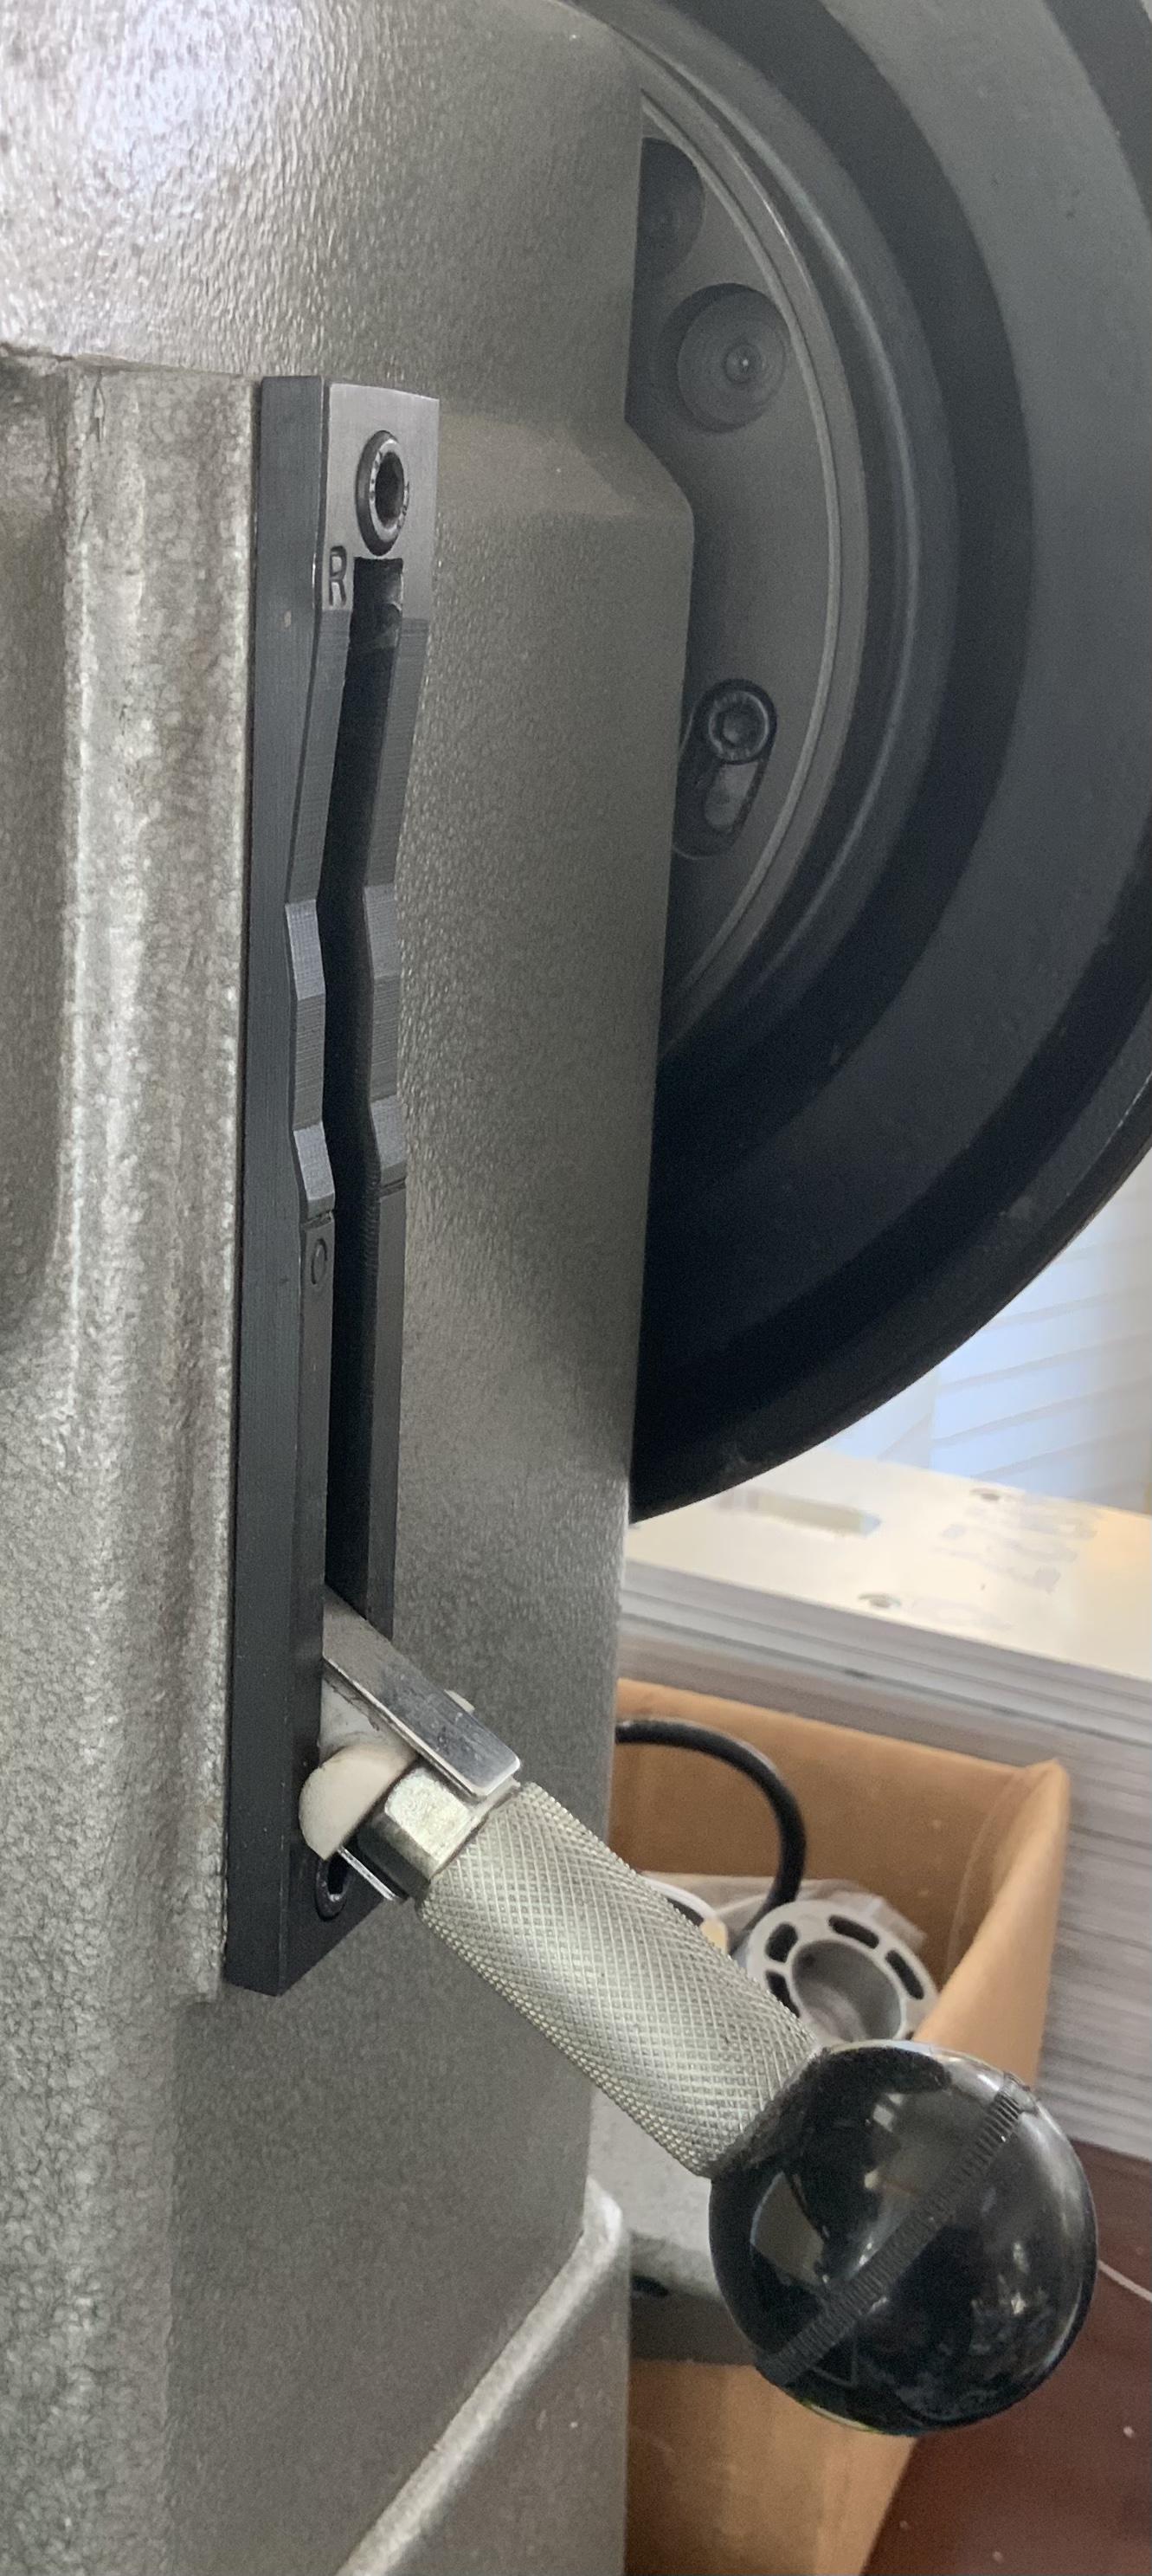
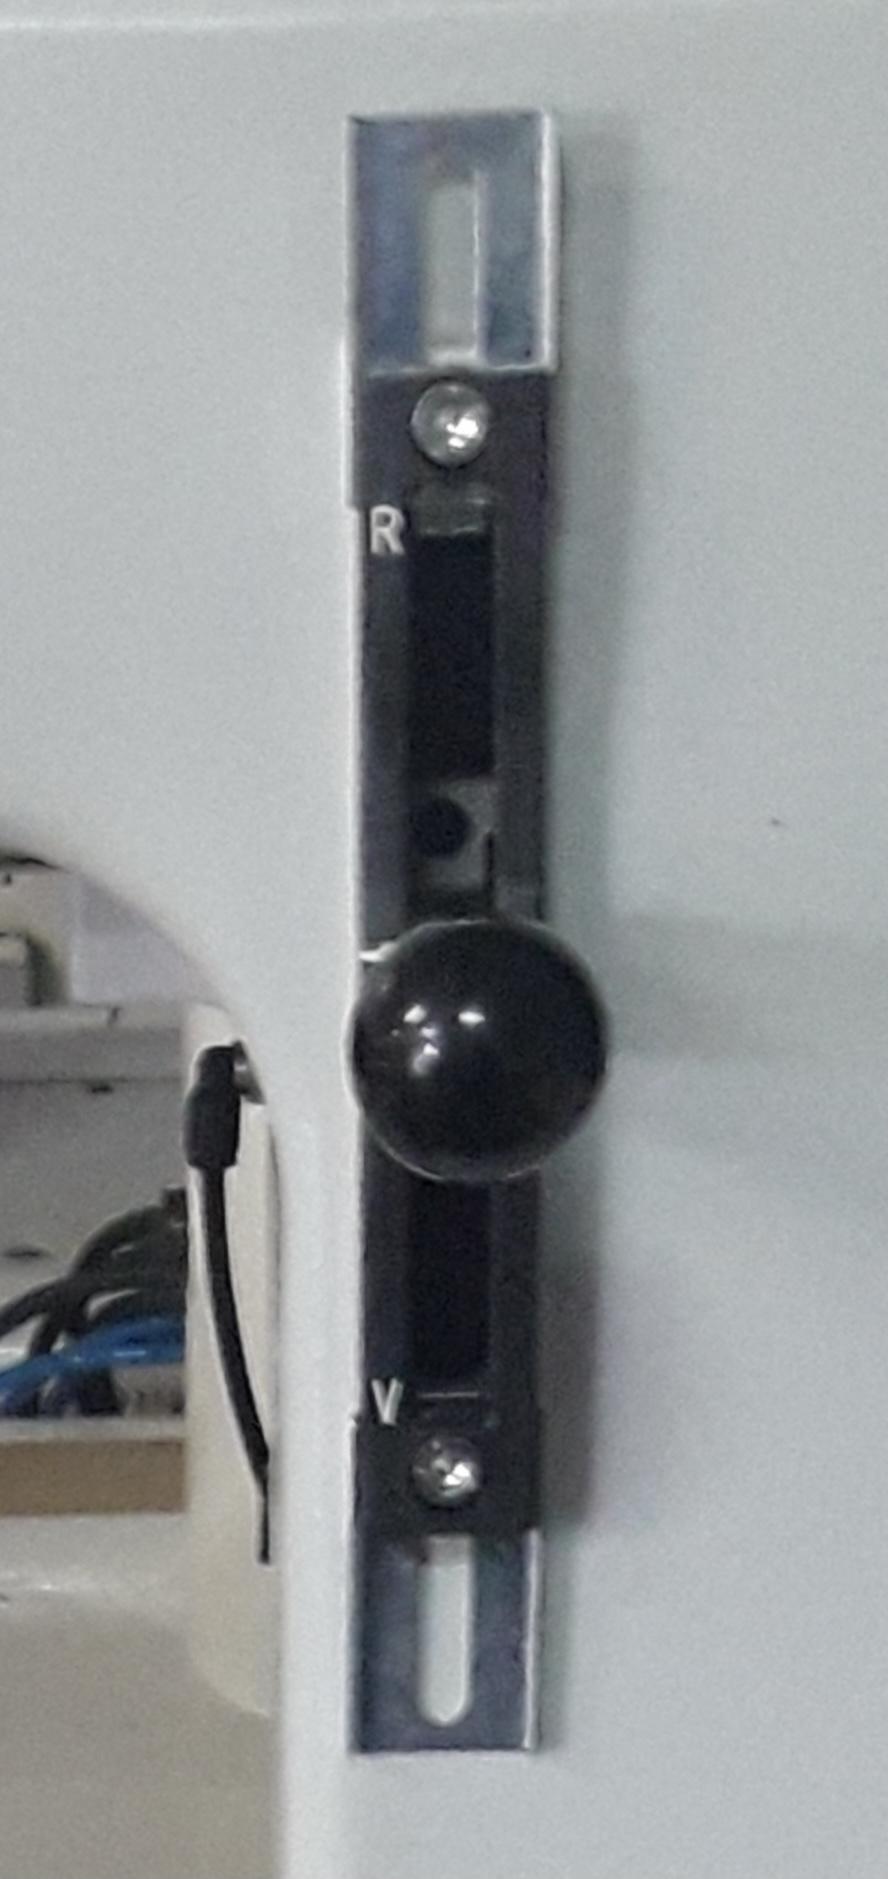
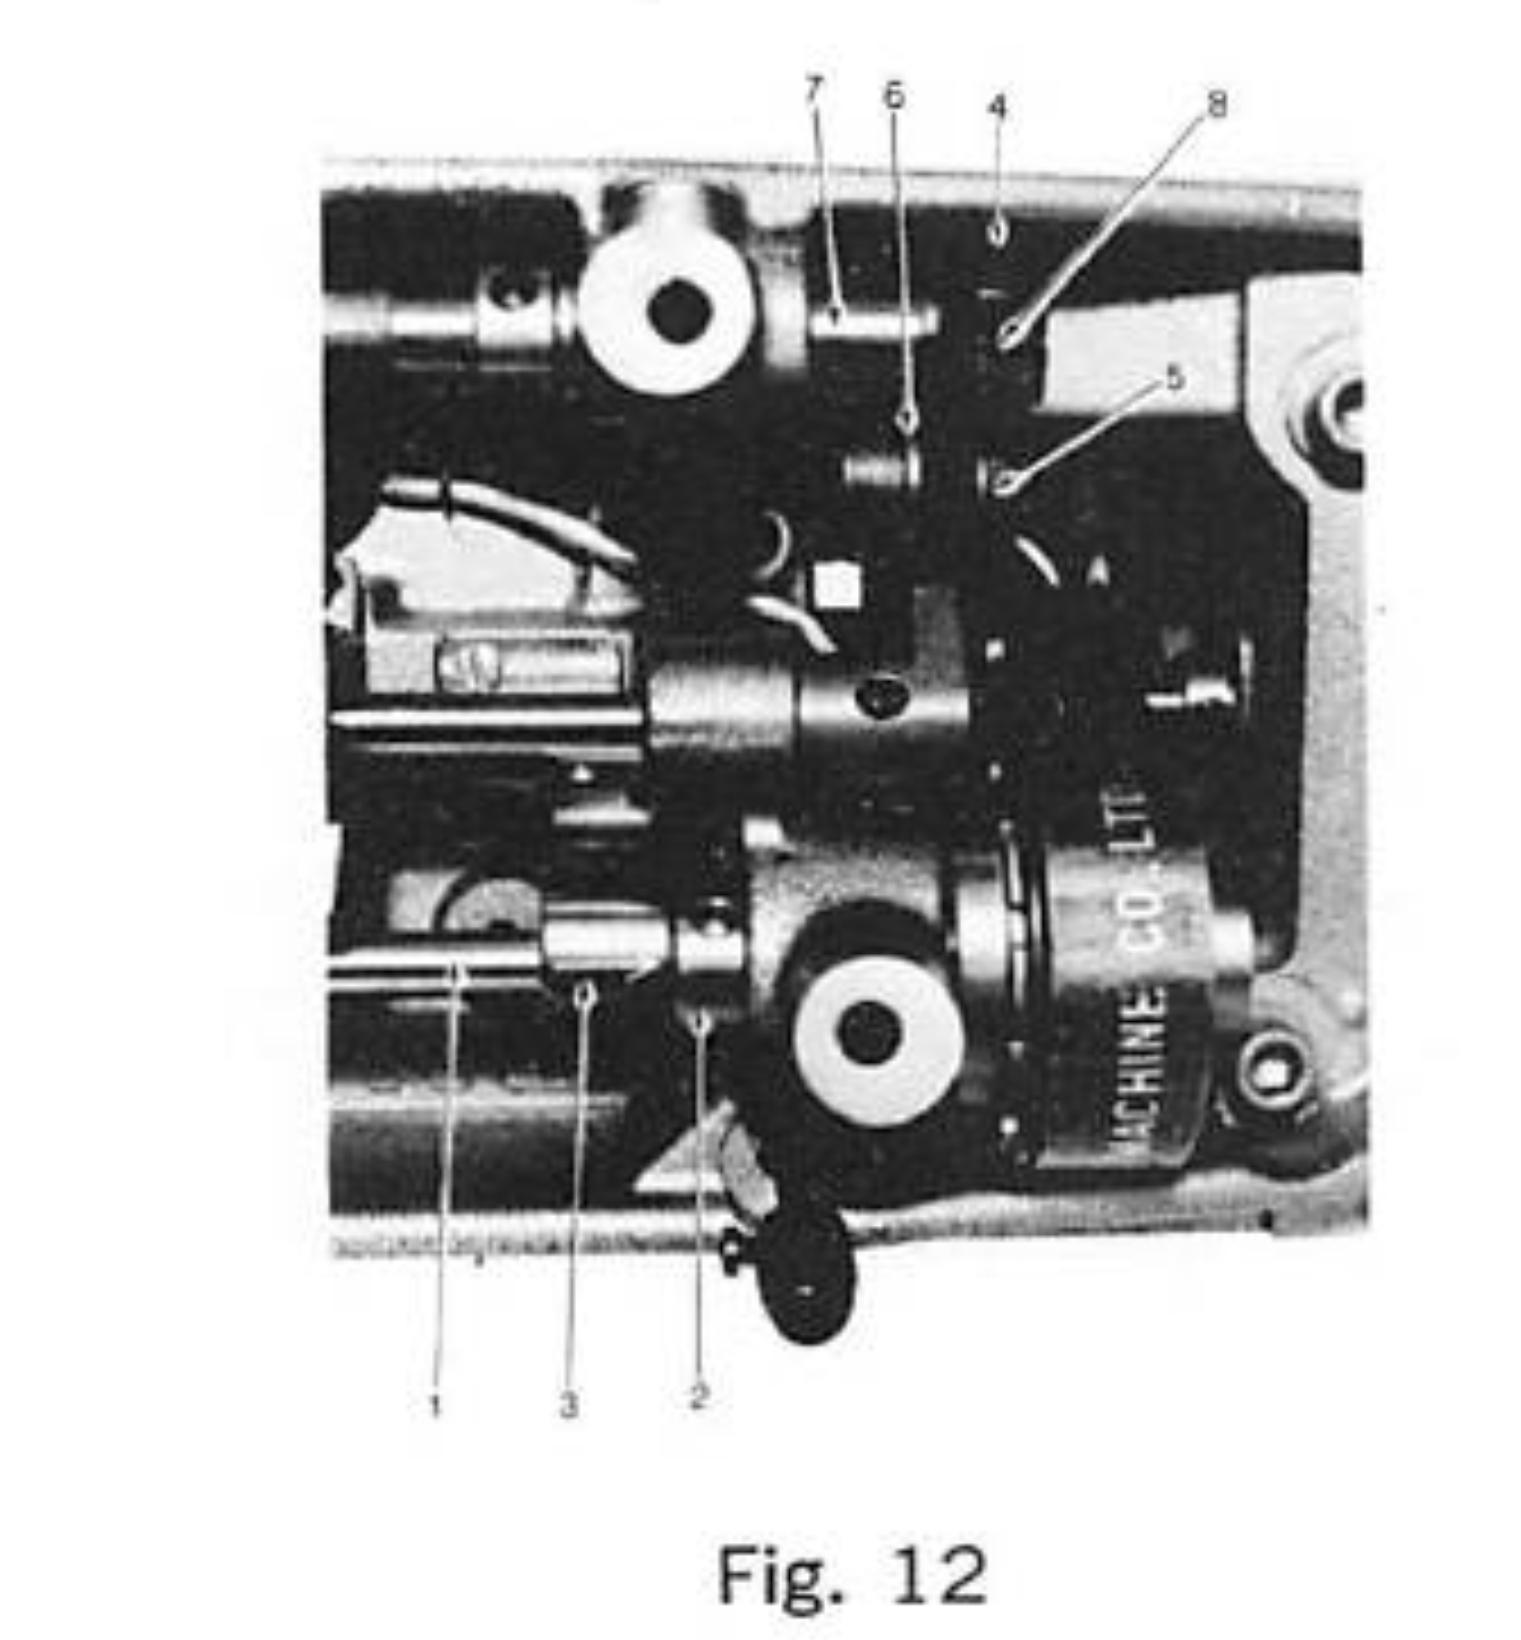
The easy thing to try is to put a small shim/washer/wedge under the cover plate 24; either at the top or bottom, depending which direction you need to shorten to match the other. That cover plate 24, along with part 10 determine where the lever that regulates stitch length stops. Putting it at a slight angle will shift the stitch length balance one way or the other. On the Adler 205-370 that cover plate is not flat but has steps and different thickness, which fine-tunes stitch length balance. You can also use sliding hard stops under the cover plate to dial in perfectly matching forward/reverse for one particular stitch length and material combo. Here’s what the cover plate on my Adler 205-370 clone looks like, showing the steps. Looks like a good candidate for custom 3D printed part, too. This picture shows the sliding hard stops you can use to dial in one particular forward and reverse stitch length independently and with high precision.

-
It sounds to me like your machine’s hook timing is considerably off. I recommend re-timing the machine as described on page 23 of the Adler 69-373 Service Manual (assuming that is indeed your machine’s subclass.) The tip of the hook does not merely need to meet the needle scarf at some point, it has to meet the scarf at precisely the right moment during the stitch cycle. On most machines that right moment is defined by the needle rising a specified distance from bottom dead center (2mm in your case.) After hook timing is positively correct, look at the check spring again. On most machines the check spring (you call it take-up spring) has two functions: 1. Keep the thread taught while the needle is descending, to prevent the needle piercing the thread on the way down. Once the needle is in the material the check spring should rest on the adjustable ledge and no longer apply tension, until ... 2. It puts tension on the thread again as it wraps around the far side of bobbin case. This makes the thread slip through the passageway under the throat plate quickly to avoid snags. Make sure the adjustable ledge under the check spring is in the correct position to apply and remove thread tension as described above. The only time the thread should overpower the check spring is when the take-up lever is near the very top of its movement as it pulls the knot into the material and more thread from the spool. I don’t recommend accepting paid work until you really have your machine figured out.
-
Consew 255RB3 semi automatic oiling and presser foot lift
Uwe replied to sandmanred's topic in Leather Sewing Machines
If I recall correctly, the little oil regulator knob has a little shaft underneath with a seal at the tip to open or close a drain hole that allows oil go where it needs to go while you sew. Take the top off and inspect that little seal. It may be worn or missing. Also inspect the lifting mechanism for that knob to make sure it actually is in the closed position when you think it’s closed. As for the lifting height of your feet, the max foot clearance height may not be the same as real-life max sewing thickness, especially if you have max alternating walking height dialed in. If you actually need to sew a 9/16”(14mm) tall stack of hard leather with max walking height, the Consew 255RB is perhaps not the right machine. Don’t be afraid to start separate topics for very different questions. It keeps the discussion more focused. -
How to identify my Singer model and make it work
Uwe replied to Schlaumeier's topic in Leather Sewing Machines
@HENDREFORGAN I didn’t forget, that’s exactly what I thought I was explaining, perhaps before I was properly caffeinated. We still have not seen any pictures of @Schlaumeier‘s actual machine, so we’re all just guessing as to how it is actually set up. -
Consew 255RB3 breaking top thread in reverse
Uwe replied to sandmanred's topic in Leather Sewing Machines
The feed dog (and thus needle) movement should be centered in the throat plate opening. If it’s offset towards front or back, it’ll be hard to get hook timing just right in both sewing directions. The Seiko LSW manual (Consew 255 is a clone or re-badge of the Seiko) has adjustment instructions starting on page 7.


-
Consew 255RB3 breaking top thread in reverse
Uwe replied to sandmanred's topic in Leather Sewing Machines
That’s very likely a hook timing issue. Hook timing is more forgiving when sewing in the forward direction because hook and needle move towards each other. In reverse, they move in the same direction at different speeds, which trickier to get right. I usually tweak timing a bit (advance or retard the hook) to make sure the machine sews well in reverse at max stitch length; that all but guarantees that it’ll also sew great in the forward direction.