MADMAX22
-
Posts
3,201 -
Joined
-
Last visited
Content Type
Profiles
Forums
Events
Blogs
Gallery
Store
Everything posted by MADMAX22
-
Very nicely done, I like it.
-

Made my first belt
MADMAX22 replied to MADMAX22's topic in Purses, Wallets, Belts and Miscellaneous Pocket Items
Thanks for the compliments guys, and yes Bree she loves it. Its still gotta break in a bit, she was use to a thin Ariat belt that wasnt shall we say very sturdy. I actually got this one off of ebay. Its a BTS buckle. Not sure if that company is still in business or not, gotta look them up. Its pretty darn nice buckle, all brass and made in the USA which I like. -
Im interested, dropped ya a pm. Ive been looking around for a new knife.
-
Made my first belt
MADMAX22 replied to MADMAX22's topic in Purses, Wallets, Belts and Miscellaneous Pocket Items
Thanks, Just wondering but do you not wax or use prewaxed thread. Im not sure how well that stuff would dye. Have not tried it though. The biggest thing with this sewing job was that it was a different style for me, I was trying to use the "proper technique" which meant a little change in how I did it. Its a little more difficult. Definatly gonna need some more practice and a better stitching apparatis. I am using a pony when I really need a horse lol. -
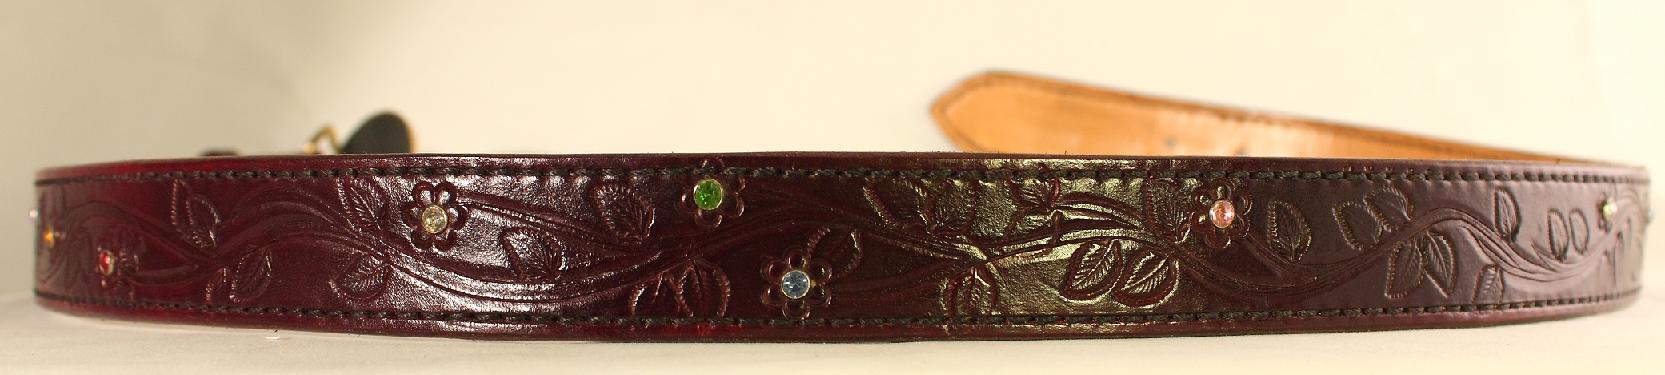
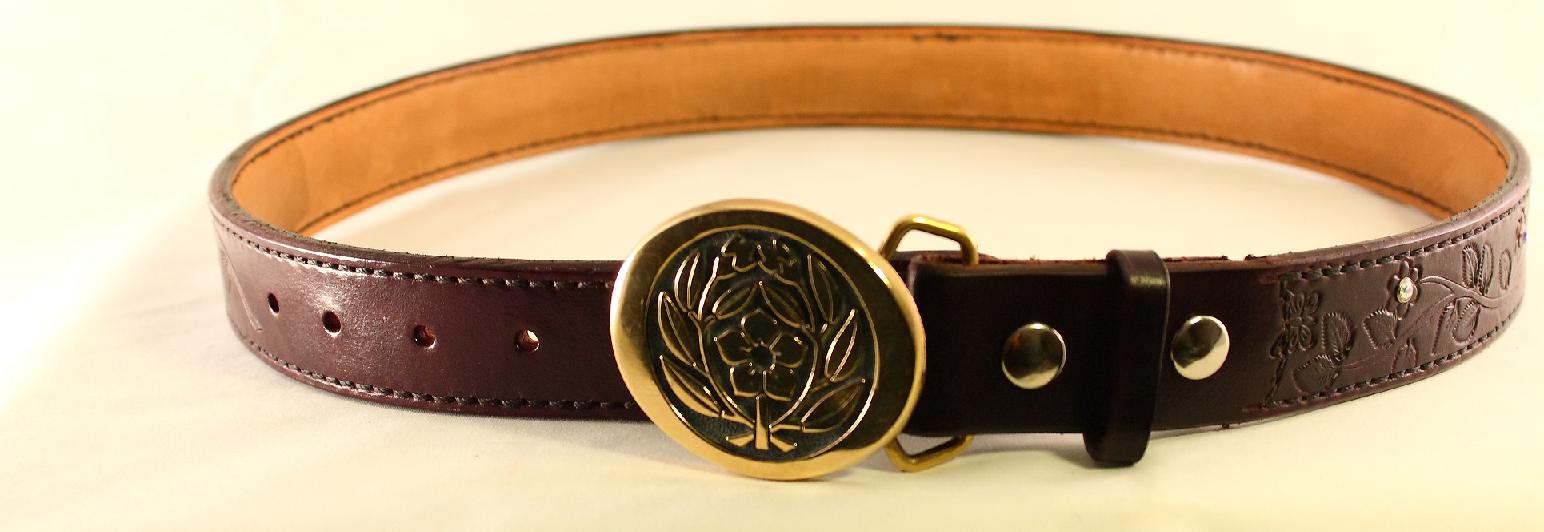
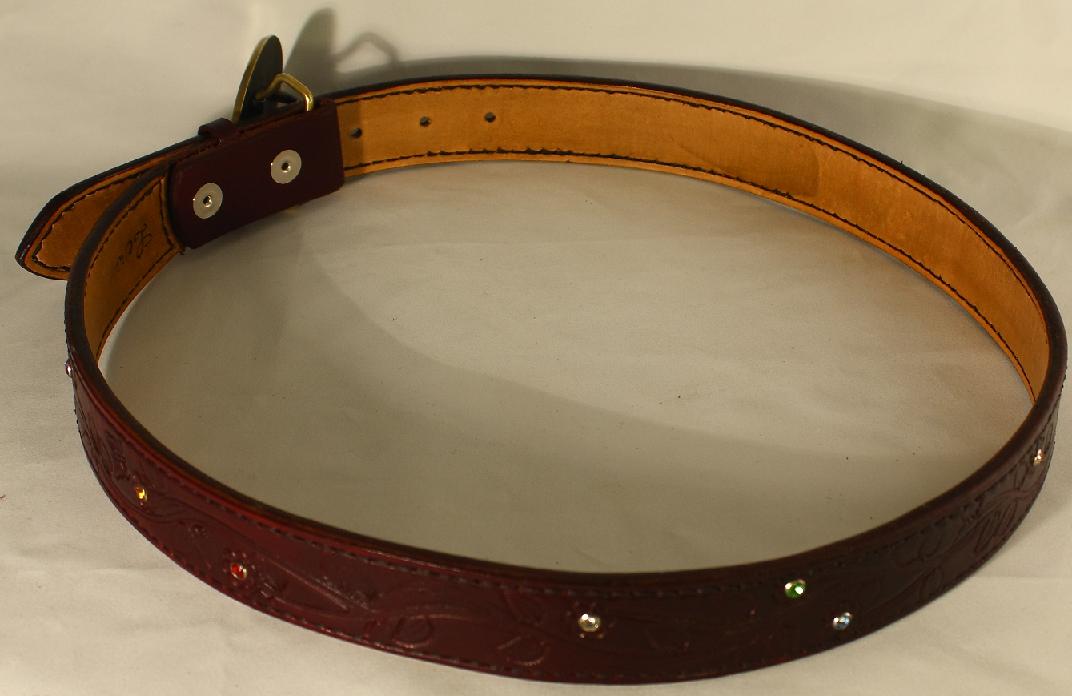
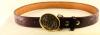
Hey guys well I finally got around to making my first belt. The body is 8oz, the liner is 3-4oz. I hand stitched the whole thing, the outside stitching I thought looked ok but on the inside you could really see all the errors. I stabbed the holes all on the table but stitched the rest with the classic way so it was a learning experience. I freehanded the design with the stems cut and beveled then I stamped random leaves and flowers. I put those rhinestone rivets in the center of the flower stamp. Dyed the outside with feibings mahogany and sealed with atom wax and then some sno seal. The inside I did a quick name (for the girlfriend) and then tried to do a quick antique on the name part just so it would stand out but forgot to put a resist on the inside. Ahh well so had to go over the whole inside really quick to get the same color and let one spot sit to long and it left a off hand stain. Still figured the inside would wear this out eventually. The belt buckle I got off of ebay after we were all done with the belt. Thought they looked good together.

-
first photos posted...critiques please
MADMAX22 replied to carljc72's topic in Gun Holsters, Rifle Slings and Knife Sheathes
Looks good to me so far for your second one. Cant say too much as I have only made a couple myself but stitching looks great, good lines and such. As stated get the edges cleaned up a bit. I cant seem to tell if I would like the reinforcement to have rounded corners or keep the pointy corners, either way I think it looks good. Keep going on them and refine your technique. -
Looks great, nice and simple and will probably last her near forever
-
Very cool looking, good job. What did you use to color it with?
-
Outstanding, nice job on the seat and congrats for getting it published. That is a cool looking bike as well.
-
Some bracers and a pouch I made today...
MADMAX22 replied to UKRay's topic in Collars, Cuffs, Leashes and Leads
Looking good, I really like that bracer, nice colors and design layout. -
Whats the bicks again?
-
Sad part is most of them rave about there stuff. This is one instance that you gotta go USA for quality. Not saying other places dont produce it but what gets imported to the US is the mass produced junk, they seem to keep all the good stuff they make and sell it locally or something. There are a few places you can get good biker gear online, fox creek leathers are where I got my chaps, nice leather and good workmanship but they werent cheap either. Two to three times the cost of the thin junk you could get somewhere else. There are very few local places to get anything that isnt imported. Infact I know of only one place that is somewhat close that a lady works at and she makes pretty good stuff.
-
Thanks for the info Rob. Trying to envision it and I think I have a good idea. I know what you mean by those little clamp type things, saw those and wasnt sure I wanted one bolt holding the bag on there. Im running into the same barrier where you did with how to make it follow the contour and it may make sense to not do that lol. Thinking Ill have to take another look at his bike and see what I come up with.
-
Newb saying hi and ????
MADMAX22 replied to UKCATSFAN's topic in Gun Holsters, Rifle Slings and Knife Sheathes
MMMMMM well cant say for sure the correct answer for your first question but there are some styles/types or mechanisms that are copy righted so you gotta be careful. most of the holster makers tend to post in this section regardless. The show off will get moved down here after a while but guess the holster guys like to keep it in the group lol. Also post some pics and lets see it. -
Guess I should have used a different term lol. Ive scene the ones you are talking about and in the end may go that route, however I remember seeing the same toolbag design that is used on the front forks for the windsheild bag. The thing thats getting me is how to cut the body of the bag. EDIT: http://www.bikeremporium.com/Products-Windshield_Bags.html OK I see the longer ones and I guess the multi bag setup is what was used to wrap around the inside of the window. It looks like most sites that I see make the bags short enough so that you dont have to worry about the curvature as much. May end up having to do that.
-
Excellent,
-
OK so I have a buddy that Im making a windsheild bag for. Its a road king. He made a aluminum bracket for me that follows the contour of the inside of the windsheild so that we can bolt it straight to the three windsheild mounting bolts. Now the hardpart. How do you construct a bag that follows that contour. I wanted to go with the classic look of a standard tool bag but not sure if its gonna work. I played around with some construction paper but couldnt seem to come up with anything that worked. Thanks for any help.
-
applique Lacing: Belt
MADMAX22 replied to jbird's topic in Purses, Wallets, Belts and Miscellaneous Pocket Items
That is a very nice looking belt for sure. Dont mind me asking but did you run both thickness leathers thru the belt end or did you end the lining somewhere, skiv them down or something. Just wondering because I finished my first belt and did it with 8oz on the outside and about 3/4oz on the inside but ended the lining before the buckle setup. Not sure if I really like that too much. -
Celtic Knotwork for belts
MADMAX22 replied to lokiprime's topic in Purses, Wallets, Belts and Miscellaneous Pocket Items
To get unique or close to it your gonna have to do your own. There are many books on how to do celtic knot work. Its not to bad and about the only way you will get a design that may be a little different then what you normally see. -
Looks pretty good. I like the design alot. I think maybe you could tighten up the lace around the edge but youll have to get a seat guru to help ya there. Hope my first seat turns out as well.
-
Set going to Sweden
MADMAX22 replied to DCKNIVES's topic in Gun Holsters, Rifle Slings and Knife Sheathes
Great looking stuff. What color did you use on the sheath, I think it came out really well and looks good with that croc. The knife looks awesome also, I love that blade -
Nicely done, I like the design with the skulls kind of peering out from the edge.
-
Need to make sure a seat I made is waterproof!
MADMAX22 replied to Kustomizer's topic in Motorcycles and Biker Gear
Im sure the pro's will jump in here soon but IMHO a simple method would be to use something like sno seal on it. That or aussie wax is good also and both of these are easily applied by any one with a cotton cloth and a working hand. Granted they work better if you can take a hair dryer to the leather first (not too hot just warm) then apply them. -
Three New Sheaths...
MADMAX22 replied to Talfuchre's topic in Gun Holsters, Rifle Slings and Knife Sheathes
Looks good to me. Great work. -
Maybe get them back out in the sun for a afternoon or two, should even out the color I would imagine.