.jpg.d60258221c476480a6e073a8805645bb.jpg)


fredk
-
Posts
5,966 -
Joined
Content Type
Profiles
Forums
Events
Blogs
Gallery
Store
Everything posted by fredk
-
You have my condolences as well friend I can understand your feelings at this time Thank you for feeling you could share this with us strangers on here
-
This whole thing of manufacturers getting things made cheaper in another country, then trade tariffs imposed et cetera is nothing new. The Romans and Greeks had the same problems over 2000 years ago and it happened right thru the centuries to modern times
-
 Looks most excellent to me
 -
Deviation over Back to the main subject; if you were yo increase the card thickness, say, by gluing on another layer or two you could impress the design deeper
-
That place does not actually exist anymore. Its what we call a ghost. When it was open, it was only a meeting place with high prices. They did not have either any equipment nor experienced advisors. We have a lot of these types of business who's only aim is to get public money to run empty places
-
I am NOT getting a dog just so I can buy its food boxes! Its bad enough that I choose cereal for ME by the size of the box! I don't have any of those fancy toys. But I do have lots of very nice and very sharp knives and scalpels and a DTP comp proggy Not available in N.I. afaik. I've asked about and whilst some colleges have equipment its non-accessible to outsiders at all, just to enrolled students on Tech courses and they can only do stuff on their course. Talk about being in the 'dark ages'?!
-
First passport wallet
fredk replied to swortsoul's topic in Purses, Wallets, Belts and Miscellaneous Pocket Items
It looks pretty good and nice.. Wetting the leather at the fold then folding over, tapping down with a mallet then drying out under a weight helps reduce the wrinkles To 'burnish' edges of thin leather I just use some soft beeswax rubbed along the edge with a piece of linen to rub it in -
@DJole, very most clever. I never thought of that oh, I use it for patterns too but also for stiffeners in the likes of the bases of dice- trays, (aka valet trays)
-
Would a simple draw-string bag work? I make them in various sizes and one I currently make for D&D dice sets would carry that amount of shot easily Although the draw-string pouch can be just put in a pocket, with a long loop of thong it can be held onto a belt, and with an even longer length of thong it could be held over the shoulder(s) PS. a friend of mine collects antiquities from archaeologic sites. He once showed me some Roman sling-shot bullets. They were cast lead, long pointed oval shape with 'Tolle Quad' on them - Latin for 'Take That'
-
-
But no-one on here is Selling Tandy patterns or passing them off as their own. You are looking at a question raised 15 years ago and basically resolved 11 years ago. It is quite legitimate to compile the Doodle pages on to one CD or DVD and sell that to cover the cost of the disc but with no profit element for the pages and with recognition that the pages are Tandy's
-
For WHY will Tandy sue? They are the ones offering us the Doodle Pages free for our use
-
A random sampling shows the broken links are fixed Well done that man, carry on
-
Its true!
-
Excellent. An obvious thing to do in which all we others failed
-
If the top of the anvil is plain, I would grind it down flat so that the head and stem can be put in vertical alignment with the ram
-
or, you could say the day the treaty ending the war was signed in 1783 and Great Britain recognised the USA as independent, or the day in 1778 the French ship acknowledged John Paul Jones flying the Stars 'n' Stripes as when US Independence was recognised by another country Whichever date is chosen, celebrate the Independence won from a tyrannical government
-
Don't feed the troll
-
Happy Independence Day to all US Americans everywhere
-
Drawing A Straight Line For My Pricking Iron
fredk replied to AzShooter's topic in How Do I Do That?
On a wallet, my first ever so far, I 1. put the parts together using double sided tape 2. trimmed all the edges neat 3. used a Tandy pen marker to mark a line where I wanted the stitching to be 4. using that line as a guide I ran the wallet thru one of my sewing machines 4a The sewing machine is manual 4b I used a magnetic sewing guide to run the edge of the wallet against for consistent line to edge distance 4c. The sewing machine was set to about 8 stitches per inch 4d. I used a leather needle but no thread in the machine. It was only to make the holes 5. I then saddle stitched the wallet together using a very fine thread -
I have this one
-
You are correct, its for lacing. I have a set of these
-
One method I learnt is to wrap the thread tightly around a ruler or stick marked with a couple of inches. Then count how many threads you get to the inch. There is a conversion table somewhere on the internet which converts the threads per inch to regular standard measure There should be no variation on thickness between manufacturers when using the standard nomenclature. A Tex90 should be the same size no matter who makes it. Thats the whole point of standard nomenclature
-
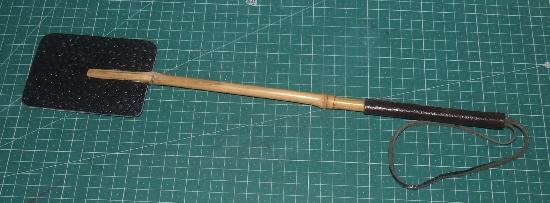
I did. The piece I had was no good. The packs in the gardening centre were £4.99 for ten but they were very poor. I bought a children's guppy fishing net with a bamboo handle for £1
-
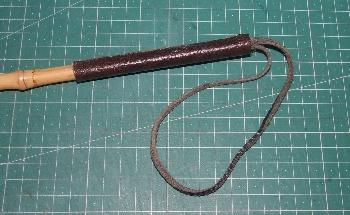
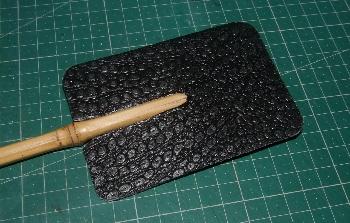
I hereby present my Buzzy Swatter Mk.1 over all length is 16 inches A thong glued into the natural hole of the bamboo and a piece of thick chrome tan upholstery leather on as a grip The Whacker is two thicknesses of a leather that has some sort of reptile skin pressed into it. The bamboo shaft is split and grips the Whacker like jaws, assisted by contact glue. Whacker is 2.75 inches wide by 4.25 inches long I nearly had a tester victim today. A buzzy came through my window, saw what I was making and exited pdq