-
Posts
5,995 -
Joined
Content Type
Profiles
Forums
Events
Blogs
Gallery
Store
Everything posted by fredk
-
This is an old thread. The OP has possibly not been on here since May 2020 In the interests of information: try IKEA. Not too long ago (last December 2020) I saw they were selling hides with hair on as rugs or chair throws. The prices and sizes varied from modest to ' no-way hosay!!'. Hides included sheep, goat, possibly highland cow and other types
-
Try a couple of thinned coats of 'Mop and Glo' floor 'polish' which is a water thin acrylic varnish. Preferably sprayed on with an airbrush. I use it to seal the paint on my game boards
-

How to apply Epoxy to a finished leather product
fredk replied to Hayes's topic in How Do I Do That?
The epoxy will damage the leather. Maybe overlay it with a thin sheet of 3mm clear acrylic. Punch holes around the edge of the leather, drill matching holes in the acrylic and lace together -
Dutch hooks https://dutchwaregear.com/product/ti-dutch-hooks/
-
Its not???? You too need to read quote from one of their listings - see the bit that says 'All items Made by us' ???? Fully functional, easy to store & good addition in your tools. Great for giving away as a gift.Each of our Damascus skiving Tool made by professionals according to the need for everyday use and they are unique in their own way. Buy with confidence. :::::All Items Made by us:::: Feel Free to contact us for all your Inquires, Questions and Feedback. We will be happy to help you to design tools according to your need and taste. Thank You I've not bought from them but I have been in contact with them Just forget it all. I shall no longer be posting any advice or help on this website. Its a bluddy waste of my time PS. the 'quality control sticker' is actually the sellers ebay listing identifier. If you bother to read or contact the seller you'd find this out and not jump to stupid unfounded assumptions
-
Check out this seller https://www.ebay.co.uk/itm/Handmade-High-Carbon-Steel-Round-Head-Leather-Cutter-Skiving-Tool-Sheath-QC20/183974299306?hash=item2ad5b906aa:g:6oMAAOSwzRpe4n7c Mixed, but mainly positive, reviews on the quality and sharpness as received. But all knives should be sharpened after arrival
-
Very nice set up another difference in lingo: a door-kick panel on a door is a re-enforced panel so's ya can kick a door closed, an inset panel under a cupboard door so's ya don't keep kicking it with your toes is a plinth panel
-
1. if you reckon this is ruined as its now, try wiping it down thoroughly with lacquer thinners aka cellulose thinners 2 but be advised that the lacquer thinners will most likely take off a lot of the dye 3 this may or not work 4 after the thinners you'll need to re-dye and give it some nfo
-

Dying rough leather
fredk replied to JAWS's topic in Dyes, Antiques, Stains, Glues, Waxes, Finishes and Conditioners.
yes, I do it as often as necessary if you 'dip dye' it gets dyed as a matter of course If you apply by sponge, the flesh side absorbs a lot of dye. I usually do the front/grain side first then see how much of that has soaked into the back then dye the back side/flesh side After doing the flesh side I like to rub in a wax mix as a sealer -
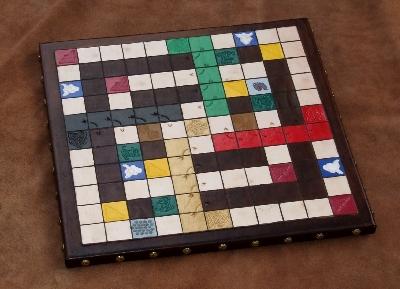
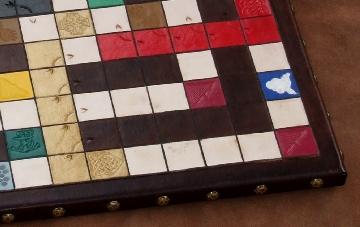
1. These are the same. The maker keeps changing the name and I can't keep up. There are cheaper alternative out there which are the same formula and work just as good. eg, in the UK Pledge is about £15 for 750ml, I use 'Astonish' at £1 for 750ml Although this is not wet moulded its for showing sealing of leather Game board, over view, Close-up of a corner 1 after the squares were stamped and edges done by grooving the squares which I was going to paint and the squares I was not going to dye got two coats of 'Astonish' sealant 2. squares were painted using mainly Humbrol Acrylic model paints, also used were Vallejo and Revell acrylic model paints 3 after painting those squares got two more coats of Astonish, the squares not to be dyed got one more coat 4. the remaining squares got a few coats of oil dye, as did the leather surrounding the playing area 5. an 'antique' gel was rubbed into the lines between the squares. 6. about an hour after 5 one coat of sealer was applied to all five surfaces of the leather, that dried almost as fast as I put it on so it got a second coat overall right away 7 all was left overnight, about 8 hours then the nails in the sides were fitted. No dye or paint ran or was discoloured by the sealant
-
A big can of worms Basically, many pattern makers won't bother you if you only make a few, say up to half-dozen, items from their patterns and sell them. More than that and the pattern maker would look a fee, unless they've said 'only for personal use' or 'go and make lots' Tandy actually encourages you to use their patterns to make things for sale. The more you make the more you buy, hopefully, from Tandy Copying exactly someone else's product and selling yours is a big no-no. Using the product style to make your own version is better
-
Write to them. Tell them what you want to replace, the size you'd like. If they want to sell you the tools they'll soon tell you. If they don't tell you then don't deal
-
I think your blade is too small. Its cutting only a few mm at a time so it can wander easier. The wider the blade the more it cuts. Even a box cutter blade is better Use a good straight edge for the . . . errr . . . .straight cuts. When I cut a curve I tend to not only draw the blade around but also to turn the leather. Often, on outside curves I use leather scissors/shears
-
There are many reasons for and against 1. I've just started to make a bag for my dottir. It going to be black*, so I bought a large piece of leather pre-dyed black. After cutting out the parts I only have scraps left. 2. I buy leather 10 to 30 sq feet at a time. If I buy one leather, say 20 sq feet, 2mm thick, predyed in tan brown I'm stuck with that, everything has to be tan brown. If I want or need to make something in red, I'd need to buy another hide in red, adding to additional stock costs. But by having un-dyed leather I can dye it whatever colour I want when I want. Keeps cost down to having one hide and just bottles of dye 3. If you are making on an industrial amount pre-dyed is cost effective but if like many on here, no more that 10 or so of the same its better cost wise to have un-dyed leather * this bag was going to be tan brown in 1.8 - 2mm leather but the supplier had run out so I got 1.4 - 1.6mm black. I didn't fancy dyeing 15 sq feet or so of leather tan brown; leading to 4. the tannery doesn't always have just what you need, when you need it
-
Don't diss yourself over that. I use a cheapo digital caliper as well. Its good enough to tell me which ball park I'm playing in. My expensive superior ones are in a tool box, unloved I've always called that part the ram
-

Ostrich Foot Wallet
fredk replied to Loudcherokee's topic in Purses, Wallets, Belts and Miscellaneous Pocket Items
on cutting thin and/or slippery leather 1. use a straightedge with cork or rubber on the back 2. use a rotary knife -
For the odd time I've had to burn off a thread I use a wood cocktail stick lit up by a tea-light candle. I often have one of those scented tea-light candles burning nearby.
-
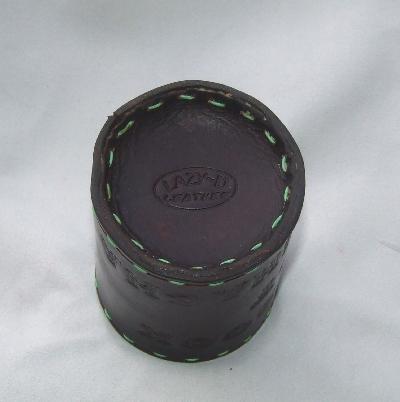
When I made a dice cup with inset bottom I punched the holes for the sides. glued the bottom up into place then used a round awl to punch each hole through as I came to it (actually I did about 6 holes at a time) I know its not great work
-
Properly done even a basic sealer will make it keep its shape. It needs a real long term soaking and mushing about for wet-moulded leather to loose its shape A real good sealer I'm using more and more is the acrylic varnish sold as 'Pledge Floor Gloss'
-
no, it was a top gears cover to lower cover / engine nose / engine and also a dynamo mounting to the top gears cover
-
Note. Off topic. Just to answer queries We did the first 1/4" bolt into M6 helicoils fitting by accident. We had two parts bolted together, one had threaded through holes and the other had threaded blind holes. The design of the parts is that the bolt is screwed part way through first part, the part offered up to the second part and the bolts run up tight. There are short locating sleeves to help with alignment so the first few mm of the hole in second part has no thread 1. we had through holes with near stripped 1/4 inch threads 2. I drilled out and ran M6 helicoils into the through holes. Intention was to put M6 helicoils into the blind holes as well. But I held off as changing to M6 was going to compromise the part. 3. No.1 son accidently took the 1/4 inch bolts and bolted the two parts together thinking I'd finished and all was ready for re-assembly. 4. when we realised what we'd done we took some bolts out and checked and they needed unscrewing their whole length 5. We used this same process on purpose on a few other 1/4 inch bolt threads. I think the threads on the 1/4 inch were British Whitworth, just slightly off from M6. The helicoil, by its nature of being a coiled spring can expand slightly to accommodate the difference.
-
Just as a note for others looking in. Helicoils, some of, can adapt to the thread. eg. I/we fitted some M6 Helicoils into some drilled holes and screwed 1/4 inch bolts into them on my 1930 Austin . It wasn't an option to change fully to M6 bolts
-
yes, I keep a a sewing needle in a pin drill chuck just for the purpose of clearing that hole
-
Drill it out to M7 and fit M6 helicoils


