


Dwight
-
Posts
5,265 -
Joined
-
Last visited


Recent Profile Visitors
.thumb.jpg.327685d8c1787fa894323fed9a6b2dac.jpg)


Dwight's Achievements
Leatherworker.net Regular (4/4)
-
Don't know if you it Chuck . . . Tippmann has a full life warranty . . . if it don't work . . . send it to them . . . Ft. Wayne, Ind. . . . they'll fix it. I only live 2 hours away . . . so I just saddled up and took it to them . . . never a problem . . . someone cleared a desk . . . fixed it . . . and I came home. Only bill I ever got was for the extra needles or other stuff I bought while there. They're great people. A second thing . . . and I don't know why . . . but I bought a patcher machine . . . and they stressed I had to use left hand twist thread. I checked all the threads I've used . . . they are all left hand twist. You might check that . . . May God bless, Dwight
-
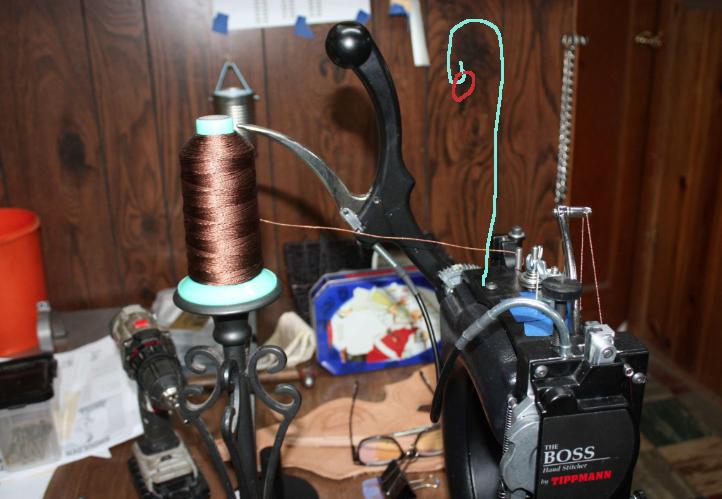
Hey Chuck . . . shortly after I got my Boss back in 2000 . . . I saw the "thread" problem you mentioned. And I don't recall where I saw the solution . . . look at the picture . . . there is a piece of 1/8 inch rod about 12 inches tall . . . bent over at the top (the green part) . . . with a hook on the end. Add an oval shaped piece of the same stuff . . . about 2 inches long . . . and you have the cure . . . almost. The second thing is you have to make the loop be almost directly above the spool of thread . . . for it to work right. When I got done with mine . . . the thread spool was about 6 inches below the red loop. I've sewn 55 inch cowboy rigs with that rig . . . which is almost 130 inches of continuous sewing . . . and never had one thread problem since I built that. Again . . . not my design . . . but my interpretation . . . and it worked great. I made the thread come down from the loop and go straight into the first hole on the whachmagiggy and it worked like a champ. Have fun . . . may God bless, Dwight
-

Antique Tools - Edge Channelers; Anyone else use these?
Dwight replied to alfredleatherworks's topic in Leather Tools
For most of us . . . a picture or 3 would have been enjoyable . . . as they are actually used . . . how they are used . . . what the product looks like when it is being produced. Kind of like a gun . . . gun pics are good . . . like to see what can be done with it down range. May God bless, Dwight -
Yep . . . that's a good looking belt . . . owner and wearer should always wear that with the shirt tail tucked in . . . for all to see. Most of the belts I do are not done by oz . . . but by X thickness in inches. When I buy leather . . . it is most of the time a side . . . and I take my thickness tool with me . . . looking for .1000 or so. I use two layers of this for my belts . . . most of the time . . . using a thinner liner if the wearer is really skinny . . . thicker outside if the wearer is on the "bulky" side. I can easily make a belt that will hang next to the OP belt . . . in less than three hours . . . but only because my Cowboy 4500 loves to do belts. I could probably push myself right real hard . . . and do it in one hour . . . If I got a customer who wants his belt to be hand saddle stitched . . . I'd be more than happy to accommodate him . . . but he will need to bring his big check book . . . his little one won't handle the problem . . . . . . and there will be a one week lead time. May God bless, Dwight
-
veg tan lined taco holster
Dwight replied to Genzale's topic in Gun Holsters, Rifle Slings and Knife Sheathes
I've never used that, Tony . . . may take a look at it . . . I buy cotton backed vinyl (like for tablecloths) from JoAnn fabrics . . . which I guess is not Michaels (??) It's 25 bucks a yard . . . but is like 48 inches wide . . . and if you check . . . there's usually a coupon out there for up to 50% off. I like the vinyl . . . use it to develop patterns . . . and it works pretty darn good. Ususlly have to add a 1/4 to 1/2 inch all the way around to make up for leather thickness . . . but like you said . . . sure beats beating up good leather . . . especially at today's prices. May God bless, Dwight -
What is this called and how to install them?
Dwight replied to Jen the Canuck's topic in How Do I Do That?
The top ones and the bottom ones will stay shiney and pretty a lot longer than the middle ones. They quickly corrode and lose their luster. May God bless, Dwight -
veg tan lined taco holster
Dwight replied to Genzale's topic in Gun Holsters, Rifle Slings and Knife Sheathes
Cut out the pattern for the liner . . . and leave about 1/2 inch all the way around. Soak it right real good . . . put your gun in a very thin plastic bag . . . or wrap it with saran wrap . . . and wrap the gun with the wetted leather . . . hair side to the gun. Use your thumbs to mold it to the shape of the gun . . . and remember that the better the molding you do . . . the better it will fit . . . and the longer it will be a useful holster. Ease the gun out of it . . . bring the edges together where your sew line would be. Take a clothes pin and hold it together as though the sew line was holding it. Hang it up and let it thoroughly dry . . . I just do 24 hours . . . so I don't have any worry. The next day . . . cut the pattern again . . . this time allow about 3/4 of an inch all the way around . . . and this one you want WET . . . slobberly . . . sloppy . . . WET. Actually do not use HOT water . . . but as hot as you can stand your hand to be in for 10 seconds is about right. Put the gun back in the first piece you did . . . and wrap the new piece around it . . . hair side out . . . and fold it and mold it as tight as you can to the other molding . . . and once you are done . . . spend a good 10 minutes trying to make the shapes match . . . remove the gun . . . and then just sit it down on the back . . . with a piece of masking tape holding the sew line edges together. Leave it that way for another 24 hours. When you get ready to make your holster . . . get a small paint brush . . . I use acid brushes from Harbor Freight . . . and give both of the flesh sides of the two pieces a good smooth coat of contact cement . . . let it get just dry to the touch. You can accomplish that in about 10 minutes with a heat gun or a hair dryer. Put the gun in the liner piece . . . make sure it is where it should be . . . then lay it down into the outside piece . . . using the sight line for the first contact point. Wrap the outside piece around the inside piece . . . and using your thumbs . . . or the rounded end of some of your wooden handles on the leather tools . . . try to make as much of the two pieces match up as you can . . . or if you have some tool that will squeeze the edges together . . . use it. That is the way you make a double thickness leather holster without a bunch of wrinkles going down the sight line on the inside liner. Some will take the pattern . . . cut it twice . . . glue the pieces together . . . then get it wet and mold it. It will not kill the looks of it . . . but you will always come up with wrinkles in the inside piece . . . mostly down the sight channel. Also . . . remember that you need to mark and position the strap and the snap for your suicide strap over the gun. Unless you are making this for a certain reason to keep it as the same overall shape . . . I would do away with the suicide strap . . . and put in a thumb break. They are soooooo much better. As for that little plastic pieces . . . I never use them . . . I use rectangle shaped metal loops . . . with the leather from the holster in one side . . . the straps in the other side. Plastic will break . . . those will not. The little piece you wanted for the thum lift . . . you make them yourself . . . cut out the kydex piece . . . and holding it with two pieces of metal . . . rounded to the diameter you want . . . heat up the edges of the kydex . . . rub it on a board . . . and you can shape them as good as the mfg does . . . and a whole lot cheaper. May God bless, Dwight -
What style and size stitching chisels/pricking irons for starting?
Dwight replied to Moyerbros's topic in Getting Started
Since you are doing holsters, belts, etc . . . go for 5 stitches per inch or 6 at the most. Either makes a really good looking and good working belt, knife sheath, or holster. More stitches makes it look like an over sized watch band . . . fewer won't hold as well. My machine is set for just over 5 . . . and I never have any problem with the item being held together. AND it really looks better whether I'm using matching stitches or contrasting stitches (think black belt with white stitches). And the plus side . . . there will be times for one reason or another . . . you will want to pull out X number of stitches . . . and 5 or 6 doesn't take long and is not tedious to do. The other side of that as well . . . sometimes when I'm doing a very special holster or knife sheath (or other stuff) . . . I use my machine to punch the holes . . . and then hand stitch the item . . . using a saddle stitch. 5 or 6 stitches per inch is sort of quick to do . . . many more than that is a real pain. May God bless, Dwight -
That's almost too simple for a pattern . . . use a manila folder . . . wrap it around the gun . . . mark it and cut it . . . voila . . pattern May God bless, Dwight
-
When u design a new holster pattern
Dwight replied to rccolt45's topic in Gun Holsters, Rifle Slings and Knife Sheathes
I have gotten a reputation as the "odd ball" holster maker. Made an appendix carry holster for a double barreled derringer . . . made a double shoulder holster rig that doubles also as a pair of suspenders . . . made a double carry vest for notebooks / pencils / other oddball stuff / could carry a small auto pistol in it . . . made one to carry a long barreled .22 auto with a large scope mounted on top. And that just scratches the surface of my shenanigans. I simply make a decision that "this" holster will carry this weight / in this location / so it needs to be ______thick. I cut a piece that I know will be 1/2 inch to 1 inch too wide and too long along sides . . . get that dude sloppy wet . . . thumb mold to start with . . . then stick it on the vacuum former. Depending on how hard I do or do not want this . . . I may stick it in the hot box for hardening thru heat. Either way it then gets dried. Come back within 48 hours after the above . . . cut out what I need . . . put a back on it . . . glue / trim / sew / sand / and finish. I have more back patterns than I have for the fronts. May God bless, Dwight -
No . . . I put it around me and buckle it . . . or lay it across my file cabinet . . . and never have any problems with it. Someone would have to intentionally do something out of the ordinary to get it to be bent or folded. My friend used to be rather large . . . and his belts would "sag" so to speak. This one does not sag . . . he cinches it up . . . it stays there. May God bless, Dwight
-
Special Holster for Special Friend
Dwight replied to Dwight's topic in Gun Holsters, Rifle Slings and Knife Sheathes
I have a drawer with a couple pieces of leather that were cut for a right hand holster . . . and the customer was wrong handed like you said. I'll use em up some day . . . or forever have reminders of how not to do things. May God bless, Dwight -
I make steel lined belts . . . actually have a favorite black one that is steel lined . . . I often wear it to church. The steel is 20 thousandths thick . . . 1 inch wide . . . and it goes from the last of two buckle retention holes . . . to just shy of the last hole in the other end of the belt. I made one for a friend 10 years or so ago . . . he still wears it . . . loves it . . . I used two pieces of veg tan leather that were about .1000 thick . . . steel is glued on both sides with Weldwood contact cement . . . as well as the edges where the leather comes together. Leather sewing done with 346 poly thread . . . May God bless, Dwight
-
Special Holster for Special Friend
Dwight replied to Dwight's topic in Gun Holsters, Rifle Slings and Knife Sheathes
Chuck123wapati, FrankHester, JSage, Skinknife . . . thanks everyone for the kind words. Yeah . . . he's one of the last of the good guys . . . He's never failed to help out when he could . . . I first knew his grandfather . . . then his dad . . . now him . . . and both of his kids . . . as well as his 3 grandsons. It has been one fun trip May God bless, Dwight -
If you have a "friendly" Tandy store like I have . . . they'll give you more help than you can use as far as ideas are concerned . . . they also have patterns that I've found to be pretty simple and basic . They also are my "go to" store for leather. I've tried some of the expensive stuff . . . and it's like comparing a Ford to an Audi . . . both gets you down the road . . . but one is more than twice the price. I pick my own out . . . and they'll even help me there if they have time. May God bless, Dwight