Dwight
-
Posts
5,249 -
Joined
-
Last visited
Content Type
Profiles
Forums
Events
Blogs
Gallery
Store
Everything posted by Dwight
-

Need Advice On Special Purse
Dwight replied to Dwight's topic in Purses, Wallets, Belts and Miscellaneous Pocket Items
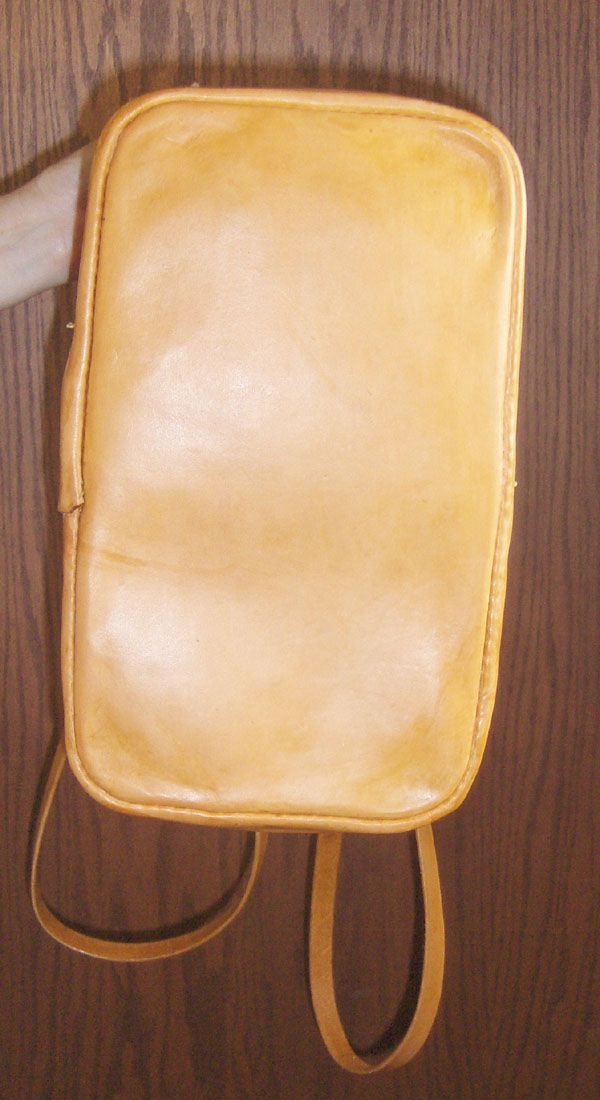
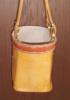
Actually, Joe, . . . turning it over was far easier than sewing it. I couldn't cement it because I didn't want the cement to show if I somehow missed where I needed to stitch it. So, . . . I'm holding the sides straight up, . . . turning the corner with my left hand, . . . pulling the Boss handle with my right hand, . . . balancing the rest of the bag on my left knee, . . . and all the while blinking and squinting, . . . hoping that what I'm seeing is what I'll get when it is all done. Half baked funny now, . . . sure wasn't then. Took it to my deep sink and soaked it wet, . . . fully the whole thing, . . . turned it inside out just like a dirty old cotton sock off my left foot. Had to play with the seam to get it straight, . . . but no biggee. That's why next time the bottom is the last thing going down. I've got some chrome brown leather left over from a pair of chaps, . . . probably gonna turn into a hand bag. May God bless, Dwight -
Need Advice On Special Purse
Dwight replied to Dwight's topic in Purses, Wallets, Belts and Miscellaneous Pocket Items
I was almost hoping no one would ask that question. I bought Eco Flo "all in one" by mistake, . . . thinking I was getting just the water base dye. Well,............. once I started putting it on, . . . I knew something was wrong, but could not stop as it was trying to dry and puddle even as I was working it. I had to take the glaze off it to undo some of the puddle spots, . . . then I used a conditioner as I had used thinner to deglaze. Needing to get some oil back into it, . . . I finally resorted to my old tried and true 50/50 beeswax and neatsfoot oil, . . . the belt and the trim strip atop the bag were finished in Resolene, so they would match. All in all it was a true test for me of my skills in fixing mistakes, . . . finding work arounds, etc. But it has the single most important part, . . . it is soft, supple, and feels good to the touch. I really dislike picking up a leather purse or wallet, . . . and it feels like a piece of Kydex or vinyl in your hands. We're going to do Aussie wax on the next one May God bless, Dwight -
Need Advice On Special Purse
Dwight replied to Dwight's topic in Purses, Wallets, Belts and Miscellaneous Pocket Items
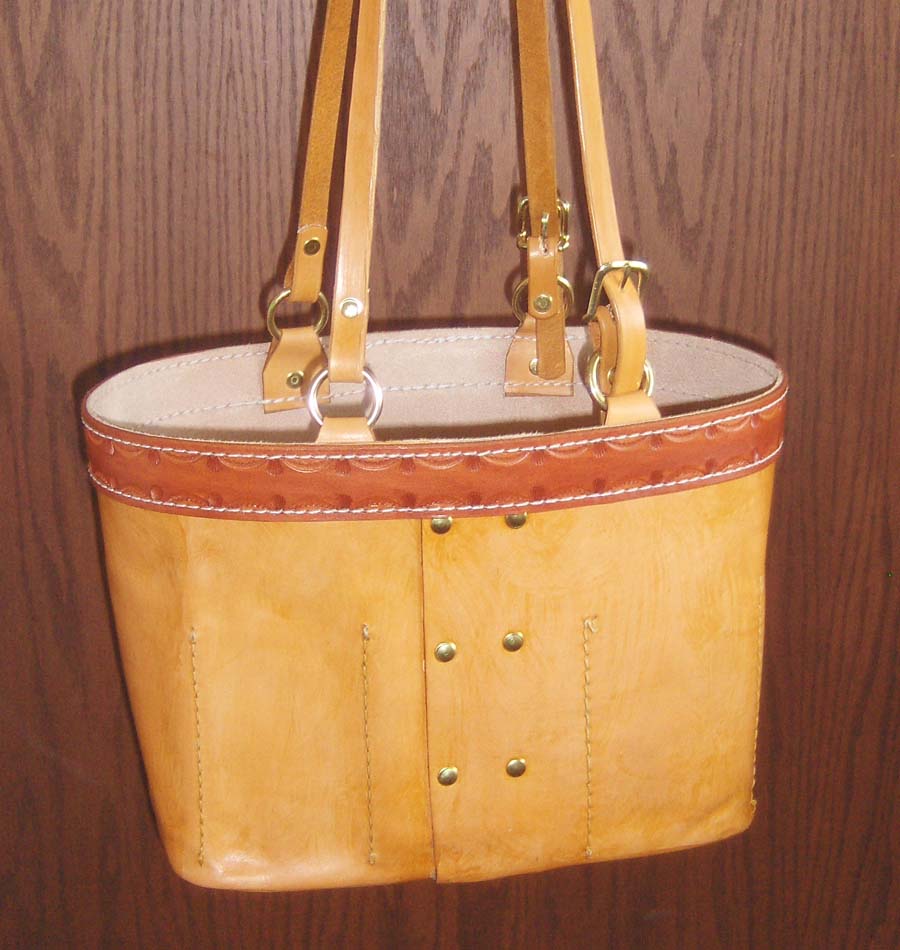
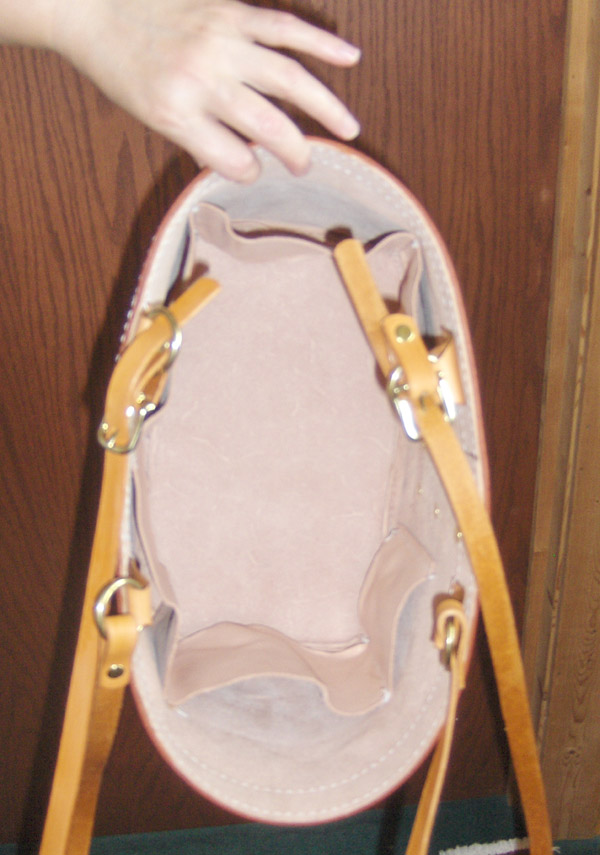
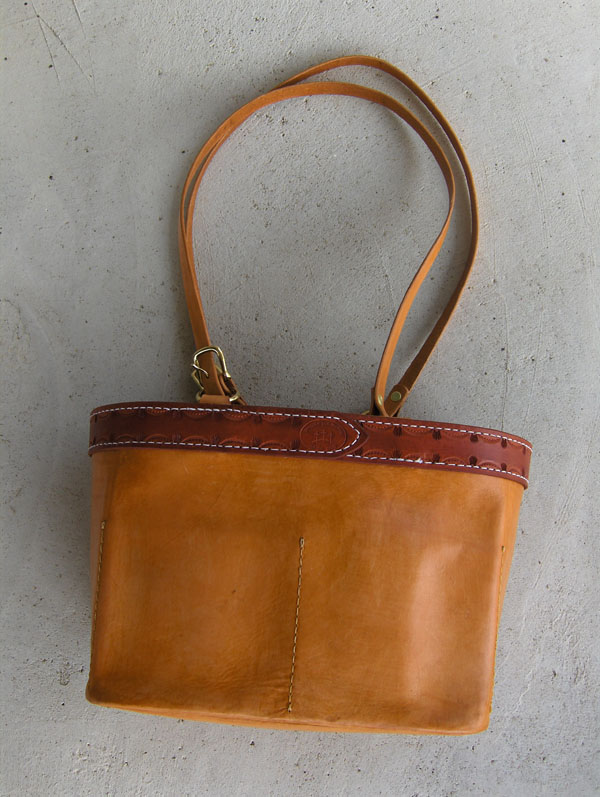
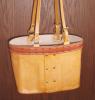
You are certainly welcome, Monica, . . . and yeah, . . . when I first saw them, . . . I had a "what the heck is this?" moment when I saw the stitch lines on the outside of the bag. Looking inside and seeing the little cubbyholes to stash stuff was THE decision maker for me. I'm very much a "practical" enthusiast, . . . do very little in "decoration" type stuff, . . . but this bag had to have something to make it beyond just a bag. That was the reason why I did the stamping on it. I use that particular set of stamps almost as a signature, . . . with the "Sunburst" color I devised, . . . it reminds me of the Arizona sun coming up over the mountains to the East. And I left the straps extra long, . . . and will take my hand punch to allow her to adjust the length to her liking. Anyway, . . . thanks for the good words, . . . glad you liked it. May God bless, Dwight -
Need Advice On Special Purse
Dwight replied to Dwight's topic in Purses, Wallets, Belts and Miscellaneous Pocket Items
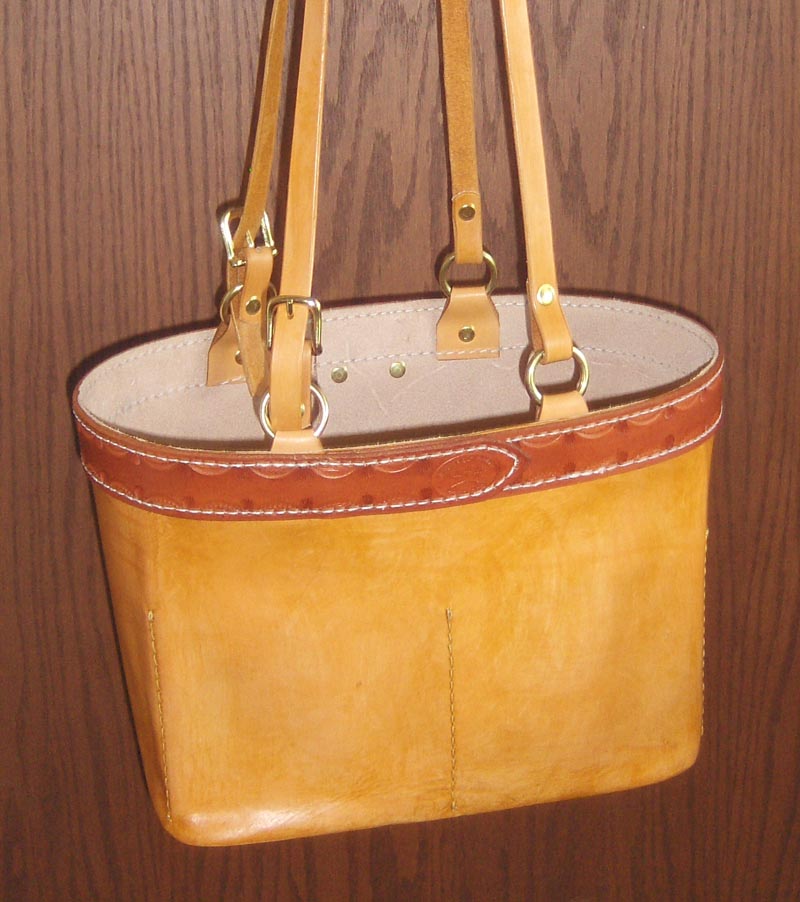
Well, Monica, . . . up close and in person, . . . the purse did not turn out as well as I had wanted. I had trouble with several items, . . . mostly of my own making, sad to say, . . . but leather working is kind of like fishing, . . . at the end of the day, they are either keepers or you pitch em back, . . . I'll keep this one. Especially since it is the first one like this I've ever done. The body is basically 3/4 veggie tan, . . . whole thing is sewn on a Boss, . . . 346 thread, . . . Desert Tan water base dye for the body, . . . British tan for the belts. Inside dividers are of the same 3/4 veggie tan, . . . belt is 7/8 veggie tan. The next one of these I do, . . . the bottom will be sewn on last, . . . that was my BIG mistake, . . . and I thought about it for a long while before i took the plunge, . . . Anyway, . . . a good learning experience. Thanks all for the good words and the encouragement. May God bless, Dwight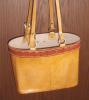

-
Need Advice On Special Purse
Dwight replied to Dwight's topic in Purses, Wallets, Belts and Miscellaneous Pocket Items
Well, . . . they're done, . . . his belt and her purse. There were a couple of things that didn't turn out the way I wanted them on the whole two projects, . . . but with all the help i got from you all, . . . I'm happy with how they turned out, . . . they'll get wrapped and given as wedding gifts to a very special couple. I figure with any luck at all, . . . the purse and the belt will both long out live me. Thanks again for everyone's input, . . . special thanks to Bondo Bob, . . . I was struggling with the "idea" until I hit that website, . . . her future mother in law said she would love anything even remotely close to those, . . . thanks again. May God bless, Dwight

-
I cheat, . . . not being steady handed, . . . and probably over caffeinated, . . . I take the color I am going to paint the letters, . . . and go buy a very sharp pointed "Sharpie" of that color (or as close as I can get), . . . and use it to outline the inside of the letters. That gives me a much wider area to come up against with my brush full of paint, . . . and depending on what you are desiring for a finished product, . . . sharpies do a pretty fair job all on their own, . . . Yeah, . . . I'm lazy too, . . . but you know how it is said: Necessity is the mother of invention, but laziness fueled the imagination. May God bless, Dwight
-
Question About Finishing Leather
Dwight replied to jdmracer12's topic in Gun Holsters, Rifle Slings and Knife Sheathes
One of my favorite finishes is a mix of bees wax and neatsfoot oil. It makes a cake like product that you can rub on,. . . kinda treat it like Kiwi shoe polish, Works like a champ in my book, . . . my cowboy rig is done in it, . . . as well as my daily use cell phone holder. May God bless, Dwight -
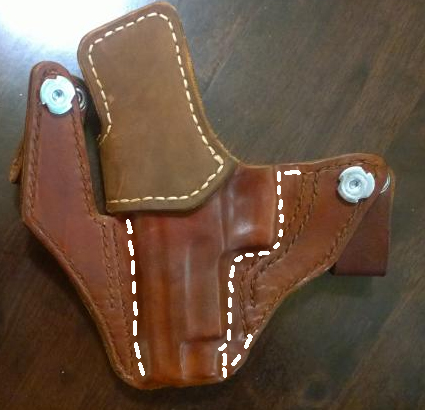
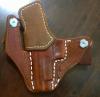
1. I don't know if you carry or not, . . . I do, . . . have for years, . . . anything but a FLAT backed holster becomes a rubbing point for me and for others I know of. I carry a full size all steel 1911, . . . and used to carry a .45 cal XD double stack, . . . IWB, . . . never a problem with the flat back, . . . all others beget sore spots. You sew the front down, . . . wet the front leather, . . . lay the gun down on it, . . . mold the gun, . . . let it dry, . . . sew the back side. 2. See the enclosed picture for the stitching. If the weapon is not hard to fit into an already sewn holster, . . . it is too loose to begin with is a fairly good rule. Once you branch out to pancakes, . . . especially without thumb breaks or suicide straps, . . . they have to be close fitting, . . . well molded, . . . and sewing close is pretty much THE key to making that happen. Loose stitches or excess leather between gun and stitches will allow it to open up, . . . and again become a bag instead of a holster. 4. See previous post Anyway, . . . keep at it, . . . you're on the right track. May God bless, Dwight
-
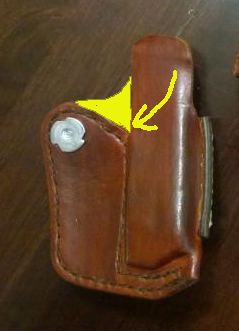
I don't know how to explain how it does it, . . . experience taught me it does do it. #4 created a sharp valley, . . . which I have found become problem areas. All I was suggesting is that you get away from doing that. I tried to modify part of the picture so it explains it better, . . . I would have followed the track around the yellow insert. May God bless, Dwight

-
Several things come to mind, . . . but first, . . . as a beginner, . . . you are doing pretty good. 1. For IWB holsters, . . . it is FAR more comfortable for the wearer if the mag holder and holster have a flat back touching the wearer. Yours both have lumps of the mag and the handgun digging into the wearer. 2. Your stitch lines are in the wrong places around the weapon. Pull both in much closer, . . . and follow the outline. The rear stitches behind the trigger guard really won't help hold the weapon in place. You will get away with this one because it is an IWB, . . . but if this was worn as a pancake, . . . outside the belt, . . . the holster would open up in short order and become more of a bag on his belt than a form fitting holster. 3. On both of the reinforcement pieces, . . . lose the sharp points. I know it looks cool, . . . but leather and sharp points will always be at odds with each other. The point gets soft and raggedy in short order, . . . begins to look like a piece of a paint brush hanging off the corner. 4. On the mag holder, . . . there is a valley between the loop and the mag, . . . cut your leather in an upswept arc, . . . never a valley. That becomes a weak point in the item. 5. I also never put the nuts on the back side of the holster. People who sweat profusely (I am one that does) will very quickly find great big ugly rust spots on their inside garments, . . . rust spots that in many cases will not wash out. Two or three really nice shirts, . . . ruined by 50 cents worth of cheap metal, . . . can ruin the whole experience, . . . and give your holster business a bad name really quick. But, . . . your first project is a whole lot better than my first one, . . . keep trying, . . . keep learning. May God bless, Dwight
-
There is always a "first time" for everything, . . . but I've never had much trouble with contact cement in cementing leather together. When I do, I simply add another light coat to the side that is causing difficulty. BUT, . . . I only use the contact cement to hold it while I'm manipulating it, . . . cutting it, . . . sanding it, . . . etc. The stitches and/or rivets are what I rely on to hold it together. Try a couple of pieces of scrap, . . . that will answer your question. May God bless, Dwight
-
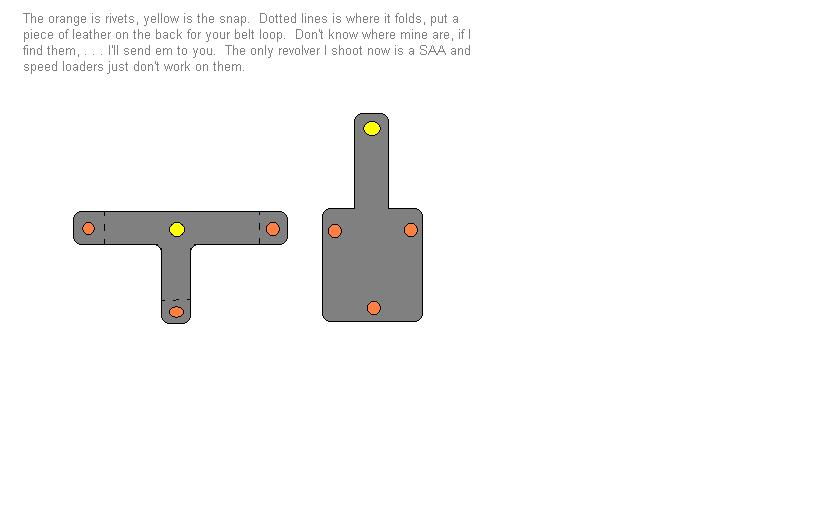
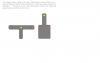
Mike, . . . I don't have a "pattern" but the ones I used to have were shaped like the enclosed. Not hard to make, . . . May God bless, Dwight
-
Never heard of such a thing, . . . but then again, . . . only been messing with leather for some 40 years. May God bless, Dwight
-
I don't remember the DOS command, . . . but there was one similar, . . . that's where I learned it, . . . back in the days of 5 1/4 inch floppy drives and Win 3.0,............ May God bless, Dwight
-
On regular use, . . . unless it is really humid, . . . Resolene coated items can usually be handled in 8 hours with no ill effects. For white stitching, . . . I let it go till 24. As a side note, . . . it has been quite some time since I got an order for a black belt with white stitching. Got one yesterday, . . . came home and found this conversation. Sometimes the events of this life somehow seem too characteristically interwoven. May God bless, Dwight
-
Back when we had 40 meg hard drives, . . . or paid $175 for one of those huge 80 meg ones, . . . I routinely went through my total of 120 megs in a similar fashion as I showed earlier. I would whack anything in a doc, xls, jpg, bmp, or other familiar extensions, . . . if it was a duplicate or if I knew it would not ever be needed again. Sometimes it did wonders for me, . . . sometimes I wondered what the heck I just did. Thankfully, . . . with today's hard drives having such great capabilities, . . . I just don't bother any more, . . . (BUT, . . . I have really learned how to use the "search" function). Please do take to heart the good advice Billybop gave you about not whacking those you don't know. You can also go over to the column marked "Size", . . . double click on it, . . . it'll bring the "big" files to the top and you can see what is hogging all your HD space if that is a problem. May God bless, Dwight
-
On your Windows start button there is a search function (or "find", . . . depending on your version). Get the little dog up on the screen by following the prompt. In the parameter window type *.* and hit "enter". Go get a cup of coffee and maybe a couple doughnuts as this will take a few minutes at least. When it is done, . . . go to your "view" tab and select details, . . . double click the "name" column, . . . it sorts alphabetically, . . . and you can spend the next few hours perusing down that list to get rid of all your duplicates. Or, . . . you can buy a bigger hard drive, . . . and do like me, . . . not worry or care about duplicates. May God bless, Dwight
-
Let me jump in and tag this so I can get the information too, . . . between us we have 4 saddles needing some serious help. May God bless, Dwight
-
Lots Of Questions About Tooling/forming Leather
Dwight replied to niteshiftfromkc's topic in How Do I Do That?
The basic answer is similar to the speed / power question. Which can you have? Either, . . . but only one, . . . which do you want? Same goes for wet forming around a shape, . . . and stamping/tooling. You can have one for sure, . . . but the other will suffer at least, . . . and you may not be able to get it at all. That would be my answer for tooling then bending & forming a shot shell holder. Ain't gonna happen. The tooling requires an almost dry surface, . . . wet molding requires a far greater wetness, . . . all the fine details will be lost, . . . and mostly all you will have is the outlines and the cuts made by the swivel knife, . . . the rest will be severely damaged if not flat out ruined. May God bless, Dwight -
IF, . . . and again IF, . . . you buff that holster enough after you have dyed it and let it dry, . . . thoroughly, . . . completely, . . . like DRY, DRY, . . . you should then have a very bare minimum rub off. BUT, . . . you still want to seal it and finish it. SO, . . . cut, . . . glue, . . . wet form, . . . trim, . . . burnish, . . . dye, . . . DRY !!, . . . buff, . . . buff, . . . buff some more. Put a finish coat of 50/50 resolene and water on the holster, . . . let it DRY !!, . . . 24 hour minimum, . . . don't cheat !!! Then, . . . stitch it with your purdy white thread, . . . 346 or even 400 if you can get it, . . . after you get done with the stitching, . . . take a small paint brush and add a coat of resolene and water to the stitches, . . . blend it back onto the holster and wrap it around the edges. Makes a purdy, purdy, purdy holster. May God bless, Dwight
-
All I do is put the wax and the oil in a jar, . . . set it in my crock pot with enough water in it to float the jar of wax & oil, . . . and go find something to do for about a half hour. When I come back, . . . all is melted and run together, . . . so I grab the jar with a hot glove, . . . pour the contents into cupcake papers in a muffin pan, . . . let it harden up, . . . stack it up on the shelf. I use it almost like it was Kiwi shoe polish, . . . the same process will work for you. And yes, . . . it will darn near waterproof something. Makes a really nice finish. May God bless, Dwight
-
Cut the blank, . . . measure and punch the holes to make the blank the "right" length belt. Make the belt keeper. Now all mine are 2 layer belts, . . . so this is where I glue the pieces together, . . . sand the edges, . . . run my #4 edger down both sides, . . . stitch groove the thing, . . . then run it through my sewing machine. Dye with Feibings pro oil dye, . . . cut 50/50 with Feibing thinner, . . . let dry 24 hours, . . . buff off the extra pigment, . . . buff again, . . . buff again, . . . buff until a white face cloth will not show any appreciable pigment coming off. Burnish the edges real good, . . . apply a coat of 50/50 resolene and water, . . . OR, . . . apply a pre-blended 50/50 mixture (measured by weight) of virgin beeswax and neatsfoot oil, . . . The wax/oil mixture has to be put on by hand, . . . then hit with a heat gun on low, . . . melts the wax and helps it cling to the leather pores. THIS IS something you want to practice before putting on a finished product. See if you like it. Resolene will give you a more stiff belt, . . . wax/nfo a more supple belt. Then leave it over night and the next day, . . . polish it like you were getting ready for Captain's inspection. This is my workflow, . . . so to speak, . . . don't get any complaints, . . . so it must be working. May God bless, Dwight
-
Call To Holster Makers
Dwight replied to ericpetrosian's topic in Gun Holsters, Rifle Slings and Knife Sheathes
Red Cent, . . . bring your camp fire chair, . . . your root beer, . . . come on over, . . . I'll light the fire when you come in the driveway. Seriously, . . . I love a good conversation as well as the next guy, . . . but I've also learned that there are any number and/or percentage who feel they have to "defend" their way of doing something, their purchase, their ownership, . . . so depending on the subject, . . . sometimes I'll ask people (I have a question over on the purse section, . . . been there for a couple of weeks, . . . knowing someone on here has the answer), . . . but other times, . . . Google is my friend. I put something like "snake skin tanning" and got a couple of youtubes right out of the chute, . . . tough to beat that. But anyway, . . . I'm just glad we have both, . . . Google, . . . and this site, . . . May God bless, Dwight -
Yes, . . . absolutely, . . . provided: a) you did as Shooter McGavin suggested, . . . buffed all the loose dye off the project first, . . . and you really do have to put some muscle into getting it out or off the flesh side, . . . and you put on a proper coat or two of Resolene. I've read where folks just "dunk" it in Resolene, . . . shake it, . . . and consider it done. Simply stated, that has never worked for me, . . . I have to take a bristle brush and paint it on like I'm painting the holster. Then I brush it around, up, down, left, right, obliques each way, . . . beginning with a bit of a lather created by the brushing and adding of product, . . . and ending with all the little lather bubbles broken by my constant brushing. Once the lather is obtained, . . . don't add product, . . . just brush. When I use this technique, . . . mine don't bleed. May God bless, Dwight
-
First Gunfighter Stitch Belt
Dwight replied to Red Cent's topic in Gun Holsters, Rifle Slings and Knife Sheathes
Thanks, Camano, . . . Good job, Red Cent, . . . as before, . . . that is one of my favorite patterns. Been seeing it for over 50 years on belts, purses, and stuff. Can't say as I ever got tired of seeing it. May God bless, Dwight