Dwight
-
Posts
5,248 -
Joined
-
Last visited
Content Type
Profiles
Forums
Events
Blogs
Gallery
Store
Everything posted by Dwight
-
There are two schools on dye and the liner, . . . the A school dyes the whole belt (I'm there, . . . a "dip" dyer guy), . . . and the B school who leaves the liner natural. I personally like both ways, . . . but my process is easier for me & quicker, . . . otherwise, I too would be a B school guy. May God bless, Dwight
-
Look on Craigs list, . . . Ebay, . . . and used furniture stores, . . . don't forget yard sales. I've seen any number of super sewing machine tables given away to get rid of them, . . . in fact I have one in my living room that meets that criteria. You don't need castors, . . . you need 2 wheels about 3 inches in diameter. Put them on one end or the other only. Then tip up the other end and roll it where you want to leave it. If it is on 4 casters, you will have to buy the locking kind, . . . otherwise the thing will roll all over the place while you are trying to use it. The locking kind are in the neighborhood of 6 to 12 bucks EACH. With only two wheels, . . . the other end will hold it in place while you use it. May God bless, Dwight
-
As a soldier, I always carried my bayonet or kabar on my left suspender, . . . upside down, . . . Still carry my hunting knife that way, . . . I like the way you tucked it into the sheath with two straps, . . . if one fails, the other should catch it. May God bless, Dwight
-
Leather is no different from any other business. Go where your talents and interests lay. Above all, consider leather work as a custom business, . . . not a retail business. For now, . . . I would look to your buds from the renfair, . . . what would they need? What would they like? Also, you may put your work on Ebay, . . . I've sold several pieces through them, . . . all satisfied customers, . . . and, . . . uhhhh, . . . yeah, . . . I spent all the profit. Look for renfair forums, . . . showcase your work on them, . . . make sure folks know you are available to do work for them. You are already one leg up on most of us here, as we have other pursuits, . . . mine is holsters and gun belts for the concealed carry crowd. May God bless, Dwight
-

Newcomer Questions About Basic Tips For Armor Pieces
Dwight replied to NightWarp's topic in How Do I Do That?
My alter ego is as the Centurion of Capernaum and I had to make armor for "him". I used 12 oz vegetable tanned leather from Tandy's for the breast plate, back plate, cuffs, skirt, and shin guards. Vegetable tanned leather can be wetted and formed to just about any shape you would like (within reason) and armor works out real well with it. I first made a full sized replica of my upper body, . . . using a 6 foot 2 x 4 on a stand, . . . several pieces of 2 x 12 for the chest pieces, . . . took a smaller tee shirt, put it on the frame, . . . stuffed it full of old rags to get the "body shape" needed to make my armor fit me. You will need to be careful with the temperature, but in holster making, . . . you can make the leather "hard" by force drying it under heat. BUT, . . . remember that the MAXIMUM temperature is 130 degrees farenheight. An old fashioned trick that also works is to dip it in liquid parrafin or beeswax. Tricky, . . . but again it makes it very hard. I was fortunate when I was doing my armor to have a pretty good coach, . . . be sure to "round out" the neck and arm holes like the lip on a bowl, . . . it seriously prevents chafing, . . . and make sure the holes are big enough. Personally, . . . I go to Jo Ann's fabric and buy their naugahyde for patterns like this. Works really good I think. May God bless, Dwight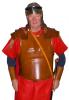
-
Which Edge Finishing Method For Shoulder Strap?
Dwight replied to zeroflight's topic in How Do I Do That?
I would suggest you simply stitch it up both sides (I'd do machine stitching as there is a LOT of sewing there) and burnish the edges just like it was a belt. That is how I did a rig for a friend of mine. He loved it, . . . still uses it in competition shooting. It had suspenders, a duty belt, pouches & sheathes, . . . all sewn and burnished where there were two layers or more. Non burnished edges look raggedy, unprofessional, . . . and as though they were imported by Walmart from west of Honolulu. May God bless, Dwight -
Use the searhc function built in to this site, . . . This is one result: http://leatherworker.net/forum/index.php?showtopic=49413&hl=snap#entry314544 May God bless, Dwight
-
Does Anyone Know How .... Bench Grinder To Burnisher?
Dwight replied to RoosterShooter's topic in Leather Tools
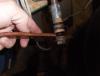
Here is how I did mine. If your motor is going too fast, there are speed controllers that would probably be a lot cheaper than a new motor. May God bless, Dwight
-
Marking Stitching Holes In Black Or Dark Leather
Dwight replied to biker55's topic in How Do I Do That?
Laugh if you will, . . . good old welders soap stone works pretty good too, . . . just have to have a piece of fine grit sandpaper close by to keep it sharp. May God bless, Dwight -
A Classic For A Classic.
Dwight replied to Lobo's topic in Gun Holsters, Rifle Slings and Knife Sheathes
Beautiful is the only word I know, . . . Both the gun and the holster. May God bless, Dwight -
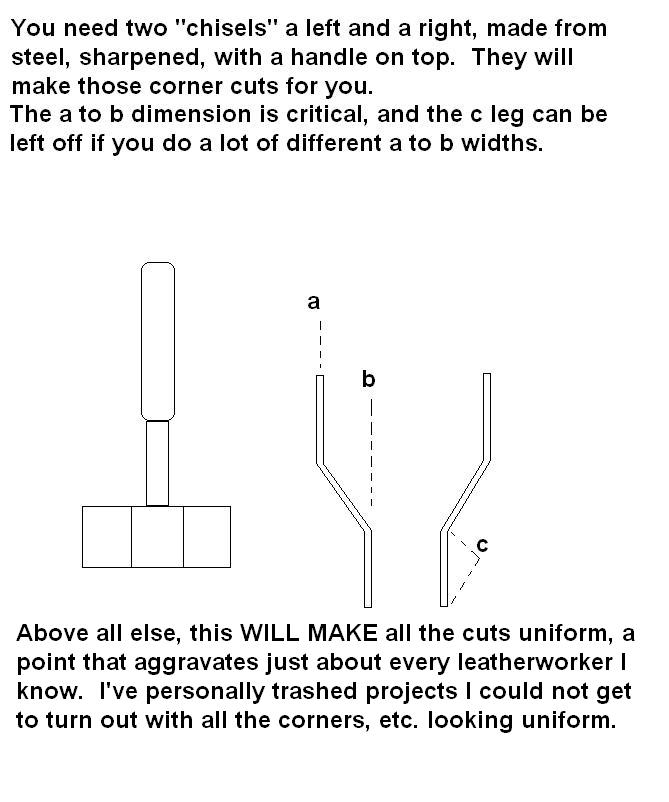
Ahhh, . . . uniformity, . . . "the lost chalice of leathermaking". Your problem is really a simple one and can be "fixed" rather easily if you have a real "craftsperson" among your friends and or acquaintances. Take a look at the drawing, this is what you will need. May God bless, Dwight

-
Vaalpens, . . . most of us have patterns that over time we have adjusted in such a manner that we can predict with serious accuracy where the stitch line needs to go. When we don't have that pattern, . . . we are forced to "form first - then stitch". I also do that to every gun holster that I don't have a really good pattern for. Stitching first is a shot in the dark, . . . that usually is not to my standards. Try forming it first, . . . letting it dry, . . . testing the fit, . . . then stitching. May God bless, Dwight
-
It is easy to make anything "two sided" exactly the same: cut off either the left half, the right half, the top half or the bottom half (depending on the pattern) and decide which one is the best. Turn it over on it's back, . . . and outline the other half with it. I learned this trick making sewn leather suspenders, . . . one side fit and looked "right" the other didn't. Pitched the bad side and re-traced it with the good side, . . . works every time now. The other "secret" to good patterns is using a rigid pattern material. The best I have found so far, is called "bag stiffener" and is sold by Tandy. Cuts easy, . . . almost impossible to tear it, . . . edges don't fray, . . . and you can lay it down and trace it with a pencil, scribe, ball point pen, . . . whatever you want to use. May God bless, Dwight
-
Although I would never have one in my personal stable, . . . Glock 19 and Glock 21 are both fairly popular in Central Ohio. May God bless, Dwight
-
Some Recent Holster Work
Dwight replied to SooperJake's topic in Gun Holsters, Rifle Slings and Knife Sheathes
Now that's some good looking work. Just goes to show the old adage, . . . practice makes perfect. Are you doing any good with your "business plan" now that Wisconsin came around to being a concealed carry state? May God bless, Dwight -
I was thinking I saw a post from him a week or two ago, . . . probably down in the holster section, . . . can't find it though. May God bless, Dwight
-
Second 1911 Holster
Dwight replied to drummingpariah's topic in Gun Holsters, Rifle Slings and Knife Sheathes
I've made a couple similar to this, . . . so here's how I would do it; You'll need a piece of vegetable tanned leather about 24 inches long and about 14 inches wide. See the drawing for a rough idea of the pattern. This is a "Somewhat Rhodesian" pattern and only has two stitch lines, . . . both perfectly straight. Fact is, if you allow enough leather, . . . you can do the whole thing with rivets. Leave the bottom open, . . . about 3/4 of an inch below the muzzle of the gun. The gun will lay in the holster, supported by the top edge just in front of the rear sight, and the handle, just behind the trigger guard. Take your time, . . . make a pattern first out of manila folders and masking tape, . . . cut your leather large enough that you can trim back to the right size (cutting it down is easy, . . . making it bigger is a real challenge). Contact cement the front sewing line and the sew line where you make the belt loop. Also, . . . get in the habit of never making hard, . . . sharp, . . . square corners in leather working. 1: they booger up real quick, look like UGH !, and are a real pain to sew around most of the time. Also an inside square corner is an open invitation for the leather to break right there. Make all your corners rounded, . . . inside corners and outside corners. That also aids in the final edge burnishing and finishing of the holster so it looks really nice. (Edit: In the drawing, I mentioned only one sewing line, . . . there are 2, . . . my mistake, . . . belt loop and front of the holster). May God bless, Dwight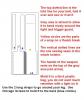
-
How Do I Cut A Beveled Border Like The One Here?
Dwight replied to SouthernCross's topic in How Do I Do That?
I would probably use a spoon modeling tool, . . . that bevel is going to go bye-bye when the border is stamped anyway, . . . so it really is not critical as to what tool is used. May God bless, Dwight -
Charles, . . . the effort needed to sew would be similar to the effort needed to pull up a 43 inch venetian blind (the size of mine). That is the down stroke, . . . there is virtually no effort to the up stroke. AND, . . . if you have a friend who is mechanically inclined, . . . it would be no trick at all to put a small air cylinder on the arm, . . . you could make it work with a pedal. I'm actually thinking about doing that to mine, . . . but I have to wait until my new shop is built. We just put the poles in the ground a week ago. For what it is worth, . . . I'm 68 yrs old, . . . have had some arthritic problems, . . . but I can still knock out a 44 inch belt (at 5 stitches per inch) in about 20 minutes. That is just shy of 500 individual stitches, . . . works out to about 25 stitches per minute average. May God bless, Dwight
-
My belts are generally .160 to .230 in thickness, . . . sometimes both layers are the same thickness, . . . sometimes not, . . . no hard and fast rule there due to the variations of leather thickness from all suppliers. I try to make the longer ones with the thicker overall, . . . makes a longer lasting product IMHO. I cut one piece, . . . turn and cut the other piece right then and there, . . . knowing both are EXACTLY the same width. No curves. Cut, . . . glue, . . . sand, . . . bevel, . . . sew / dye (for dark thread), . . . dye / sew (for white thread), . . . finish. May God bless, Dwight
-
Most of the saddle work I've done has not involved stitching with a machine, . . . but I did have a guy bring me a really pretty (but old) award saddle he had gotten back in the late 60's / early 70's. He wanted me to stitch up the tear in his wool on the skirts. It was shot, way beyond any repair, . . . just falling apart. I removed the skirts, . . . took off the old wool, . . . pulled out the old stitches (talking about tired fingers,.............ohhhh,......) and glued in the new stuff. My Tippmann just "happened" to be set perfectly for the stitch length to sew that wool back on, . . . trimmed it up afterwards, . . . he was as happy as a Easter Bunny on Sunday morning. Wish I could be more help, . . . but that's about all I got, . . . far as horse tack is concerned. I regularly sew 2 7's or 2 8's together making belts and sometimes 4 5/s plus when doing a holster that is lined. May God bless, Dwight
-
I'll be number 3 to say I like mine. I've had it several years, . . . been to the shop twice, . . . easy fix for them both times, . . . Ben is as good a phone tech rep as you will possibly get, . . . and he speaks fluent English (just a little friendly sarcasm there folks). I do belts with it, . . . dog collars, . . . holsters, . . . knife sheaths, . . . gun bags, . . . sandals, . . . armor, . . . chaps are a challenge but they can be done. May God bless, Dwight
-
The product at Tandy's is aptly named: Bag Stiffener. May God bless, Dwight
-
About Vacuum Forming
Dwight replied to Dwight's topic in Gun Holsters, Rifle Slings and Knife Sheathes
Sorry to be the bearer of bad news, . . . but detail forming a stamped / tooled / carved piece, . . . for the most part, . . . just does not work. The press or the vacuum bag will distort the tooling, . . . and there just isn't much that can be done about it. You can tool, . . . form, . . . and as it is just about dried from forming, . . . take your tools and "touch up" your tooling, . . . but it will not be as good as it was before you formed it. If I had a customer who demanded and was willing to pay the extra labor, . . . I'd make sure he knew he was paying for two toolings and it may not be to his total satisfaction. And I would definitely use the vacuum bag method. A press will work over your tooling like a 2 year old in the chocolate frosting with his fingers. May God bless, Dwight -
For that project, . . . I would invest in some soft garment leather: elk, deer, fake deer, goat, lamb, . . . they can be very soft, . . . easily cleaned with a wet rag, . . . and should not scratch your lenses. As said earlier, . . . contact cement the two together, . . . flesh side to flesh side, . . . leave extra around on the lining, . . . sew, . . . then trim (is how I would do it). May God bless, Dwight