-
Posts
5,257 -
Joined
-
Last visited
Content Type
Profiles
Forums
Events
Blogs
Gallery
Store
Everything posted by Dwight
-
Leather breathes, . . . and if water gets in it, . . . eventually it will dry out. Some synthetics can hold water and cause the knife to rust. Seeing the client is looking to protect his knife, . . . kydex is the best choice for THAT, . . . even if you cannot sew it. AND, . . . it can be riveted with only a few rivets. May God bless, Dwight
- 15 replies
-
- synthetic
- knife sheath
-
(and 2 more)
Tagged with:
-
Kydex would be my first choice, . . . I don't like working with it, . . . but it makes a good product when it is done. May God bless, Dwight
- 15 replies
-
- synthetic
- knife sheath
-
(and 2 more)
Tagged with:
-

Is conditioning necessary
Dwight replied to DaveP's topic in Dyes, Antiques, Stains, Glues, Waxes, Finishes and Conditioners.
Fredk's experience has not been the same as mine. Resolene is an acrylic finish, . . . in a common word, . . . plastic. If it is applied correctly, . . . it will totally cover and encapsulate the product. Think of putting something in a plastic bottle, . . . sealing it up, . . . then try to get it wet or dry, . . . See the problem??? If you want to condition and have it work 99% of the time like it should, . . . when you cut your blanks, . . . or at the latest when the item is getting ready for dye, . . . give it a light coat of neatsfoot oil with a bristle brush, . . . I only coat the hair side if I can reach it, . . . if not, where I cannot, I'll coat the flesh side, . . . but it is done sparingly because the flesh side will soak up the oil really quick and will take a lot of it. This will also tend to smooth out the color of especially light browns like Feibings Saddle tan. May God bless, Dwight -
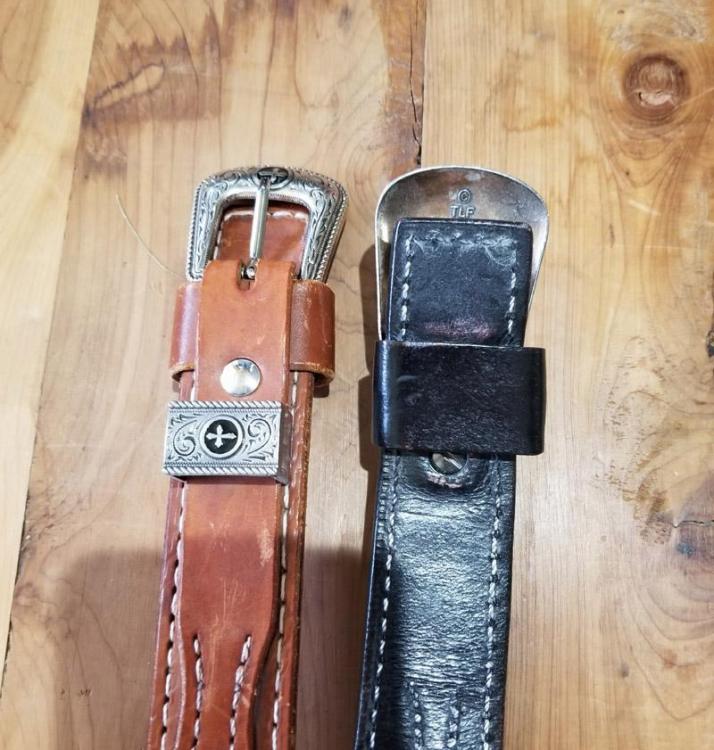
Here is my brown one and my black one. The pictures probably tell you ore about it than I could write in a week. May God bless, Dwight
-
I'm with Frodo, . . . two layers of 7/8 oz, . . . sometimes I'll shave one down so that the overall thickness is .200 or so. As far as the overlap, . . . you want the piece in your right hand to go under the part in your left hand, . . . and slip into a loop on the back of the belt, . . . so it stays even when you cinch it up. Cheap skates making Ranger belts leave the loop off of the back thinking they are saving something, . . . and it ruins the whole look of the belt if the wearer has it in the first or second hole. Looks like a leather tow rope holding his gut in. May God bless, Dwight
-

Why the Rabbit Ears
Dwight replied to LiftPig's topic in Gun Holsters, Rifle Slings and Knife Sheathes
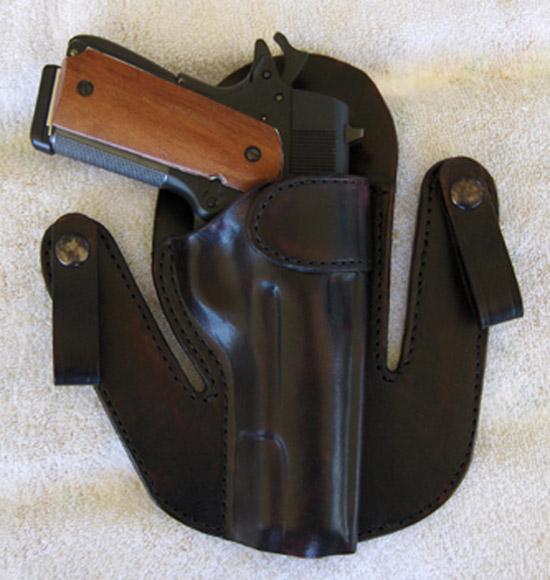
Actually the loops and the belt are a very small part of the picture. They are much more for allowing the holster to be hidden by tucking in the shirt around the holster. May God bless, Dwight -
I kept trying to figure out why my sound wasn't working. One way or another, . . . I kinda shut it down in the late evening when the Mrs is in bed, . . . thought I'd really done it this time, . . . Finally figured there must not be a sound track. Anyway, . . . I figured it out without the play by play. Thanks, may God bless, Dwight
-
Ummm, . . . no sound . . . May God bless, Dwight
-
John Bianchi, . . . professional holster maker of some 60 years or so, . . . often used a bath of neatsfoot oil to finish his holsters, . . . and nothing else. He did a set of VHS videos featuring a western rig and it was done that way, . . . I like it myself sometimes. Otherwise, . . . Resolene is my finish of choice. May God bless, Dwight
-
Tandy sells acrylics that have always done good for the few projects I've painted. Just remember, . . . nothing painted will always stay pristine, . . . I always go over my paint work with Resolene, . . . and I go over the painted part a couple extra times to protect the art work. Sadly, . . . using the leather object will eventually wear the finish, . . . and can wear it off the inside. In the case of a clutch purse, . . . holster, . . . or other such piece, . . . it can get wet from the inside, . . . but unless it gets fully soaked, you will usually be alright, . . . the finish itself tending to try to retain the shape. Personally, . . . I always seal the whole project, . . . inside and out, . . . and Resolene is my product of choice. EDIT: The one exception to sealing the inside is if I use a soft liner such as suede or pigskin. May God bless, Dwight
-
If we lived close enough we could make a good living together, . . . I'd sew, . . . you'ld tool, . . . and we'd share the profits. Seriously, . . . really good looking work, . . . far, far beyond my present or anticipated skill level. Making holsters, . . . CCW belts, . . . that's my game. May God bless, Dwight
-
I use a 1 inch wide Harbor Freight bristle brush, . . . they're about 50 cents each there. Never had a problem in over 15 years. May God bless, Dwight
-
Mark, . . . do yourself a favor and when you remake this, . . . undercut the back side below the mag ejector button, . . . other paddle holsters as well as yours, . . . are only a nudge away from a lost mag, . . . tuning your fine firearm into a single shot. Mine did that to me one time when a coon was robbing my hen house. I learned a valuable lesson about holsters that day. May God bless, Dwight
-
Not sure what you are attempting here, . . . Resolene is a FINAL, . . . LAST THING product. It is the cherry you put on top of a hot fudge sundae. There is no way it can take dye off a product that has been properly dyed and finished. May God bless, Dwight
-
The same black grease I use on my tractor, mower, chain saw, etc. works fine on my Boss, . . . has for almost 15 years. When I don't have black, . . . the brown stuff fills the bill. May God bless, Dwight
-

Getting started with leatherwork suggestions?
Dwight replied to ElectricZombie's topic in How Do I Do That?
The first thing you need to decide, . . . what do you want to do with leather. The people making high end leather vests would not know most of the time where to start with a saddle. Many holster and belt makers would have a tough time doing a really nice ladies' purse. Determine what product you want to produce, . . . go to a local Tandy store, . . . tell them, . . . let them give you some good advice. May God bless, Dwight -

Advice needed for sheath
Dwight replied to DaveP's topic in Gun Holsters, Rifle Slings and Knife Sheathes
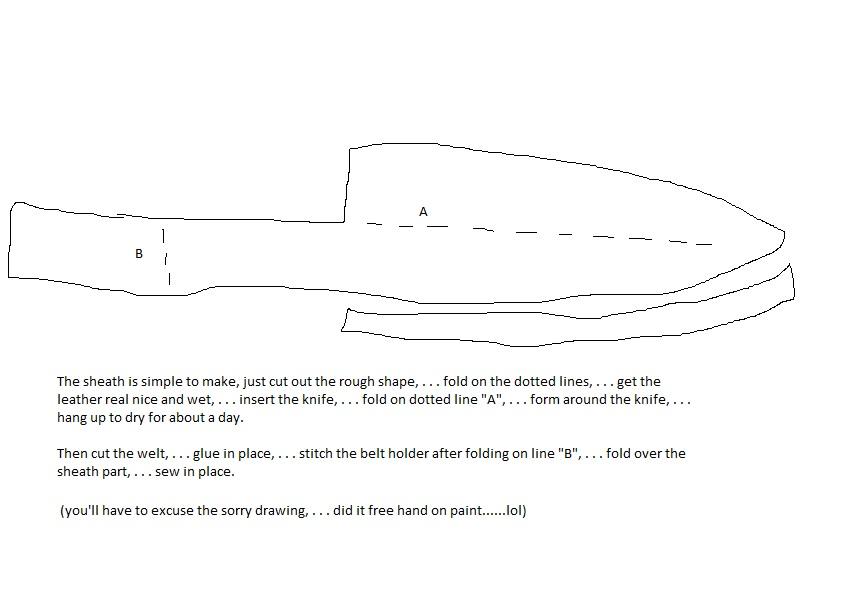
I like wrapped sheaths, . . . with a welt to protect the stitches, . . . looks like it would work for all three of em. Nice part about wrapped sheaths, . . . you can do it in two pieces, . . . the sheath and the welt, . . . May God bless, Dwight -
A friend had a pair of suspenders with these to protect the leather seats in his Mustang, . . . the others scratched the seats badly. He loves em, . . . so I made a pair, . . . mine are 1 inch wide, . . . no elastic, . . . and I have no problem at all with them. They are really comfortable, . . . but if I decide to re do them some day, I'll make them 1 1/2 inches wide, . . . as I have others that are just a tad more comfortable with the wider width. Mine were made with embossed veggie tan that looks like gator leather. May God bless, Dwight
-
Look up on the top of the screen to the right, . . . little envelope, . . . you have a PM there. May God bless, Dwight
-
I feel for you my friend, . . . as I often have the same problem with work gloves. And, no to akguy59, . . . larger gloves become more of a liability because your hand slides around in them. I mostly just soaked the gloves in warm, . . . almost hot, . . . water, . . . then wore them until they dried out. That usually cured the problem. But if you are sure you want to do this, . . . cut the seam going down the pinky finger, . . . then turn most of the glove inside out, . . . that should give you a flat surface so that you can put the patch over there where you want it. Make sure you glue it down with contact cement first. May God bless, Dwight
-
As above, . . . thank you for your efforts and information. May God bless, Dwight
-
If you have never done a belt before, . . . you need to carefully measure the length you need, . . . by taking a belt worn by the customer, . . . measuring from the front edge of the buckle, . . . back to the most used hole. That is your belt length. I punch 7 holes in the belts I make, . . . so when I get to this point, . . . I will later mark that as the middle hole length. Then you work the end for the buckle, . . . do you have a pattern or template for that?? Do you also have a pattern or template for the tongue end?? When I cut the belt blanks, . . . I actually "need" right at 9 inches beyond the measurement for the belt length. I will cut 10 or 12 inches over, . . . just in case there is a flaw or something I need to work around. I make the outside piece, . . . and do whatever decorations are necessary, . . . I then lay the liner down on the belt with the buckle end folded over like it would be to put the buckle on, . . . measure and cut the liner. I use Weldwood contact cement to put the two pieces together, . . . Once they are together, . . . I even up the edges all around with a belt sander. Stitch the two pieces together, . . . bevel and burnish the edges, . . . punch the 7 holes at the tongue end, . . . dye, . . . finish May God bless, Dwight
-

Dual SA Cowboy Rig
Dwight replied to MLGilbert's topic in Gun Holsters, Rifle Slings and Knife Sheathes
Yep . . . good lookin rig, . . . Go in hock, . . . get that other pistola, . . . it's worth it, . . . May God bless, Dwight -
I make and sell my CCW belts by cutting two consecutive strips 1 1/2 inches wide from 7/8 oz veg tan leather, . . . glue em together, . . . sand the sides smooth, . . . stitch the edges, . . . punch the holes, . . . dye and finish, . . . put on a buckle, . . . send it to my customer. That's the way I do it. May God bless, Dwight


