


RockyAussie
-
Posts
3,265 -
Joined
-
Last visited
Content Type
Profiles
Forums
Events
Blogs
Gallery
Everything posted by RockyAussie
-

my leather shop shut down by quality control
RockyAussie replied to Frodo's topic in All About Us and Off Topic
That is one serious lookin cat look your gettin there Frodo. -
Yep...I saw that as well but dammed if I could find it either. It looked like a good set up and I stalled on making one up. I hope someone else knows where it is.
-
How to do a lining for a weekender bag?
RockyAussie replied to panchoskywalker's topic in How Do I Do That?
Could you not glue the lining down at the ends in the base when you put it in place? Another solution if you prefer is to make a separate drop in base piece to cover the bottom. Like as in this one which is a sloppy bag - Thanks mate...last I looked you were doin pretty good yourself.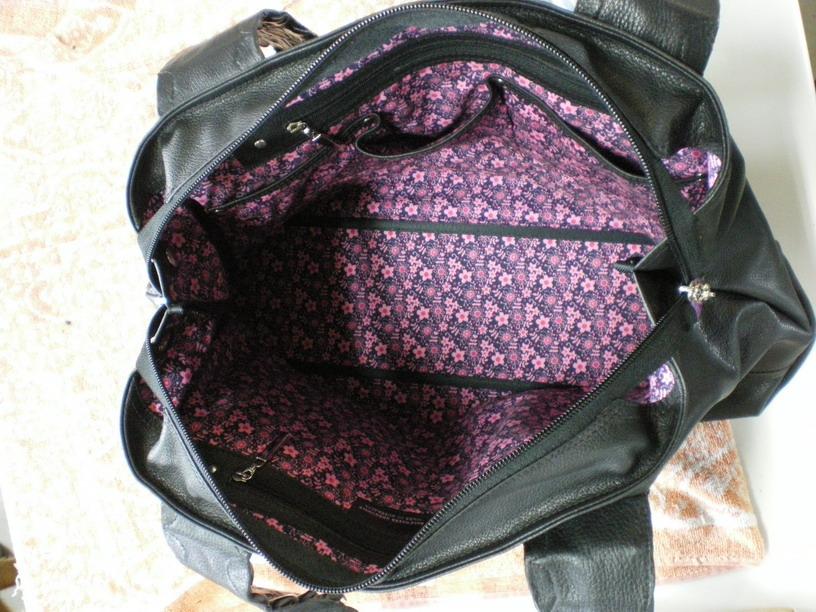
-
How long does it take you to finish an item with painted edges
RockyAussie replied to Spyros's topic in How Do I Do That?
Depending on the level of finishing you are after it can be very time consuming. Several coats with sanding or ironing in between are normal and thin coats dry faster and don't drip and dry pretty quick. Some thin jobs can be done with one layer and a quick iron and polish. Sanding yes but not burnishing as this can stop the paint from adhering to the job well and can just peel off in a long strip. Been there done that. -
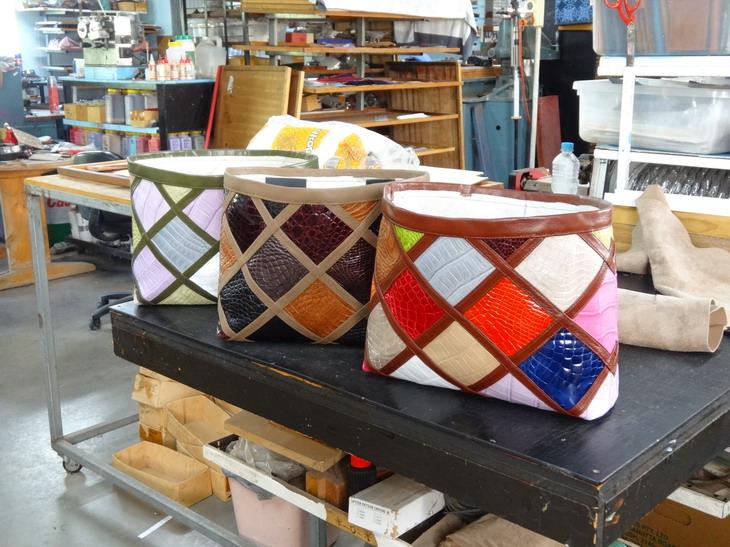
How to do a lining for a weekender bag?
RockyAussie replied to panchoskywalker's topic in How Do I Do That?
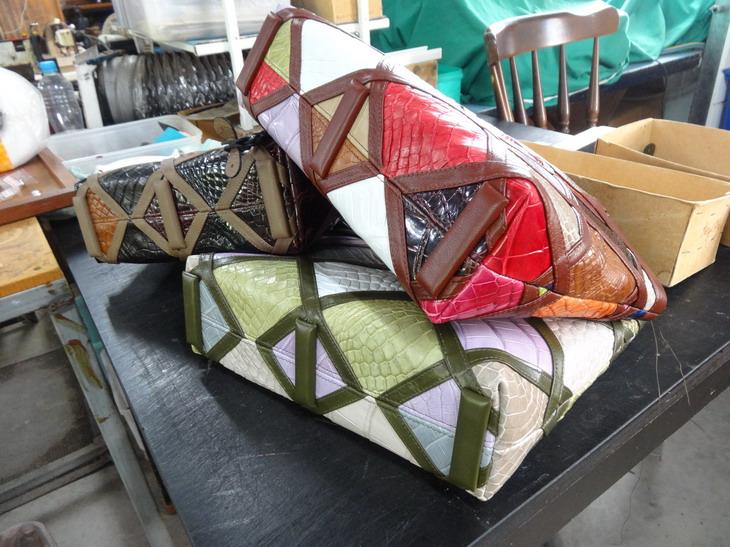
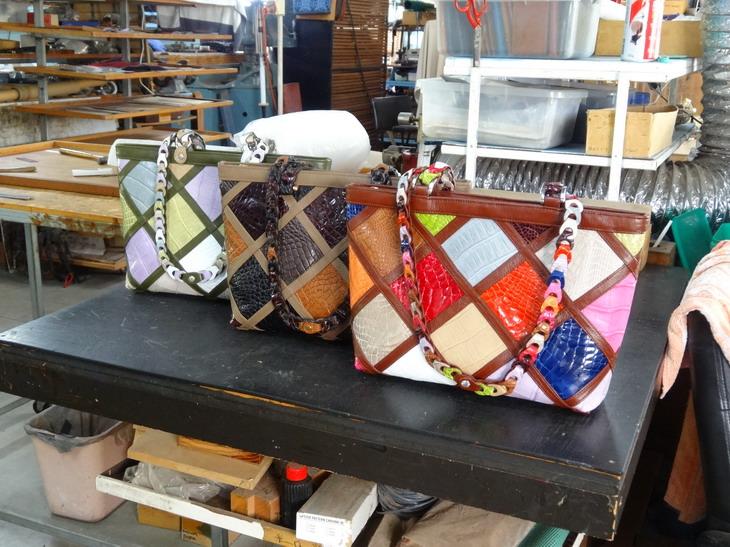
I can not say for sure how she has done the full job but I would think that what you may want to consider is using a thin foam to lend a flexible support to the shape of your bag. We do this very commonly on many of the bags we make here. I don't have any ideal pictures to show but this one here showing some patchwork tote bags being made should help. Note this picture shows the bag before the lining is installed and is able to stand up firmly with the foam support glued in. We usually just spray glue the foam to the outer skin.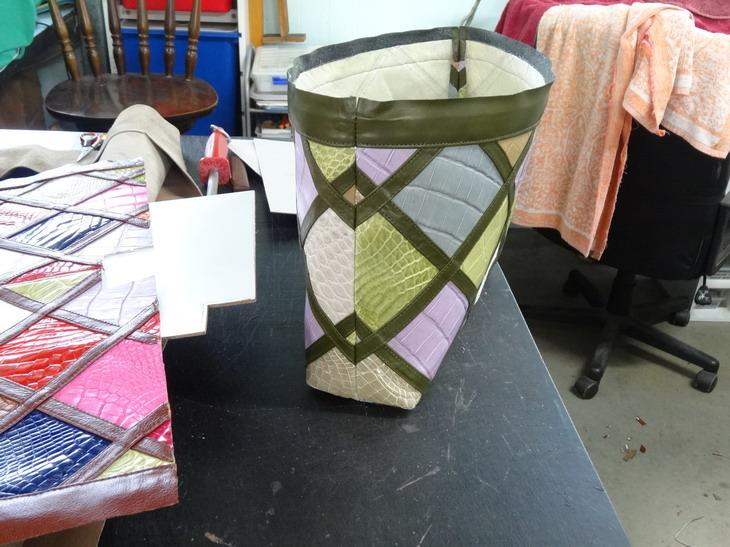
-
Well ...at least one of them. Great build, but I guess you you may be right handed or leggered?
-
Prusa 3D Printer Heated Bed Sheet Mileage Replacement
RockyAussie replied to kgg's topic in 3D Printers and Lasers
For what is worth.... I have never had to use tape or glue or any other medium to get a good adhesion on a print. I have always used either glass or mirror and the only problem I have had at times is getting the print to come off without taking a chip of glass with it. This is rare thankfully. I always give my bed a spray with isopropyl alcohol and wipe it in. What I use when I wipe it in does have an effect on the adhesion. Some toilet paper must have more of a starch or something in it and if I use it, it stick like s..t to a blanket and may make it very difficult to get the print off. If I use a chuck cloth instead then the adhesion is way less. @jimi I would try playing with my z height on the first layer until you can get a better connection between your lines. If it looks thin and a bit transparent you are way too close and stand the risk of blocking the nozzle, if it looks like it is full and high then you are asking for adhesion problems for sure along with a rough finish at the end. A little while back in the paint section at our local hardware store I found this very thin and cheap springy scraper tool . I sharpened the front edge and rounded off one corner and I have found it to be the best by far for prying in under a print job to get it off without any damage. -
I forgot to mention ...If you chase down a shoe repair supplier down there called J.A.Brooks there could be someone there could help.
-
AH HA I never knew that. I still have several of the Esto machines myself including the master finishing machines that I use every day nearly. I think the trimmer in the above picture is called a rough rounder from memory. I have one of those as well and thankfully in a bit better condition. Thanks for sharing.
-
Gregg of Keystone Sewing Machine
RockyAussie replied to CowboyBob's topic in Leather Sewing Machines
Very sorry to hear this and I wish his family and friends the highest of condolences. -
This video by @Uwe is one of the best assets to have if you have one of these machines.
-
CB 105 forward reverse stitch length dont match
RockyAussie replied to RockyAussie's topic in Leather Sewing Machines
True perhaps if only one adjustment were done. I did 2 as shown in the attached pdf file. This file should help I think. I will do a video on it to show the process better. Cowboy CB 105 Forward and reverse stitch length adjustments.pdfCowboy CB 105 Forward and reverse stitch length adjustments.pdf -
CB 105 forward reverse stitch length dont match
RockyAussie replied to RockyAussie's topic in Leather Sewing Machines
Its alright I worked it out. I had 4 stitches to the inch going forward and 6 going back before. I now have 3 stitches to the inch forward and 3 going back. The seller had been told by a dealer that it was not possible to adjust and I was bluffed for a bit I guess. Turns out it was a pretty simple adjustment in the end so if you need to know ......let me know and I will put up some pics and instructions. -
Is it possible to adjust the difference in stitch length to get more equal between forward and reverse on a CB 105? The reverse is a lot shorter than the forward and I doubt spacing out/wedging the front plate would be enough and would come at the cost of a lot of reduction in the forward stitch length by going that way if even possible. Thanks for any help you can give.
-
The machine in the link you show is likely an excellent machine but if you check a little more you can get one from Cowboy or Techsew that also has the option of a feed wheel on the other side that can be used for quite a few other things like strap folding, piping making and strap combining etc. This is a link to a recent video on the Cowboy version - If you scroll down to the bottom of this page you can see the machine and I would guess if you contacted your nearest dealer they could help you more. https://www.cowboysew.com/leather-belt-manufacturing-machine.htm If you are in Australia anybody is welcome to come and try one out at my place. I will have some more video's of this machine showing off some more uses that this machine can be useful for like fringe making etc.
-
Need help threading Brother machine
RockyAussie replied to rivercityleather's topic in Leather Sewing Machines
I think the previous owner has angle grind cut away that front section and if I am not wrong they have cut away the back section as well probably in order to get a deep bag to fit further in or something like that. Long and short that machine is not likely to hold up to much downward pressure without bending or breaking the hole cylinder arm apart. Spare parts is all I think it could be good for. -
New Options for cutting and folding leather straps
RockyAussie replied to RockyAussie's topic in How Do I Do That?
Hi @jimi, sorry for my late reply, I've been way too busy. The command you need to get the hang of is the loft command. Basically it is a fancy extrude. In simple explanation ...do a circle or any closed polygon shape on the plan base level. I always take a line out from the middle and go wide past the edge and make it another colour so it is easy to see. Go to front view then draw a line up to the height of your next level and again if you have 3 tiers in mind, do this out on the far side. Back to the plan view and do a smaller or larger oval or square as long as it is a closed polygon then Move the shape up to the level you want and repeat the process if you want 3 levels. If you are wanting this to say have 2mm walls then offset 2 mm on these shapes. Hit the loft command and select the base shape then the next level and then the next level then hit enter twice. Magic. You can also go to the top level first and down to the mid level and get a totally different solid shape. Have fun and check this video out - -
Having problems binding around corners
RockyAussie replied to chrisash's topic in Leather Sewing Machines
Just my 2 cents...Some binding tapes are very bad on corners and some are wonderful even though they measure the same and the same applies with some leathers as well. -
New Options for cutting and folding leather straps
RockyAussie replied to RockyAussie's topic in How Do I Do That?
Great minds think alike?? I have been working on something very similar to that for the Cowboy machine and I think you have inspired me to get it up and going a bit quicker now. Are you happy with the feed in? I was thinking of a wider mouth at the start myself and sort of funnelling in as it goes a bit like the strap folder ones. I do have a new range of product on the go at the moment that calls for a LOT of custom made piping. Interesting idea and I might give that a go. Opening out for the tab ends should be as simple as not gluing up the first and last 2 inches I think. The pointed end should be easy to fit into and through the guide as well.
-
That is what I have been using as it allows for different thicknesses of leather as well as different size bottles and cans. 2mm and I get it 100 metre rolls.


-
New Options for cutting and folding leather straps
RockyAussie replied to RockyAussie's topic in How Do I Do That?
Thanks @chrisash,Sounds interesting, I may give that a go. Thanks @Constabulary. I know you don't mean the video itself That is Soooob true and I should of known better really. -
First Custom Axe Sheath
RockyAussie replied to WalterF's topic in Gun Holsters, Rifle Slings and Knife Sheathes
Looks pretty good to me. Why you not made friends with the class 4 yet?? should be perfect for that sort of job. -
This is my latest video showing a quick and effective method for cutting and folding leather straps for handbags, purses and shoes etc. Please note this is showing my first trial tests of my folding guides checking them for size and performance. They worked well but as for me with a camera in one hand filming ........a bit clumsy I know. If this interests you think about subscribing as I will be doing a few more other videos over the next few weeks along these lines. The link -
-
I am thinking that the construction method may not help here. If the zip looks alright until you stitch the sides then it is the method. In case it helps here's a link to one of my video's showing something that may help.-
-
Looking for Bergeon 31227 watch strap tool (Europe)
RockyAussie replied to Danne's topic in Suppliers
I presume you would have seen this before but in case not here is a link. (They do have a very good assortment of watch band gear) https://www.esslinger.com/bergeon-31227-watch-strap-cutting-plier/