


RockyAussie
-
Posts
3,265 -
Joined
-
Last visited
Content Type
Profiles
Forums
Events
Blogs
Gallery
Store
Everything posted by RockyAussie
-

I made some dies for a shoulder bag.
RockyAussie replied to toxo's topic in Leatherwork Conversation
Good effort on the knives mate. I would bore a few large holes in the wood though to enable a quick push out if needed especially if doing thicker leather. The lid flap I would add a second layer at the front most likely. The way I would suggest is to make a larger back panel/lid as a first cut and the same with the front lid flap piece and then second cut with the existing knife. I do a lot of patterning with second cutting in mind as it gets all the parts nice and lined up even which is not always easy by eye.What and where does the circle piece go? Some similar bags made by saddler's here stitch the front to the gusset so the seam is inside and that looks pretty good as well. -
Waaay more. #69 to #415 or in metric 40m to 7m. I have not myself used any thing over #277 (metric 10) so I can not say with certainty yet.
-
Thanks for the thought @fredk That would be a dream come true but so far we mostly have weirdos lacking in sufficient geek factor. This Not
-
Good to hear mate. The thread size is 138 (20m) with a NM160 size 23 LR Schmetz needle. Note: I don't think it is possible to get any leather point needles any smaller than the size 23 only the fabric point needle go smaller I believe.
-
I believe it would but I can not say for certain. If you want to try it out pm me and I will be happy to do what I can.
-
Thanks @garypl. I have just received another great report back yesterday as follows - "Here is your feed dog and throat plate on my cb4500, sewing a zipper in cloth with #92 thread and a #19 needle." He is happy and may do a video on it soon. I would love to know how much length of thread that size would go onto one of those bobbins? Probably gonna be a lot more bobbin sales too I guess.
-
No problem. I will send you a pm shortly with details and a link. (you are not the only one I have seen over time make a comment about wanting to sell for this reason and here and there they have just given up the leather work altogether.) If this saves even just a few from going that way I will feel all my efforts worthwhile.
-
I have. The time to take out the feed dog and put it back later is a major time waste. The job being stitched is a lot better with the dog foot in action especially when wanting the reverse stitches to line up correctly. The standard narrow plate means that the job has to be fed by only the needle and top centre foot and that means also the more foot pressure required the harder it is to get the job to move/slide along the needle plate in a reliable stitch length.
-
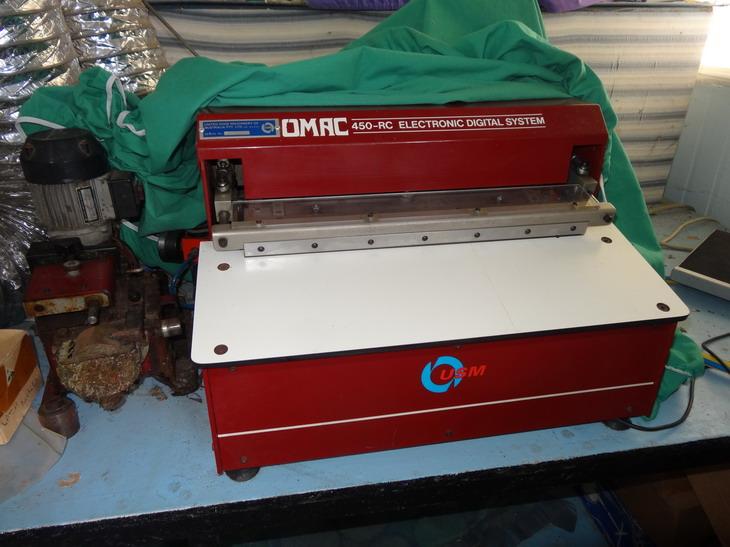
No, no help there. All I wanted is for them to send me a new main board but as my machine is more than 5 years old that's a no go. Could be just the dealers here ...who knows??? If I could just get a cost of the new one I would probably take the gamble. Wish I could speak and write Italian. I wanted to get a new motor gearbox for one of my OMAC glue machines here and that went badly south as well. Great production machines until they need some maintenance over here in OZ.
-
You probably have not seen how bad my hand stitching can be then I am still taking this as a compliment and thank you
-
You can get these on the short table that comes with castors and I find they are quite easy to wheel and pack out of the ways when not in use. If you can't fit it in then you must be holding onto less important stuff toooo much They are chrome tan mate and you know I only do quality work. I do get some pretty good sales from the workers there and I like to think they should get a bit of quality at least now and then.
-
OK back again with the video links - and another - and here are just a few of the practical use products this set has enabled me to do.
-
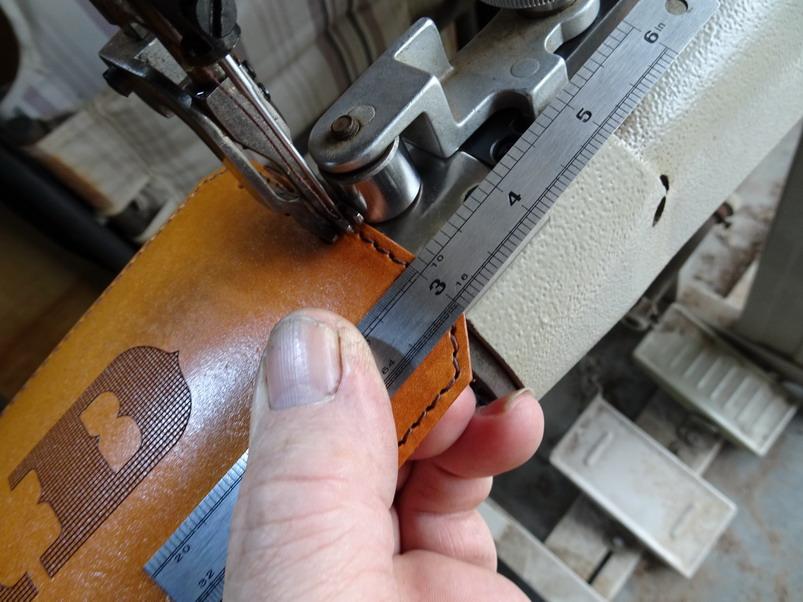
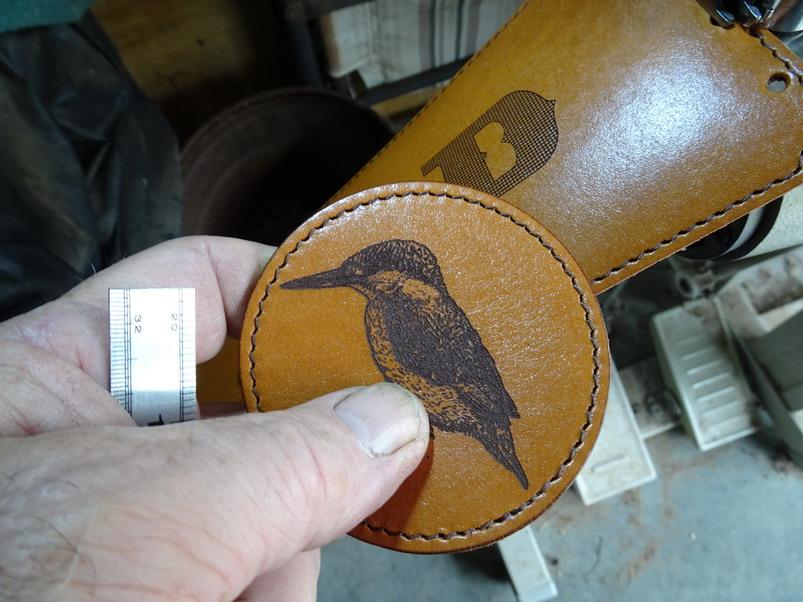
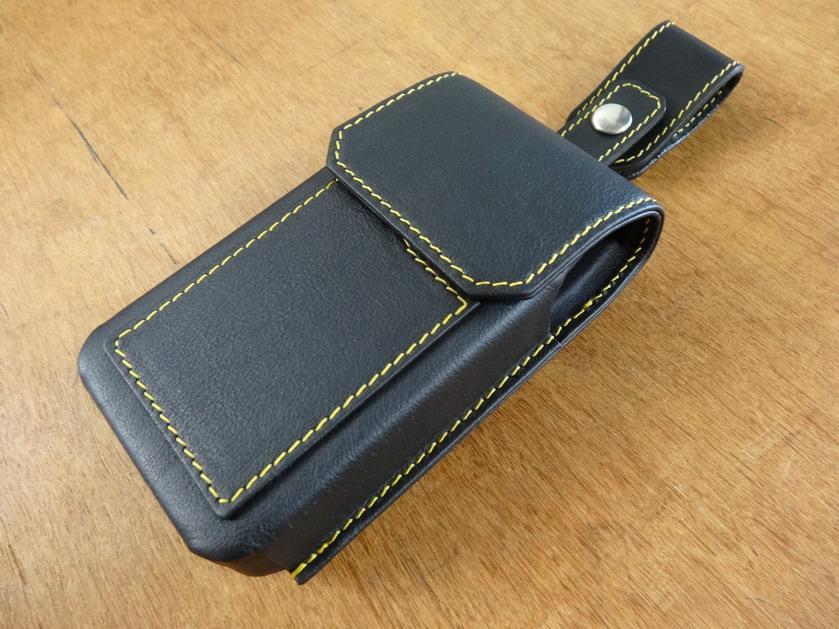
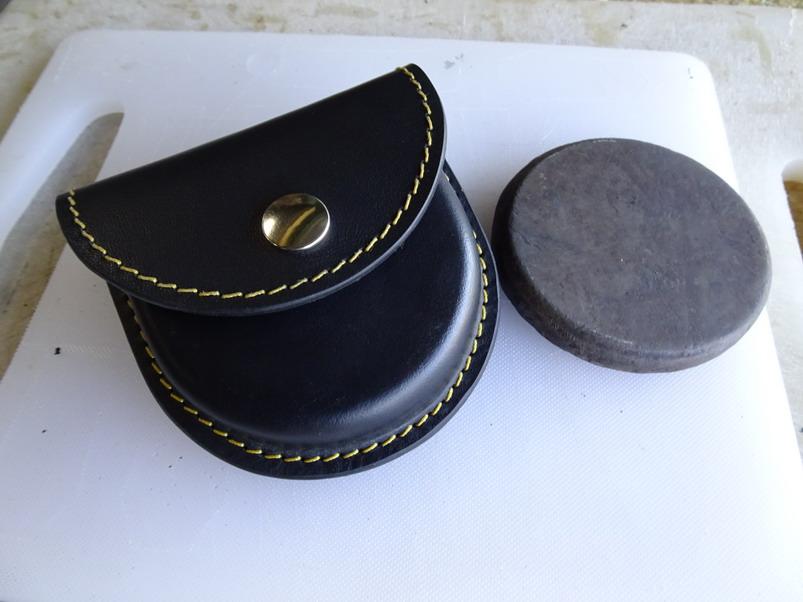
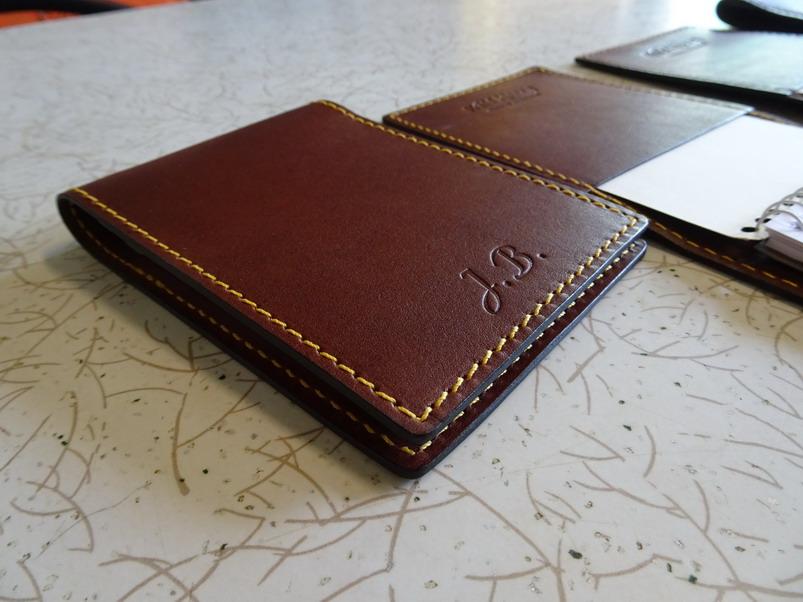
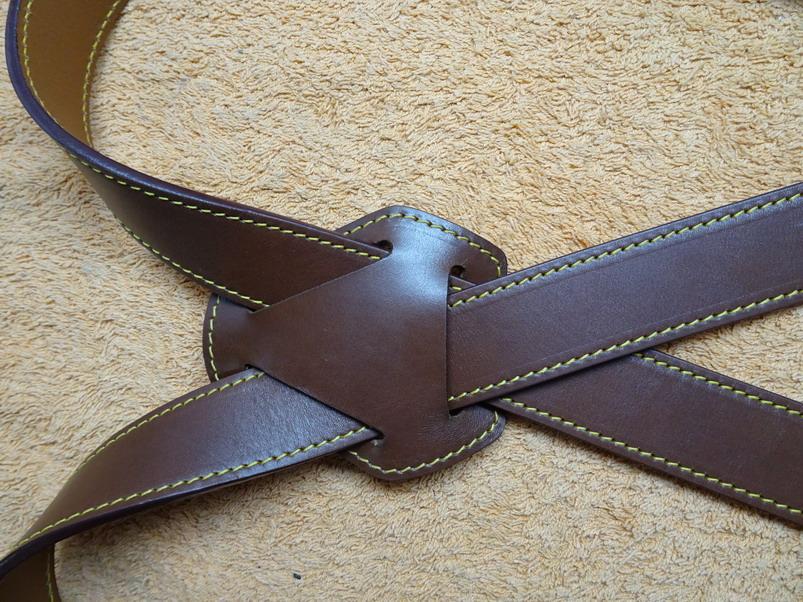
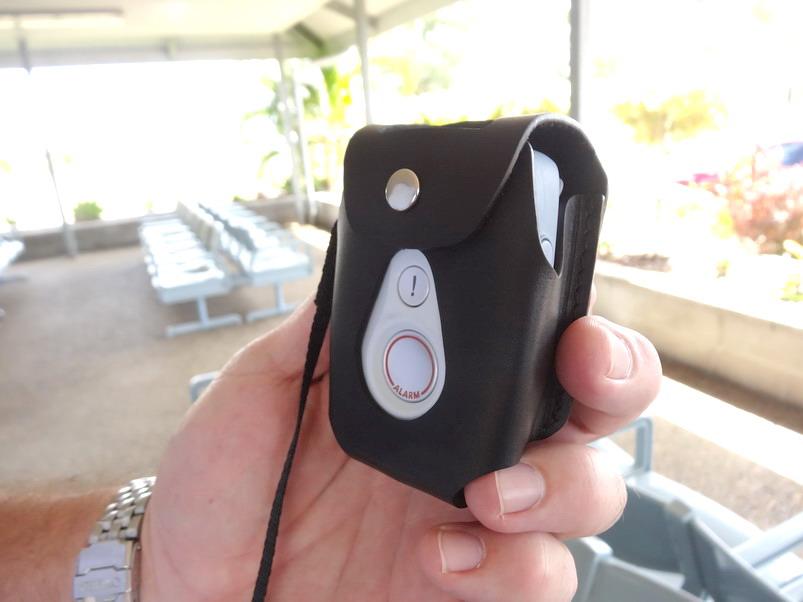
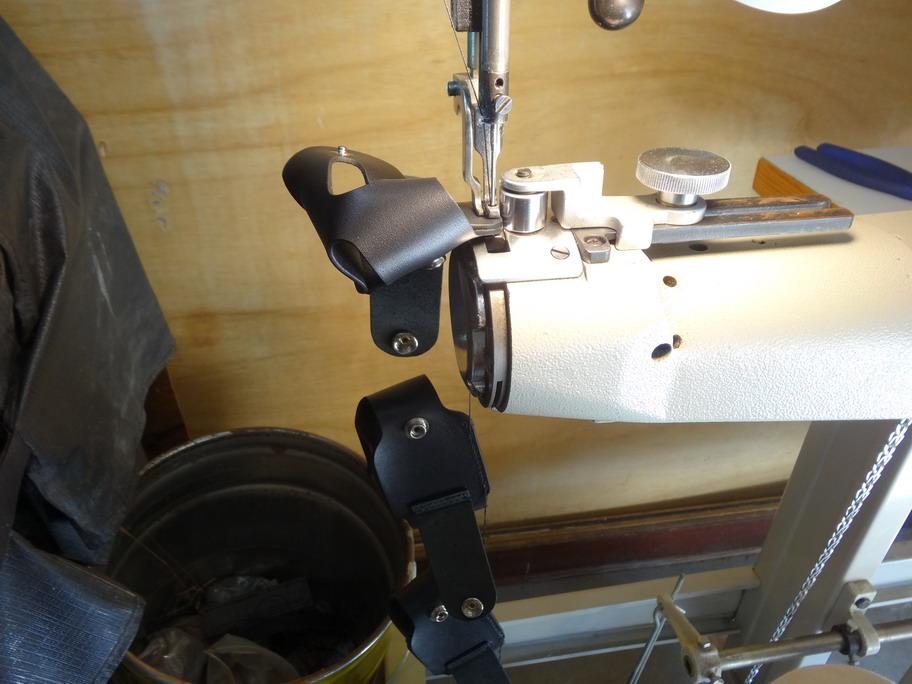
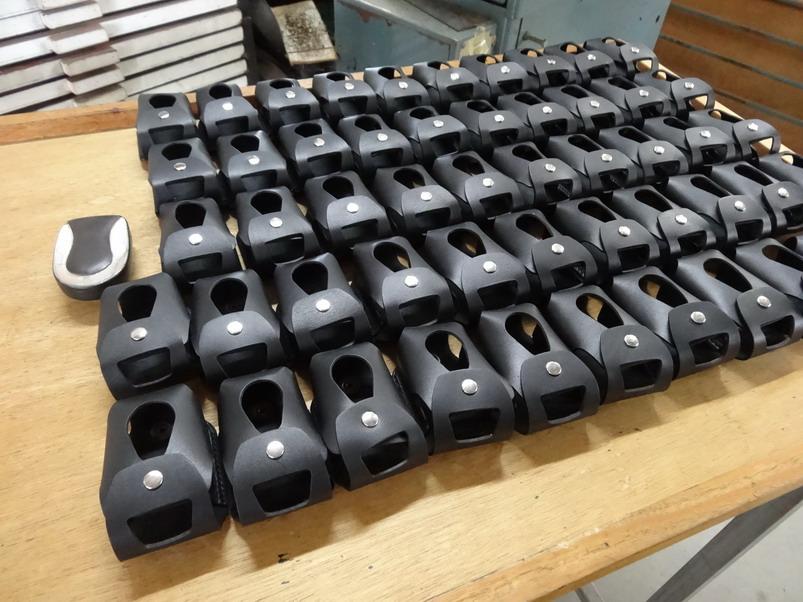
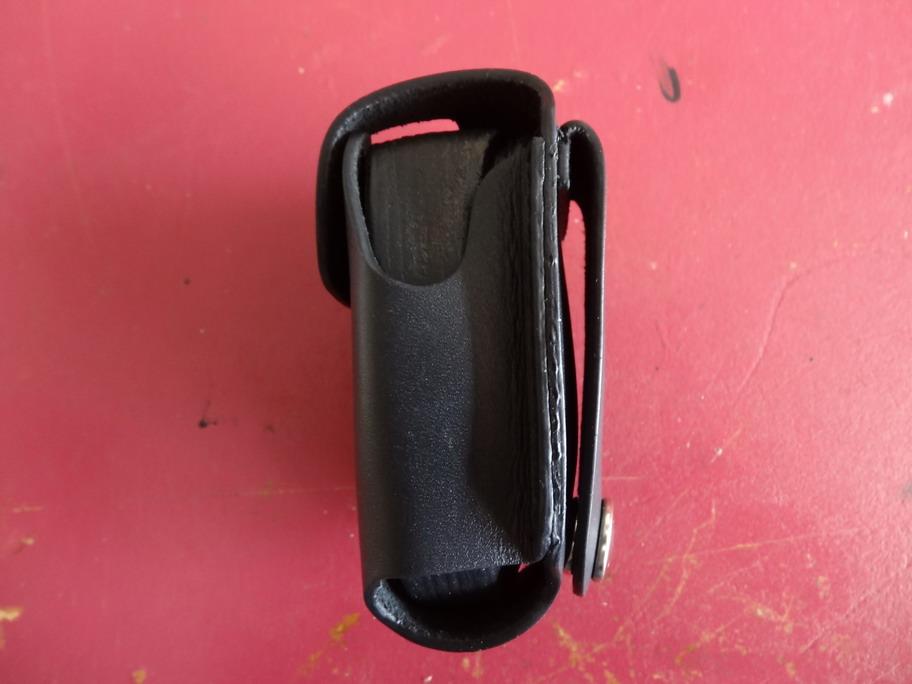
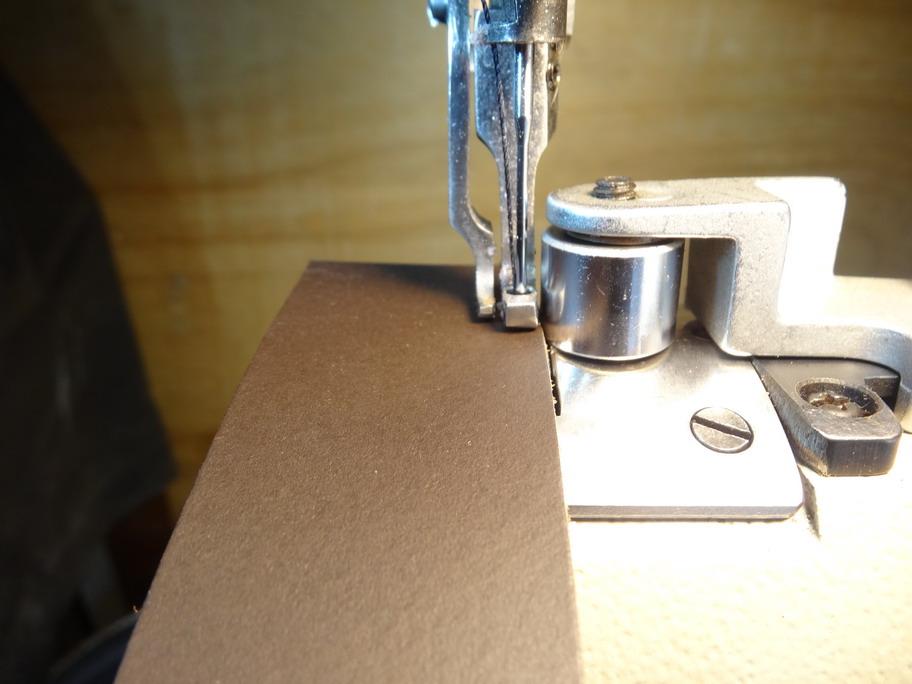
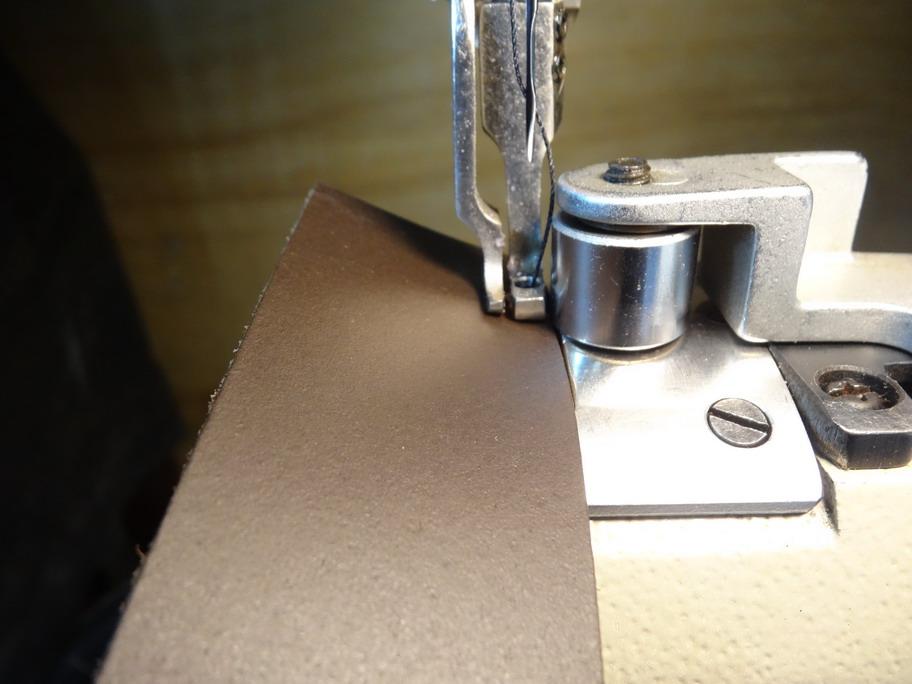
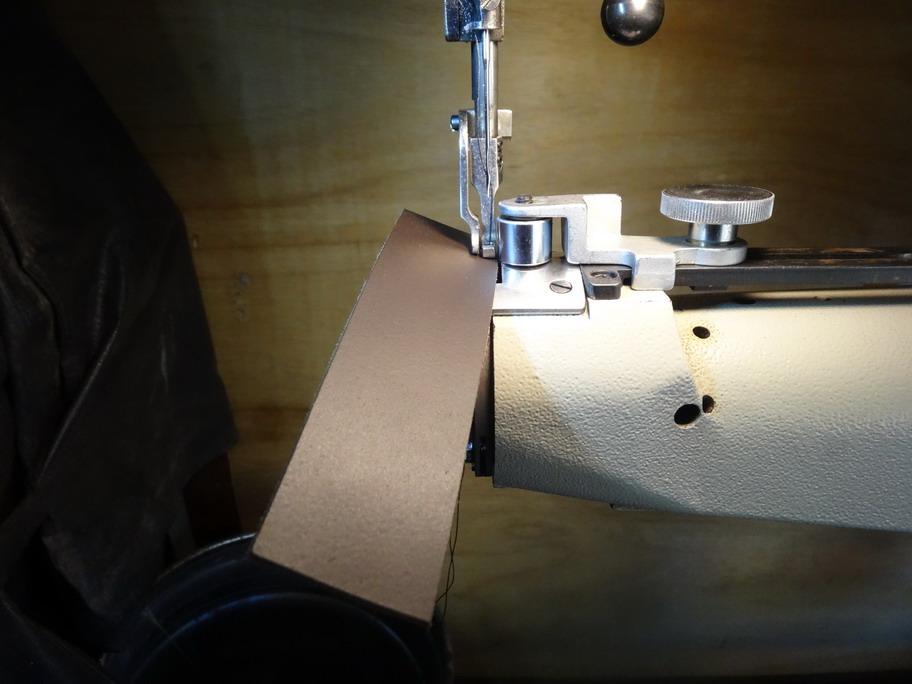
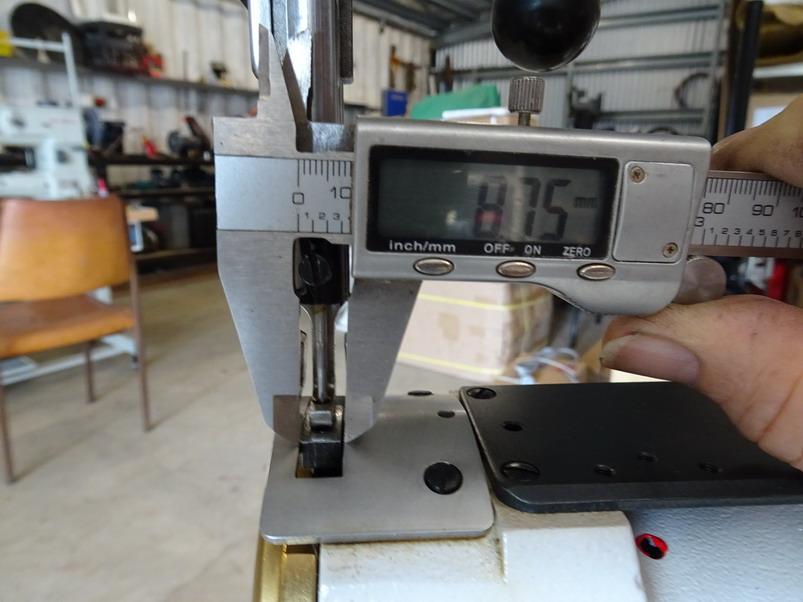
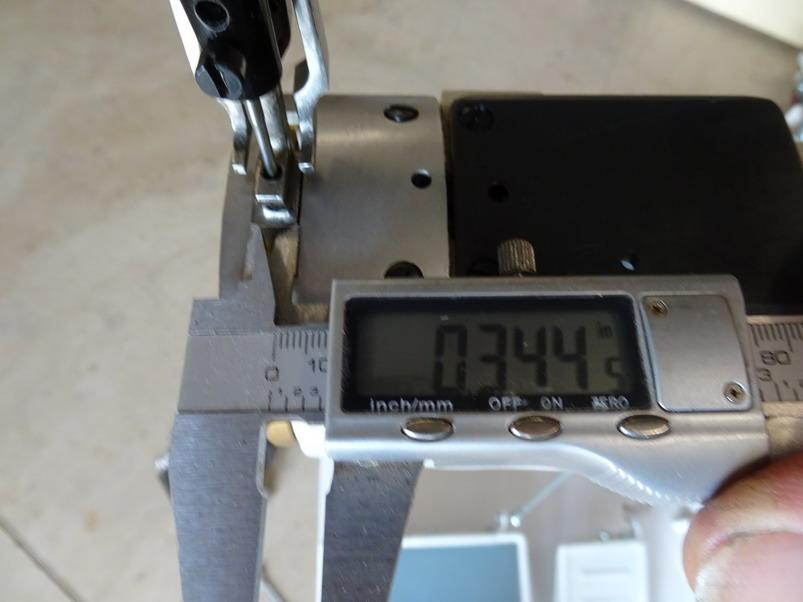
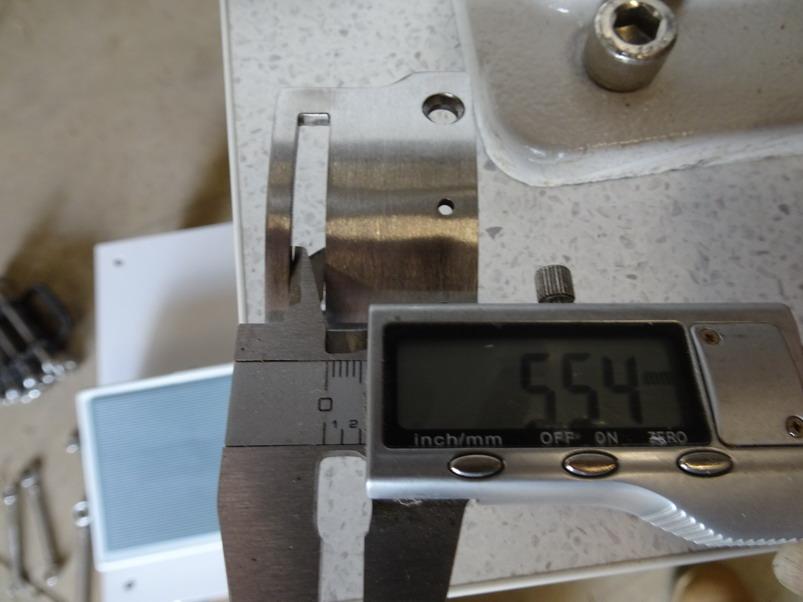
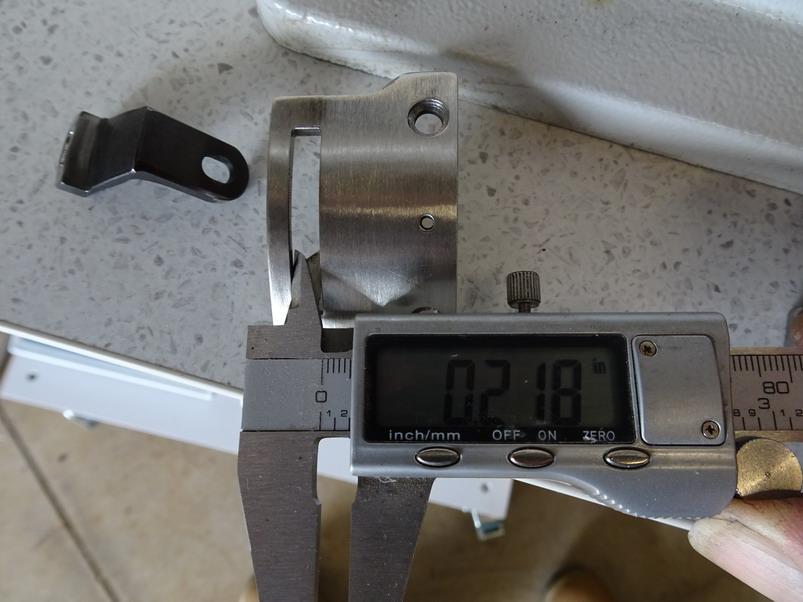
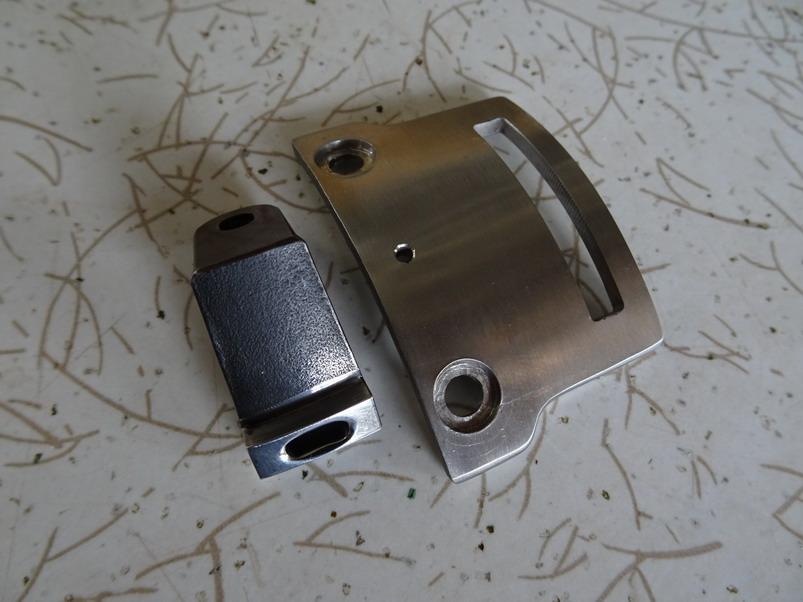
The Cowboy CB4500,3500 and 3200 narrow needle plate and feed dog set. Why was it developed? A few years back I decided that I wanted a cylinder machine that could handle a wide range of threads (particularly thick) with a large bobbin that could hold a lot. Smaller machines I have could do thread up to 138 (20m) but with that size thread in the bobbin I may only get 1 or 2 belts done before the bobbin needed loading again. Also the thickness of the job would often be more than desirable for the machine to handle. I managed to get a Cowboy CB4500 from our local dealer at the time and found the machine could do large jobs like tool pouches and such with no trouble but..........when I thought I could do smaller weight projects like wallets I was sadly mistaken. The large needle plate hole and wide feed dog allowed the job to be pushed down into the hole if I wanted to get closer to the edge than about 5mm and it would make a mess of any edging that was done prior to be stitched. I was approached by the local correctional centre about this time to make up for them an improved stronger personal alarm pouch and the numbers were pretty significant. I went ahead and designed a good pattern and proceeded to put it into production. Here is a picture of the finished article – Everything went well up until the stitching stage. The best way to do the job was to get all of the edging done first before the stitching and that is what I did. I knew when I was doing it that the job was going up and down a lot and was very difficult to control but I did not take enough notice of the edging at the time.. This picture below was by no means the worst one but just an average one after the stitching. “Golly” I said (perhaps something stronger and shorter to be honest) This was going to take a lotta fixin On a close inspection I found the reason. This belt strip shows that at the start of the strip as the needle enters the job all looks good. Then as the needle goes back with the dog foot and the dog foot descends the belt strip lowers down into the hole as well. The sharp edge of the needle plate was tearing up the edging every time the dog foot went down as it got to the back of the hole. This set me onto a path to find some way to get this machine to behave the way I wanted. After a year or more later and a good deal of development time with the new Cowboy sewing machine dealers here in Australia (Good people) this is what we came up with. A narrow needle plate which has a narrower hole in it than the original and also been reshaped to improve tighter curve stitching like gussets. The narrow feed dog gives the advantage of assisting the needle to be guided at all times through its motion whilst the feet are down. This means the stitches are less likely to miss and revering is now more accurate at lining up the stitches. Previously a narrow slotted needle plate was provided but that involved having to take out the dog foot altogether and at the cost of an unreliable stitch length at times, especially in reverse. This shows the original needle plate hole width in metric (8.75mm) and the next in English (.344 of an inch) This next picture shows the new needle plate hole in metric (5.54mm) and following that the English size (.218 of an inch) Due to file size limits on loading here I will follow this up a bit later with a link to a couple of video's I have done showing off the improved capability given with this new set as well as some practical use pictures I have taken whilst making some of our products.
-
I agree. I will post up a new video on it all going well sometime today. @Treesner after all of the info you have given I would be looking into The Cowboy CB 341 which has most of the capacities of the CB6900 but is more affordable. The 6900 can go a little thicker in thread and a little bit more in thickness but may be harder to get over there. Here is a video I loaded yesterday showing the quick table top attachment available to fit the 6900. I believe they will fit a 341 as well except that the threaded holes may not be in the arm. There are a few other video's I have done on this machine if you want to check them out as well.
-
Send it over here mate and I will fix that up for you and send it back Honest.
-
@Danne For most production type leather work I know having a vacuum is best because I have had both. But it is not always that necessary sometimes because what the vacuum does so well is reduce considerably the problem with waste sticking to the feed wheel and coming back up to wreck the job you are feeding through. Now with watchband lengths on average you can get from one end to the other before the waste comes back up. On most saddlery leathers like what @BruceGibson is used to the leather does not stick so well to the feed wheel so not such a problem. Greasy waxy leather not so bad. Some leathers will catch almost always even with a vacuum but thankfully they are pretty rare. I will be doing a 3d print version sometime soon (Cowboy machine here waiting) but keep in mind that the end of the machine has to restrict the air flow enough to increase the flow to the extraction shute. This means an end cover of sorts as well as the catching tube.
-
Ohhhhhh.....I like that a lot
-
Me as well.
-
HI @dikman, Sorry for late answer mate ...The old computer s..t itself again as it does at times and as usual it was just needing the ram sticks cleaned up. Spent many hours getting a new one and files over blah blah Still a work in progress. $120au delivered and available in Australia at the moment to you . Just give Jess a call if you want to go ahead. I will do a separate post on these showing some more detail than the video shows. I would do it here but there is a fair bit and I don't want to overload with all the pictures and stuff. I understand what you mean and I will do a separate post asap that will give a better and more full explanation of the advantages and once done I will put a link back here. HI @dikman, Sorry for late answer mate ...The old computer s..t itself again as it does at times and as usual it was just needing the ram sticks cleaned up. Spent many hours getting a new one and files over blah blah Still a work in progress. $120au delivered and available in Australia at the moment to you . Just give Jess a call if you want to go ahead. I will do a separate post on these showing some more detail than the video shows. I would do it here but there is a fair bit and I don't want to overload with all the pictures and stuff. I understand what you mean and I will do a separate post asap that will give a better and more full explanation of the advantages and once done I will put a link back here. Too true. My next post will try and convey better just that.
-
I am sure like myself the previous owner made them to suit those applications. Most jobs are small like credit card pockets and it is easy to avoid the hole when doing those. I have had an OMAC one that has heated plates top and bottom with the option of a raised section for putting in a crease line at the same time as the folding. I used it a lot but when it developed problems with the main board they advised me that they dont have those parts available for machines over 5 years old. Cost about $12,000 au here and they still sell the same machine that all works the same except perhaps the main board section. I prefer now to stick with what I can do with the manual versions.
-
I will try and get back to this tonight as it does give a whole lot of advantages to a machine that was only good on heavy gage work mostly.
-
Similar looking but The CB 341 does not have the same capacities as the CB6900 -When I get a bit of work done here I will come back with some more info but here is a link to study for now - https://www.cowboysew.com/heavy-duty-cylinder-bed-sewing-machine.htm
-
Awhile ago I would have fully agreed with @kgg but something we came up with recently for these machines really does change this a LOT. Here is a video I did on it While you are there check out the videos I have done on the CB6900 which is a really great machine to start off with in my opinion.
-
Forgot to mention ...the holes cut in the table top would have been cut out for zip pulls to sit down into and the other one probably for the centre bridge section of a wallet to sit down into so the top section can be done straight across. A teflon cover on the table will make it way quicker and nice to operate on.
-
WOW ....I"m crying ...the freight to me would be ridiculous but I have paid 10 times more than that for smaller ones. For those of you that want to do serious production on wallets and stuff you better be quick. Here is a Very inexperienced operator showing one of these off and I can tell you we do pocket tops on something like this machine at the rate of about 10 secs per. Hint ...take of that silly bar in front if you are doing anything less than 2 hand widths wide caus its way quicker to hold it by hand. Anyway here is the link