


RockyAussie
-
Posts
3,265 -
Joined
-
Last visited
Content Type
Profiles
Forums
Events
Blogs
Gallery
Store
Everything posted by RockyAussie
-
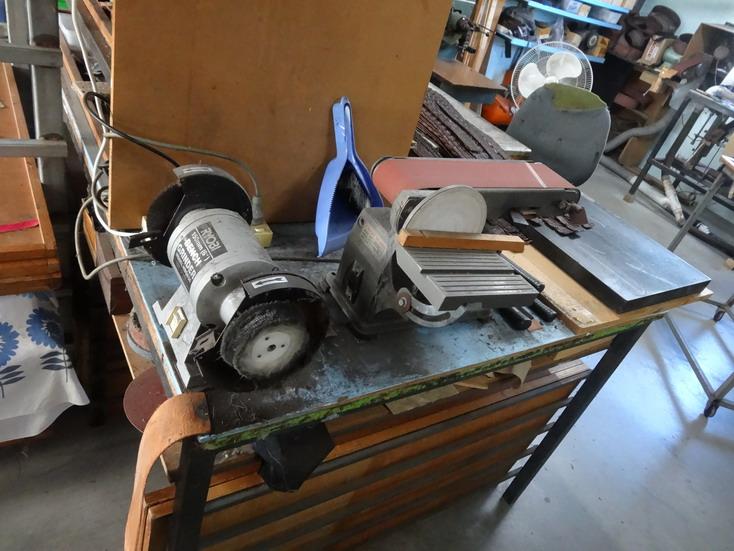
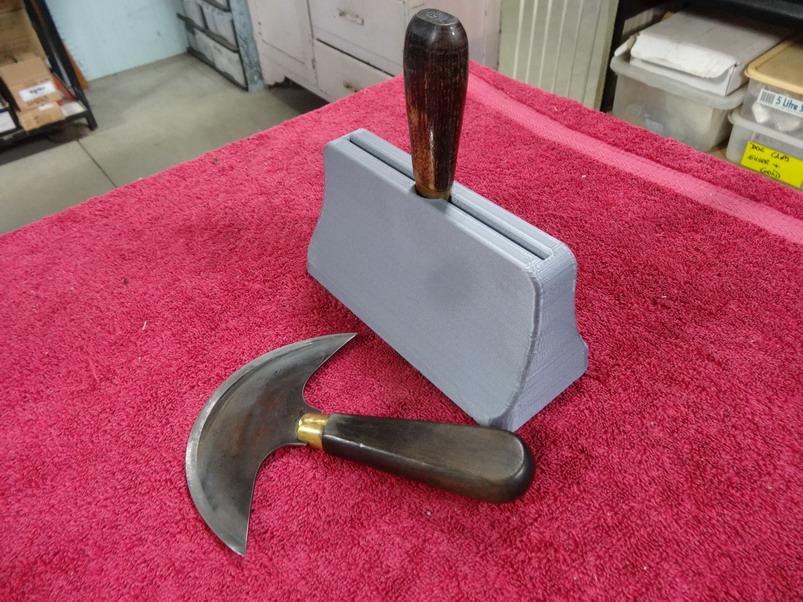
For myself not being a hobbyist time is an important part in how I go about doing things. Like most I used to sharpen with stones etc but now days I find I can sharpen very well on the belt sander what is required in a couple of minutes followed up with some Tripoli polish on a rag wheel. As I keep the blade always facing away from the belt rotation I have never had any catching issues as described by dikman thankfully. There are a couple of pictures below to show what I use and what I am saying is that it would be hard to get much of a tapered edge if the handle gets in your way from you doing so. I will also put in a video link that shows why I like to have a broad taper on my knives.
-

How do you sharpen a round blade for a 1 in 1?
RockyAussie replied to SheltathaLore's topic in Sharpen it!
I don't believe you can sharpen those as any thing you take off will leave a gap and there is no adjustment on them, least not on any of the ones I ever had. There are blades that have notches and you can get blades that are plain so best be sure you get the plain ones unless you need to cut sole leather on shoes. -
Looks like it should be a good one. I do think the timber and bottom rivet may be a bit too low for belt sharpening though.
-
Small Cross Body Bag
RockyAussie replied to Chux's topic in Purses, Wallets, Belts and Miscellaneous Pocket Items
Interesting idea. Some pictures that show how it hangs would help I think. I feel sorry for your scissor cutting hands. -
Glad to hear you have found a solution that works for the problem. Thanks also for letting us know.
-
R.E. RICE holster inspiration
RockyAussie replied to WyattEarp's topic in Gun Holsters, Rifle Slings and Knife Sheathes
Just given credit where it is due, and thanks for sharing your talent here with us. -
You don't really want me to post "what didn't" do you? That is one hell of a lot of space you know. Good point about thanking the sponsors though and I will add a big thank you to you and Tom and Wiz and all the rest who make up this forum for us to enjoy.
-
Biker wallet
RockyAussie replied to WyattEarp's topic in Purses, Wallets, Belts and Miscellaneous Pocket Items
Most excellent -
R.E. RICE holster inspiration
RockyAussie replied to WyattEarp's topic in Gun Holsters, Rifle Slings and Knife Sheathes
Not my kinda stuff but I have to say that is some very nice lookin work there @WyattEarp -
Starting to look like a bunch of mad inventors here what? Here one post I did on a drill press for embossing as well -
-
Great thinking there @Lil Doodler and thank you for sharing it as well. Getting a crew punch to come down even let alone in the right direction is challenging and having a fence to line up to as well ........
-
You may already have this manual but in case here is this one - https://www.bootmaker.com/Junker_Ruh_Manual.pdf
-
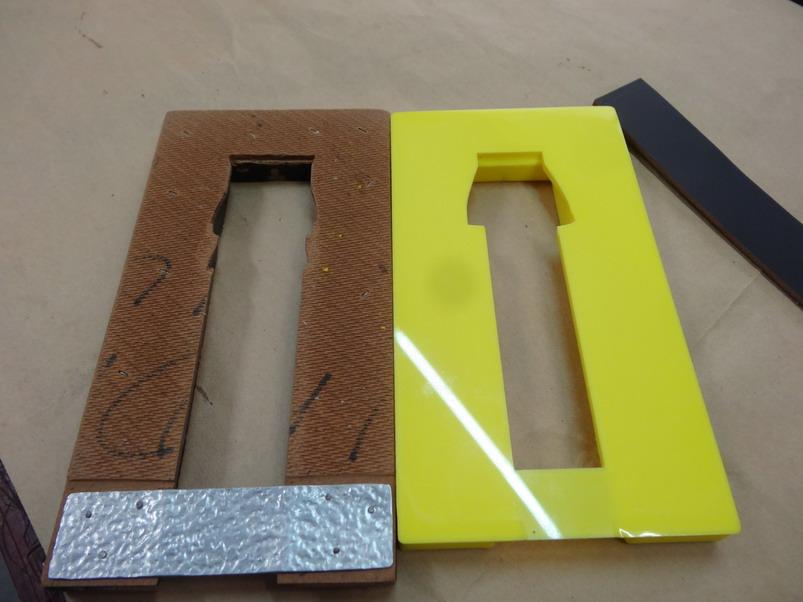
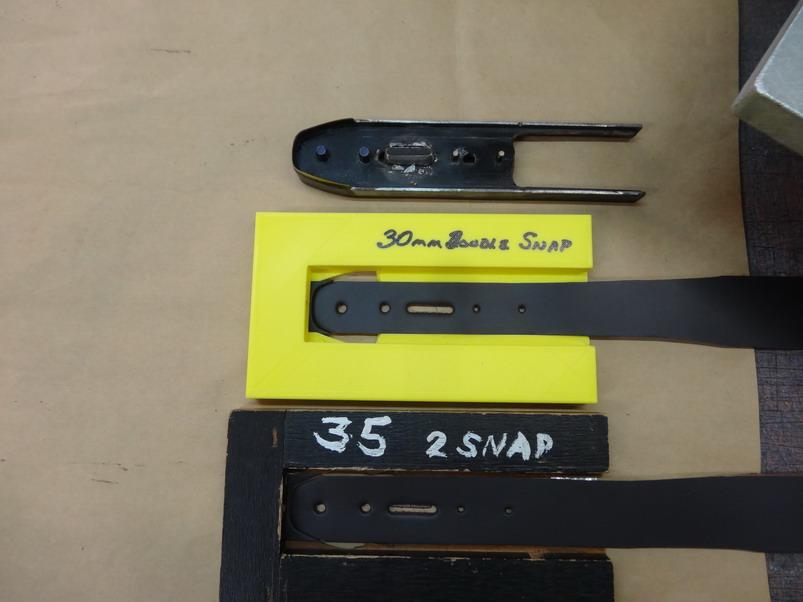
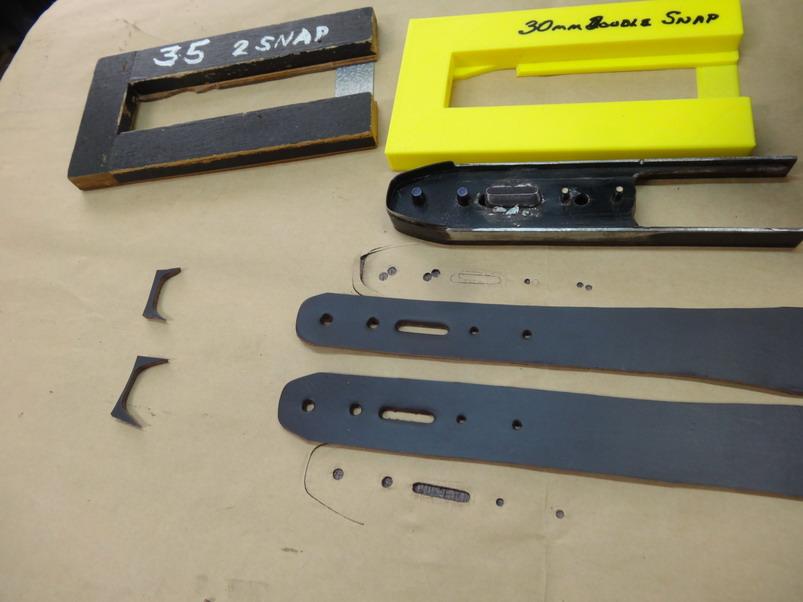
I think we all suffer from that problem. I have found even with a mill or router bit I can make it go all over the place. On my printer it prints out with no input from me except the cad drawing and my drawing program finds the middle of stuff WAAAAy bettern me.. I don't have much of a call for one of them things because I print out holders to hold multiple holes for different size belts in the one cut but I just may draw up one for those that have a printer and pop it into the printers and laser posts section here. Heres a couple of pictures of jigs I've made both out of wood and plastic that use the same knife for different width belts. The plastic is way easier and less time consuming and if I want a little bit wider or less I can just streath it in the program and print it again. NO probs.
-
Very easy to make up with a 3D printer and some Chicago screws. No problem at all with doing whatever shape slots and hole shapes you want then. Only tricky bit is working out how to set it up for spring closing as well.
-
Ya forgot the egg white
-
Have a look in here and you will find all sorts of stuff like those roller presser feet and feed rollers etc - https://www.campbell-randall.com/shop/fav-fratelli-alberti?page=8 As to the vacuum...... the machine has to have an end covering to get the vacuum to work properly. You can see a plastic end cover in the pictures on this page which is along the lines I am talking about - https://www.techsew.com/en/catalog/category/view/s/cutting-skiving-machines/id/566/ That said having good backup and someone you can trust from a supplier is also important.
-
Keep in mind that most dealers do not use these machines every day and would have little idea of the differences between the different models. Most of the cheaper clones are running a set up similar to what Fortuna stopped making around 50 years ago. The bell knife cutting only starts when the feed stone starts and that means also that when you want to feed the material through slowly then the bell knife also turns slowly and that does not work so well. It is common for people to solve this by putting in a second motor to have the bell run fast and the feed run independently. The FAV AV 2 you mention above already has a clutch motor similar to the Fortuna (I have one of each) and at the back there is a knob which can be set to have the feed run at whatever speed you want if you ever want it to run at a set speed continuously. IF you expect to use a skiver a LOT spend the extra $ early or learn the hard way as I did. Last note.....the rubber feed wheels do not go well if you mistakenly allow it to contact the bell knife while adjusting. It slices it and kaput. With a feed stone you can make a light contact and get rid a any coarse burring when you are doing a heavy sharpening process. Having a vacuum also takes a lot of waste away to the side without any need for it to drop down at your feet or the need to try and position a catching bucket etc. Personally I would be looking for a good condition 2nd hand Fortuna.
-
Some close up pictures of the set up would help. In your picture above it may be that your feed stone is not close enough to the bell cutting edge but that may be just the picture. The feed stone for most work should be parallel and all but touching the bell knife inside edge. IF doing heavy weight leather a little bit of a gap at the back can help sometimes. Parallel to the bell is set by the knob at the bottom left and if you pull that toward you you will see the feed stone tilt down at the back. The feed stone closeness to the bell is set by the knob at the back just before the spring tension adjustment. The bell should be set into the proper place before any adjustments are made and that should be done by moving the bell forward so that it is around .5mm (1/2mm) away from the presser foot edge. For fine leathers a little closer and thicker harder leathers a bit further away. Once the blade is in position sharpen until there are no nicks in the blade and then dress the bell inside with the dressing stone and then recheck the measurements look right. As I said before ...some close up pictures would help here.
-
Most leathers except greasy/waxy saddlery type leathers will stick a little to the stone or feed wheel that the presser foot pushes it down into aqnd that very often leads to the waste piece coming back up and ruining the leather you are skiving. Some of these machines use a wiper piece to try and stop that happening but the pressure it puts on the part often destroys and because the part that holds it is also on a spring pressure control it then upsets preciseness of the skive as well. The vacuum assist greatly in taking the waste away and avoiding this problem. I have had both with and without vacuums and I would NEVER have another one without vacuum. Other than the video above that is mostly doing leather pieces not long enough to come back up and around I ask you if you can find any other videos where you don't see the leather coming up and around at times that is not a vacuum type. This is even on dealers videos selling these machines. Believe it or not. Techsew and Campbell Randall both sell skivers with vacuum assist and Campbell Randall have a good range of feet and other stuff which can go on most of these model skivers. Most of it is in the FAV machine section but they are interchangeable with most others.
-
I agree fully
-
Watch bund strap
RockyAussie replied to Danne's topic in Purses, Wallets, Belts and Miscellaneous Pocket Items
Excellent looking work @Danneand a nice design touch with the attachment method as well. -
A little bit yes. Bit like a 4 wheel drive compared to a 2 wheel drive. For heavy leathers and rubber and such then yeah go for the top/bottom but for most leather work except perhaps saddlery work I would not have one if you gave it to me. They are a pain and slow to alter the settings and get right but if you are doing a LOT of the same setting and its heavy stuff the go that way. (1to 2mm would be very easy on a bottom feed) If I wanted to skive 4/5mm of firm temper I would do a double pass if it were a wide and thin skive required. At near to the end of this video I did awhile ago you can see me skiving some pretty firm temper leather on a bottom feed but note I am using a roller foot which I use always on anything as can be seen in other skiving videos I have done. I hope to get another vid up soon showing some belt skiving stuff on it as well.
-
Messed up my machine (juki 441 clone), advice appreciated.
RockyAussie replied to Ysalex's topic in Leather Sewing Machines
A close up picture of the needle just entering the leather might help here. What type of needle is it and have you tried replacing the needle yet with a new one? -
Messed up my machine (juki 441 clone), advice appreciated.
RockyAussie replied to Ysalex's topic in Leather Sewing Machines
-
Thanks @sainte that looks interesting and I do look forward to seeing it all come together.