


kgg
-
Posts
3,344 -
Joined
-
Last visited
Content Type
Profiles
Forums
Events
Blogs
Gallery
Store
Everything posted by kgg
-
There are two basic styles of machines cylinder arm and flatbed machines. The term "free arm" I think came from the introduction of the Singer model 222k Featherweight back in the 1940's that had a "free-arm sleeve". That reference to the style then got further shorten to "free arm" by the domestic sewers. There are basically three common forms of how material fabric or leather is moved along to the rear of the machine. i) by the feed dog along with a drop down presser foot that just keeps tension on the material as the needle enters. Typically seen in domestic sewing machines. ii) by the feed dog along with a presser foot that keeps tension on the material but moves in coordination with the feed dog to move the material along. Typically referred to as a walking foot machine. iii) The same as walking foot with the additional feature of the needle also moving the material along. Typically referred to as a compound or triple feed. To short answer to your question of whether a walking foot flatbed machine will sew bags and purses easily the answer is No. Things that are flat like a wallet or belt is best sewn on a flatbed machine and things that are round are best sewn on cylinder arm machines. Keep in mind that you can sorta kinda turn a cylinder arm into a flatbed machine with a flatbed attachment but you can not turn a flatbed machine into a cylinder arm machine. If you come across a machine but are unsure of it's capabilities just ask but include the model of the machines you are looking at. I am sure someone can give you the pro's and con's for most models and manufacturers. Example: Flatbed Juki DU 1181n (walking foot) Juki DNU 1541S (compound feed) Cylinder Arm Juki LS 341 or LS 1341 (compound feed)
-
You using the 3D printer for what it was intended to do, make work easier. kgg
-
Typical setup is on the right front corner area. kgg
-
To handle 2 layers of 9 oz you need a class 441 machine. You could probably get away with a Class 341 / 1341 but it probably wouldn't handle the the addition of the welt. So you need to move up to a Class 441 machine. The premium one is a Juki TSC 441 but the cost is prohibitive at around $10,000 USD so most go for the clone machines which to name a few the Cowboy 4500 and the Cobra Class 4. The base machines like the Cowboy 4500 will set you back about $3000 USD and the Cobra Class 4 will come in at about $3400 USD. From the base price you would add the accessories like needle positioner and table top, etc plus shipping which probably would add another $300 or so depending on where you live. The Class 441 machine probably will be over kill for most belts. Keeping in mind the difference in the size of holes the needle will make in the leather. The Class 441 has a needle diameter of about the same size a 2 1/2 " finishing nail would make. So you in reality you should consider two machines depending on the thickness of leather: i) a Class 341 / 1341 for belts, wallets, etc and ii) a class 441 for the holster type work. It will really come down to what 90 percent of you work will involve. Where are you located US, Canada, Europe ???? If you are going to get a Class 441 machine go with the standard arm length of about 16", the small 9" on the 3500 probably will only give you about 7" or so working area. Join the club. You can drive yourself nuts researching the various machines available, their specs, flatbed or cylinder bed, are they a clone or a hybrid machine, manual or motorized, whether they have a needle positioner, a table top etc. Ask yourself two simple questions: i) What are you going to be sewing the most??? Buy a new machine for that type of work while buying a used one for the other type of work. ii) What is my budget? If money is no object buy Brand Name machines like Juki, Dürkopp Adler. If it is more of a hobby buy a clone. Keep in mind that no one machine will do everything and you can sorta kinda turn a cylinder bed into a flatbed but you can't turn a flatbed into a cylinder bed. Buy Once, Cry Once, kgg
-
I agree the first video does show long cables but the second video shows the control box and servo motor as one unit with the wiring from the motor directly into the control box. Looks like two different servo motor setups being advertised. @friquant which layout did you get?? The one with the long cables or the one with the on/off switch mounted to the front of the table??? Second related video in advertisement: https://www.amazon.com/live/video/0b443a3824a2418a9770702b7017ddf6?ref_=dp_vse_ibvc1 kgg
-
Very nicely done. Ain't templates wonderful grand things. kgg
-
Basically whatever you can stuff between the cutters it will cut.
-
That may work but besides longevity the diameter maybe an issue with the bending ability of the belt around to such a small diameter and premature belt wear. It's worth a try but I would alter your design to add a larger diameter surface face on the motor side of the pulley with blades to help keep the motor cool while running. With that size of servo motor pulley (35mm) and a 4" (104mm) handwheel with the servo motor running at 100 rpm the speed at the handwheel will be reduced to 33.7 rpm. The controller will handle the speeds but it's configuration on the motor was done to reduce the manufacturing cost with no consideration of easy access to the settings. You are going to be on your knees trying to change any setting. kgg
-
The design of the servo motor you referenced has fins on the motor of the pulley probably for motor cooling as the control box blocks / restricts air flow into the motor. Options: i) If you can't find a 45mm pulley with the correct taper I would check with a machine shop or supplier. ii) have a 45mm pulley modified by either re-machining or by using a brass taper bushing. iii) If you got this off off Amazon I would personally return it and get a more conventional layout, one where the control box is mounted on the front underside edge. I think having to reach underneath the table to the far back of the table to change settings could be very inconvenient. iv) If you do find a pulley chances are it will not have the cooling fans which may affect the life expectancy of the servo motor. I think buying and installing a speed reducer would be the simplest solution. Based on the motor you referenced. The motor pulley is 3" in diameter and if you install a 3:1 speed reducer which typically has a 6" large pulley and a 2" small pulley you will reduce your speed at the sewing machines handwheel. If my calculations are correct by 75 percent. Example: i) servo motor 3" pulley running at 100 rpm ii) 3:1 speed reducer installed iii) 4" sewing machine handwheel pulley The 4" handwheel will spin at 25 rpm. kgg
-
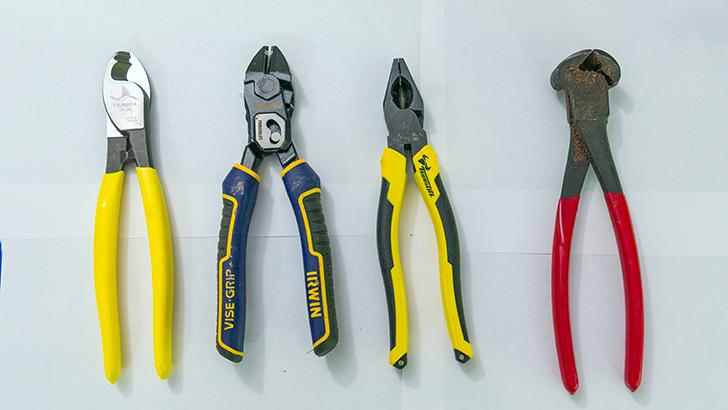
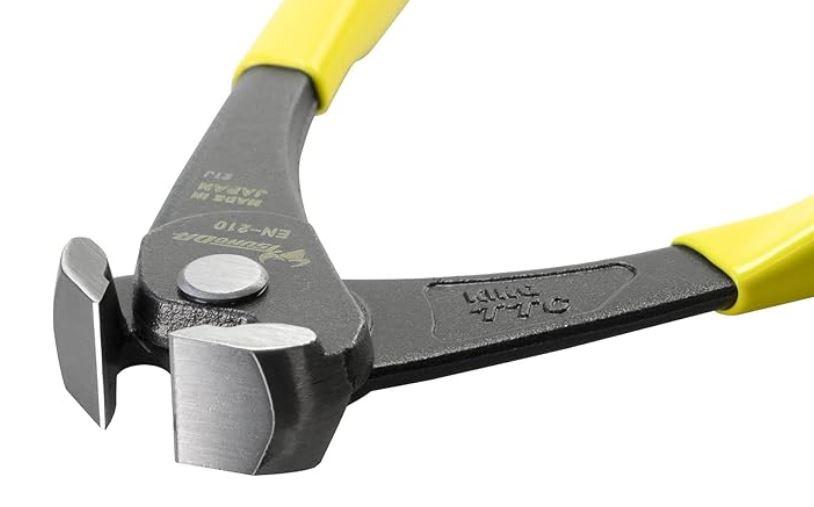
I have used a wide variety of tools for cutting copper rivets. Most of the time the cutting the #12's you can use just about anything however when cutting #9's I find you need much better cutters. I use mostly what is call "End Cutting Pliers" or "End Nipping Pliers" in 8" or 10" length. They give me just about the right amount left above the burr. I have used and abused the cheap $20 China ones and the expensive ones made in Germany. None were what I would consider as good as the Japanese ones. Less effort which really doesn't matter much for one or two rivets but if you are doing a batch the hand starts to really hurt old hands. I needed a new set of pliers and came across the Japanese Brand Tsunoda and said for badness will they cut #9 copper rivets. The Tsunoda cable cutter cut through the #9 shanks like a hot knife through butter so I order their 9" Tsunoda EN-210, End Cutting Pliers. I did a unprofessional test of four styles of 8" cutters that I have on hand. Here is a photo of how I rated them from best to worst and a photo of what I ordered. The difference between the Irwin "PowerSlot" and the Tsunoda PP-175TG, High-Leverage Linemans Pliers was so ever minor but I had to choose one. Cost: Tsunoda cable cutter are about $24 CAD Irwin "PowerSlot" are about $40 CAD Tsunoda PP-175TG, High-Leverage Linemans pliers are about $36 CAD End Cutter (Canadian Tire Special) was about $40 CAD Tsunoda EN-210 End Cutting Pliers are about $27 CAD kgg
-
Replacement feed dogs for my Artisan 246. Suggestions?
kgg replied to Piko's topic in Leather Sewing Machines
I would try Wawak.com, Toledo Industrial Sewing Machines or Superior's Industrial threads to name a few. kgg -
Replacement feed dogs for my Artisan 246. Suggestions?
kgg replied to Piko's topic in Leather Sewing Machines
When you click on the manual listed for Artisan 246 it gives you the manual for the Juki DSC-246, The manual states that the part number for the 246 feed dog is #21135009 and the other one numbered 21134101 is for the 246-7. Buying another one or installing another one will not buy you anything as they will be the same. I agree. What determines the size of the hole is the needle size and shape of the needle tip. The leather looks like a thin leather. Have you tried 2 or 3 layers of leather and comparing the stitch quality. What I think maybe contributing to the problem is: i) the leather isn't stiff enough or thick enough so it is not forced down into the feed dog hole or to hide the bottom thread knot properly ii) stitch length maybe a factor so I would increase the number of stitches per inch iii) change the needle from a LR needle point to a S needle point as the LR gives a off centre opening while the S is inline. ( https://www.coats.com/en/info-hub/all-about-needles/ ) kgg -
Replacement feed dogs for my Artisan 246. Suggestions?
kgg replied to Piko's topic in Leather Sewing Machines
A couple of questions: 1) What size of thread are you using? 2) What size of needle are you using? 3) What needle system are you using, 135 X 16 X needle size or 135 X 17 X needle size? kgg -
I have never used one but a point to keep in mind and do your own investigation with your appropriate agency probably the United States Customs and Border Protection (CBP),would there be a potential tariff on importing the machine into the US from Canada. If the tariff applies, you will be the importer and could be responsible for a 25 % tariff ( tax / duty, call it what you like) so the machines price would increase from $3349 to $4186.25. That would work out to be an additional $837.25. Just something to check so there are no surprises. kgg
-
Renia Colle de Cologne vs Syntic Total a Superfix
kgg replied to Yukonrookie's topic in How Do I Do That?
Now that is north. You do need good tough gear and a couple extra pairs of woolies. kgg -
Renia Colle de Cologne vs Syntic Total a Superfix
kgg replied to Yukonrookie's topic in How Do I Do That?
My take is there is no ideal boot thread to cover Canada's widely varying temperatures. Everything from hot humid summers up to about 40 C (104 F) with a humidity factor on top of that temperature while some parts during winter will experience temperatures down to -60 C (-76 F) plus a wind chill factor. In the summer you can only strip down so far as not to scare the horses while in the winter you dress up to look like the Goodyear blimp. I can remember waking up one beautiful sunny winter morning a few years back and no water it was frozen. It was a balmy -50 C and I'm in Southeastern Ontario. Those winter temperatures will play havoc on bonded nylon thread. Since bonded nylon absorbs water during cold conditions like what the Yukon experiences (dropping down to, if I'm not mistaken, -50 C) the thread may act more like that of glass (Glass Transition) of becoming more rigid and brittle. Flexing will then cause fraying / cracking and failure of the thread. In real cold conditions bonded polyester would probably be a better cost effective solution. Kevlar would better again but would probably have other cons besides cost. kgg -
With NL in your forum name I am going to assume you are from the Rock, the old country. kgg
-
The handwheel, that has the drive belt from the speed reducer, should turn towards you in a counter clockwise motion. If it is moving in the clockwise motion it can / will cause damage to the machine. kgg
-
Renia Colle de Cologne vs Syntic Total a Superfix
kgg replied to Yukonrookie's topic in How Do I Do That?
The best I can figure is an off yellow. The color really shouldn't matter as you should never see it when you are gluing two pieces together just be careful not to put too much close to the edges. When making a belt I use two layers of 6 1/2 oz leather glued together, as I like a heavier belt and then stitch along both outside edges with V138. When I wet mould I do that before putting the pieces together then decide whether to glue, use double sided 1/4 binding tape or just sew. kgg -
When you pickup the machine do Not transport it with the machine in the table like in the back of a van or pickup. Make sure the sewing machine sews properly before purchasing and if possible leave the clutch motor there unless you have another purpose for the motor. I would recommend: i) Remove the belt from the handwheel, then remove the machine from the table top, make sure the presser foot is in the down position and strap it to a passenger seat preferably in the upright position. ii) if using a hatchback vehicle: a) remove all the accessories off the table top so it is a flat clean surface b) turn the table over and unbolt everything from the underside of the table top like frame, motor, electrical boxes, actuating foot pedal lever from the motor, etc. c) then breakdown the fame Don't forget to save all those screws, bolts and nuts. As a note I can easily get 3 industrial sewing machine setups in a Honda Fit when broken down. iii) If using a pickup or full size van just securely strap the bare table and frame (no machine) in the back. kgg
-
Renia Colle de Cologne vs Syntic Total a Superfix
kgg replied to Yukonrookie's topic in How Do I Do That?
Why not good old fashion LePage Heavy Duty contact cement??? I use it all the time, readily available, smells terrible, usually requires two coats with the first soaking into and sealing the leather and the second coat, once the first coat is dry, for bonding and can be thinned. kgg -
This maybe caused by the needle not reversing into the same holes it made going forward. A quick check is to put some heavy weight paper under the presser foot as if you were going to sew something except with NO thread in the needle. Handle wheel the machine for about a half dozen stitches and then hand-wheel in reverse. The if the machine is setup properly the needle should fall into the same hole as when you were going forward. Also be for-warned from my experience the Consew 206RB-5 (made in I think China) is not the equivalent of a Juki DNU-1541S (made in Japan). That said there isn't much difference between the two machines with the Consew being about $300 less then the Juki DNU-1541S. kgg
-
I often go to a industrial sewing machine shop and buy an old sewing machine frame with the pedal setup. The old sewing machine table frames are so much better as they were constructed with heavier real metal. Then go to your local hardware depot and pickup two pieces of 3/4" plywood then glue / clamp them together. From there you could get fancy and put a pretty laminated top on. The standard kitchen counter typically is only is about 3/4" thick and constructed more often with press board. For the weight I would recommend going with the standard 1 1/2" thickness. kgg
-
Is B69 thread thick enough for use attaching bag handles?
kgg replied to AEBL's topic in Sewing Leather
I do agree. To name a few variables the results will depend on: i) leather type and thickness, chrome vs veg tan ii) thread size iii) thread type, nylon, polyester, etc iv) needle size and tip shape v) stitches per inch vi) stitch patterns About a month or so ago I got a new metal lathe, We had to move the wooden crate from the driveway to the rear of the house about a 60 foot or so move. We used my little 25 hp tractor using chains wrapped around the crate and hooked to the bucket hooks. No problem and in the basement we used a 1 ton shop hoist, 600 lb capacity hydraulic table and a combination of 2" and 3" nylon lifting straps. I always use backup straps as a just in case. One of the lifting strap on the last lift failed at the seam stitching of one of the end loops. It took the weight initially then went off like a gun glad we had the backup straps on or it could have been a bad day. kgg -
Is B69 thread thick enough for use attaching bag handles?
kgg replied to AEBL's topic in Sewing Leather
This formula can very misleading as it was develop mostly for fabric and indicates that by increasing the number of stitches per inch increases the seam strength it leaves out the practical factor before you damage / weaken the material, fabric or leather. As a note the strength factor would be 1.7 if you were using a Chainstitch machine. Using the formula in that article for Lockstitch machines: i) 6 stitches per inch x V92 having a breaking strength of 14.5 lbs x the strength factor= 130 lbs / inch ii) 20 stitches per inch x V92 having a breaking strength of 14.5 lbs x the strength factor= 435 lbs / inch The stitches per inch is stitch density and for leather it is recommend the stitch density should not be more then 3 to 4 per cm which converts to 6.35 - 8.46 stitches per inch. The reference article for this is Schmetz, Sewing Focus Technical Sewing Information -- Section 3.3 ( https://www.schmetz.com/mm/media/zh/web/7_tochtergesellschaften/bilder_18/schmetz/pdfs_4/sewing_focus/SewingFocus_20_3075-22_Lederbekleidung_D.pdf ) kgg