


kgg
-
Posts
3,369 -
Joined
-
Last visited
Content Type
Profiles
Forums
Events
Blogs
Gallery
Store
Everything posted by kgg
-
To try to cover off most your requirements a cylinder arm is probably your best bet with a table top attachment which you can also purchase aftermarket or do DIY version to suite your needs. Depending on how much you can afford I would suggest either a new or good used Juki LS-1341 or a good used older Juki LS-341. After that most of the clones are copied after the older Juki LS-341 so you can have a wide selection and price range to choose from depending on where you are located. Where are you located maybe someone can direct you to a dealer in your area? Buy Once, Cry Once kgg
-
Very nicely done. kgg
-
I am in eastern Ontario and to ship a 1 lb spool of T-135 (V138) Anefil Nylon directly from A&E located in Toronto cost me $8.50 and if order before noon I get it the next day before noon. kgg
-
Another thread chart would be ( https://www.tolindsewmach.com/thread-chart.html ). kgg
-
Lookling for help with a Chandler C-287 / Juki DNU-241
kgg replied to HDSewing's topic in Leather Sewing Machines
The height adjustments for the pressor foot is on the back side of the machine. Check pages 7, 8, 9 and 10 of the 241engineers manual. If the 241 is the same as the 1541 refer to section 7 of the Engineers Manual. Hopes this helps. kgg DNU-214H-5-2B Engineer.pdf JUKI_DNU-1541-S-7EM01_SERVICE_MANUAL.pdf -
Yes you can get them to sew but that can be a frustrating process for some people. I do have one and they are a true tinkers delight providing hours of entertainment. The quality of fit and finish to say the least is generally poor at best. They do have their place but the quality is nowhere comparable to that of a old Singer 29K or a new clone patcher. There is a fair number of mods that will be needed to make constant decent stitches such as resetting the height of the needle to accept 135 x 16 needles, polishing / replacing the pressor foot to reduce marks, polishing parts to get it to run sort of smoothly and retiming are just a few. If this is all someone can afford and has the time to invest it maybe a starting point until they could afford something better. If someone could stretch their budget to $565 US maybe what Walmart is selling which appears to be a clone of Singer 29k72 ( https://www.walmart.com/ip/TFCFL-Hand-Crank-Patch-Leather-Sewing-Machine-Cobbler-Shoe-Sewing-Repair-Machine/975331286?athbdg=L1700 ) or in Canada for $769 CA ( https://www.walmart.ca/en/ip/INTBUYING-Leather-Sewing-Machine-Sewing-Mending-Machine-Shoe-Repair-Industrial-without-Table-Motor/PRD442E8MWFN5KN ). I think better options out there in the new machine market for about the $500 US price range for a first new machine. kgg
-
Happy Leathercrafting Christmas 2021
kgg replied to Handstitched's topic in Leatherwork Conversation
Wishing the same to everyone. Enjoy, Relax and Stay Safe. kgg -
I think you have two options: 1. Bring the cutouts to a leather shop that has a leather splitter and have them reduce the thickness for you at a fee. 2. Buy a leather splitter, new or used, something similar to a Cowboy 8020 (new for approximately $2900 US plus plus) or Cobra Class 14 Leather Splitter (new for approximately $3000 US plus plus). This maybe an option if you plan doing a lot but will involve a learning curve. kgg
-
According to the A&E charts the info seems to be correct. kgg 5-Thread-Size-Comparison-Chart-2-4-10.pdf
-
Just a note to the above chart from RockyAussie . Metric thread sizes are written as just the number like "20" while Far East thread size would be written as "M20". Both the Metric and Far East sizing methods for threads are the same. kgg
-
The #21 needle is to small for your V138 (T135) thread and will not provide a large enough hole to haul the bobbin thread up properly. The #21 is good for V92 (T90) thread. You should look at the the the needle / thread chart on Toledo Industrial Sewing Machine site https://www.tolindsewmach.com/thread-chart.html kgg
-
Seems like you tried to order excellent thread (A&E), you can't go wrong there. But I wonder why you didn't order directly from A&E as they have two distributors in Australia Distributor A: Charles Parsons Com P/L A&E Distributor 75 Heyington Avenue Thomastown Melbourne VIC 3074 Australia Phone: +61-3-9380-3600 Toll Free: +61-1800-301894 Contact: David Millard Email: apparel@charlesparsons.com.au Website: www.charlesparsons.com Distributor B: Paskal Australia Pyt Ltd A&E Distributor 9A Lakewood Blvd Braeside Victoria Australia 3195 Australia Phone: +61 3 9588 8800 Fax: +61 3 9583 1699 Contact: DavidClota Email: paskal@paskal.com.au Website: www.paskal.com.au I hope this helps, kgg
-
To help with your thread problems a couple of pictures detailing how you have the top thread routed from the thread spool to the needle along with the size of needle could probably help solve your problem. kgg
-
The possible problem I see with the machine is getting parts should something break / wear out. Kingsley was sold in 1995 and parts / support can be hard to find. kgg
-
The number 135 x 17 is the system of needle you didn't mention the needle size. For leather you should be using a 135 x 16 with a #22 needle for thin leather and #23 needle or even #24 needle for thicker leather. The 135 x 17 needle system you are using is mostly for fabric. The spec I seen on your machine says the max needle size to be a #23. To me this would indicate it being rated for a #23 needle the machine is probably rated for V92 thread top and in the bobbin in thick and V138 top and in the bobbin in thinner or fabric. This would be similar to the rating of a Juki DU-1181n (flatbed) which is factory rated for V92 thread top and in the bobbin but can accommodate a #23 needle for V138 thread. In some materials depending mostly on thickness I can use V138 thread top and in the bobbin and others I have to go down to V92 thread top and in the bobbin. From the photo showing how the thread is unwrapping / seperating I think the hole the needle is making isn't large enough and rolling the thread slightly so it is unraveling. Looks to me like a polyester type thread. As a test go down to V92 bonded nylon or polyester with a leather needle (135x16 #22 or #23) as see what happens. kgg
-
A couple of questions. How thick is the material being sewn, what size thread (top and bobbin) and with what size needle? A couple photo's of the top thread path maybe helpful along with the item being sewn. kgg
-
I agree it can be confusing to say the least. As every brand name manufacturer brand or clone seems to number and classify their machine differently. I sort of break it down by Type first then Class then Series. Type is the easiest, basically what the machine looks like: Flat-bed, Cylinder-bed, Post-bed, Patcher, etc Class, to me is, what the machine was designed to handle: Domestic home sewing machines, Domestic Heavy Duty like portable walking foot, Industrial Fabric, Industrial Leather Upholstery, Industrial Leather Saddlery Series, to me, is where the machine capabilities are. I find it generally easier to determine a machines abilities when comparing brand name machines as there is usually more detailed technical information then what is offered by some of the clones. The "Class" label I think is being used, me included, commonly and interchangeably with "Series". This is where things like rated thread size, feed mechanism (triple feed, walking foot, jump foot, drop feed, etc), tension mechanisms and sewing thickness come into play and determine what a machine was designed and rated to handle. Just my thoughts, kgg
-
I'm not sure it's about each individual machine but more to do with the number of various manufacturers even through they all look pretty much the same expect for the coat of paint so who knows what other differences are lurking. Excellent advice. kgg
-
Like I've always said they are a true tinkers delight that gives endless hours of entertainment. kgg
-
Tippmann Boss or Cowboy Outlaw packages?
kgg replied to drumminor2nd's topic in Leather Sewing Machines
I like the look of the weaver as I figure you could probably modify the wheel at some point to accept a belt so a servo or helper motor could be installed to save your arm. As far as dependability / service or use I don't know. kgg -
Tippmann Boss or Cowboy Outlaw packages?
kgg replied to drumminor2nd's topic in Leather Sewing Machines
You didn't mention the Weaver Cub, maybe another one to look at and consider. kgg -
Hi Colt, welcome to the forum. If my math is right the thickness of what you sew is going to be somewhere be the 7/16" to 1/2 " thickness. This would put you above the upholstery case machines so you would be looking at machines probably in the 441 class. Since the Juki's in that class of machine are very expensive so the clone machines provide much more affordable options. I think in a motorized machine you would be looking at something like a Cowboy cb3500 new for about $2800 US. Another more affordable option that could work would be the one arm bandits like your Tippmann Boss new for about $1000 US or the Cowboy Outlaw new for about $1400 US. I know you said you had a budget of $400 so you are going to be in the used market but maybe this will give you an idea of what type of machine you will be needing. If you find a machine and are not sure of it's capabilities just ask as I'm sure someone would be able to help. kgg
-
Backlash issue with Juki 1541 & bonded thread
kgg replied to aslfkjaslfkjasflkj's topic in Leather Sewing Machines
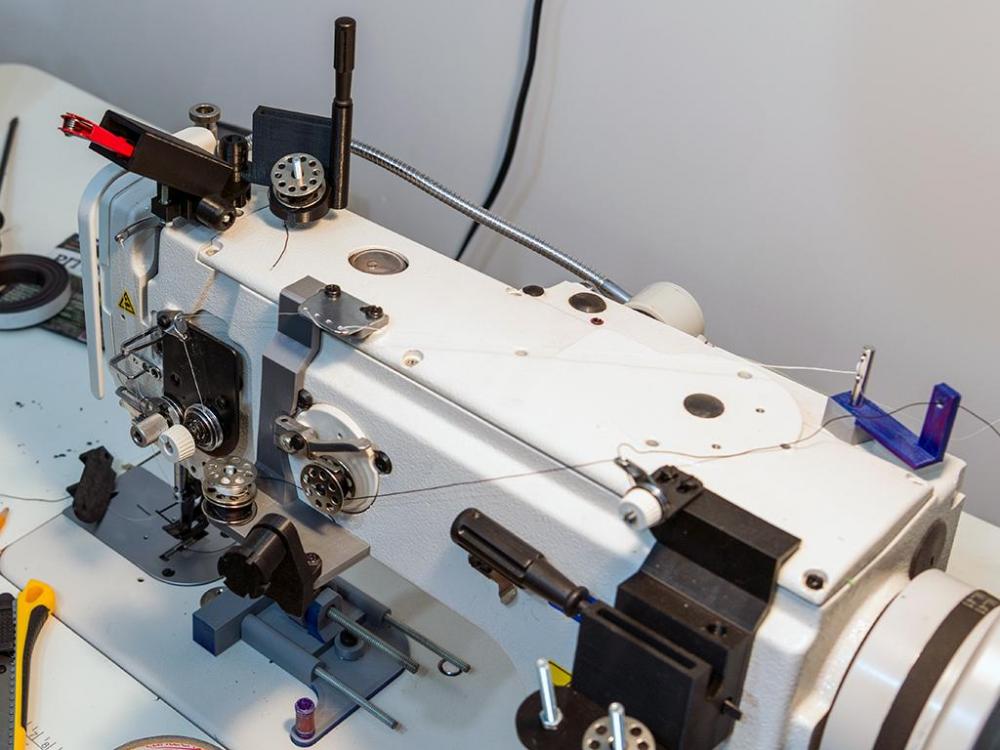
I know I usually design the old school way, well over expected load and filament is such a inexpensive medium for prototyping. A lot also depended on that they were designed around my golden rule. No additional holes to be drilled or tap into the machine or table top. The bobbin thread swing-away and the supports has to be able to withstand the breaking strength of V138 thread which is about 22 lb (10 kgs) and any additional bending moment loads where as the snips / needle / bobbin holder on the top front of the machine they all swivel horizontally and vertically so they have to withstand my constant grabbing / banging. All my initial designs for my machines have gone through some form redesign and each machine has it own unique set of attachments to speed up or make things a little easier or be able to repurpose attachments made for a flatbed so they can be used on a cylinder bed. kgg -
Backlash issue with Juki 1541 & bonded thread
kgg replied to aslfkjaslfkjasflkj's topic in Leather Sewing Machines
I use only one location for my top and bobbin thread pins, the location you are using for your bobbin thread guide pin, but I use the metal thread guide for the top thread and the PLA guide for the bobbin thread. This allows me to wind a bobbin at will without having to undo the top thread. Since you are using the standard thread spool stand you need to get the spools as close to the table as possible and the spool stand arm 2 to 2 1/2 times the height above the thread spool bases or you don't allow the thread to properly untwist. My particular setup has the thread going into the top and bobbin thread pin on top of the machine much closer to horizontal then yours to reduce angle thread tension. When I wind a bobbin I thread my bobbin thread through one of the outside holes in the bobbin and it then goes to a swing away thread attachment that holes the end of the thread and automatically cuts the thread flush with the side of the bobbin. I hated the end of the bobbin thread floppy around as I sewed or having to un-thread the needle and hold the end of the thread. I would use the thread guide pin location that you use for your bobbin thread and replace the flat horizontal top thread guide on the top cover of your machine as it has some severe thread cuts in it which may nick your thread and cause fraying and come out of the last hole rather then second last hole. I changed the angle of the next guide to the 2 o'clock position rather then the 3 o'clock position yours is in which did change the entry angle into the top tensioner slightly. The guide just before the takeup arm I changed the position to about the 1:30 position as this helped keep the thread from floppy to much to the left and crossing over to the other side and possible intermingling with the downside of the top thread from the takeup arm. Where the top thread enters the flat spring loaded bar just before the top of the needle should be 1) on the right side of the screw however I haven't found that to makes much difference 2) the flat bar tensioner needs to have the screw tightened in so the thread stays basically in one location with a constant tension so the thread doesn't slide or flop about. See if that helps. kgg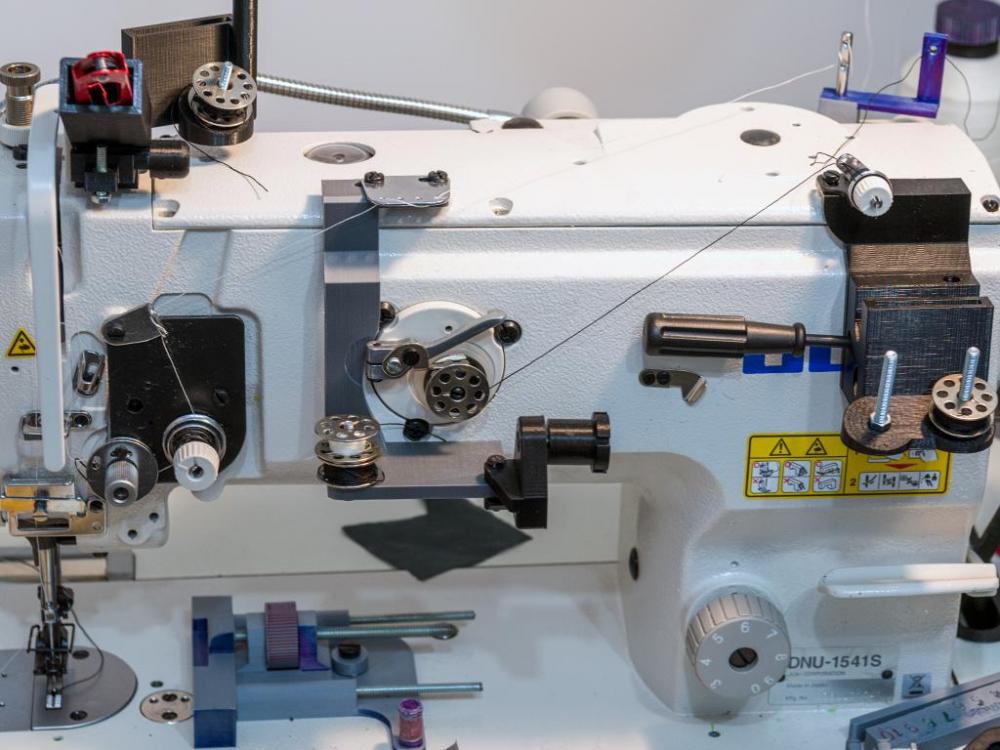
-
Backlash issue with Juki 1541 & bonded thread
kgg replied to aslfkjaslfkjasflkj's topic in Leather Sewing Machines
I have had to changed the height of the feed dog so it isn't as aggressive, severely reduced the pressor foot tension so the material isn't being forced down into the feed dog opening, run a layer of tear away paper between the feed dog and the material so the material doesn't ruffle / bunch up / curl. If the bobbin is spinning once the bobbin holder has stopped rotating my thought would be to install the bobbin in reverse so the thread is being removed from the bobbin against the direction of the bobbin case rotation. Also this could be probably caused by bobbins with the centers being out of spec like some aftermarkets ones have been known to be. kgg

