Leatherimages
-
Posts
417 -
Joined
-
Last visited
Content Type
Profiles
Forums
Events
Blogs
Gallery
Store
Everything posted by Leatherimages
-

Advice On Lasting Boots
Leatherimages replied to sepulverture's topic in Shoes, Boots, Sandals and Moccassins
Nick, It's Nick, isn't it? My suggestion is to get done gettin' ready, and get started. I assume you're still on the Russell Hunting boot style, is that correct? My opinion is that it really is an overly ambitious style with which to start. Did you get your pattern makers book yet?. When you do, here's a good first step; after you've made your pattern, make up a fitters model. You'll get lasting practice in 'real time' as it were. Up to now, what you're getting has been good for up to now. I've attached a picture of a fitters model of the western boots I make. (It's the assembled rough outs) They are made up of remnant leather, assembled so as to give me the negative space for the last to fill. I usually make them to test the fit before I begin making the boots, but also sometimes as a pattern test. If you wanted to practice toe boxes, you could properly install remant leather liners (I guess that would be good practice too), and pull it over your last. Do you need to know the sequence of your "drafts"? That may need to be another lesson. I'd strongly recommend DW Frommer's book ofnthe Western Packers for instruction in assembly fundaments. He works with the Geometric Method of pattern making, as opposed to choices elsewhere. http://www.bootmaker.com/dwswb.htm For the fitters for your Hunting Boot design, you'd have your quarters and vamp stitched together, and then pull that over your last with insole attached.. (You could wait to make your smaller pattern pieces later, unless you want to practice that now too, of course. Moving forward in small steps is not a bad idea by any means. Just don't get discouraged. This is a very long process that only gets some quicker. Remember there's more to it than meets the eye.) You need to make your tries with the work that has proceeded the step you're practicing, if you know what I mean. FYI, I often use skirting leather scraps for the counters in my fitters. I don't know if the style you'll be making will want 'stitched in' counters, or "pocket" counters, probably the latter. DW's method, which I use, has 'stitched in'. I guess we can talk about that as we get there. I've looked thru most all the pictures on my computer, and I don't see any for lasting as instructional images. The best I can do is the next three attached. They are; 1. tops and vamps are ready to be side seamed, 2.treed prior to being lasted, and 3.lasted.... everything but the actual lasting.. I would be pleased to help with building a holdfast on your insole for inseaming when you're ready, (and I have many pictures of that) but my suggestion is to let your fitter be cement constructed.. Veldtshoen (sp?) or Norwegian Welt, is a whole 'nuther kettle of fish. And one for an advanced class. Do you know of Sharon Raymongs book Simple Shoes? Check this out also: http://www.amazon.co...s/dp/1579903789 Have you spent any time on this web site yet? No boot/shoe making study should be without it. http://www.thehcc.org/ You'll find all this and more discussed in spades, but patience, it takes awhile to find it. I'll stop here and give you a chance to reply... -
The Cardinals
Leatherimages replied to Leatherimages's topic in Shoes, Boots, Sandals and Moccassins
Thank you friend. I'd really like to be able to just type a couple of paragraphs and answer all your questions. I really wish it were that easy. I've got lots of photos, and a key board, but it's just the thing about sitting still long enough to compose a "how I". I'd like to see that you were doing things according to the tutorial posted on this site, which I understand you've downloaded. It would give a premise for instruction, if you know what I mean. It's hard for me to get on board with you because of your choice of how to begin. I'll keep checking back and see what happens. Patience is a very very important skill in boot/shoe making/learning. -
 I like the rawhide collar.
 -
My Third Biker's Vest
Leatherimages replied to Bikeruga's topic in Clothing, Jackets, Vests and Chaps
This looks remarkable! As to not beating you too hard, it looks like it wouldn't hurt anyway, if you were wearing this vest, that's for sure. I wonder if it rides up when the wearer is seated? Actually it doesn't look like you were going for comfort. I discovered a great leather treatment several years ago for veg tan leather that is toolable yet soft, and much more flexible than what we are accustomed to tooling. It is a Milled Veg Tan from Wickett and Craig. This same vest would be completely different if it were made of 3-4 ounce Milled Tooling Leather. The first side I ordereded was almost "drapy" the way it arrived. I've used it very successfully as boot top leather, and many other projects where I did not want the boardiness of regular tooling leather. Ask for Glenn, but be patient. They don't run it thru the tumblers until they have a vat-fut. -
Advice On Lasting Boots
Leatherimages replied to sepulverture's topic in Shoes, Boots, Sandals and Moccassins
There really are alot of unknowns in what you've got going on here. I don't know where you're starting from, or whose method you're working with. But I'll offer what I can. First it sounds like you may be using veg tan, if you're 'trying to tool it with a hammer on the last'. Actually, veg will make for a very stiff foot once you've got it lasted. It would not be a very comfortable boot, and not really for first timers or unguided. Chrome would be better. Your 6-7 ounce is very heavy, and you don't say anything about lining leather. I don't know it this will address your issues, but try this next time. Use 3-4 ounce vamp chrome tanned vamp leather, and 3-4 ounce vamp lining leather. Before lasting, soaking it in warm water for an hour or so. This is mostly to soften the veg tanned counter, which you don't say anything about. So after lasting, and allowing the boot to dry on the last for several days (depending on the humidity in your area), take the vamp loose at the toe only, leaving the lining still in place. Now install your toe box. The toe box is what makes a hard toe, and is it's own lesson with several choices. Briefly, use 6.5 ounce veg, skived at the edge. Once it's cased, installed and allowed to sit for anouther day or two, shape and harden with celluloid cement. Once that's hardened under several coats, pull the toe of your vamp back over it all. Now you'd be ready to inseam, and pull the last. This probably raises more questions than answers, but there you go. As my first teacher used to always say, 'there's more to it than meets the eye'. -
Eric, You haven't attached a picture of them.
-
I love mine. And I paid $400! For wallet edges I'd reccommend a thread size 46 or 69 with needle size 12 or 14 respectively. Use a round point needle to avoid cutting the thred when you cross over on any given stitch pattern. It's best to sew with your right hand constanly on the flywheel. A loose leather belt will slip and give you a little slower stitch. And remember, "Practice doesn't make perfect, it makes permantent. Only perfect practice makes perfect.". Good luck.
-
Here's wishing you strength and stamina. Make things for people you love. Besides being good practice for later when you're recovered, it'll be good for your heart and your soul. God Bless, Paul
-
I'd recommend the Jones and Vining Co. They are will to do single orders, tho they suggest three pair for best shipping rates. They have a catalog of their models for a nominal charge. Global Footwear Solutions is not in buisness at this time.
-
Cool. The plug looks machine stitched. Is it? How'd you line them? Love the bead work.
-
Stewart, There is a whole field of leather work that is modled only. I kinda like it actually. Even more depth can be accomplished by raising the leather from the back. They call it reposse', I think. Ten years ago, about fifty of us did a Leather Art Cruise up the Inside Passage of Alaska. There was this huge landscape scene that was done without a swivel knife, modling tools only. It looked like about 6-7 ounce side of leather. Really quite amazing. If you like, do it. There's very little right and wrong, and even that don't matter. Go for it dude!
-
Wow Friend, You've chosen a very ambitious style to start with. I won't be discouraging, but there's more to this than meets the eye. Frank Jones of Noble Footwear has a pattern cutting book that I'd use if I were to attempt this design. http://www.noblefootwear.com/Books%20For%20Sale/book1.htm Good Luck.
-
I'm sure this was a very frustrationg time for you ladies. Thank you for your hard work for us all.
-
Mark, Thank you for the reply. I don't know that I've ever seen them done with a lace up the front. I'm not a rider, horse or motorcycle (any longer) but I've seen more than a few pair of chaps and made many different styles also. But none that lace up the front. Do you maybe have a picture, or sketch, so I can see how the crotch begins the close.? Thanks again, Paul
-
I've had a customer ask about a pair of step in chaps with a lace up front.. I don't quiet see how practical that would be. It would be "bulgy" when seated. Does anyone have any input?
-
Need Help Fine Tuning My 110W125
Leatherimages replied to Happy Hooligan's topic in Leather Sewing Machines
I'll just jump in with an obvious possibility. I have a 31-15 Singer table machine, with a knee lift. I've noticed that when my knee is touching the lift pad even a little bit, it will throw the tensions off, usually the top thread pulling to much below the surface. I don't know if this has been considered here, I'm just dropping in, but it's something to know not to do. Good luck. -
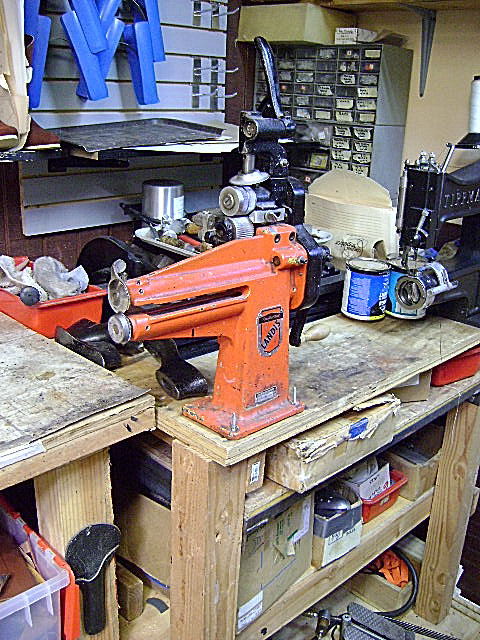
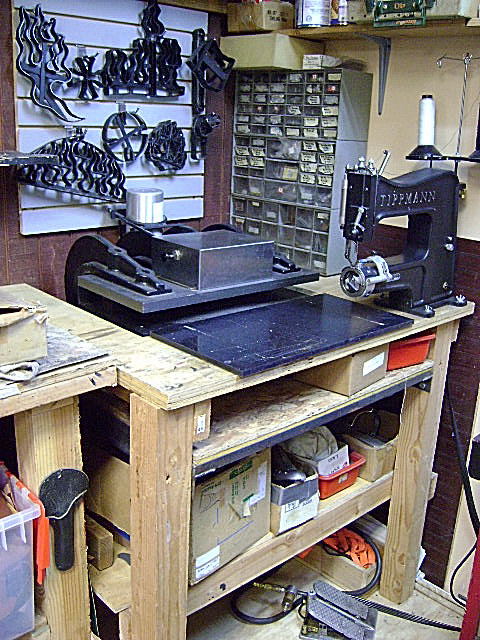
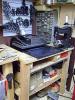
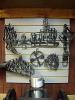
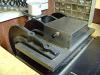
I'm going to go ahead and post the pictures on here, so I don't have to send them out indivdually. The Clicker is mounted on the table which is also for sale, and the dies a hanging on the back wall. This is all there is. These are mostly dies of flame configurations. All sizes.
-
does anyone have any ideas? thank you Charlene Did anyone ask you about the needle? I have seen over and over again, it's usualy something so obvious it should be called a "dope slap". Good luck.
-
Elephant Belt
Leatherimages replied to mmirob's topic in Purses, Wallets, Belts and Miscellaneous Pocket Items
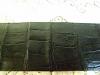
Rob, I understand your self criticism, but this looks pretty nice. To get a cleaner edge on fleshy leather, I'll use my skive knife and take off a strip about 3/8" wide, thinned to the edge about half thickness. Spray the back of your leather with a mist of water, to skive a clean strip. For edge treatment on fleshy edges, you might try to soak the edge a bit with a diluted clear acrylic, and then sand this firmer surface when it's dry. It wouldn't even have to be clear. I suppose you could get the same results with any color acrylic. Edge coat could work this way too, of course. There's several choices one might use. A wet/dry sand paper would be great to finish sand it with. As to splicing, yes one would skive and overlap, just as you would, say with calf. The trick, if you want to get good money for a quality job, is to do it so it doesn't show. If you practiced alot you might be able to hide it in one of those deep straightish valleys in the Elephant. Ostrich can be a trick, but if you avoid a verticle line between quills it will hide pretty good. Alligator works real well doing this. And don't forget, "black covers a multitude of sins". You might be able to see the splice on the 'gator guitar strap I just finished, which I have attached. But unless it's pointed out, "no one would know". And then, of course, you could cover splices or intentional gaps with a leather "medallion" or design of some sort, or a concho. One last suggestion, some of that 'spongyness' could be reduced by spacing your stitching closer to the edge. I say either an 1/8", or a stitch length, depending on the thickness. Keep wprkin' it. Every one you make is practice for thwe next.
-
Fritz, Great design. But I always enjoy your finish work ther best. Great craftsmanship. Paul
-
It really does matter what your needs are. You'll always be asked what you're going to do with it. Describe the job and the machine will appear. It's magix!
-
Painted Head Bands
Leatherimages replied to Stewart's topic in Purses, Wallets, Belts and Miscellaneous Pocket Items
Hey! I want my table cloth back! ( I use the same design for my photos.) Good job on the sweat bands. A suggestion: If you want something alittle softer on the brow, that you could still tool, ask W/C to "mill" a piece of their Tooling Leather. It's a tumbling process that results in a really drapy piece of tooling leather. You'd have something really nice in a strap of 6-7 oz.. Keep up the good work, and keep pushing yourself. This is the kind of project to grow from. Best, Paul -
I have for sale a 15 ton Tippmann Clicker that has seen very little use, $2000 firm. Various dies available also, including "flame" dies, pictures available. For pickup only, located in No. Arizona. Interested? please call Paul at 928 442-1213 or 928 308-5865.
-
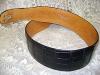
I just delivered this guitar strap today. The customer is outfitting his fellow jass musicians with these straps, and this one was for the bassist. 3" wide X 48" long, the 10 oz. Wickett and Craig skirting strap has a 1/2" wide bevel, gdown to 3 oz. all along both edges. The 'gator was cemented over this core, and an old Stohlman belt design was cut only along the back. I don't practice my swivel knife much and it shows, but it doesn't look too bad, huh?