


Wizcrafts
-
Posts
7,804 -
Joined
-
Last visited
Content Type
Profiles
Forums
Events
Blogs
Gallery
Store
Everything posted by Wizcrafts
-
I use edge guide presser feet on my walking foot machines that take Singer 111 type feet. I have them from 1/8 to 3/8 inch from the edge guide to the needle. I leave the inside foot on and just change the outside presser foot to whatever configuration I need. The edge guides are really good as long as you have a straight edge to follow. It gets a little dicey if there is a slope, or a thin edge. They have a problem on inside curves unless the radius is large, like on a vest armhole..
-
Material Guides on Juki 441 and Adler 205?
Wizcrafts replied to Cumberland Highpower's topic in Leather Sewing Machines
This swing-away edge guide looks like the one mounted to my Cowboy CB4500. It also resembles a Union Lockstitch edge guide. You can buy the Cowboy edge guide from Toledo Industrial Sewing Machines. The ULS edge guide is available from Campbell Randall Company, in Texas. -
Questions re: DIY box style speed reducer
Wizcrafts replied to shelr1's topic in Leather Sewing Machines
Disable any ad or script blockers you have running. If you are using a computer to manage the forum, but the photos are on your phone, and the phone is plugged into a USB port to open its files, download the photos to a folder on your computer, then upload them to the forum. I often run into this problem when I try to upload photos that are still on the phone, while using my computer. If you are going directly from the phone to the forum, and the filesizes are under the limits, try sending just one photo. If successful, add another after the first one appears in your post. You should have enough time to edit the post several times. -
Something has come loose on its shaft. Check every setscrew the attaches the balance wheel to the main shaft and onward. There shouldn't be more than a gazillionth of a parsec of free motion.
-
Before you take the revolving head off, check the feed motion cam for slack motion. Do this by pushing and pulling on the raised foot with the stitch regulator set all the way down until it touches the top of the foot. Every measurable amount of slack motion translates into lost maximum stitch length. You ancient feed motion cam may or may not be replaceable. If it isn't, you can bronze braze onto the puck shape to build up its diameter, then file, or grind, or sand it down for the best fit without binding as you rotate the butterfly handles. The maximum length will be 5 to the inch. There's no better time to rebuild or replace it than when the head is off the machine anyway.
-
Try reducing the pressure screw on the presser foot and see if it is easier to turn the balance wheel.
-
You're gonna wish you hadn't broken that spring. First, remove the presser foot and stitch length regulator assembly. Next, unscrew the needle clamp and needle. The easy part is now over. Get a drift punch with a 1/8 inch round shaft (flat face), and a fairly small inside diameter socket wrench socket. Have someone hold the socket over the stud that connects the needle bar to the take-up piston. Place the drift punch against the back side of the tapered stud and use a mallet to drive it out, from the back to the front. The socket should hold the stud after you drive it all the way out with the drift punch. The needle bar will drop against the needle plate. See if you can pull the loose needle bar up and out of its housing, past the take-up rack. You have to rotate the hand wheel to raise the rack to its top-most position. If you're lucky, the bar will come out the top and you can set it aside and proceed. Otherwise, read the next paragraph. Loosen and remove the flat pressure spring from the back of the machine. Next, use a long flat blade screwdriver to remove the four screws that hold the entire rounded revolving head housing to the left side of the body. When the last screw is removed, pull the head away from the edge until the needle bar falls into your hand. Set the needle bar on some cloths and clean the oil and grit off of it. Then examine the two tiny screws that are securing the top of the paddle spring to the indent in the needle bar. If you see the slots and can get a tiny screwdriver blade into them, unscrew the screws and set them aside away from each other. Set the one on the right in a cup or jar on your right and the left screw in a jar on your left. I promise you that it is easier to reuse these screws than to install new ones. Remove the broken spring. Clean the channel under it and look to see if the thread has gouged a channel in the steel. If so, use Emory cloth, or a narrow file to smooth out the steel and remove the gouge. blow out any filings, then place a new spring in position. Insert the original screws into their original holes and tighten them down, making sure that the spring makes firm contact with the flat steel under it and isn't twisted out of the narrow channel it fits into. Oil the needle bar and reinstall in in reverse order. When you reattach the tapered stud at the top, place the socket on the back and drive it in from the front. Should you be unable to remove the tiny screws and remove the paddle spring, buy a replacement needle bar. Try to find one that has the spring on it. If the existing right side screw can't be reinstalled, you'll have to get a replacement and install it. Then, you have to file it down on the right edge to prevent it from gouging the inside of the needle bar channel in the revolving head. If you replace the left screw, it too may need to be files down a little to clear the housing. When you're done, refer back to my opening sentence. If you need parts, contact @CowboyBob, or @shoepatcher. Good luck!
-
I am a professional patch sewer. Bikers bring or ship their vests to me and include embroidered patches they want me to sew on, along with a photo of the patches in place, or by taping or pinning them in place. They have their patches sewn at embroidery shops. Have you considered simply working with an embroiderer to have your designs digitized, then sewn onto a leather vest? Yes, the patches will cost actual money. But, those designs can be stored and repeated if others want a similar patch job. If you really want to hand tool a vest, you'll need to construct it of vegetable tanned carving leather, about 4-5 ounces thick. Make sure you don't carve the lines so deeply that they get perforated and separate under use. If you cut too deeply, the vest will be ruined. I recommend carving the patches on 4-5 ounce leather panels, then use double-sided tape to hold them in place and have them sewn on by an upholstery shop that has walking foot sewing machines. Note, if you intend to place any patches over pockets, it takes a special "patcher" machine to sew them on without closing up your pockets. These patchers are usually found in shoe repair shops. Many professional leather crafeters own patchers and walking foot machines.
-
Measurements of speed reducer box needed
Wizcrafts replied to Metalhorseman's topic in Leather Sewing Machines
I've been buying servo motors from Bob Kovar, at Toledo Industrial Sewing Machines, since 2011. All of the recent motors have a 45mm option You just have to call him and request that pulley when you order the motor and new v-belt. -
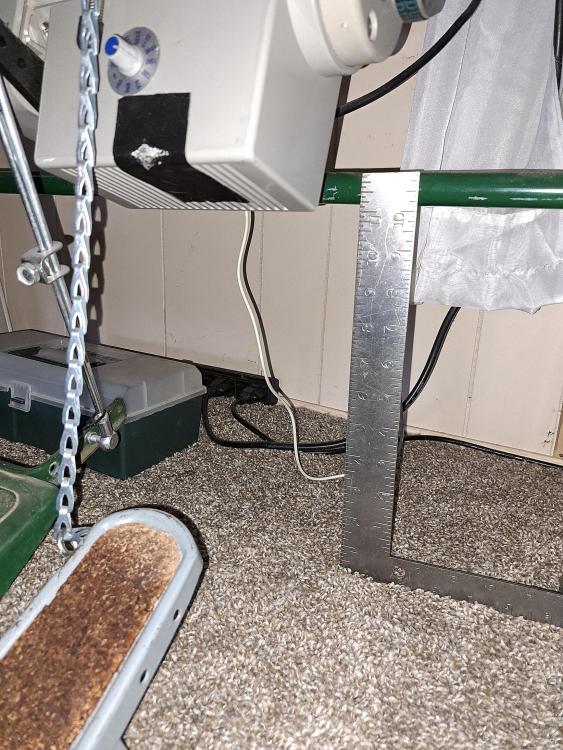
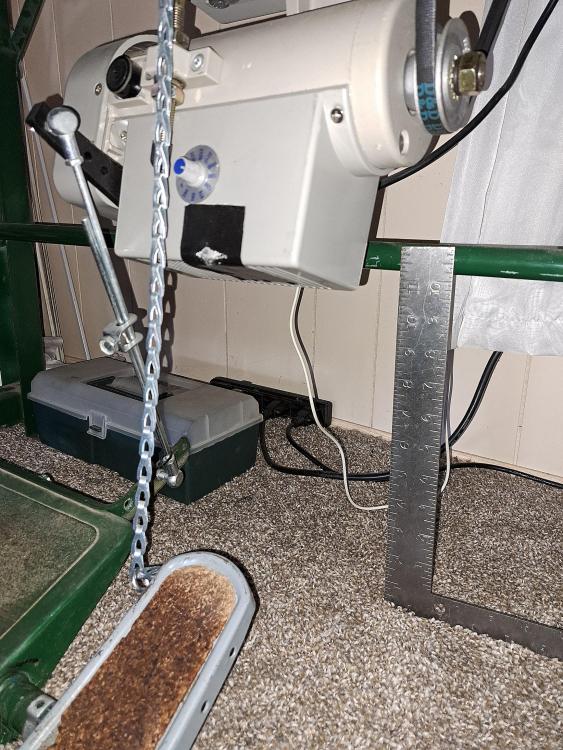
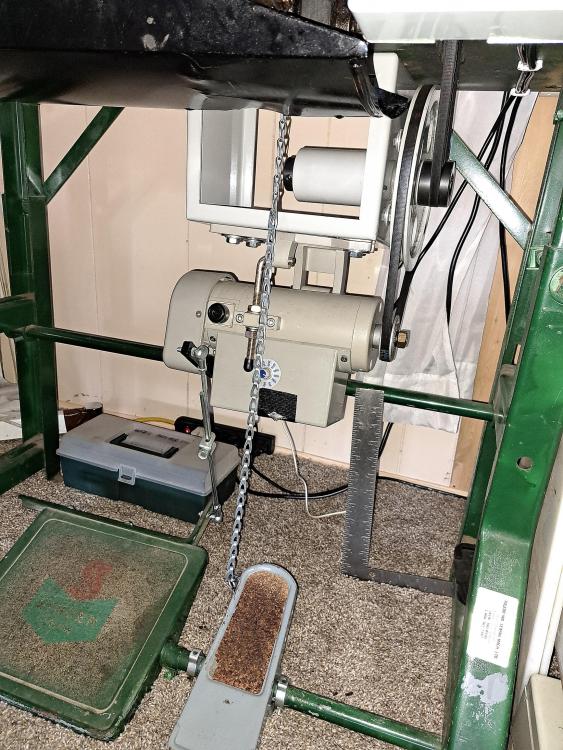
Measurements of speed reducer box needed
Wizcrafts replied to Metalhorseman's topic in Leather Sewing Machines
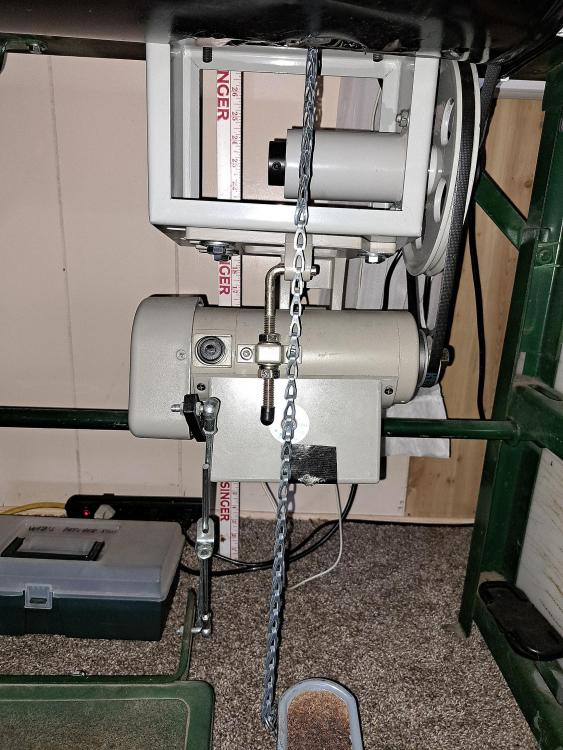
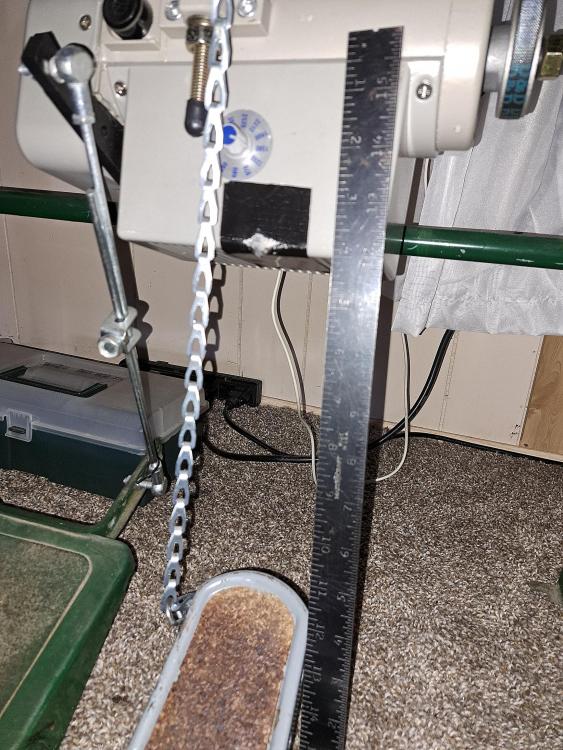
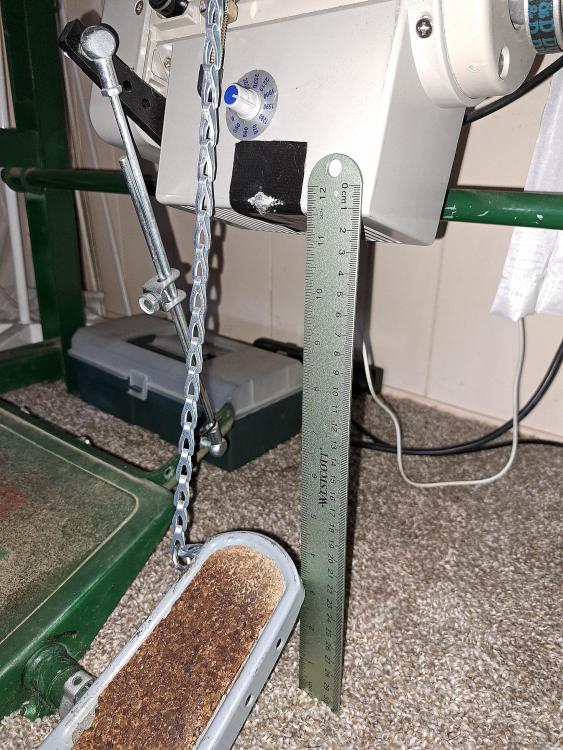
I have a drop-box reducer under the table for my post bed machine. Here are some photos, which include a ruler, showing the distance above the carpet.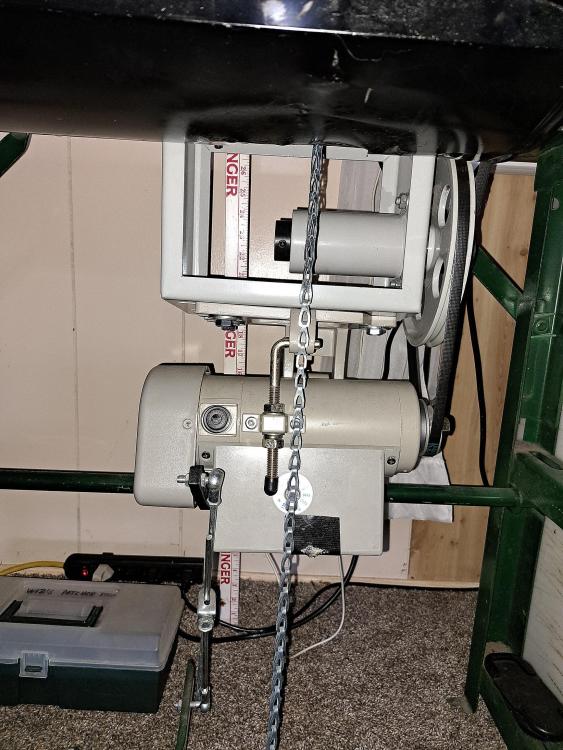
-
Get you a couple packs of #18 in Schmetz Serv 7 round points in System 135x17. They have a larger eye and are reinforced to resist bending. They cut through double sided tape well. The next best are Gross Beckert Gebeder in system 135x17. They are titanium coated.
-
Sewing on patches is a large part of my business. When I first got into that field, I was using v92 thread and a #19 (120) leather point needle. I have since moved to only using v69 thread, top and bottom, with a #18 round point needle (GB Gebeder, or Schmetz Serv 7). I also recently bought 7 spools of v45 thread and some #14 round point needles (Serv 7) for poorly edged patches. My round point needles are all System 135x17. The reason I switched to round points has to do with the embroidered (serged) edges. I found that leather points were actually cutting the thread on the edges, rather than separating them. Round points don't do that as much. I also prefer round holes to anything with a shift between stitches. Most of the patches the customers bring in have tight border stitching. But, some are overly loose. When I run into trouble using #69 thread with a #18 needle, I can move down to #45 thread and a #14 needle. I crank down the foot pressure screw to minimize any deflection from the patch, leather and lining. In case you're interested in the machines I use to sew patches, they are as follows: Adler 30-7 patcher with a long arm and large bobbin (in shop) Singer 29k71 short arm, small bobbin patcher (at home) Singer 168g101 compound feed post bed machine (at home) Singer 139w109 long bed walking foot machine with a Juki LU bobbin conversion (in shop) Singer 111w103 walking foot machine (at home) The reason for the split between home and shop machines is that the place of business that hosted us closed up on December 31, 2022. That put me and my partner out of work. We finally found a new location to setup the shop, but there just wasn't enough room for the three other machine. Also, I was able to sew patches at home for a few local MCs. They still prefer to come to my house, so the three machines will stay in my expando.
-
You have two things going against you when you sew thin or flexible materials. 1: the feed is strictly on top. 2: the gap between the toes is too wide to hold down the material as the needle comes up with the two threads overlapped. Here's what you can try to do. 1: use the thinnest needle and thread combination that will secure the seams. 2: Add some liquid steel between the legs to reduce the width of the gap. It would be safer to do that to a new, aftermarket foot than an original Singer foot. File the gap smooth and use Emory cloth to slightly radius the top, and smooth out the bottom. Also, reduce the bobbin and top tensions to the minimum that will form a decent stitch that lays tight on the material.
-
Sewing Machine Thread Brand and Type
Wizcrafts replied to rodneyv's topic in Leather Sewing Machines
They must have tweaked that machine to sew 1/2 inch and, do it with #277/207 thread. I have tweaked a few of my Singer walking foot machines to sew thicker than normal, or to use heavier thread than the standard limit suggests. One of those tweaks is changing the needle system to a longer needle, allowing me to raise the alternating height of the feet. But, this had an adverse effect on thinner work. -
Looking for a used, but not abused belt embossing machine, preferably with some wheels in good condition. I only respond to existing members of the forum.
-
Looking fo a quality 111w155 hook driving shaft
Wizcrafts replied to cynthiab's topic in Leather Sewing Machines
Try contacting @CowboyBob to see if he has some old stock. He owns Toledo Industrial Sewing Machines, which has been in business since before Singer's industrial division went out of business. -
Does anyone know about the Keats and Bexon Outsole Stitcher?
Wizcrafts replied to Dannymac's topic in Leather Sewing Machines
The Keats and Bexon shoe repair machines were built in Staffordshire, UK, from 1894 through 1926. The only hope of finding any manual or instructions is to find somebody who owns one and has a manual they will photocopy, or mail to you. The stitchers haven't been produced in many decades. You might try contacting the people who maintain and sell Landis 12 series sole stitchers to see if they are aware of any intentional or unintentional similarities. -
This post is a duplicate of an ongoing topic started by the same member. The author should post any further questions in the previous topic he started.
-
Always hold back the starting threads for about three stitches on these machines. This helps set the tensions and prevent the top thread from jamming in the shuttle. Consult this needle and thread chart to use the right combination for a given thread size. Larger threads need bigger needles. The shuttle needs to have sideways clearance for larger thread to pass freely and the hook must not hit the needle. You may be able to tweak the check spring so that thicker thread can be properly tensioned as the machines cycles. You may have exceeded the machine's thread handling capacity.
-
I second that! Good parts maker.
-
I'd get a hold of @CowboyBob - Bob Kovar, at Toledo Industrial Sewing Machines. He may know about the bobbin and case for your machine.
-
Does anyone know about the Keats and Bexon Outsole Stitcher?
Wizcrafts replied to Dannymac's topic in Leather Sewing Machines
Here is a video of a Keats and Bexon stitcher sewing shoe soles. It looks just like a Landis 12 series machine. https://www.facebook.com/watch/?v=357374289648482 -
Artisan Toro 3200 PED 500 vs Cobra Class 4
Wizcrafts replied to apexcustomleather's topic in Leather Sewing Machines
Hey Glenn, that's a Cobra Class 4. The Cowboy equivalent is a model CB4500. That's what I have. -
Welcome aboard, Jose! I mentioned masking because we sometimes get trolls from Eastern Europe and Africa, and India/Pakistan who are spammers or scammers. Some of them try to mask their actual geo-location, but I track them down anyway. Many years ago, I had a Juki LU-563 walking foot machine that was used to sew orange honeycomb vinyl safety vests for road workers. We cut the vinyl out with a motorized saw blade fabric cutter, but the edges were sharp. So, the boss decided we needed to cover the edges with bias tape. I tried the cheap folders that were readily available from sewing machine dealers, but they couldn't navigate the inside curves of armholes. So, I went and talked to the dealer where I got the machine and he sent me to a guy who custom made folders. The guy had me bring the cutout vest parts and the bias tape. He made us a right angle folder that laid the tape into the material perfectly, whether on inside or outside curves or straightaways. The advantage of using the Juki was that it didn't lose stitch length. I sewed at 4 to the inch on some parts and 5 to the inch on others. I just turned the dial. I never experienced any problems with the path of the platter holding the tape roll to the folder. Fortunately, we didn't need a cylinder arm machine for those workers' vests. Another advantage of the walking foot machine was that I just swung the folder out of the way to sew on reflective tape and official patches. Again, it maintained the desired stitch length. You can't beat a compound feed walking foot machine when sewing difficult or slippery materials.
-
According to his ip address, he is posting from Palermo, Buenos Aires F.D., Argentina. Of course, he could be using a VPN to mask his true location.


