


dirtclod
-
Posts
2,418 -
Joined
-
Last visited
Content Type
Profiles
Forums
Events
Blogs
Gallery
Store
Everything posted by dirtclod
-
I don't have a Cobra but the same style machine i was told to sew on a couple pieces of chap leather till the stitches looked right and they would work fine for just about every other thickness. So far that has worked. Good luck.
-
Need Help With A Purse Pattern
dirtclod replied to johnggrg's topic in Purses, Wallets, Belts and Miscellaneous Pocket Items
I cut ever piece out of poster board ( mark right and left pieces, tops and bottoms ) and put it togeather before i cut the leather, to make sure it all fits. You have to take in to account your seam allowinces to and mark them on your pattern. Tape or clip it all togeather to check the fit. The poster board will hold it's shape when you stand it up or move it around. Your leather i'm guessing a thin chrome tan and it won't hold it's shape if you try to move it much wrinkle and pucker. A plus on cutting every piece out before you cut your leather is you make sure you have enough leather and your able to move things around on the leather to make things fit and you may still screw up. It just happens. -
For me it depends on the piece, some i mark on the front and some on the back. Holsters, checkbooks get marked on the back. Belts get marked beside the snaps. Headstalls, reins get marked on the ends. Breast collars sometimes in the center of the tie down strap sometimes in the middle of the collar design. Saddle bags sometimes on the front of the flap sometimes under the flap. Chap yokes sometimes in the middle but most the time at the end next to the belt.
-
What kind of stamp ? A makers stamp or a design stamp.
-
Need Help With A Purse Pattern
dirtclod replied to johnggrg's topic in Purses, Wallets, Belts and Miscellaneous Pocket Items
I would cut a piece of poster board as wide and as long as half the bottom and side needs to be. Put a center line on that piece. Then measure what ever half the length the bottom is and mark that on the poster board. Then you can take a straight edge and angle the sides in to what ever width you want at the top. Or measure a set distance up the side and taper from there. If you line doesn't look right erase it and try again. I make patterns all the time and don't get them right the first time very often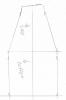
-
Need Help With A Purse Pattern
dirtclod replied to johnggrg's topic in Purses, Wallets, Belts and Miscellaneous Pocket Items
I'd just cut the pattern and the sides and bottom out of poster board one the way they have it one with the narrow top and wider bottom. Tape the pattern pieces togeather and see which one she likes the best. Then make it. -
How To Properly Taper A Belt
dirtclod replied to ABC3's topic in Purses, Wallets, Belts and Miscellaneous Pocket Items
Pratice you taper on a piece of poster board or something like that. It doesn't have to be belt length just as long as what you want to taper. When you get it right trace it onto your belt blank and cut it out. -
I use wet dry sand paper to sharpen my round and head knives and it works great. I've been using 320 grit cause that's what i had and then i strop it. But you could start with 320 or 400 and go on up in grit say to 600 and then a 1000 if you want to. Use it just like you would a stone work it till you get a burr and work the burr off. Make sure you have a good flat surface to work on. You can wet the paper and the surface of what ever your using and it will pretty much stay in place. Their are several videos on you showing people using the wet dry paper. For my strop i cut out a shape i liked with a handle from a piece of scrap plywood and glued a piece of horse hide on it. I use green buffing compound, you can get it off ebay if theirs not a store close by that sells it.
-
( One of these days, . . . I'm going to invest in a band saw, . . . there is a company in Florida that will make a band saw blade that is just one long sharp blade, . . . I plan to try that some day, . . . just don't have the band saw machine to do it with yet ) Dwight you may want to invest in one the chain gloves if you buy the band saw and knife blade to go with it. That would be real similar to the knife / saw thing they use to cut material in sewing factories and several of the cutters have missing fingers. Before they started using the chain gloves. Any knife round, head or razor knife is going to cut your fingers if you put em in the way.
-
Barge contact cement for me. I have tired the weldwood and didn't have much luck with it. If you it to dry quicker use a hair dryer and blow on the glued piece. I keep one at the end of my bench and use it mostly in the winter time when the glue is slower to dry.
-
I use round and head knives for all my cutting. But they have to be sharp on you will be in the same boat. Something to look into is a better quality of leather. Over the years i have got some leather that you needed a chainsaw to cut.
-
Shoulder Holster Construction Question
dirtclod replied to THein's topic in Gun Holsters, Rifle Slings and Knife Sheathes
Sew the sides. Then bend to fit on the bottom and sew. Or sew it all flat bend to fit on the bottom and sew. Your picture doesn't really show the front of the bottom of the holster. Might work might not. -
I would try the one you have on some scrap and see what happens.
-
Floral Belt
dirtclod replied to Clay's topic in Purses, Wallets, Belts and Miscellaneous Pocket Items
Just to add to Particle's post you can click on the thing that loos like a floppy disk right above CLOSE and it will open in a new window and be smaller. -
I nave have heard of the people your talking about but that's beside the point. I think you have done a great gob on your outfit !! You get a GOLD STAR from me.
-
Ostrich Leg Wallet
dirtclod replied to pitman's topic in Purses, Wallets, Belts and Miscellaneous Pocket Items
Nice job. I like it a lot !! -
If you click on the thing that looks like a floppy disk by close it will open in another window and be smaller.
-
Nice, Very Nice !!!!
-
Really nice !! He is going to be real proud of his bag. I do have a question. I noticed that all of your flowers and most other tooler's always have a odd number of petals. Is their a reason for that ?
-
Koi Fish Tri-Fold
dirtclod replied to Kevin King's topic in Purses, Wallets, Belts and Miscellaneous Pocket Items
Great job ! It looks great ! -
Leather In The Garage? Around The House?
dirtclod replied to Shorts's topic in All About Us and Off Topic
That's a great ideal ! -
Look on you tube their are several movies about covering one. The guy from west coast customs has a great ideal of running your leather though a sewing machine with no thread to make the holes.
-
If u post yur question somebody will probely be along to try and answer it. But they will need to know what the question is first.
-
Holster For A Really Big Gun!
dirtclod replied to Lobo's topic in Gun Holsters, Rifle Slings and Knife Sheathes
Looks like it's made for a left handed person to me. -
If you put some conditioner like Lexol ( not a lot i rub it on using a trimmed piece of wool on sheep skin ) on the pieces you have dyed it should help limber them up.
