JLSleather
-
Posts
7,384 -
Joined
Content Type
Profiles
Forums
Events
Blogs
Gallery
Store
Everything posted by JLSleather
-
Okay, I admit it (and I'm sure I'm the only one) ... I just GOOGLED "cart buckle" and I'm STILL not sure that that means
-

Too many options for leather finish
JLSleather replied to Warhauk's topic in Leatherwork Conversation
Yup, Yup, and YUP. SO MANY people love to put that cheap (easy to apply) acrylic junk on leather.... BRAG about how "resistant" or "water proof" or "repellant" it is... and never mention (if they even realize) that it prevents the penetration of conditioners as well (which, for those who still don't get it, would be BAD). I recommend one product over others I have tried, and I admit I have NOT tried them ALL. That old fishin' question applies here as well -- Q: What is the best lure for walleyes in deep water? A: The ONE YOU WILL USE. -
THere are a number of "commercial" products, each with its' own accompanying line of bull intended to sell it to you. I personally do not put ANYTHING on the flesh side of unlined holsters. Depending on if you're one of those guys who puts his gun away IN A LEATHER HOLSTER and DRIPPING gun oil, that might be a consideration ... but you shouldn't be doing either of those things, so not a problem.
-
That's quite a project! Look forward to seeing it
-
Depending on what I'm working on, I get this sometimes. If I'm molding leather, and doing the cooking, and helping at the church.. somewhere in there i can wash my hands so much I basically flush out all the oil in the skin... and ... dropsies. I helped put new rafters on a building a while back.. repeatedly told the guy under me might want to find another place to stand, since sometimes I drop stuff. Guessing a 22 oz hammer from 30 feet above is a game changer
-
Colt King Cobra holster
JLSleather replied to dakotawolf's topic in Gun Holsters, Rifle Slings and Knife Sheathes
Welcome, but maybe I should clarify that I dont' think THIS holster would have an issue -- it's "pretty" high on the gun, and the double layer certainly adds some rigidity. Clarifying.. I LIKE this holster -
Colt King Cobra holster
JLSleather replied to dakotawolf's topic in Gun Holsters, Rifle Slings and Knife Sheathes
Looks purdy good. Wanna watch HOW FAR you drop that center.. too much and that over the trigger can get "flappy". LINED will help with that.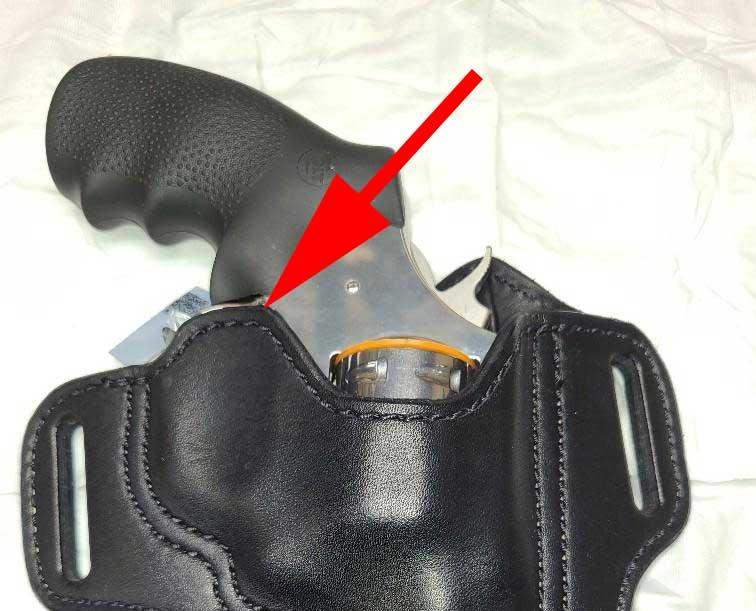
-
Assa lotta werk! Well done
-
There is no inherent "oily" in shark hide. Like everything else, it is tanned, colored, stained, and/or finished in many different ways. None of the shark I have ever used has been "oily". Still, I'm sure it is sometimes done that way, for various reasons. I would like to think that if the shark somebody is selling is "oily", they would let you know that.
-
That cow in MN GUILTY on both counts in the death of Dante Wright. That kid was NO SAINT, but he didn't deserve to be executed in the street. The "I didn't know I had a gun in my hand" defense apparently doesn't work at all Ironically, she claimed to be attempting to arrest the kid for a GUN POSSESSION charge. I guess she didn't think "i didn't know I had a gun" was a legit defense FOR HIM...
-
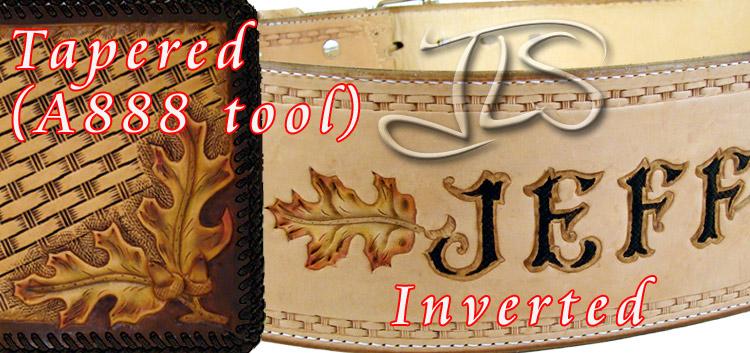
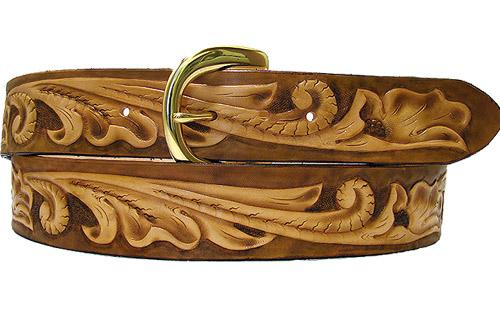
That's exactly what I did when I started out. Used to be "craftaids" were the thing, little plastic templates (I still have some of them). No tracing, no copying, just rub on damp leather to put your pattern on there. Idea was, I wanted to practice CARVING, not practice TRACING and DRAWING. So I would git a chunk o leather and do THAT design, repeatedly, until it looked like the picture that came with it. Definitely RUINED some leather, but wasn't long before I was carving away (the guy who said he was going to "teach" me ended up trying to HIRE me). Yup. Yup. Yup. I like Tan-Kote on my carved projects. ALMOST no darkening of the leather... allows your tooling to show through where the leather darkened from shading or beveling. No fancy toolin' neither - just dribble some on and smooth it with the palm o yer hand (remove kitty hair from your hand before use). Work it into the cuts and depressions enough so you don't have any 'bald' spots. Very simple to use. Later - if you like - you can add a bit of DYE right in the tan kote for custom shades (I use a separate little bottle, a bit goes a LONG way). Chuck is correct... some pics would make it easier fer folks to help out with specific stuff. When I started, some of my early work went right in the trash (after comparing to the pic it was SUPPOSED to look like and also using it to test dye colors, finishes, etc - no point carving another one WELL, then messing up the GOOD one with a bad dye job!) See kin I find a thing what got Tan-Kote'd ... Okay, here we go. The wide belt on the left was FOR ME, and I LIKE that natural leather color. Obviously the leaves and letters used some DYE. The rest of the belt got a couple LIGHT coats of neatsfoot oil and then TAN KOTE. It slightly darkened the tool impressions, basically left the rest unchanged (maybe a SLIGHT darkening). The belt on the right is a simple one done good while back using one of those 'craftaid" templates. Pattern is from the 80's - I think - and STILL gets requested (in fact, I think that craftaid is still available in stores). The background was dyed in thinned chocolate dye, and the seeds in the design. Then the entire belt got TAN KOTE'd, transferring a bit of the dye to the depressions in the leather, thus following the natural darkening of the tooling (some them 'fancy' folk call it 'burnishing").
-
If'n a fella DIDNT have arthritis, that might be a good way ta GIT it
-
Okay, that got boogered already Let's try this again. This is now a COUPON CODE you can enter at checkout (theoretically simpler). Pick any patterns you want - no minimum, no maximum - and get HALF OFF through the first of the new year. https://www.etsy.com/shop/JLSbydesign?coupon=CHRISTMAS21
-
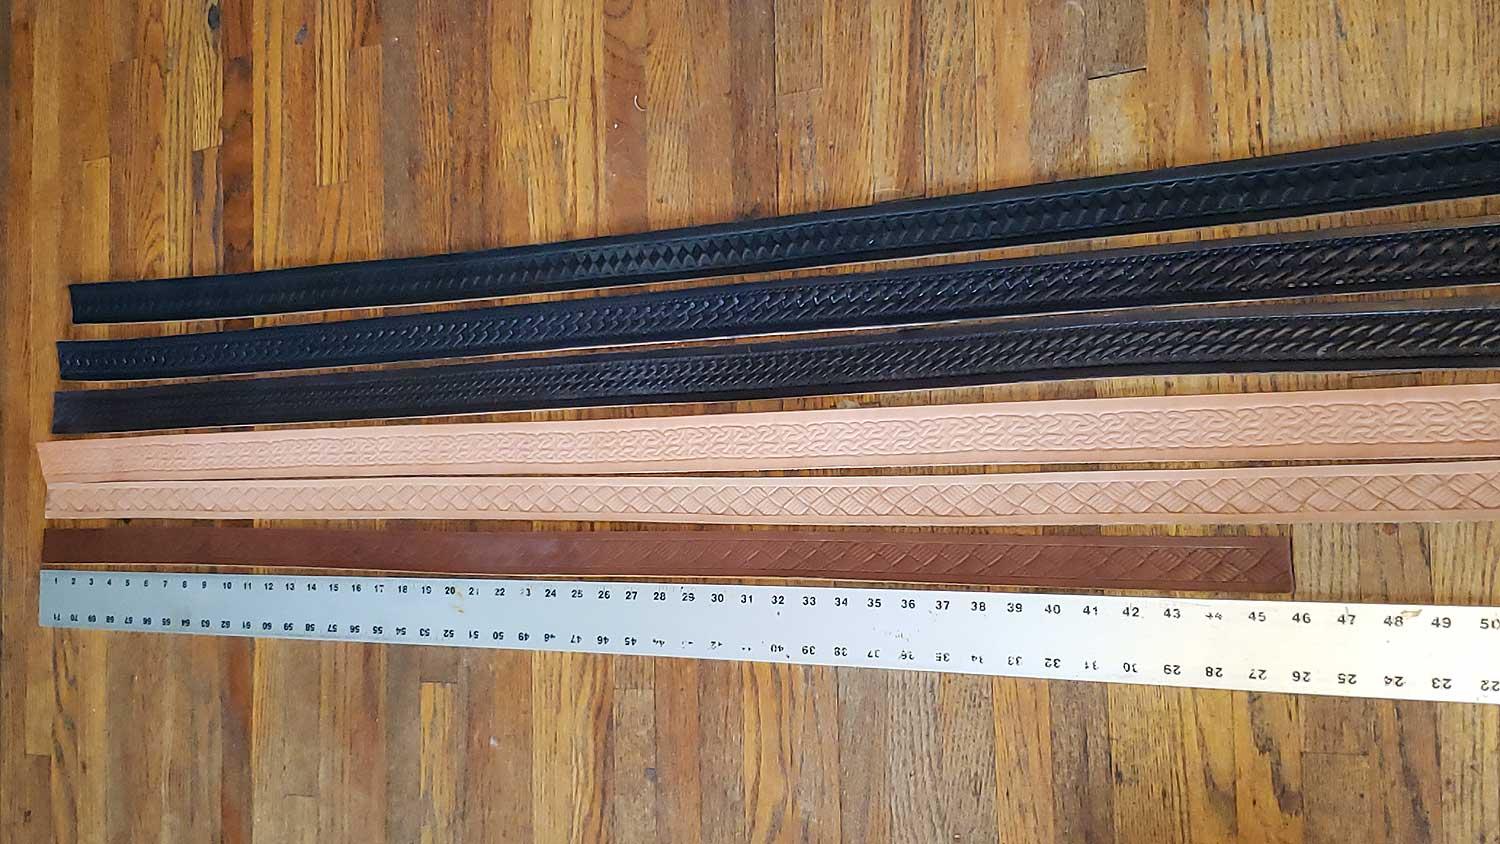
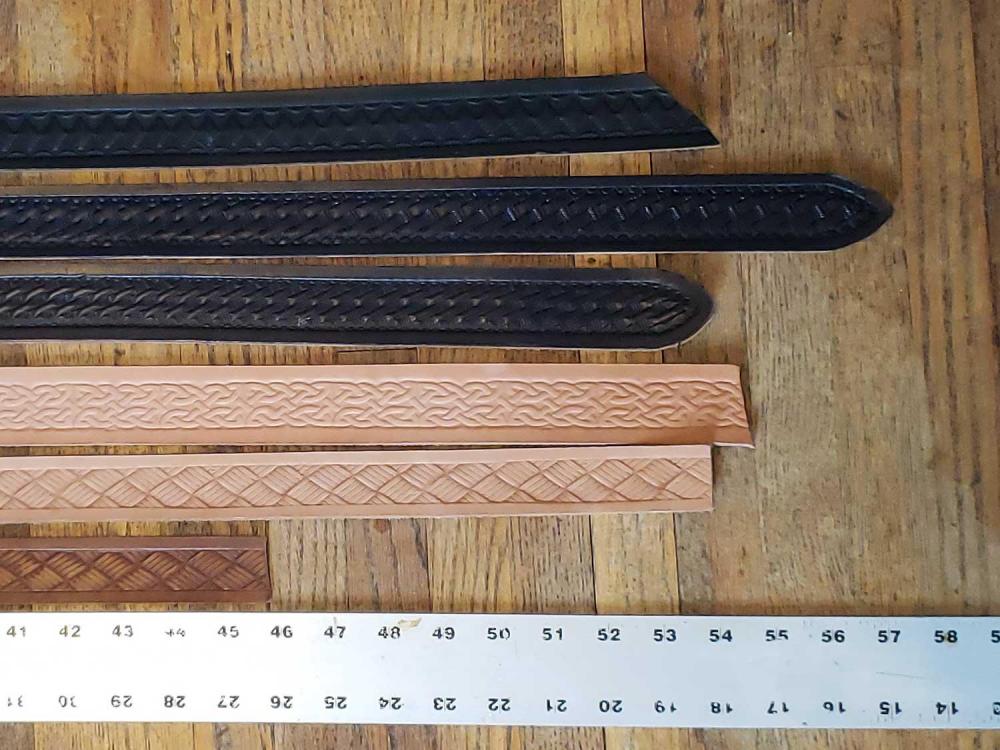
Embossed or basket stamped. Pics should show the patterns and the length (one end is lined up with the end of the ruler on all straps). Shortest one is 46", which should make about a size 38 belt. The two next to the ruler are 1 1/4" wide, the others are 1 1/2" wide. No finish applied, so any of these can be dyed or stained. Very simple stuff... color, apply stain, punch holes, and wear. These are 7/8 leather (one is 8/9) which we intended to LINE with 3/4 oz. If you want, we can provide the lining leather for a fee... but for now, to move out the straps .. ALL SIX (6) FOR $60, and that's with "FREE" (Jeff pays) shipping. Gitter dun ...

-
https://www.etsy.com/shop/JLSbydesign?coupon=CHRISTMAS21 $5.50 (50%) off any of our patterns you dun had in yer cart fer a while and was thinkin' about. Not sure how cutesy does that, but you're SUPPOSED TO get an email if you "abandoned" something in your cart (no idea how long it needed to be in there) no need to rush off, this wont expire until end of the year ...
-
Pancake Holster for a Taurus PT .22
JLSleather replied to rickybobby's topic in Gun Holsters, Rifle Slings and Knife Sheathes
This is nice Been meaning to do a layout for this one.. like for about a year now -
Made a belt for my boy
JLSleather replied to DustinSmith's topic in Purses, Wallets, Belts and Miscellaneous Pocket Items
Would have LOVED to see those initials CARVED instead of stamped, but that's great lookin' belt rotcheer! -
Pancake Holster for a Taurus PT .22
JLSleather replied to rickybobby's topic in Gun Holsters, Rifle Slings and Knife Sheathes
NOT hatin' that one bit
-
Sewing on the 4500, you could try one or t'other... either sew QUITE slow which allows time for the lower feed dog to get into position, or cut your pattern about half an inch WIDE on the BACK side, makes it easier to keep the holster level when sewing .... check out page FIVE of your STohlman book
-
Why is that?
-
I'm gonna GUESS that if you broke a needle that heavy, most likely the holster sewing area wasn't perpendicular to the travel of the needle bar. Meaning either not flat, or allowed to "rock" while sewing, causing it to come out different spot on teh back than on the front But if that pattern is the one from the "how to make holsters" book, which it looks like, that holster is better suited to an L frame revolver (fits a 686 right nice)
-
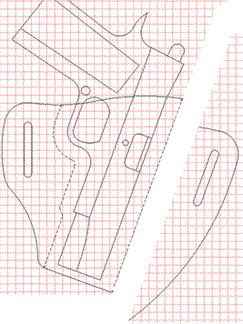
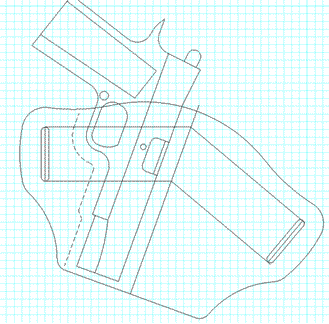
1911 holster rig
JLSleather replied to blue62's topic in Gun Holsters, Rifle Slings and Knife Sheathes
Looks good! My only 'coulda, woulda, shoulda" would be the mark from the sewing machine foot. Avoid them. Or if you can't avoid them, remove them. Or if ya can't avoid them and cant remove them, use a creaser or folder to BLEND them -
AvengerLayout.pdf A "50/50" pancake and what most call an "avenger" is THE SAME LAYOUT. If you already have a "pancake" pattern, you could give me a few bucks for an "avenger" pattern, OR YOU COULD just cut the front end off your "pancake" and mirror it, as discussed in this YEARS OLD article by sumdummy ...
-
No fair double dipping I don't go that deep in the port simply because i dont' want anything "catching" on it.. I want the holster to slightly "smooze out" the profile - like the snow fills a ditch - so it doesn't catch shirts, pockets, etc.. and telegraph that it's there. Holster looks good, though ... and nuthin' I said should be taken as "negative" or "bad" ... just each his own. I AM wondering how you got the trigger area so F L A T ...
-
yours are very much like what i'm talking about and I like to use graph paper (do they still call it that?) for the scale, but a guy could just put something in the scan for scale (to be sure it prints correct size later)