


JLSleather
-
Posts
7,386 -
Joined
Content Type
Profiles
Forums
Events
Blogs
Gallery
Store
Everything posted by JLSleather
-

One more tooled Bible cover!
JLSleather replied to YinTx's topic in Books, Journals and Photo Albums
Most any craft store will have ribbon in various widths and colors. Or if a guy uses leather lace, you could use that as well (though if you mark mulitiple pages like I do, that might create enough bulk to not be good for your book binding). I have been known to buy these ... though a guy with a scrap of leather and some ribbon could easily make them from "scraps" . Note similar stuff is available with adhesive, like peel and stick to the inside of the binding. https://www.amazon.com/gp/product/B08LG9TYHX/ref=ppx_yo_dt_b_asin_title_o02_s00?ie=UTF8&psc=1 Some folk is determined to use it... so ... say lah vee ... -
One more tooled Bible cover!
JLSleather replied to YinTx's topic in Books, Journals and Photo Albums
Assa nice color. Maybe a little smoother in the matting around the cross (probably the angle and the glare making it show up as much), and then there's that spot on the back panel. Oh, wait... that's a spot of something on my screen Seriously, I like it. -
Keeping the retailer above water IS NOT your responsibility. I get SO tired of retailers running brick 'n' mortar stores who think that I should find it reasonable to pay 20, 30, 40 percent more for something so that THEY can justify their existence. I do not. If you give me a better deal, I'll shop with you. Better deal might be better product, or same product at better price, or same product and same price but quicker delivery, for example. If you want 25% more, TELL ME WHY I should pay it. Haven't asked in a while, but for a long time H.O. had a minimum order of 10 sides. This is not a large amount of leather. I thought ordering 10 or 15 sides would be a good bit until I talked to people buying 50 at a time. GREAT leather is just over $8 per foot. Sadly, most of the 'retailers' are selling LOWER GRADE leather (though they don't often admit it) and marking up 50% AND MORE. At $12 per foot, it should come with the beef STILL IN IT. I have suggested FOR YEARS that if you use small pieces or if you only get to do leather on weekends, for instance, that you get 2 or 3 others who do the same and POOL your money. Got other leather crafters within 50 miles or so? SPLIT an order of 10 sides with another guy, or two, or three. I buy BACKS (belly removed).. usually run about $180 each after shipping for the best grade. An order of 10 for $1800-ish. SO if you got a couple other guys buy a couple sides each, maybe easier to swallow. Sadly, not too many interested in that around these parts. A few years ago I was moving, and offered to sell some backs AT COST. Just saves a little room on the truck.. didn't really matter. Wasn't going to take a loss on it, but thought it would be a good chance for some who were interested to see what the GOOD stuff is supposed to look and feel like. I think ONE person wanted ONE piece (or maybe it was 2?). Another option ... Wickett-Craig sells leather by the side (or back, or bend). They will sell individual sides, in natural or pre-dyed colors (yes, the dyed leather can be stamped/tooled). I've used a good bit of W/C leather, the vast majority of it quite good. If you're TOOLING leather, it is DIFFERENT but not better or worse... a bit different feel, but tools very well and retains its shape when formed. There are "genuine" leather, "bonded" leather, "corrected grain" leather, ... blahblah.... it goes on forever. It's confusing because it's MEANT TO BE confusing.
-
Finished up another Bible cover
JLSleather replied to YinTx's topic in Books, Journals and Photo Albums
YIKES! YIKES! -
looks like ya got a ways ta go, but lookin' good so far
-
My First Attempt at Holsters
JLSleather replied to VikingKong's topic in Gun Holsters, Rifle Slings and Knife Sheathes
YOU tell US. Try on your rig, see how it feels. Personally think 15 is enough on longer barrel lengths -- sometimes more like 20 with shorter barrels. -
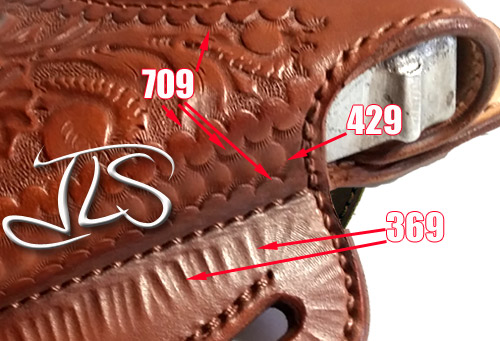
I wouldn't say those tools are the same, but in the end they're both for "decorating" the leather. Either can create the illusion of "roundness' and depth -which is the point. Beyond that, part of the idea is texture, and that may be where those tools vary the most. Chuck's correct, though... just do it how YOU like it. Bob Ross comes to mind ... the canvas is "your world"... so might put a tree right here ... 40 years ago, when "craftaid" templates were quite popular, the template usually came with a picture that showed the tools used and where they were used on that carving. Many of them I used AS SHOWN, since i was trying to learn how to carve leather and wanted to be able to compare what I did to the picture. Probably not necessary, but it did help ME ... FWIW. Probably where i got the idea to do this type of thing when asked.
-
some more holsters
JLSleather replied to chuck123wapati's topic in Gun Holsters, Rifle Slings and Knife Sheathes

-
Bifold Wallet
JLSleather replied to lansacoder's topic in Purses, Wallets, Belts and Miscellaneous Pocket Items
-
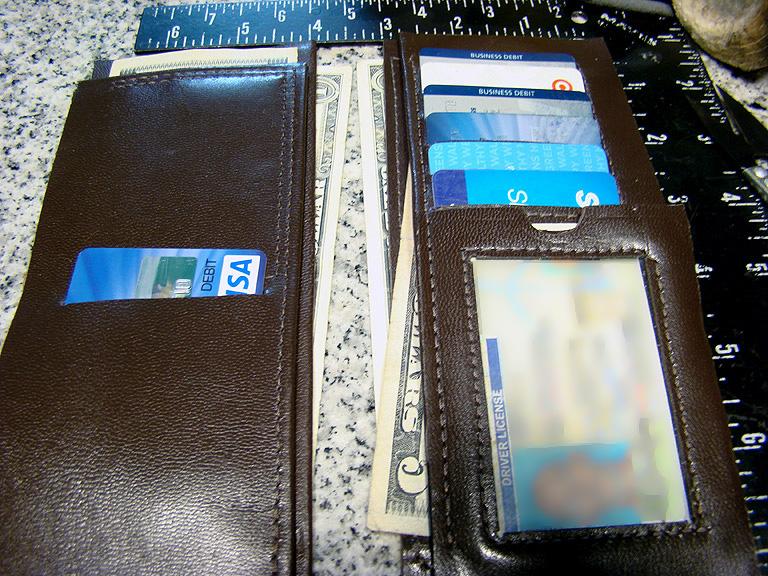
1 of 2 ways, generally . Use kidskin - from S-T Leather. Very nice, very consistent feel and colors. About 1.5 oz. Double check, but I think it's item L3777 in their store. Skins are about 5 sq ft, give or take a bit. Very nice. It's chrome tanned, so the edges don't burnish. I either skive a taper or fold the edge over on outside edges (not pocket tops). Their web site is WEIRD at the moment, just call them at (314) 241-6009 Alternatively, consider the Chaylor-Finelli inserts distributed by Springfield Leather. I have used a number of various styles and found them all to be quite nice. Customers always like them. Very easy to work with. Being pre-made, you would want to be sure that the size is correct for your project before beginning. Being part leather and part fabric (innards) these are even thinner - still very nice.
-
A Little Weekend Project
JLSleather replied to AzShooter's topic in Gun Holsters, Rifle Slings and Knife Sheathes
Oh, yah - it should be obvious, but just in case .... The pattern shows actual size for the main body of the holster (you could trim it if you don't want room for the initials) but not for the 'clip strip". This is because .... depends on the clip you use. Just trace or sketch your clip, then cut the leather 1/4" wider on all sides. -
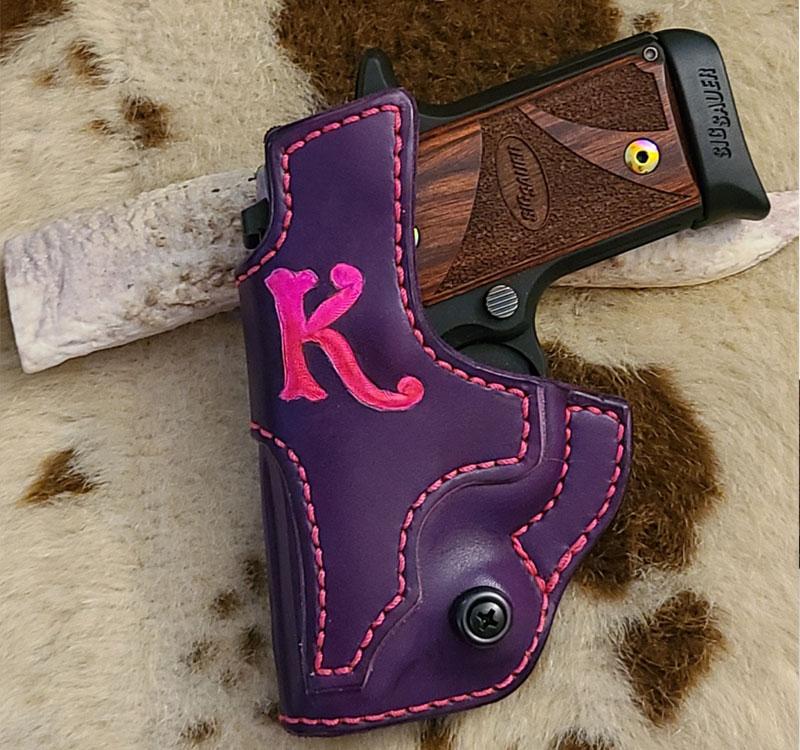
Yup... staying at it like i dun figgered ya wuzz Here's one from .. last year (?) ... that was kinda the same thing, though I filled in the letter. Tried to tone it down a bit by making it 2-tone with some of the purple ... that "hot pink" was BOLD! But looking at the gun you see WHY the purple. Sent her to a color picker online, had her send me the RGBs for the color she wanted. Miss Katherine likes it

-
A Little Weekend Project
JLSleather replied to AzShooter's topic in Gun Holsters, Rifle Slings and Knife Sheathes
Oh, yah - you DID say 2 years of posts, not 2 hours of snoop. Correct. Guess i didn't pay much attention to you Nor should you be. I have a history of noticing what others don't, and have on occasion been known to say what others won't. -
A Little Weekend Project
JLSleather replied to AzShooter's topic in Gun Holsters, Rifle Slings and Knife Sheathes
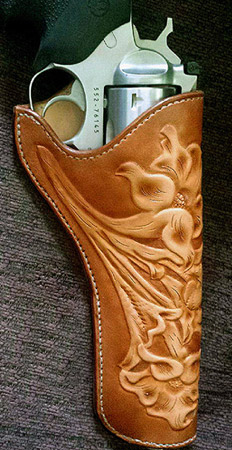
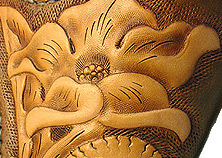
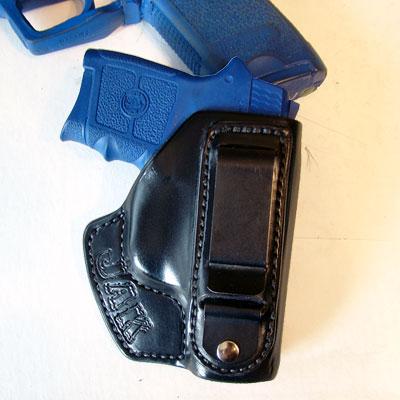
You really should get some kind of a life. I can't imagine any SANE cause for digging through somebody else's stuff, especially not for hours ... I wouldnt' even do that if they ASKED me to. I don't think I was making this style holster around 2010 - most of the holsters I do are TOOLED leather. In fact, had you asked a simple question I could have TOLD you that and saved you all that time. Course, you woulda missed out on seeing my cool stuff. I was doing stuff more like this ... and these ..... since these do at least take SOME skill / experience to make. But certainly NOT this, since as anybody who knows me or any of my work knows I would never leave this ... space .... on any holster I make. You know, cuz ... "IF what you do is something that ANYBODY can do, then don't be surprised when ANYBODY does.", and those 'cut it out, sew it, and form it" holsters definitely something anybody can do. In fact, SO MANY people started popping up with FOR SALE patterns around that time that I made some myself TO REMIND PEOPLE just how simple this is, and that a guy really don't need somebody else to do the layout for 'em. The person in that video appears to be one big fat wrinkle (sad when even a guy's WRISTS have folds) ... and even he/she seems to be doing okay, thus we conclude ANYBODY can do it. Incidentally, I made these SPECIFIC holsters with tooling designs from WAY back .. 1) because I personally like them, and 2) because SO MANY people were suddenly "tooling" leather (probably too gracious for some of what I saw) and I wanted people to be able to COMPARE what others tooled with what I tooled, WITH THE SAME PATTERN. But, lemme git on back to patterns n holsters n stuff. Now in 2021, I find I'm quite bored with those "plain" holsters. Again. SO bored in fact, that I'm currently only making them for people I know, and only by specific request. I plan on making more holster PATTERNS, though, and I'll need to MAKE them to test the fit, so there's that to do. MEANWHILE, seems a bit rude to talk this much about patterns and NOT provide AT LEAST ONE. That in mind ... what do I have "laying around" that some folks could maybe benefit from? Oh, hey - how about this simple little clip-on IWB for the SW Bodyguard! EVERYBODY use this pattern, make a holster, take a pic of it and upload it to here. We could have an "anybody can do it" photo gallery ... and the winner gets.... NOTHING at all (but the pattern is FREE). Yes, that's a small bit of sueded leather on the inside face, for TRACTION I'll git the pattern 'processed" here directly, but for now i'll say this took a piece o' 7/8 cow about 8" x 4.5", another strip for the clip "retainer" piece, a clip of your choice (I'll include the SIZE of the clip used, but don't remember WHICH one exactly) and a rivet. Dye and finish as you see fit... and attach small piece of suede leather (or cloth, or cork, whatever). Wait.. no point to "process" something this simple. Just remember to mark the sewing line ON ONE SIDE ONLY... the other side is shown just so you can easily mark the GLUE LINES on the inside. The clip used is shown full size... alter or use another style if you want it to ride higher or lower ... BG380_C3.pdf Actually, ya know what? Fer you OWB folk, here's a mag carrier for that same little shooter ... SAME COST Mag_SWbg_P0.pdf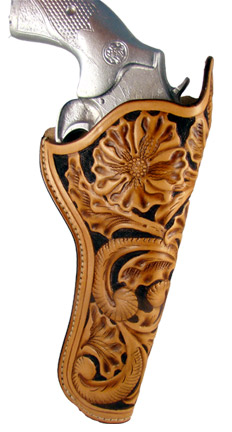
-
A Little Weekend Project
JLSleather replied to AzShooter's topic in Gun Holsters, Rifle Slings and Knife Sheathes
this must be same pattern, I guess? I'll have ta snoop around, see if i still have this tooling design anywares near here ...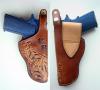
-
perhaps. or perhaps they're making more of them because they're cheap and easy to make and they sell? where's the british gal usedta come around here.... beautiful stitching at like 11 to the inch... can't remember what her name was now ...
-
I don't like "chisels". I didn't like them in the 80's when they were well made, and I certainly don't like the 'stuff' tha's available now. A good awl is much better for getting all the holes consistent depth (size) for the thread, works on items that arent' flat. Having said that, a GOOD awl is tough to find too. yeah, that's what I said. Turn off the videos and all that time-sucking noise, and PRACTICE.
-
No I mean the outline of those letters DYED the same color as the thread, like a border ...
-
What weight is that? PM me an address and I'll send you a piece of what its' SUPPOSED TO look like... pretty sure i have some 3/4 oz and some 4/5... not sure i have any 2/3 left around here.
-
A Little Weekend Project
JLSleather replied to AzShooter's topic in Gun Holsters, Rifle Slings and Knife Sheathes
our pattern fits the .22? Good to know Still, who's this Ables fella? That holster looks familiar ... Maybe we'll gitya to try out this other thing.. see if this fits ya as well ... Right hand, very simple thumb break holster with integral belt loop Able might have one JUST like it ...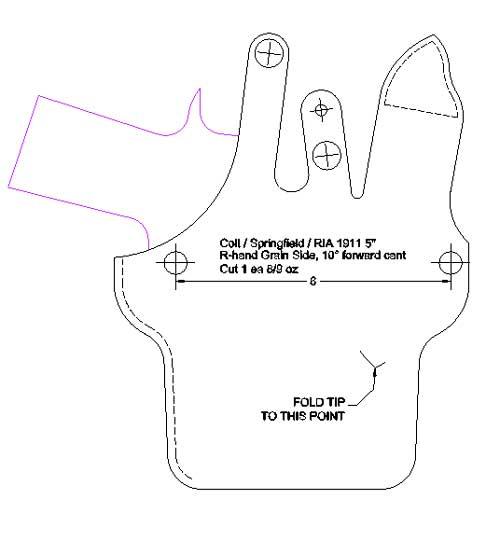
-
Yup, looks nice, I think you're right 'Assa good point
-
-
I LIKE THIS WALLET. Coming from YOU .. I almost expected the fancy letterin' to be outlined in the same blue as the thread (which would ALSO be SWEET) ...
-
Not a chance I'm spending half an hour watching some dufus go on about something as simple as sewing with a needle SERIOUSLY folks... you want to know how to work with leather? You have to WORK WITH LEATHER. Stop spending your day on y-tube (pronounced WHY tube) and ACTUALLY DO IT. Grasp the idea that you're going to make some mistakes, and jump in. I love AL's books - probably owned most of them over the years. But in this one, even Al (who is usually very to the point and informational) got a bit WORDY. The book ABSOLUTELY IS worth having if you can get it.. just keep in mind that the principle is very simple.
-
What are the shaded parts on the first one? And... I don't mind the LOOK of that last one, though I suspect it could get irritating catching on belt loops when put on.
