


JLSleather
-
Posts
7,385 -
Joined
Content Type
Profiles
Forums
Events
Blogs
Gallery
Store
Everything posted by JLSleather
-
These terms have been polluted and convoluted to the point where they mean virtually nothing. "full" grain once meant the entire skin, as opposed to "top" grain, which seemed to denote a leveled hide - leveled by removing the BOTTOM section to end up with a consistent "top" piece (the underside was often modified to become suede leathers or "prints"). Hermann Oak Leathers (St Louis, MO) sells tooling leather "split" to the thickness you need. The hair has been removed and the hide has been "tanned" (another term that has been through the wringer over the years). EVERYBODY will rush to tell you that H.O. is THE best leather. Just keep in mind that they sell GRADES of leather, and not all are equal in condition or cost. That said, I DO recommend HO tooling leathers, but would add that if you're buying through a retailer you're going to pay a SIGNIFICANT markup, and if you're buying "panels" (or other small cuts) the markup will likely be WORSE. While we would all LIKE TO BELIEVE and EXPECT to pay more for a "panel" or "piece" with defects removed (cut away)... that is NOT guaranteed. There are those who will gladly cut a piece of "C" grade leather, complete with visible defects and "mushy" spots, and sell it to you at a PREMIUM price. Buyer beware ...
-
the curve (radius) of the tangential arcs are bilateral, and such that the pivotal center of the arc is maintained in a position inversely proportional to the square of the strap width. Even more so on Tuesdays before dawn. Seriously, this is not something you need vector software for.
-
Based on WHAT? What is the "right" proportion of cut length to strap width? What is the "proper" radius of the curve of the cut? How does leather thickness affect the proportion? If you "worked out" a pattern, that seems to suggest that you have A way, not necessarily THE way. This is perfectly acceptable, but it does reinforce the idea that there is no "right" way to shape a belt tip... Oh, I guess I assumed it was clear, but maybe I should have said that this heavy paper (card stock) becomes your TEMPLATE ...
-
There is no "right" way. Cut it the way you like it. Easy way to get there is cut a piece of heavy paper the width of your strap, and the length of a sheet of paper or so. FOLD the paper in half lengthwise (so you have a piece 11" x HALF THE WIDTH you started with). Using a knife or shears, cut a curve you think is "about right" through BOTH layers. Open the fold, and the two sides will match. Don't like the look? Fold it back together and try a different curve, until you get what you're wanting. Once done, measure from the tip to where you want your holes, and mark (or punch) the holes on the folded line.
-

Mag holster for myself
JLSleather replied to lansacoder's topic in Gun Holsters, Rifle Slings and Knife Sheathes
tough to see much detail in that pic, but I rather like the overall look of it. might ride a tad higher than I like, but each his own -
What kind of Hammer for stichlines and gluing?
JLSleather replied to Silvyr's topic in Leatherwork Conversation
doesn't matter... as long as the face is smooth. in fact, you could "hammer" your stitching with the back end of a punch for that matter ... -
Just for the record, I have ordered a number of times from Sandy and friends at Int'l Die (GA). No issues - - ever. Always just what I asked for at a price I couldn't argue with. Everything from ranger die billets to holsters with NO straight lines anywhere - always well made.

-
Finished up another Bible cover
JLSleather replied to YinTx's topic in Books, Journals and Photo Albums
https://www.youtube.com/watch?v=CIICvf7D7Ng Don' seems like a decent fella (though to be honest, that's what gets him paid). Nothing new going on here, though - this is the same principles laid out in Stohlman's book "Art of Making Leather Cases, Vol 2" like 40 years ago. https://tandyleather.com/products/the-art-of-making-leather-cases?_pos=1&_sid=0b0d18e83&_ss=r Al shows construction with a zipper closure, and about a gajillion other principles a leather guy would benefit from knowing .. -
Finished up another Bible cover
JLSleather replied to YinTx's topic in Books, Journals and Photo Albums
Yeah, I know the ones. Still, some of them are quite nice, and the fabric usually allows a much thinner finished product than is generally seen in leather. Tough to tool nylon, though And THERE is the rub. Have to have the book dimensions to make a "legit" case for it. Some of the ladies at the Sunday service have those fabric covers that are FAR too big for their Bible. Some of them cover LEATHER bound Bibles - seems they just wanted the zipper closure to protect it and keep in contained should it get dropped or bumped (which causes me to wonder why they didn't buy the HARDCOVER Bible). MY Bible is hard cover, and I've been hesitant to make a nice leather cover for it ... for fear that it will get seen and EVERYBODY will want one. HOW would I find time to make all those covers AND be here complaining ... Congrats and thanks on your willingness to do your own designing ... that's getting SO rare these days - everybody wants to click a link and have it all done for them ... -
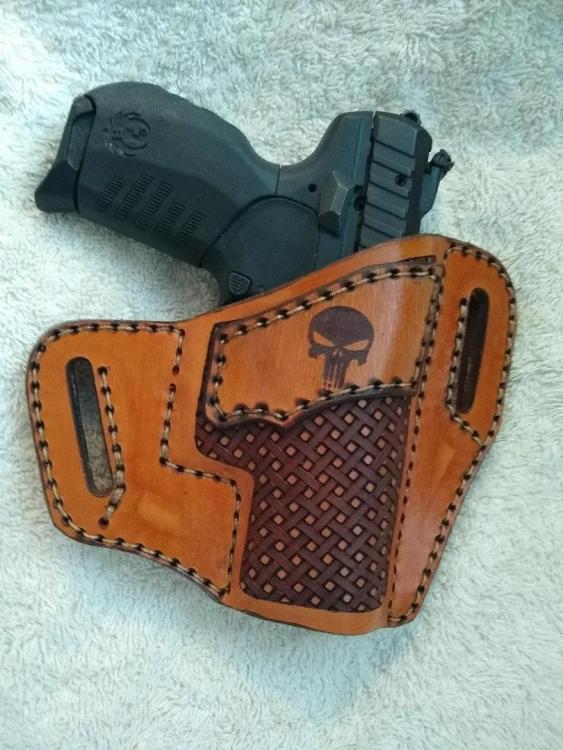
My First Avenger Holster
JLSleather replied to AzShooter's topic in Gun Holsters, Rifle Slings and Knife Sheathes
If you "favorite" our patterns on Cutesy, there's a 12% discount for the "12 days of Christmas" (all month). https://www.etsy.com/shop/JLSbydesign?coupon=12DAYSOFCHRISTMAS -
exactly. and since buying theirs means you STILL need a drill press, might as well buy the drill press and spend 20 minutes making YOUR OWN burnisher. I dont think that's "cheap", I think that's SMART
-
My First Avenger Holster
JLSleather replied to AzShooter's topic in Gun Holsters, Rifle Slings and Knife Sheathes
Really? That looks IDENTICAL to one of MY designs ... Do I have YET ANOTHER "admirer" (copier)? TELL US they didn't CHARGE you for what I gave away for free! Oh, BTW ... I DID alter that a bit... to have the sweat guard included in the reinforced section (the "loop" piece extends all the way up). Originally looked a bit like this. You can search JLS on this site and probably see 50 pictures OTHER people uploaded after downloading the pattern (from US). I've left the JLS logo OFF of this one, in case Able (or others) care to use the pic with the pattern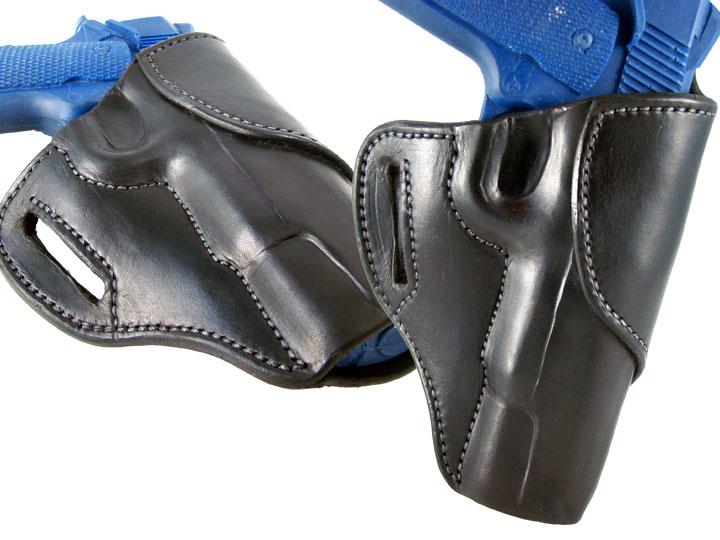
-
My First Avenger Holster
JLSleather replied to AzShooter's topic in Gun Holsters, Rifle Slings and Knife Sheathes
Looks a tad loose, but moving from 4/5 to 8 oz leather will likely take care of that all on it's own. There's some play with a barrel that long.. retention isn't as critical. Gotta be careful with that oil, as a rule. I basically hold up the project in one hand, jug of oil in the other hand, and TALK ABOUT oiling it ... I like Dwights stitch line spacing, but i do not GROOVE. I mark the stitch line with a heavy press of a creaser = make a DENT but not a CUT. -
Each his own, but just know that it ABSOLUTELY CAN alter the look. SO, depending on how you want it to look,.... I have dyed leather as STEP 1, also after cutting/tooling/stamping but before sewing, and also after complete assembly and sewing is already completed. Each "works", just a question of the look you want. That said, I generally like to dye a SINGLE PIECE, slightly LARGER than I'll need. You can test on some scrap if it helps visualize, but i find that if you cut out the parts before dye, the edges may WICK up MORE dye than the body of the piece, making the edges darker, and with lighter shades can be hard to keep consistent. The "open" edges DRAW IN more dye than the surface. Now, you MIGHT be able to thoroughly drench the thing as to saturate ALL of it, but that wastes time and dye. Lighter color dyes are more obvious, as black tends to be black, almost doesn't matter how it's applied. Better, I think, to dye a piece with a bit over size. It will likely STILL wick at the edges, which you THEN trim off - leaving your project with a consistent color. Generally, I dye belt slots, holster slots, etc with a small brush or q-tip (yeah, I HATE those holsters where the inside of the slots aren't dyed - just looks LAZY to me). The exception, then, is when I'm tooling the leather, though in that case I DONT WANT consistent color throughout. Oh, after all that noise, here's an EXCEPTION ... this one was tooled BUT ALSO dyed before cutting or tooling ... AND touched up after tooling. This was done - in part - because the guy specifically asked for a solid color (he picked the color from a color picker online) outside with an UNDYED lining. Note NO "halo" on the edges from wicking.
-
rifle sling with thumb hole
JLSleather replied to Frodo's topic in Gun Holsters, Rifle Slings and Knife Sheathes

-
Sam is pretty good most of the time. Hank appears to REALLY be packin' on the pounds Yup. Never did understand why somebody would pay 50, 60, 80 $ for something you could do yourself - with whatever size grooves you want - with a piece of oak dowel stuck in a drill press and a file applied
-
Finished up another Bible cover
JLSleather replied to YinTx's topic in Books, Journals and Photo Albums
I'm with battlemunky .. I HATE that stitch that just stops in the middle o' nowhere Still, I 'get' why you didn't.. SUCKS when the machine doesn't adjust to the new depth (I've been known to just pull it out and hand stitch through the same holes, honestly). Stopped by because I'll be making a number of Bible covers coming up directly, and wanted to snoop what you were puttin up. Gals round here will want some type of closer .. zipper, snap, tuck-tite, ... etc. Got a picky batch up here -
oak is very good - and in N. America it's everywhere
-
Beginner with questions about belt straps
JLSleather replied to BriarandThorne's topic in Getting Started
WIckett/Craig skirting makes a nice belt. You can get it in colors, which are generally quite good (though not exact - the "brown" you buy today and the brown you buy in two months may not be quite the same shade). Still need to apply some sort of finish. I do not use leather from Weaver. -
those prices are NOT acceptable for MY wallet. You can get dies made to punch belts for FAR less money, fit right in a shop press (under $100 at harbor freight). I prefer to cut the ENDS with a die, but only MARK the hole position so I can hand punch. I use OVALS for the adjustment holes, and it's just easier to ALIGN the punch by hand. This COULD be done in a die, but the cost would be exponential. You COULD have the die also punch ROUND HOLES and then go back and punch the ovals, but wat would be the point of that?
-
Stingray holster
JLSleather replied to Garyak's topic in Gun Holsters, Rifle Slings and Knife Sheathes
-
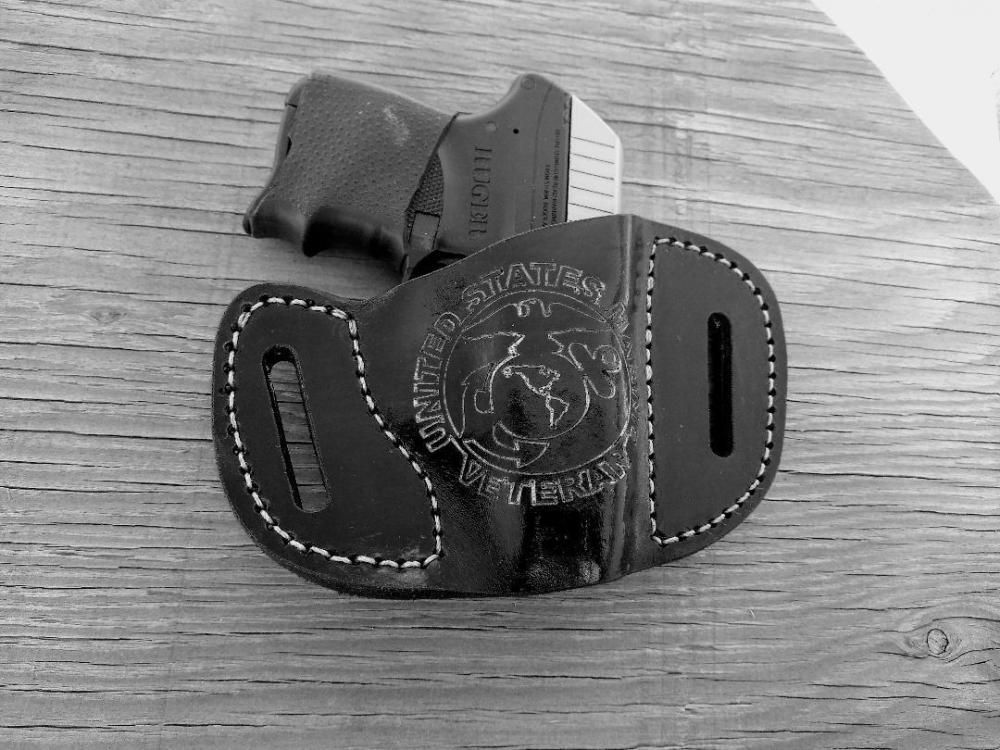
Holsters for me nuttin Fancy
JLSleather replied to Bert03241's topic in Gun Holsters, Rifle Slings and Knife Sheathes
Those little pocket guns are the TOUGHEST to design leather for! Still, I LIKE YOUR LAYOUTS Not sure how well the snake will hold up in this situation.. we'll leave that to you to fill us in. There's a smart-mouth bald guy round these parts what got a design fer that little smithy ... not much damage to tha pocketbook ... Not sure if its' the file format.... jfif ?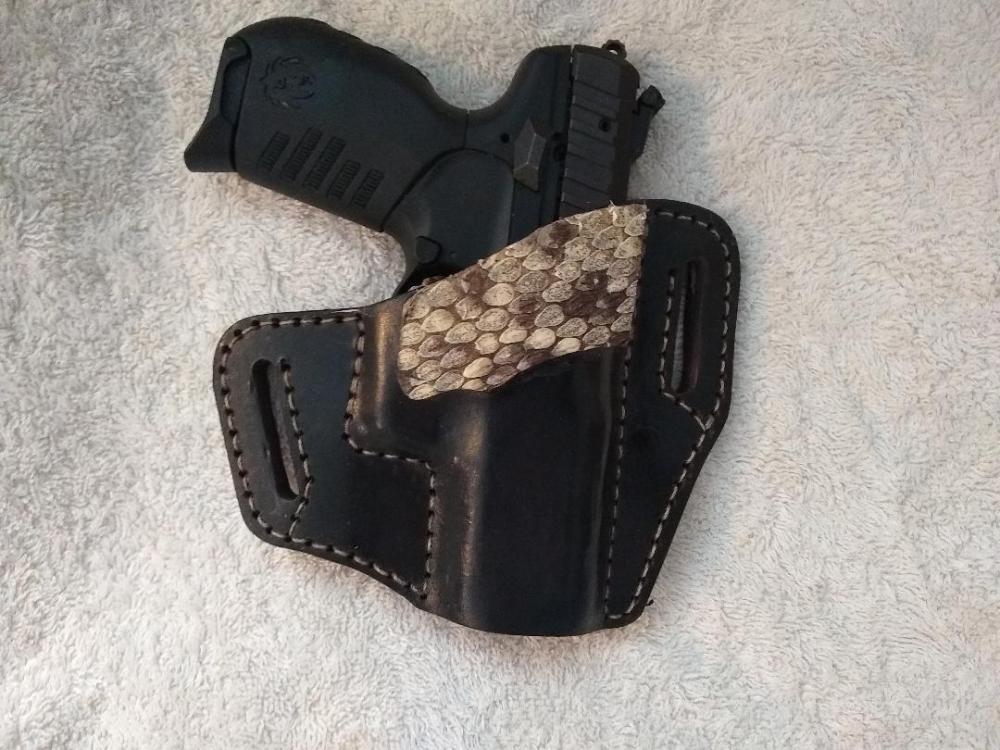

-
Construction looks purdy good, and that's a nice color ya got there. As a rule, on that type of holster I like the scope "covered" as in "protected" (from brush n such), though I normally would BEEF UP the form above and in front of the scope so that the holster doesn't actually contact the scope when finished (a bit of clearance there) and then "snug up" the stitch lines elsewhere. With this length barrel, don't really need to be overly close. This is a nice rig, no reason he wouldn't be happy with it. On the NEXT one, I'd likely 'adjust' the stitch line under the gun, not "tight" but make it parallel to the form (cosmetics).
-
Cleaning up (again). Will have "pieces" to box and ship available shortly, will include pics this afternoon when more time .... Black dyed and chestnut dyed are W/C skirting leather 7/8 ounce mostly, though there are a few pieces of 4 oz. Yes, you can still stamp or tool this leather Also some "natural" tooling leather, all the natural is H.O. This leather was about $11/foot - so this price will be a STEAL. These are larger pieces. I hesitate to call it "scrap", since every piece should be usable somewhere, and most is large enough for knife sheaths, small holsters, mag pouches, perhaps a small binder. Some pieces are less firm than I would like in holsters, some wern't that nice cosmetically (but could easily be stamped / basketweaved / etc). That which is FIRM but less lovely on the face, turn inside out for "rough out" holsters, or glue to an exotic leather. None of it is "junk", which is why I AINT throwing it out.
-
Hermann Oak has stated more than once that "holster leather" and "tooling leather" are the same leather. They have never provided any reasonable explanation for why they call it different things, other than they want holster makers (and potential holster makers) to be able to search "holster leather" and get linked TO THEM (and then there are of course the multitude of "holster makers" who rant that there's is obviously "better", since they use only "holster leather" ) What W/C refers to as "holstered" is a compression process that you'd have to see. They've always done this for us free of charge, though they do advise that the extra step may delay your order slightly. We ALWAYS have this step done, with the exception of when I order LEATHER FOR TOOLING (call it "tooling leather" if you want, though W/C calls it "skirting") which is the exception, since we use almost exclusively H.O. for tooling.


