


.jpg.e13e7809a690335a89b8a4ed2e876db1.jpg)
Northmount
-
Posts
6,539 -
Joined
-
Last visited
Content Type
Profiles
Forums
Events
Blogs
Gallery
Store
Everything posted by Northmount
-
Try searching for fabric leather cement. One of the results will be this one http://leatherworker.net/forum/index.php?showtopic=42898&hl=+fabric%20+leather%20+cement#entry266945. See #3. Tom
-
Tandy has tips and accessories
-
CustomDoug, the old grump has some of the best input, including previous comments. One of the previous comments he made was to mount the shaft with the burnisher vertical so you can see more easily exactly what you are doing. There are short arbor extensions that can be added to any 1/2 or 5/8" motor shaft so you don't need all the extra bearings and shaft like you found on Grizzly. Take a look at https://www.swmetal.... and Extensions and you will see lots of choices, even for dremels. The typical one you would use is https://www.swmetal....em?itemID=11989. They used to be available in a lot of hardware stores, so you might find one locally. This combination with a 1725 rpm motor (or slower furnace fan motor) could be mounted so it hangs off the side or end of your bench with the shaft vertical. It would give you lots of working clearance around it for larger items and allow you to see exactly what is happening as you burnish. Depending on the type of burnisher you are going to use, you could use a tapered spin-on like https://www.swmetal....em?itemID=11973. With it, you can use a stepped burnisher, stepped right down to a small point for belt holes. Alternatively, you can drill and tap the burnisher to fit the item 11989 and just screw it on. Watch your motor rotation direction, or you may launch the burnisher! I've used my own burnisher on a lathe. Gives me variable speed, but not very convenient. I think I'll build a dedicated machine using a stepped burnisher, motor shaft vertical with fan motor speed control like the Grump says. Tom I seel Lee Valley has arbor mounts too. http://www.leevalley...072,45939,41743
-
http://www.classicbells.com/verlane/verlane.html scroll down to projects Tom
-
.thumb.jpg.6e903dd66163ad5672f00f144058c571.jpg)
Snake Skin Project, Decorating The Rim Of A Drum
Northmount replied to Tiara's topic in Exotics, Reptiles, Furs and others
Some pictures might help with visualizing the pieces you are describing. Then you'll probably get tons of answers in no time. If there is any iron containing metal behind any of this, magnetic tape might hold it in place. The tape is not strong so some friction fit would help. Note to that the double sided tape used on magnetic tape dries out and falls off. So gluing the tape to the leather should last longer. Tom -
Another thread said they should have used wider plates because some of the cutting dies were too long so they had to do part, then move over for the next bite. I'm thinking of something like 12 x 18" wide. There is lots of bottom support. Might need something to stiffen the top plate somewhat. It will be good to hear your feedback too. Tom
-
I know this is an old thread, but is there any chance of getting the pictures replaced or links fixed? Thanks, Tom
-
Great work. Since I have never built a saddle, I'm following this closely and really looking forward to the next post. Keep it up. Tom
-
Table Top Ideas And Sources For Cylinder Arm Machines ?
Northmount replied to CustomDoug's topic in Leather Sewing Machines
See http://shop.raphaelsewing.com/index.php?main_page=product_info&products_id=402 for an example. Depends a lot on the style of your machine table. I made attachment that is wider and deeper. Has three legs on hinges so folds up for storage. I like the larger flat surface vs the smaller commercial table. Small table is fine for many things, but a 3" 3 ring binder needs more support Tom -
For 3/8" and under, also look at Techsew 2700 or Cowboy CB227R along with the flatbed attachment. Gives you both open arm when you need it and flat bed when you need it. My 2700 is doing a good job for me. Tom
-
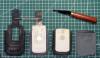
Look at http://leatherworker...one#entry203688 for some ideas Here is one for a BB Torch 9800 ripped apart. BB Case 9800.pdf This pdf has not been scaled, so if you turn off scale to fit, it will print actual size. I suspect you may have trouble reading some of my notes. My writing has become very shakey some days over the past 5 years. The OEM BB Case was sewen on a serger likely so has almost zero seam allowance. So probably add at least 1/8" all the way around. For thicker leather, use more. The front and back magnets turn off the screen when in the pouch. Sensor is in the back of the BB. So with a magnet on the front and back, it doesn't matter whcih way it goes in the case. Cut the strap extra long. Depends on your leather thickness as to how long it actually needs to be. Thicker the leather, longer strap required. The microfibre lining is not shown in the photo. You could use any soft leather with the suede (flesh) side against the phone. Kind of wipes it like the microfibre stuff does. Dimensions for BBs are available on their site, for the Torch 9800, see http://ca.blackberry...-specifications If the case is made too snug, the little switches on the sides of the phone will be activated when the BB is forced into the case. That will cause software/firmware problems and can cause the BB to hang. Then the battery has to be removed, so the phone can reboot. Your client won't like that (even if it is for your phone). Tom
-
Variable speed drills are cheap and readily available, already have a chuck, and only need a simple shop made fixture to hold them. Agree with st8. Don't need to over think the problem. Also don't need to thread the motor shaft. Should be lots available for real cheap at garage sales and flea markets. Tom
-
Search for drill chuck or Jacobs chuck. Be careful of the mount you select. Threaded are available in 3/8" x 24 tpi or 1/2" x 20 tpi. So you will need to use a die to thread the shaft. Note that this is fine thread, not coarse thread. A couple links: http://www.jacobschuck.com/images/products/JC-003%20200%20Series%20No%20Crops.pdf http://www.sears.com/jacobs-3-8-in-keyless-replacement-drill-chuck-with-3-8/p-00920970000P Lots of replacement chucks around with key or keyless. Take one off a junked drill that's no good any more. Some are locked to the drill shaft with a screw from the inside. Open the jaws up all the way so you can see the bottom. The screw (if there is one) will have left hand thread instead of the normal right hand thread, so it doesn't come loose when you reverse the drill. Tom
-
I have seen people use either oil or water on carborundum stones. Most use oil. Which ever you use, don't swap back and forth between oil and water. Waterstones are a soft stone (usually) and use only water. They need to be soaked first before being used. They also need to be flattened periodically. Carborundum can be used dry. But you will get a smoother more polished surface on your blade with oil. Sort of makes a thin grinding compound. Tom
-
How Now Black Cow? :-)
Northmount replied to Crystal's topic in Purses, Wallets, Belts and Miscellaneous Pocket Items
Great detail. Like the cow's whiskers! -
Do a search for clicker, die, press, jack. Try the search in different combinations. Lots of recent discussions. Tom
-
Depends on the size of drill press Depends on the size of the drill press. Also the drill press table will be in your road. So a cradle for your electric or cordless drill would be much easier to work around. A cradle is easy to make from a few scraps of wood and can be clamped or bolted to the bench. If you have an old drill you don't use much since you got a cordless, you could permanently attach the drill to the cradle with a long hose clamp. Tom
-
Here are a couple for you to salivate over: http://leatherworker.net/forum/index.php?showtopic=34075&hl=%2Brope+%2Bcan http://leatherworker.net/forum/index.php?showtopic=30770&hl=+rope%20+can#entry192532 Tom
-
The appearance of this one is much improved in my opinion. You could sew around the bottom edge of the front flap (below the snap) as well. Looks like it was missed. (Looks lonesome) Practise sure makes a difference doesn't it. CTG
-
Bottle Jack Press .... Why Not?
Northmount replied to RoosterShooter's topic in Gun Holsters, Rifle Slings and Knife Sheathes
The metal bookshelf type frame material looks a little on the weak side, even though is is under tension rather than bending. Here is one that I think will stand up to heavier usage and still be low cost to build. http://leatherworker.net/forum/index.php?showtopic=22164&hl=%2Bholster+%2Bpress+%2Bjpg CTG -
I likle my Techsew 2700. Does a great job. You can add a flat table adaptor to it so you have both the flat bed and cylinder arm. If you are going to work on the heavier end like 2 layers of 8 oz, I would add a speed reduction pulley as well. CTG
-
TurtleFeathers.net will get you farther than .com will. http://turtlefeather...ngelus/dye.html for dyes.
-
First Project Done, And Some Questions
Northmount replied to BulletProof's topic in How Do I Do That?
Carving gouges are better, shorter length, 4 to 8" long roughly. Lathe gouges (except for miniature work) are 24" or more long. Carving gouges should be a little lower priced too. CTG Here are a couple links to carving gouges: http://www.woodcarverswarehouse.com/_e/dept/04-001-001/Flexcut_Palm_Tools.htm http://www.chippingaway.com/Search.htm?q=gouge -
See also http://leatherworker.net/forum/index.php?showtopic=42706#entry267682 CTG
-
First Project Done, And Some Questions
Northmount replied to BulletProof's topic in How Do I Do That?
Read the whole thread. Alternate site, currency conversion. Alternate woodcarving tools. CTG
