bruce johnson
-
Posts
4,397 -
Joined
-
Last visited
Content Type
Profiles
Forums
Events
Blogs
Gallery
Store
Everything posted by bruce johnson
-
Yes sir, that is correct also. The origin of the “belt” punches goes back to flat drive belts on machinery powered by line shafts. They were intended as a price point tool used by mechanics and users to punch holes for splicing belts. Easy to make on a lathe from round stock. The tapered clearance punches are forged and have more involved in production. It kind of gets me when people grind a inside tapered punch to make a half round scalloper. They tend to undercut because of the taper. A cheaper belt punch makes a much better scalloper.
-
The difference in use is that the #147 punches have a flattened handle and the #245 punches have a round handle. Most people find the flattened handle easier to twist out of a hole than the round handle. The clearance holes seem overall smoother on the 149s as well. It is no doubt easier to manufacture the 245s and that likely accounts for the 3x price difference between the two styles. Also note that the number sizing are not the same between the 147 and 245 punches once you get larger than the #6.
-
I send out 6 inch rulers with my logo and contact info with my new customer orders and every so often with repeat buyers. I also give them away at shows. There are now over 9000 rulers out there. Several years ago someone asked me why I don’t have stickers. I didn’t know and at that time didn’t realize the extent of “sticker culture”. I ordered them in small for cups and large for toolboxes and shop refrigerators. 5000 of each in circulation now. My suppliers and other leather friends send me stickers with orders and the refrigerator and shop door are pretty well adorned, as are my two Yeti cups.
-

Arizona style clutch wallet back
bruce johnson replied to Stetson912's topic in Floral and Sheridan Carving
Nicely done, I had a short visit with Rocky yesterday. I’ll be seeing him more over the next few days. Interesting guy and a world of experience -
Here’s a link to a tutorial I did for the forum about 15 years ago. I have done a ton of rope borders. Eventually the Craftool stamps will bend up on the ends. I would go through 5-6 of them a year. Beveling really makes it pop. If you decide you like the rope border, I sell three sizes of rope stamps that have a lot of dimension and a bevel built in.
-
I would not rule out that these are tinsmithing tools. The one on the right looks like a beader to me.
-
The big thing to jump from hobby to business is to figure out what is your target market and how will you reach them? Your town or local area will likely not support a business but might support a decent hobby income stream. That just depends on what you make or want to make. The kind of things that sell off a good website or at a boutique or specialty shop wont sell at most craft fairs. Making custom or personalized items, stock items, or both? Pricing? You have to know your costs, and all of your costs. The leather is generally the cheapest thing in a product. Bob Brenner sells a book on pricing leather goods. You mentioned a sewing machine. Yes, yes and yes if you are looking to make money.. I started out handsewing and got pretty proficient and decently productive. Marked with a $5 Tandy overstitcher, two needles, awl, and most days - 6 SPI at an inch a minute. Pretty soon after they came out I bought a Tippmann Boss hand crank machine, later upgraded to an Adler 205 and eventually now we have two Ferdcos and a Singer cylinder arm. If you are competing with most products and looking for income, then you need to either put them out faster or accept you are working for pennies against their dollars, been there. The new guy starting out generally will not have the reputation and be able to command the price that pays for the time of handsewing. The customers that will seek that out and pay for it are not the new guy's customers generally. I just finished writing a series of articles in ShopTalk magazine about upgrading tools from the basics - what type of tools to upgrade and where to get them, my order of importance, and how to get them paid for. It is way too lengthy to write here and I'm not sure I'd even have the rights to do it since they have published it. I've received a LOT of positive feedback on it. Take classes and read. The internet is full of great information now along with a bit of real crap. There are two major magazines for leather crafting - Leather Crafters and Saddlers Journal and ShopTalk!. Both I think are a real plus to subscribe to. Both of these magazines also sponsor leather trade shows. There are leather classes at shows and some classes in private shops. I used to take a lot of classes at shows when that was about the only source of information besides print. The hands-on and visual aspects help a lot in person vs on a screen. My wife took men's wallet and women's wallet classes at the Sheridan WY show a few years ago from Jerry Van Amburg. She walked out with two wallets and the skills to make them. She's made a bunch since then with exotic leathers or stamped patterns. If they are not gifts, they are $150-200 word of mouth. Same with a tote bag class last year that Aron Heizer taught. she came home with a workable pattern and skills and a bunch of tote bags have gone out the door too. She's having fun! These classes flatten the learning curve and get you to making things that sell.
-
For leather edges I like paraffin or a beeswax/paraffin mix For tools my progression is black to green to purple.
-
Rob, My favorite was a rein trimmer. They look like an overgrown edger. The toes are rounded and don't snag or catch in the wool. Nearly every old saddle harness maker and saddlemaker set had one. I've got several on hand. Towards the bottom of the page - https://brucejohnsonleather.com/leather-tools-sale/knives-and-handled-cutting-tools-sale/
-
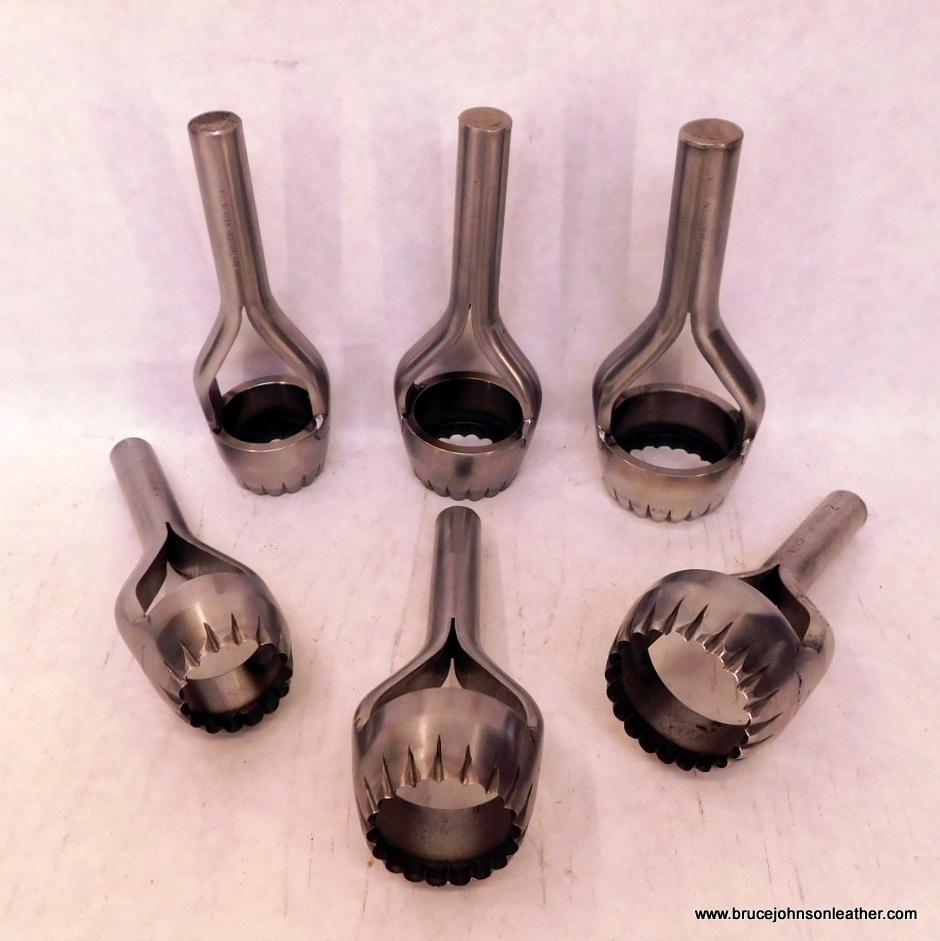
I am restocked on rosette or concho punches too, including some that are out of stock at other suppliers. These have had any burs on the edges removed and polished. I have handled punches in 1-1/2, 1-3/4, and 2 inch and press dies in 1-1/2 and 1-3/4 inch. Here is a link to some of the recent additions of leather tools for sale on my website - https://brucejohnsonleather.com/leather-tools-sale/recently-added-tools/ Thanks, - Bruce

-
I am stocked with the larger bag punches that have been hard to find. I have them for sale in 1-3/4 inch and 2 inch sizes. These have been polished and sharpened. You can check them out along with other recent tool additions at https://brucejohnsonleather.com/leather-tools-sale/recently-added-tools/ Thanks! - Bruce
-
Congratulations, that was good reading! The ShopTalk article was really good also.
-
Identifying who made the saddle and/or TREE
bruce johnson replied to KaLioMele's topic in Saddle Supplies, Tools & Trees
There are no standards and tree makers vary. Some of the factory tree makers mark their trees but not all. Often with a large carton marker on the back of the cantle or left rear bar. It is under the rawhide. some glued a business card to the bar and rawhided over that. To get to it, you'd either have to take off the jockey and rear rigging or the cantle back. The downside is unless it was like Sunny Felkins that marked a "Q" or business card usually the marking was seat size and cantle dimensions and not the maker. Gullet width gets thrown around a lot and i would defy 90% of the people selling to measure them correctly. A tape measure across the front of the swells is not very exact in a in finished saddle. -
If it is not a 30 the only other Landis splitter I know of is the Model D.

-
$800 is an OK price. You will always find the guy who found one at a junk auction or flea market for $150 and the next guy paid $1000. Yeah, $800 is fair. If anyone was building the Landis 30 today, it would be a lot more. Here is the only thing I have ever seen online for the Landis 30 - https://www.bootmaker.com/Landis_Model_30_splitter.pdf Parts are not readily available new that I know of other than blades. Harris at Pilgrim Shoe was talking about getting some of the commonly broken parts for the American and Landis splitters cast up. He retired and I don't think it ever took off. That is the problem with parts - the things that are prone to breaking are usually already broken on the parts machines. Eli Schlabach in Illinois probably has the most parts.
-
A beginner's lesson learned about leather
bruce johnson replied to Schick's topic in Leatherwork Conversation
If you bought either garment leather or upholstery leather expect a top finish. Get an airplane or go look at couches or new car seats. The leather is uniform in color and texture. Look at unfinished hides - some parts are grainy, some a smooth as a bowling lane. Different parts of a hide take dye differently and some areas on a dyed hide with have different textures . For the factory applications They need to utilize as much as they can and the uniform top finish lets them do that. That is only one factor. The underlying leather may be full grain, top grain, etc. and has the top layer still intact and theoretically stronger. Back leather may have a tight flesh and lower belly and flanks might be taggy so flesh may or may not mean much.. Its been mentioned above but it can also be a split that has been finished, the part planed away from the top grain to make a uniform thickness in that piece. The leftover split is finished and depending on tannage and hide location - might be OK, might be really loose and not very durable. Whether an grain intact leather or split is more appropriate all depends on the intended use of the leather and a cost point. Interestingly I had this conversation with an exotic leather supplier. Elephant hide is a nice leather and I have used quite a bit. There is the first generation leather that is top grain. The splits can have an embossed pattern applied and by most appearances appears to be top grain. It takes some trust in the supplier's experience to tell the difference between the top layer and a finished split. It may be still be sold as genuine elephant because it is, although the wear characteristics are going to be different. Same with any other finished leather. -
I have seen these deals go both ways, but yes, there would be some suspicion. He's likely got a minimum of $200 to ship it anywhere, so that is making his skiver about $300. Scenario one - he needs it gone NOW and it is a distressed sale that's legit. I'd find out where it is and if at all possible - go see it, try it, and pick it up, shipping savings vs the fuel to get there. If it is really fair away, you buy it untested and sight unseen, hope it is legit, hope it ships without damage, and chance losing $500. Personally I'd make a short drive or pass. I've seen some shut down shop equipment that is pristine, and others that the pictures they sent were from three years old and when I get there I'm looking at a Petri dish of rust.
-
Frankly, I always found the "measure from the fold to the middle hole, add some arbitrary number and that's your length" confusing for customers. Secondly there is the pants waist size method people that add so much to a waist size. Then there are the "belt size factory stamp" method folks where you are supposed to buy an off the rack western belt 2 numbers up from your pants size (buy a size 34 belt if you wear a 32" waist). These numbers didn't mean anything even between some different makers. When I got to doing semi-production belts with remote customers my sellers and I fell into a pretty simple system. For straight strap, non tapered belts we would ask the customer to only to measure the total length from the fold to the tip. If they wanted a longer tip exposed or tip initials, add on that measurement. If they want a shorter tip than what they wore to measure, ask them how much shorter for the total length. That is all you need - total length of the strap from the fold. The whole buckle type is not a factor for length ever and should not add any confusion. Make your belt that length. Measure now from fold to where the tip overlaps the fold. all the customer needs to do is mark that and measure. You use that length for the base line for punching. If you go by the length from the tip on charts, then you can be off. The fashion customer with the long tip will be punched too long, the guy who wants a shorter tip will be too short. Buckle type only comes into play with punching the holes back from the baseline. Trophy buckle, heel bar, or centerbar buckles - punch the main hole the length of the buckle reach from bar to tongue. You can place other holes the spacing you like. Realistically - we found most people wanted one hole shorter and two holes longer. If it is custom ask them how many holes they'd like. Some trophy buckles have a simple post tongue and longer reach, some have a reverse tongue on a tab and that reach is about a like a heel bar buckle. A few things we found. Universally when asked and given the option for hole numbers and spacing, most people didn't realize that was even an option. Most did not want big spacing (1") and rarely did anyone want their main hole in the center. Big spacing and putting on a tucked sweater on a factory belt and they were in the last hole with four holes showing back a long ways. Vanity thing but true. They wanted one hole to snug up if they weren't tucking a shirt. They wanted one for regular wear and one more for thicker clothing - nobody admitted to allowing for weight gain even though that's obviously a factor. We did a lot of three hole 3/4" spaced belts and rarely a five. We also did a lot of belts with no holes and the seller punched the holes custom for buyer at pickup. Nice touch and customer service they didn't get at the last place.
-
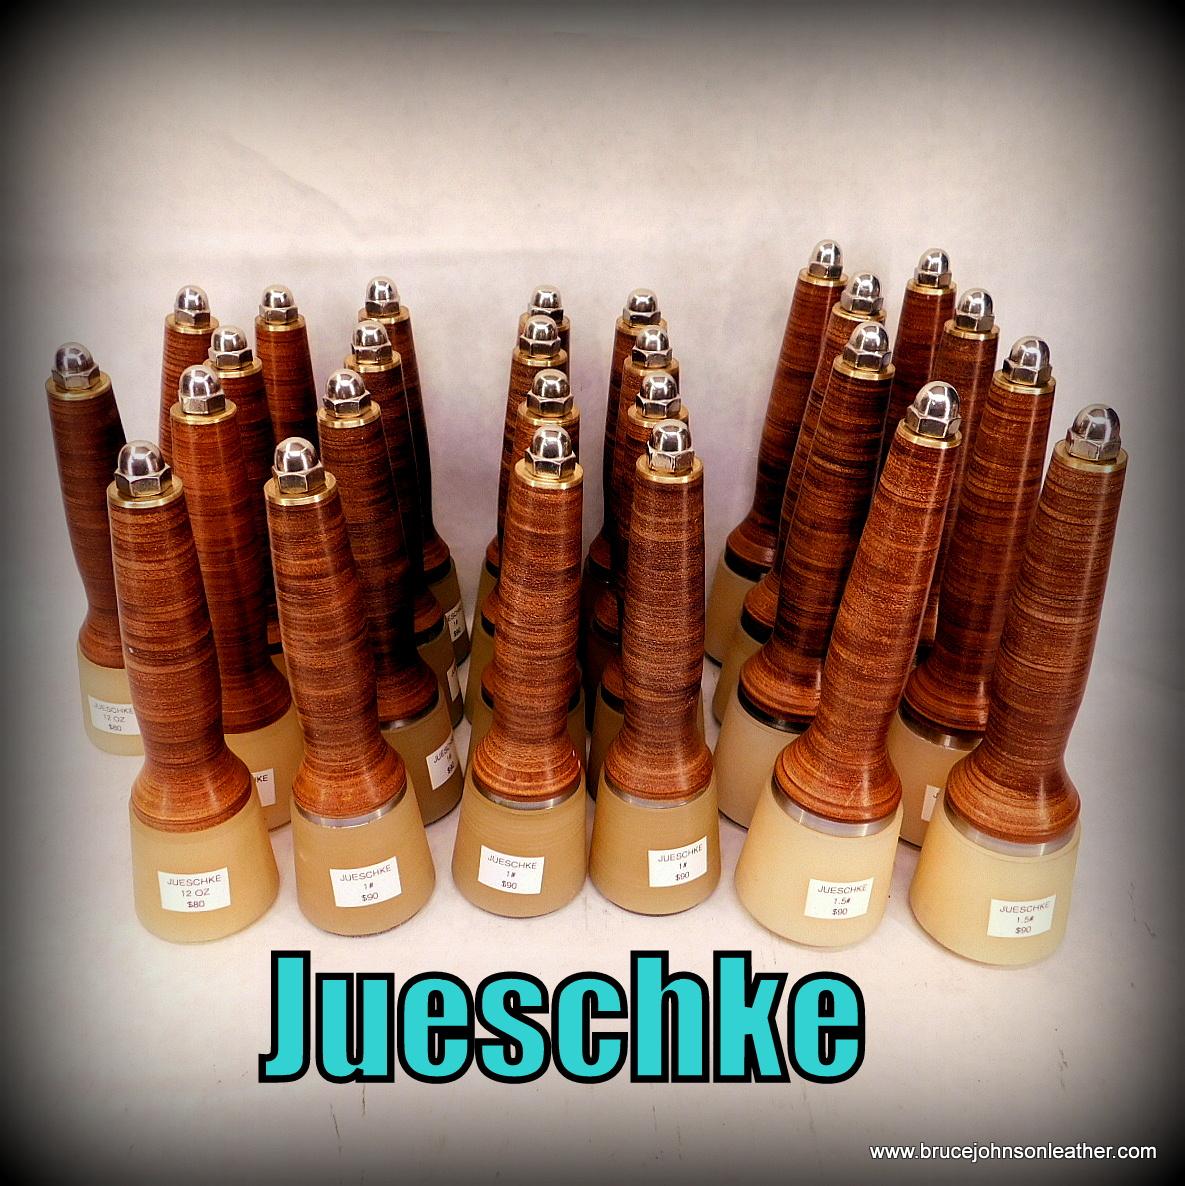
I am now restocked on Wayne Jueschke mauls in sizes from 12 oz up to 3#. Wayne has been out of stock of the smaller sizes since the Sheridan show in May. He was laid up for a while but back after it some and able to get these done for me a few weeks sooner than expected. You can check these out at other Wayne Jueschke stamps and tools we carry on his dedicated page on my website - https://brucejohnsonleather.com/leather-tools-sale/wayne-jueschke-mauls-and-tools/ Thanks! - Bruce

-
Ive pretty much been a member here since the start, when a pizza making lady from Ohio started a little internet forum. I had a newer member call me yesterday after he saw a few posts and replies here on the forum here and wondered "who is THIS guy?" . He googled and came across an online article a few years ago in ShopTalk magazine. I didn't know the article was even available. We talked a while and a very enjoyable conversation. He suggested I post this for other members to learn a little more about me. Here's a link if anyone would care to read - https://shoptalk-magazine.com/2019/09/10/bruce-johnson-bringing-back-the-best/ The article was done a few years ago, but the history hasn't changed - just more sharpening and refubishing equipment additions to the shop and a few thousand more tools in and out. I'm also selling new tools now from Wayne Jueschke and Richard Brooks since then, and recently became a dealer for CS Osborne. That me in a nutshell - mostly refurbished vintage tools with some newer used tools from retirements or estates plus new tools that I stand behind. Thanks! - Bruce
-
For punching I would recommend something softer than the HDPE. I recommend either rubber sole sheeting or LOW Density Polyethylene. End gran wood blocks work too. These are much more forgiving on your edges than HDPE. HDPE is brittle and can crack as well.
-
I’m seriously interested, sent an email
-
I sewed quite a bit on a 205-64. It would do two layers of skirting well down to wallets. Three layers of skirting and there would start to be more needle deflection. I moved to a Ferdco 2000 for those heavy back cinches and eventually sold the 205. Even with that, if I saw another 205-64 for $850 and it sewed, I jump on it in heartbeat.
-
Joe, Bill Buchman put handles on the draw gauge blades he made. I've attached pictures of some.
-
Many of you know Rundi and I from dealing in vintage tools at shows and on the internet. We also sell new tools from Wayne Jueschke and Richard Brooks. Today I am announcing that we are now selling CS Osborne tools as well. We are starting off with a limited number and have more in the works and on the way. Please follow the link for more information and feel free to comment here or through the website. - https://brucejohnsonleather.com/leather-tools-sale/new-cs-osborne-leather-tools-sale/ Thanks! - Bruce