bruce johnson
-
Posts
4,401 -
Joined
-
Last visited
Content Type
Profiles
Forums
Events
Blogs
Gallery
Store
Everything posted by bruce johnson
-
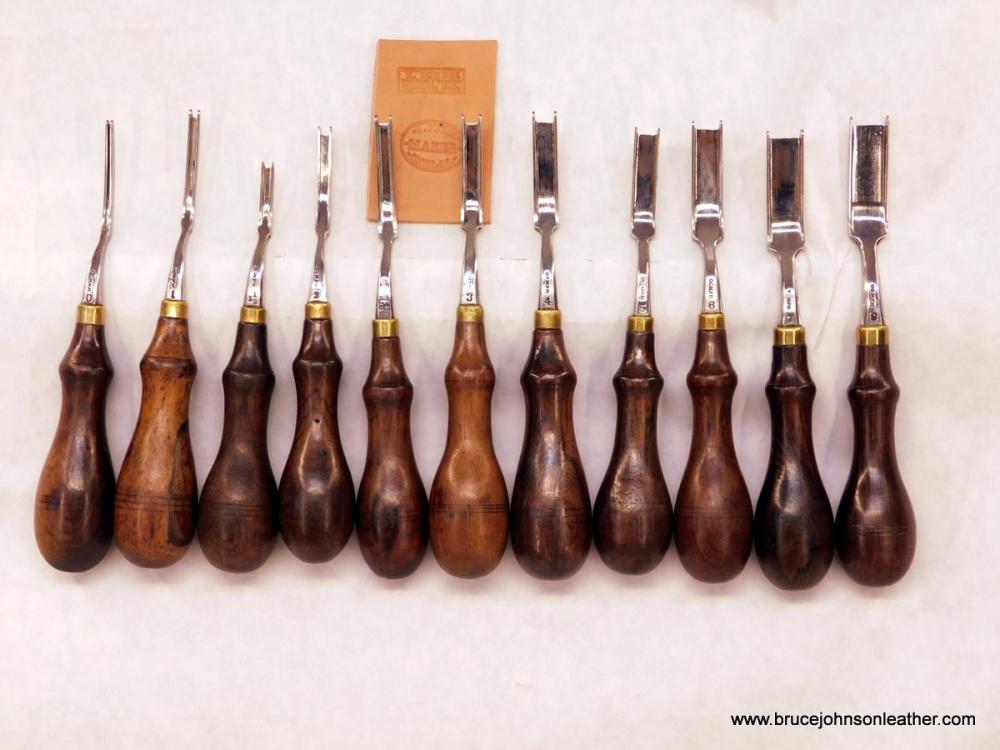
I recently was given the opportunity to purchase the personal tools that belonged to Keith Pommer. Keith was one of my heroes and mentors on leather tools as well as being a good guy to BS with. These are the Gomph French edgers and as complete a set as I have seen or heard of.
-
For a cheap option - Benchtop drillpress with a laser guide if you want laser. I think my Sears has laser. Put a piece of LDPE on the press table. Chuck a minitube handle in the press with the #2 tube. I bought the Tandy mini punches and maxi punches and had one handle for each size tube. Turn it on and crank it down. The spinning action will make a very clean hole and the LDPE permits the tube to go completely through the leather with a clean exit as well. The return spring action makes it easy to back out of the hole. Wear eye protection because the punchings will fly out in random directions. I've done thousands of holes with this drill press setup.
-
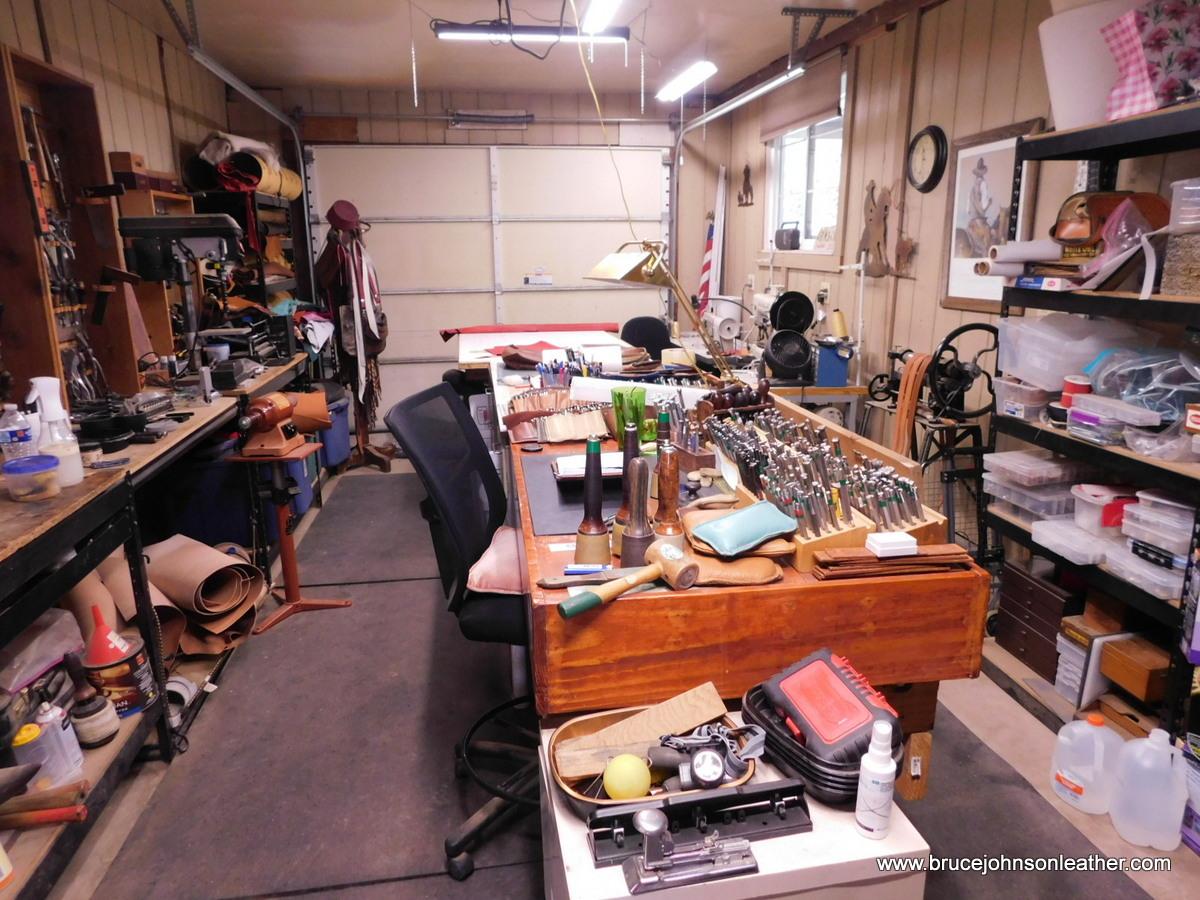
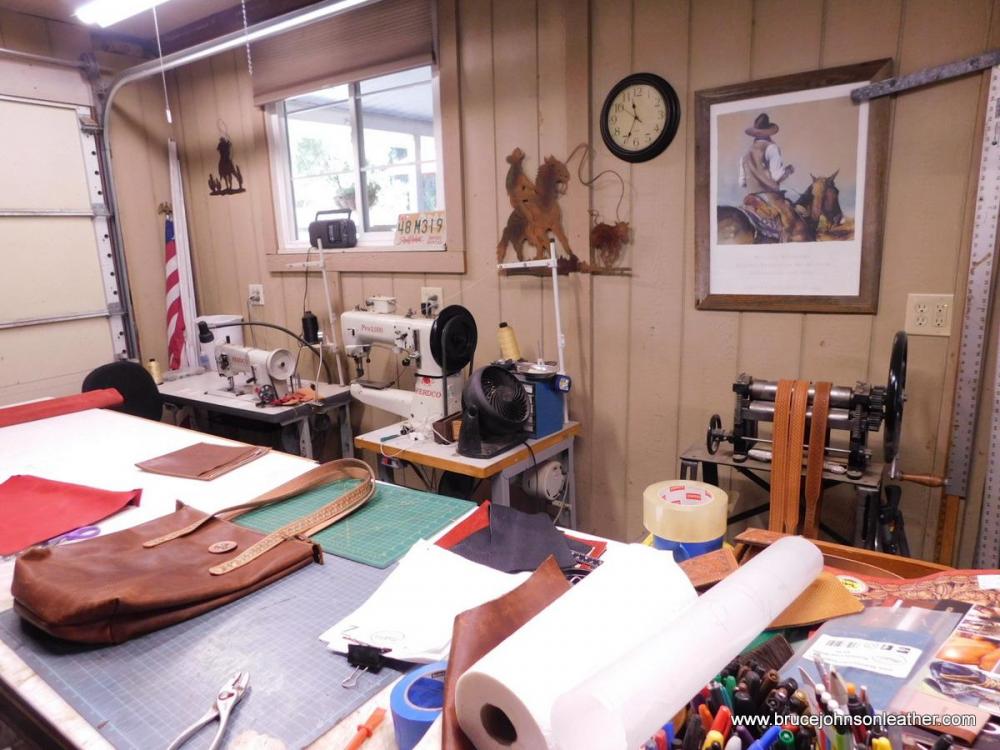
Yes it is! I favor Matthews' work. This is probably the handiest shop I've had. It is all pretty modular and we haven't been forced into a layout because of permanently installed benches or cabinets. Before the leather tool business took over and I was making a lot, I had the shop set up a little different. My wife works well in this layout.
-
The opposite side of the work table has the two (soon to be 3) sewing machines and the crank splitter. This shop has gone through a few versions and had a draw down and stitching horse out when I was building. Since my wife took it over she has changed it up some but still very workable. It has been an adaptable set up.
-
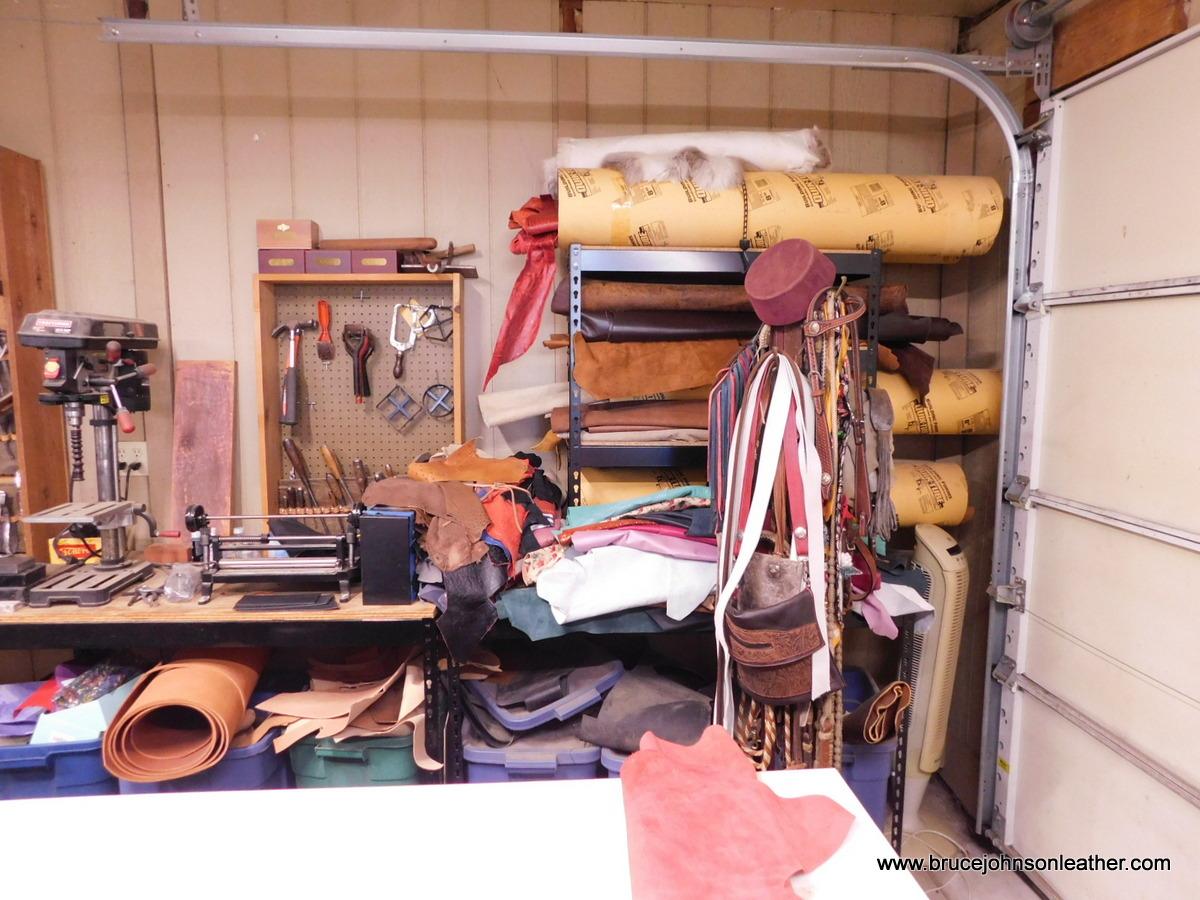
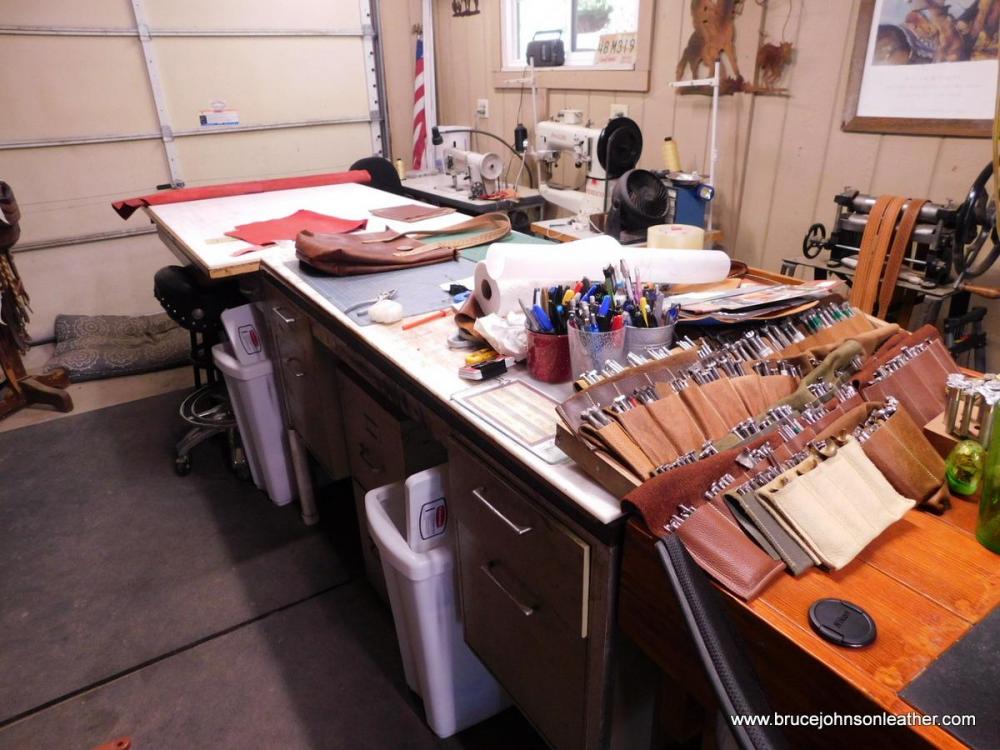
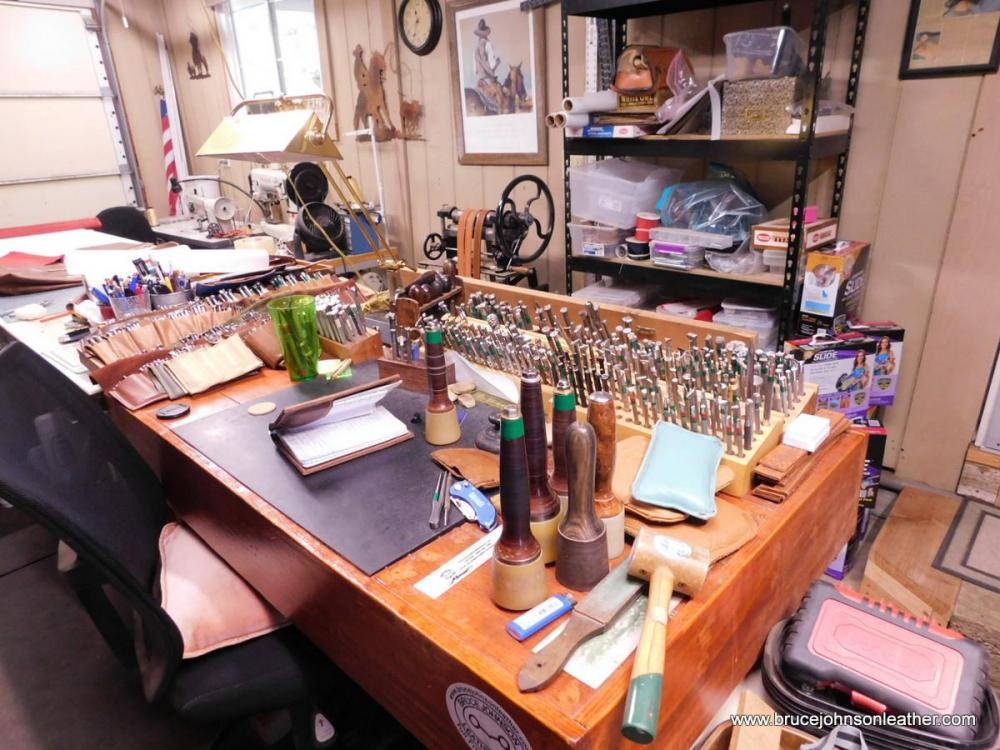
The hand tools are organized to be within a two step reach of the work table. The handled tools are stored in loops that are hung on free standing pegboard racks I made. The board holding each row of tools is hung on hooks to be easier to reorganize as more tools were added. The HF workbench has a granite block and pads for punching, the anvil underneath is put on a bench for rivet setting. She has her drill press for hole punching and burnishing as well as the grinder burnisher on that side of the work table. The Chase splitter is over there too. Leather is stored underneath and some is rolled and in concrete form tubes also. The working and cutting tables a repurposed desk and a yard sale worktable. There is a piece of 1/4" HDPE to cut and glue on. Minimal deep cuts in the surface and glue peels off.


-
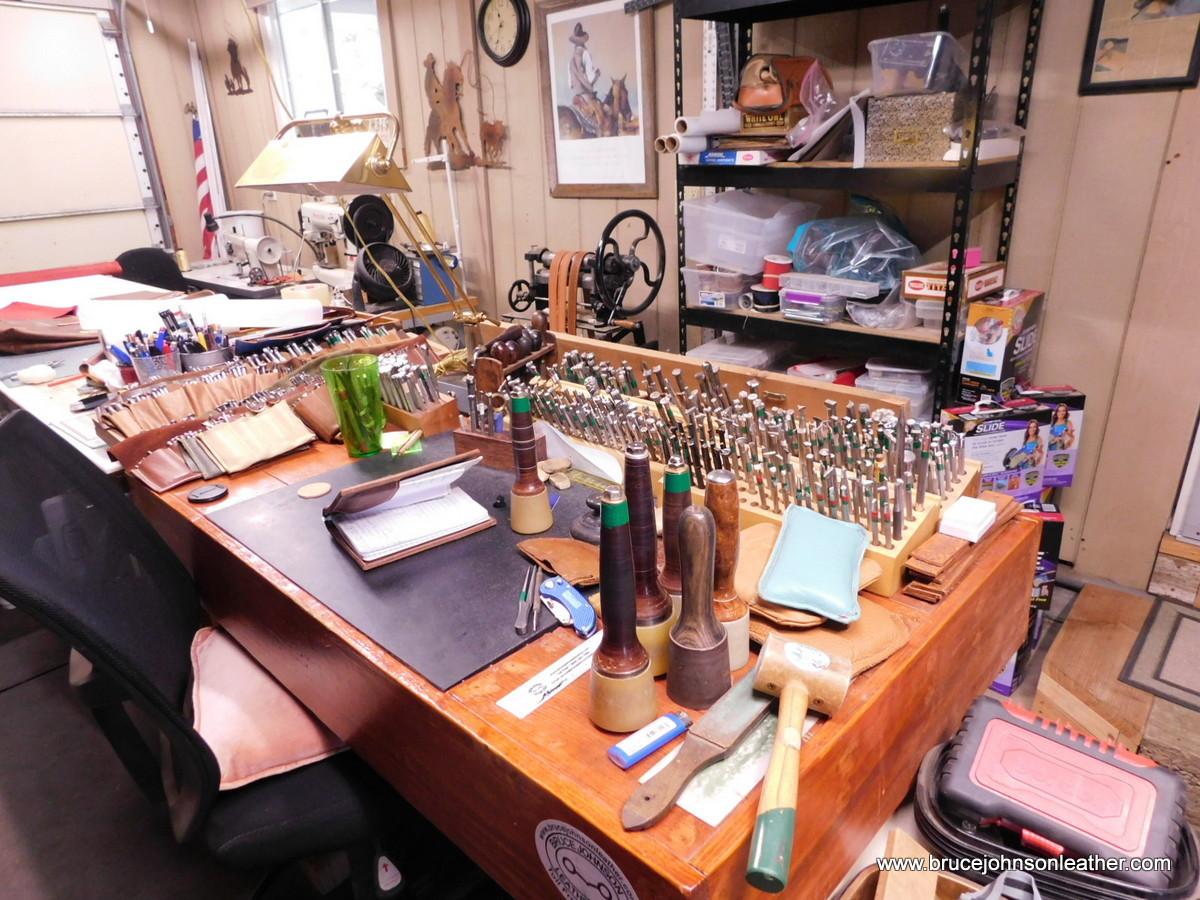
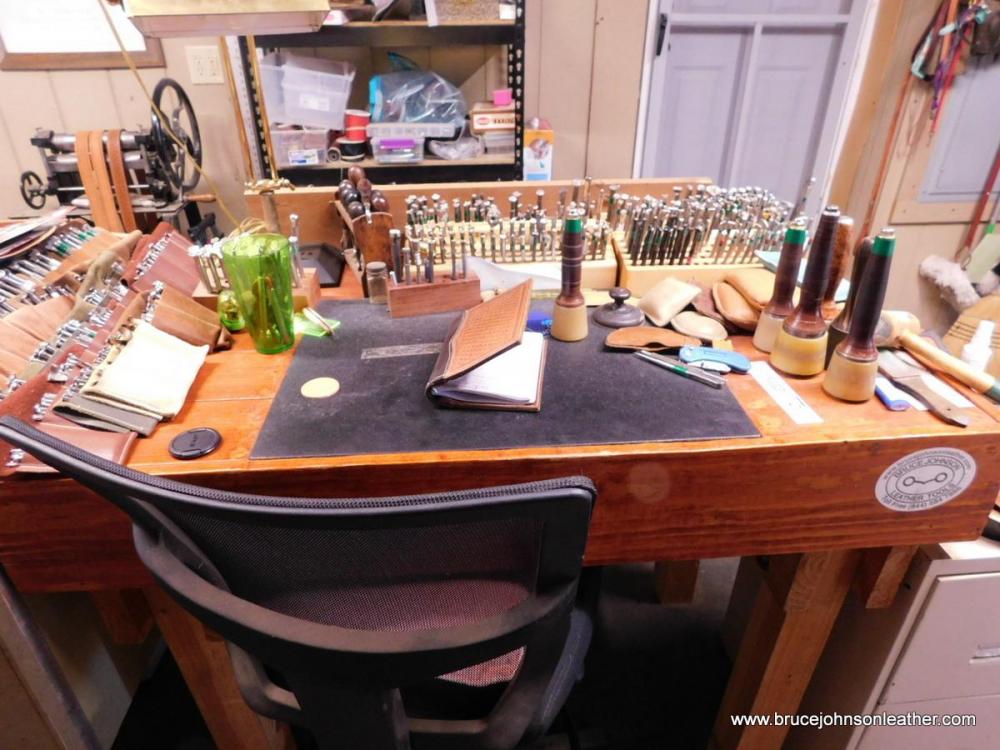
This will be broken into a few replies. I built this stamping bench with dimensional lumber and an inlaid granite inspection plate from Grizzly. The plate is supported by 2x4s on edge and glued and bolted construction. About 6 months later I tightened up the bolts after the wood shrank a bit. Quite a few years later and still no bounce and never has had much noise. The stamp organization has been a work in progress but the commonly used ones are in the racks and the rest are in rolls sorted by makers. One of the worktables is actually a desk and the McMillen stamps are sorted by type into small cups in a drawer. When I was using it I was doing a lot of longer and bigger projects so the roll stamps were in drawers also. My wife doesnt do as big a pieces and leaves them out.

-
 Doc, The fact is that some neatsfoot oil may not actually NF oil in the true sense. During a wartime effort (WW2?) the restrictions were eased and other animal fats/oils were allowed to be added or substituted and still called pure NF oil. One of the common ones is cold pressed hog lard. I used to buy gallons of pure NF from whoever was cheapest and often that was a local animal health supplier. Once in a while I'd get some that was cloudy and chunky, sometimes clear and super thick. I went to using Fiebings and had a more consistent product. I have never heard of a thinner for leather oils but light heating usually helped mine out.
 -
What size punch or what tool would you use for this?
bruce johnson replied to jcwoman's topic in How Do I Do That?
That is a typical drill bit hole. No getting around it, drill bits are not knife sharp no matter the quality or speed of feeding - they tear leather. Doc Reaper's advise with an oval punch was dead on, but finding really small oval punches without a steep taper is hard. The old European ones are good but hard to find one that has survived in good condition with the smaller sizes. I've done several thousand round holes with the same Harbor Freight bench top drill press with a mini or maxi tube punch chucked in it. Turn it on the punch won't stick even in wet leather. Use a cheap LDPE cutting board for the punch to go into and cut cleanly. This will work well even in wet skirting leather, At the end of the day, drill the punch into some paraffin wax and few times to lubricate the inside of the tube and prevent corrosion. Be aware and wear eye protection, the punchings fly out in random directions. As far as your question on dies. Some of the ones I have had through here have screw in punch tubes. They are not any less or more apt to clog than that same tube in a regular punch. I've also had dies with pressed in tubes. when they break its a pain to swap them out. Sharpening the press fit tubes is a little trickier. With a screw in tube you can screw out of the die and into a handle to easily maneuver and watch your angle. Sharpening edges of the cutting die itself is pretty straightfoward with a handheld knife sharpener like an AccuSharp. -
Belt Punch Dies - Looking for a die maker
bruce johnson replied to BeefSupreme's topic in Leather Machinery
Old school but here is what I used on everything from 5/8" headstalls to 3" stirrup leathers. It is a cheap and easy to do master and you likely have everything already. The technique was shared with me by an old friend. He had drawers of them - full and half hole stirrup leathers for Blevins, English and western headstalls, belts, tiedowns, breast collar tugs, etc. Take a strip of the leather the width of the strap. Scribe a centerline and then scribe off your desired hole spacing with a divider. On each spot punch a hole and set a copper rivet. You can leave the stem a little long. The master is done. To use it just lay it on your strap with the peened side down and tap with a small hammer. The peen will make impressions that are easy enough to follow. -
Wiz, Thanks for the link to that servo motor. I just bought my wife a Singer 17-1 with a speed reducer and clutch motor. I can sew with it but I expect she will have some speed control issues. When I got my Ferdco 2000 several years ago it had an analog servo. Within 5 minutes of sewing with it I was on the phone ordering the same motor to go on my Adler 205. I like the smoothness, performance, and simplicity of the analog servos over the digitals and you saved time me from searching for another. Appreciate it! - Bruce
-
Heart of Texas Leather Show
bruce johnson replied to YinTx's topic in Special Events, Contests and Classes
He hasnt been to any shows this year and not listed there either -
Pretty much gray in the US unless somebody has changed it up in the last few years. I got a few sides of a nice tan color from Canada several years ago.
-
These tend to heat up quickly if you drill copper rivets. Get too hot and they scorch the leather and will glaze and spin. A new quality bit or a cobalt bit is my choice and go slow. The other old-timer technique I've been shown and use successfully is to punch the burr with a small chisel. it will fold up slightly and you can get a grip with an end nipper to cut and then pull off the burr.
-
Thank you, Bob! It morphed from my leather working website. About 12 years ago I put an extra page on my website to sell some duplicate tools. I made an announcement here and they all sold that day. Eight more the next day and they sold. Eventually the tool refurbishing and selling took over my time and I had to scale back the leather work to fun stuff and not customer orders. Not counting the Craftools we mainly sell at shows we are up to almost 15000 tools and 2500 stamps handled. It’s fun!
-
I sell Wayne Jueschke tools on-line through my website. Wayne does not have a website and only sells direct at shows or through mail/phone orders and payment by check, no international shipping. If you have seen or used his tools then you know the quality. I have been selling his mauls and lace cutters/bevelers for a while and started stocking stamps a little over a year ago. The stamp inventory on hand has grown and we are stocking about 150 different stamps from him. These tools are all priced the exact same as buying direct with the convenience of viewing on a website and I take payment by PayPal or a card over the phone. I also do international shipping. Here is the link to my website page with the Jueschke tool line up - https://brucejohnsonleather.com/leather-tools-sale/wayne-jueschke-mauls-and-tools/ . Thank you! - Bruce
-
I cut on HDPE and blades do not penetrate nearly as much as LDPE. If you buy an unknown plastic cutting board and can put a knife blade very far in it - likely LDPE. LDPE is my preferred punching surface.
-
If you are looking for DIY project and time is no object, then go for it and see how it works out. If you have constraints, there are other sources. I'd look at an ignition point file blade or cobalt blade from Chuck Smith, blade from Barry King, Lonnie Height, Leatherwrangler, or Clay MIller.
-
My experience. Store in a dry container with a dessicant like Damp-Rid if you can. Wipe well after each use and then you can apply a myriad of rust preventatives - oils, greases, Boeshield, Bostick GlideCoat, WD40- Specialist, Johnson Paste wax, RainX, Renaissance Wax are some I use depending on use of the piece.
-
They are a dental dam punch. You can buy them at a lot of price points. Quick look found Ebay sellers for new from $8-9. Quality professional grade can be over $100. Fred is right about watching the tips. I get them in some sets I buy and usually throw them away because of bad tips.
-
Here's a few short punch observations and experiences. The steep angle cheap drive punches will drive you nuts in anything but thin leather. The bevel binds and more so the thicker the leather. Osborne cutting and punching tools didn't come sharp a hundred years ago and still don't. They were tools for the professional worker and just like most of the users now, everybody had an opinion how they should be sharpened -what taper, what angle, and how fine the edge needed to be. It was left up to the user to do the final edge to suit themselves. You can chuck a round punch into a variable speed drill and turn it slowly against your favorite abrasive or do it by hand to sharpen to whatever arbitrary angle somebody likes. Most of the new punches need some tune up. If you leave the edge dull, you hit harder and holes are not as clean usually. I punch into low density polyethylene (LDPE) on a shoeing anvil. My personal drive and strap end punches are sharp enough to use by hand if I want. I have also put probably 100,000+ holes in leather using screw in punch tubes in a minipunch or maxi punch handle chucked into a drill press and turned on. Even in wet skirting leather they don't stick if they are spinning. Sharpen the tube every so often with fine wet-dry and go on. The punchings will fly out of the tube in random directions so wear eye protection if you choose this. I've had punches that do exactly what you say - 4-5 punchings and they hang up. They pack tight and stop clearing. It can be something like corrsion or a rough spot in the tube catching them or the tube not having allowance to clear. I give them a chance- I wind some coarse steel wool onto a slow spinning drill bit and make a steel wool QTip. I run that in and out of the tube a few times from the top end to clean the inside of the tube and punch some Paraffin. If it still sticks, I throw the tube or punch away, life's too short to mess with it any more. I like the cone shaped punch sharpeners and also used a tapered diamond file for smaller punch tubes. I sharpen and make my bevel from the outside and I am going to make a bur that will fold in when I buff the end of the punch. A few light twists and that inside burr is removed.
-
I use a band saw - slower speed and wax my blade
-
I had it is a spray bottle and misted it on until pretty damp. Does not have to be soaking soppy wet but evenly damp all the way through.
-
Shoe and boot makers mold chrome tan every day and some all day over lasts. I've done a bunch over wooden forms for bucking rolls. From your question, it sounds like you are fastening this to another piece of leather. Are you sewing this down to the leather cover as inlay or overlay piece? If so - yes it will keep the same shape as the piece it is attached to. I've done a lot of inlays with chrome tan and molded it to the inlay plug. I used 50% alcohol/50% water to make solution to help mold the chrome tan. Commercially you can probably still buy Shoe Stretch. Some people use pretty warm water to help mold chrome tan also. The pigsuede I've worked with usually has a little more body than equivalent thicknesses of other chrome tanned species. If this is a stand alone chrome tan without much body, line it with some thin vegtan and form it over a mold to to dry if that would work for the project. it sounds like will be supported by the stock underneath so should not be a problem.
-
The old Dixon irons with the olive shape had a different groove on each side. I did some 5 oz edges with the smaller side that worked well. They were OK for bigger stuff up to about 12 oz. but once I sold them out - hard to find in the US. The advantage of the edge iron that Cary had made was having four faces each with a different sized groove to suit a particular thickness. Once his machinist stopped making them and no longer available I repurposed some copper head soldering irons. I started by cleaning them up and then working different grooves and they worked well too. The heads have a lot of heat mass and hold a good temperature.
-
No I don't sell the markers, and since he wrote this tutorial he has started selling the felt marker blanks and an edge slicking solution himself.