bruce johnson
-
Posts
4,409 -
Joined
-
Last visited
Content Type
Profiles
Forums
Events
Blogs
Gallery
Store
Everything posted by bruce johnson
-
If it is not a 30 the only other Landis splitter I know of is the Model D.

-
$800 is an OK price. You will always find the guy who found one at a junk auction or flea market for $150 and the next guy paid $1000. Yeah, $800 is fair. If anyone was building the Landis 30 today, it would be a lot more. Here is the only thing I have ever seen online for the Landis 30 - https://www.bootmaker.com/Landis_Model_30_splitter.pdf Parts are not readily available new that I know of other than blades. Harris at Pilgrim Shoe was talking about getting some of the commonly broken parts for the American and Landis splitters cast up. He retired and I don't think it ever took off. That is the problem with parts - the things that are prone to breaking are usually already broken on the parts machines. Eli Schlabach in Illinois probably has the most parts.
-

A beginner's lesson learned about leather
bruce johnson replied to Schick's topic in Leatherwork Conversation
If you bought either garment leather or upholstery leather expect a top finish. Get an airplane or go look at couches or new car seats. The leather is uniform in color and texture. Look at unfinished hides - some parts are grainy, some a smooth as a bowling lane. Different parts of a hide take dye differently and some areas on a dyed hide with have different textures . For the factory applications They need to utilize as much as they can and the uniform top finish lets them do that. That is only one factor. The underlying leather may be full grain, top grain, etc. and has the top layer still intact and theoretically stronger. Back leather may have a tight flesh and lower belly and flanks might be taggy so flesh may or may not mean much.. Its been mentioned above but it can also be a split that has been finished, the part planed away from the top grain to make a uniform thickness in that piece. The leftover split is finished and depending on tannage and hide location - might be OK, might be really loose and not very durable. Whether an grain intact leather or split is more appropriate all depends on the intended use of the leather and a cost point. Interestingly I had this conversation with an exotic leather supplier. Elephant hide is a nice leather and I have used quite a bit. There is the first generation leather that is top grain. The splits can have an embossed pattern applied and by most appearances appears to be top grain. It takes some trust in the supplier's experience to tell the difference between the top layer and a finished split. It may be still be sold as genuine elephant because it is, although the wear characteristics are going to be different. Same with any other finished leather. -
I have seen these deals go both ways, but yes, there would be some suspicion. He's likely got a minimum of $200 to ship it anywhere, so that is making his skiver about $300. Scenario one - he needs it gone NOW and it is a distressed sale that's legit. I'd find out where it is and if at all possible - go see it, try it, and pick it up, shipping savings vs the fuel to get there. If it is really fair away, you buy it untested and sight unseen, hope it is legit, hope it ships without damage, and chance losing $500. Personally I'd make a short drive or pass. I've seen some shut down shop equipment that is pristine, and others that the pictures they sent were from three years old and when I get there I'm looking at a Petri dish of rust.
-
Frankly, I always found the "measure from the fold to the middle hole, add some arbitrary number and that's your length" confusing for customers. Secondly there is the pants waist size method people that add so much to a waist size. Then there are the "belt size factory stamp" method folks where you are supposed to buy an off the rack western belt 2 numbers up from your pants size (buy a size 34 belt if you wear a 32" waist). These numbers didn't mean anything even between some different makers. When I got to doing semi-production belts with remote customers my sellers and I fell into a pretty simple system. For straight strap, non tapered belts we would ask the customer to only to measure the total length from the fold to the tip. If they wanted a longer tip exposed or tip initials, add on that measurement. If they want a shorter tip than what they wore to measure, ask them how much shorter for the total length. That is all you need - total length of the strap from the fold. The whole buckle type is not a factor for length ever and should not add any confusion. Make your belt that length. Measure now from fold to where the tip overlaps the fold. all the customer needs to do is mark that and measure. You use that length for the base line for punching. If you go by the length from the tip on charts, then you can be off. The fashion customer with the long tip will be punched too long, the guy who wants a shorter tip will be too short. Buckle type only comes into play with punching the holes back from the baseline. Trophy buckle, heel bar, or centerbar buckles - punch the main hole the length of the buckle reach from bar to tongue. You can place other holes the spacing you like. Realistically - we found most people wanted one hole shorter and two holes longer. If it is custom ask them how many holes they'd like. Some trophy buckles have a simple post tongue and longer reach, some have a reverse tongue on a tab and that reach is about a like a heel bar buckle. A few things we found. Universally when asked and given the option for hole numbers and spacing, most people didn't realize that was even an option. Most did not want big spacing (1") and rarely did anyone want their main hole in the center. Big spacing and putting on a tucked sweater on a factory belt and they were in the last hole with four holes showing back a long ways. Vanity thing but true. They wanted one hole to snug up if they weren't tucking a shirt. They wanted one for regular wear and one more for thicker clothing - nobody admitted to allowing for weight gain even though that's obviously a factor. We did a lot of three hole 3/4" spaced belts and rarely a five. We also did a lot of belts with no holes and the seller punched the holes custom for buyer at pickup. Nice touch and customer service they didn't get at the last place.
-
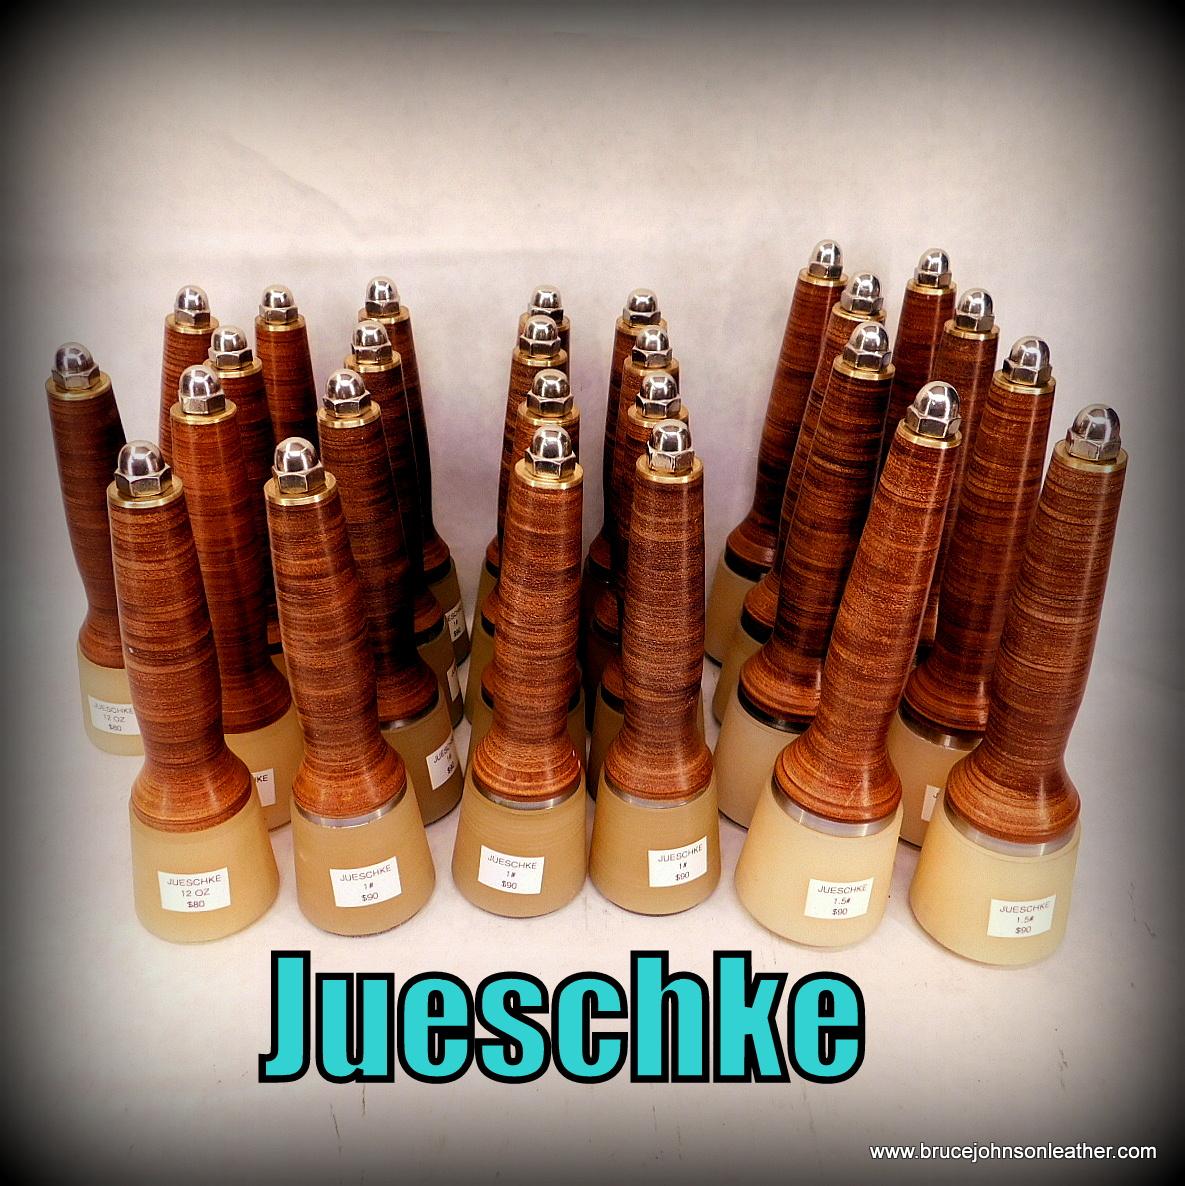
I am now restocked on Wayne Jueschke mauls in sizes from 12 oz up to 3#. Wayne has been out of stock of the smaller sizes since the Sheridan show in May. He was laid up for a while but back after it some and able to get these done for me a few weeks sooner than expected. You can check these out at other Wayne Jueschke stamps and tools we carry on his dedicated page on my website - https://brucejohnsonleather.com/leather-tools-sale/wayne-jueschke-mauls-and-tools/ Thanks! - Bruce

-
Ive pretty much been a member here since the start, when a pizza making lady from Ohio started a little internet forum. I had a newer member call me yesterday after he saw a few posts and replies here on the forum here and wondered "who is THIS guy?" . He googled and came across an online article a few years ago in ShopTalk magazine. I didn't know the article was even available. We talked a while and a very enjoyable conversation. He suggested I post this for other members to learn a little more about me. Here's a link if anyone would care to read - https://shoptalk-magazine.com/2019/09/10/bruce-johnson-bringing-back-the-best/ The article was done a few years ago, but the history hasn't changed - just more sharpening and refubishing equipment additions to the shop and a few thousand more tools in and out. I'm also selling new tools now from Wayne Jueschke and Richard Brooks since then, and recently became a dealer for CS Osborne. That me in a nutshell - mostly refurbished vintage tools with some newer used tools from retirements or estates plus new tools that I stand behind. Thanks! - Bruce
-
For punching I would recommend something softer than the HDPE. I recommend either rubber sole sheeting or LOW Density Polyethylene. End gran wood blocks work too. These are much more forgiving on your edges than HDPE. HDPE is brittle and can crack as well.
-
I’m seriously interested, sent an email
-
I sewed quite a bit on a 205-64. It would do two layers of skirting well down to wallets. Three layers of skirting and there would start to be more needle deflection. I moved to a Ferdco 2000 for those heavy back cinches and eventually sold the 205. Even with that, if I saw another 205-64 for $850 and it sewed, I jump on it in heartbeat.
-
Joe, Bill Buchman put handles on the draw gauge blades he made. I've attached pictures of some.
-
Many of you know Rundi and I from dealing in vintage tools at shows and on the internet. We also sell new tools from Wayne Jueschke and Richard Brooks. Today I am announcing that we are now selling CS Osborne tools as well. We are starting off with a limited number and have more in the works and on the way. Please follow the link for more information and feel free to comment here or through the website. - https://brucejohnsonleather.com/leather-tools-sale/new-cs-osborne-leather-tools-sale/ Thanks! - Bruce
-
I use boiled linseed oil for most wooden handles. Occasionally on hammers I’ll use a recipe of BLO, beeswax, and mineral spirits
-
What weight hammer or maul would you recommend .
bruce johnson replied to luckystudio13's topic in Getting Started
Metal hammers will wear the striking end of your punch fast. Rawhide mallets with replaceable inserts are good and some prefer those. I like mauls and once we get into that tree then I like tapered mauls best. -
What weight hammer or maul would you recommend .
bruce johnson replied to luckystudio13's topic in Getting Started
It depends on a few things How sharp are your punches? Sharper punches or smaller punches and you can go lighter, - a #3 is as much as I ever needed for anything and not very often. About the only time I use a 3# is on rosette punches. They have a lot more linear edge than other punches and need a little more force. What kind of supporting surface? something with a little flex will need more force than a solid supported surface. End grain stump or post, punching over a supporting leg of a work bench will be more solid with less force absorption than middle of a bench. My punching setup was a piece of LDPE over a granite inspection plate on one bench or LDPE on a shoeing anvil. The mass of either support pretty well negated any flex of whatever it sat on. I sell a fair amount of mauls and mostly 2# or 2.5# for strap end and bag punches with the occasional 3# for the bigger punches or duller punches. Barry King' mauls are nice with a handle shape for a good grip. -
I’m going to put out another perspective. There are old wood handle strap end punches designed to only be used by hand, simply rocked back and slice the end of the strap. Those need to be sharp. I sharpen my personal all metal strap ends to this same level of sharpness. I can pretty much drive any punch other than a rosette punch with a 1 pound maul. Easy punching is more fun for me. The punching surface is important. I recommend LOW density poly for punching, followed by either end grain wood or sole material. You want the punch to cleanly punch through and slightly into the material. These material allow that without deforming the punch edge. You need a good supporting surface under the punch material - i used an anvil or a granite headstone depending on which end of the shop I was at. I sharpen the outside edge and am a little spoiled. I’ve got a 2x72 belt grinder, 1x42 belt sharpener, and round platen grinder now to sharpen on. I go at least to 1200 grit. Once I have the edge I run a tapered Diamond rod sharpener to take off the inside bur. I buff with black and then green compound on the lower speed end of a variable speed grinder or a shaped leather strop wheel in my drill press to polish the edges. This can all be done by hand too, just takes time. I’ve attached a short clip of a punch I sharpened a few years ago. It is test cutting some scrap skirting on my workshop bench. Pre tripod era so one hand was holding the phone and one hand on the punch, not a quality video but you get the idea. . 26BC836D-BB11-40CA-95A7-832A182F20CB.MOV
-
Yes, it compresses and evens the top grain depending on how wet the leather is and how much pressure you use. A good lubricant like casing mix or saddle soap will slick the leather without much pressure and less burnish effect. I didn’t always do it on firm areas like backs. I did it on most areas where I might be getting into looser fibers like down the sides or into the shoulders. It made the cuts and tool burnish more uniform. On things that weren’t tooled I did it pretty soon after I got started and used increasing pressure to really glaze and slick the surface. It really makes a nice feel and finish surface. Kind of like that broke-in feeling of a wallet you’ve been carrying for a year - except you saved a year’s effort to get that same feel right off the bench.
-
Congratulations! You are in some good company in this issue! For those who don't subscribe to ShopTalk please consider it. These new owners and publishers have done a wonderful job of stepping up this magazine in the last few years. Sorry to say I cant be at the show this year. I used up all my free time at work and cant get away. It was a fun show last year and I expect it to be again this year. I am sure sorry to miss it!
-
Here's my take, they all will sharpen up and use them enough - they all get dull. I used to not think so but time has told me you cannot do the best job resharpening unless you use a jig. As far as jigs. I am pretty the Leather Wranglers blades will still fit the Tandy jig. Barry Makes blades that will fit the Tandy knives and jigs, and I know a few people have drilled out the Tandy jig to fit Barry's standard blades. Chuck Smith is back to selling the Big Red swivel knife jig. There are a few jig styles that hold the handle - Probably one of the more common is the Red Ox Brand jigs that Gordon Andrus makes. Nice media like a ceramic or diamond stone in a few fine grits or wet/dry paper and you are on your way.
-
I assume you are talking about slot or bag punches because some places do call them oblong punches. If not, ignore this. There is a general recommendation floating around to make the slot for a buckle the width of the strap. I don't like that. On a 1/2 strap that may not be enough or too much depending on thickness or buckle length. On a 1-1/2" it may be sloppy. On my smaller stuff usually a 5/8" was good. On a belt 7/8" was usually good. One horse gear with thick leather up to a 1-1/2 for back cinch buckles. Disclaimer - I deal in leather tools and have some opinions on makers/styles and generally they are wrong according to some email replies and phone messages I get. Feel free to contact me privately and we can discuss my opinions. Easiest way is through my website and there should be a link below.
-
Please PM me, thanks! - Bruce
-
I got linked in the thread mentioned above to a post from 2009 where I gave an opinion then. Here is what changed for me in 13 years - I continued to do a heavy amount of leather work (some know my past history) until about 5 years ago when I switched trails and started selling leather tools as the main part of the business. In the meantime since 2009 I had replaced every straight maul with a tapered maul. My wife does leatherwork for fun and uses some straight mauls once in a while I guess. I see them out on the bench. I have an article series going right now in ShopTalk magazine on upgrading tools and striking tools to me are the second thing to upgrade once you get a good swivel knife if you are doing any carving. Everyone needs a 16 oz maul for general tooling. Once you get that - go lighter if you are doing a lot of little sharp stamps like bargrounders, go heavier if you are doing geometric stamps with a lot of face. My tools paid for themselves through my and I ended up with 12 oz, 16 oz, 1.5#, 2#,2.5# and 3#. What I used depended on the stamp or punch. Realistically the only time I use the 3# punch much is punching out rosettes. Which maker to go with depends on a lot of things. I have mauls through here from most of the major current makers. I've had the $20 Amazons on up too. Which one to choose depends on your anticipated usage, what you will tolerate, and your budget. Light use on the occasional billfold for a fun hobby, the smooth nylon head/wood handle Amazon may be OK without tying up much money. Stamp three notebooks a week that you sell and a grippier head and ergonomic handle more expensive version should be more enjoyable to use. That maul will pay for itself. Every user has a favorite handle, head material, and price point. There are several makers out there to fit that. I've got my personal favorite and that's one of the reasons I sell that maker's particularly.
-
I’m not sure of the current regulation with having it but I’m not thinking you’d have much of a chance of being inspected at your shop. I’ve never heard of it. At one time businesses could buy things the average Joe couldn’t. Not sure where that stands now either. The inspection stations at the borders are usually looking for ag pests unless you are driving a commercial. I get inspected about half the time I’m pulling a trailer. Open the door, they look, I go on. They aren’t opening totes or boxes.
-
Bruce Johnson Leather Tools Oakdale, CA - but I ship world wide with very limited exceptions https://brucejohnsonleather.com vintage and refurbished leather tools and bench machines - nothing with a motor is my general rule new tools and stamps from Wayne Jueschke and one or two other higher end makers in the works. one person shop with a very helpful and understanding wife.
-
Similar concept with the blade in the handle and utility knife blades. The other one does not have changeable inserts though.