.jpg.d60258221c476480a6e073a8805645bb.jpg)


Constabulary
-
Posts
5,806 -
Joined
-
Last visited
Content Type
Profiles
Forums
Events
Blogs
Gallery
Store
Everything posted by Constabulary
-

Need help threading Brother machine
Constabulary replied to rivercityleather's topic in Leather Sewing Machines
looks like a Pfaff 335 clone - manuals can be found online. -
Shoe finisher dust collection bag material
Constabulary replied to AlizabethThomas's topic in Leather Machinery
Can´t really help but maybe a filter sack from a wood working dust collector is an idea. https://www.harborfreight.com/13-gallon-industrial-portable-dust-collector-31810.html https://www.harborfreight.com/2-hp-industrial-5-micron-dust-collector-97869.html -
I have two of these stainless steel burners for different purposes. https://www.ebay.com/itm/131038097614 You can throw in some neodymium magnets to hold them in place (require iron surface of some kind)
-
Singer 31-47 Thread Tensioner
Constabulary replied to GeorgePepper's topic in Leather Sewing Machines
Are you aware that the UK Gov. wants EU supplier to collect taxes for the UK Gov. for orders below 135 GBP and transfer the VAT to the UK Gov. - that requires work a tax consultant meaning it costs money and a 3€ order is just not worth the trouble. If you run a business in the UK - would you collect VAT for the Italian, French or German Government and then transfer it to them - I doubt so. But the UK Gov. wants just that! The UK for sure are not a public enemy. But the UK decided to leave the EU not the other way around. Brexit makes it complicated in both directions - we all suffer from that! @GeorgePepper pretty much hit the nail. It´s just too complicated - tax + paperwork - and not worth the trouble especially for low value orders. I also no longer can place orders in the UK - I tried 3 Co´s none will deliver to the EU - including my long time supplier College Sewing. I really would love to spend my money in the UK - I just can´t - because of BREXIT. I wish Brexit never happened and I´m sure if the people and businesses in the UK had proper information on how BREXIT will impact their life most people would have not voted for leave / more would have voted for remain. -
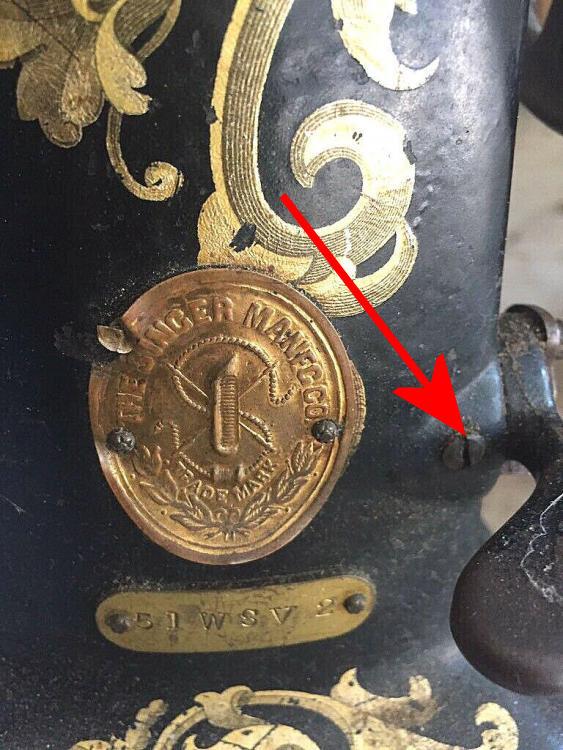
Singer 51W SV 2 Post Bed Machine Restoration
Constabulary replied to Constabulary's topic in Leather Sewing Machines
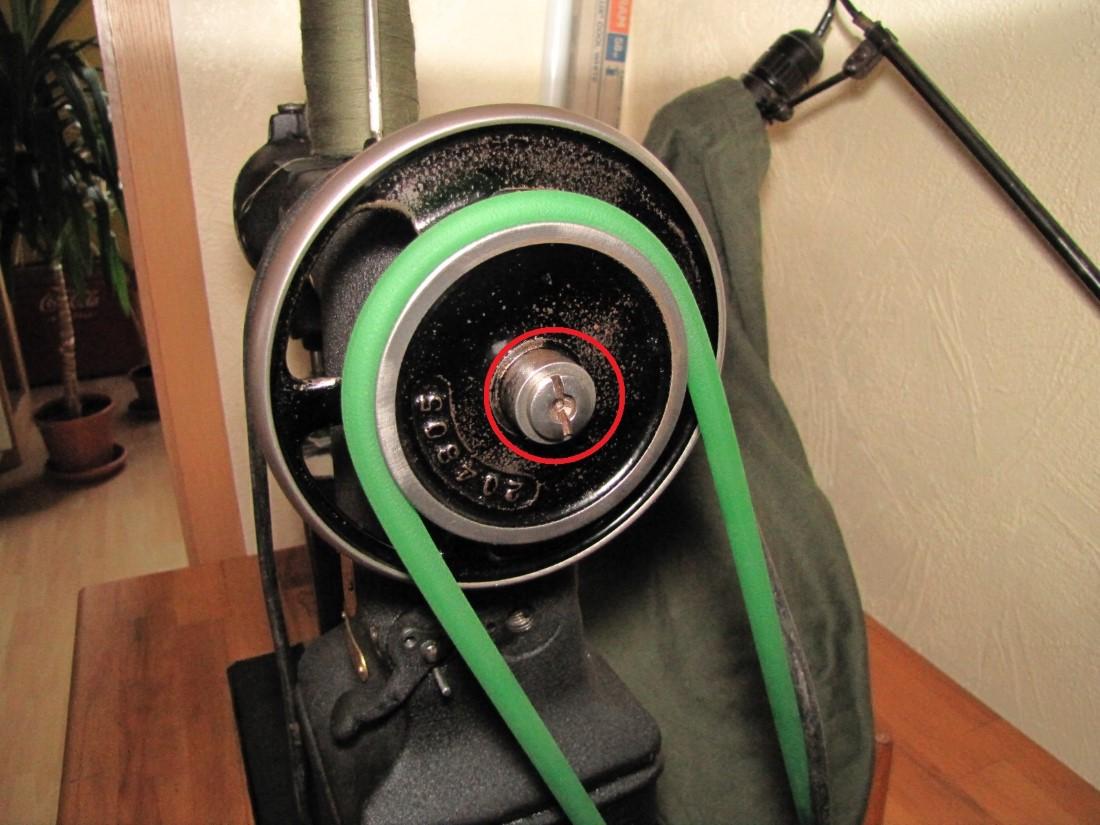
Remove the needle plate (and maybe feed dog). Remove the small screw shown the picture. Swing the curved piece by side. Grab the center post of the bobbin case with your fingers and rotate it until it comes out. Then in the center of the hook you see a screw. This screw is holding the hook on the hook drive shaft so remove it. When the screw is out you can pull out the hook (but both could be tight because of gummed oil). The sideways play on the top shaft most likely is because the hand wheel is a little bit too far right on the shaft. Loosen the two set screws on the hand wheel. Then you are able to carefully tighten the screw on the right end of the shaft to minimize the sideways play. Do not make it too tight. Then tighten the 2 set screws again.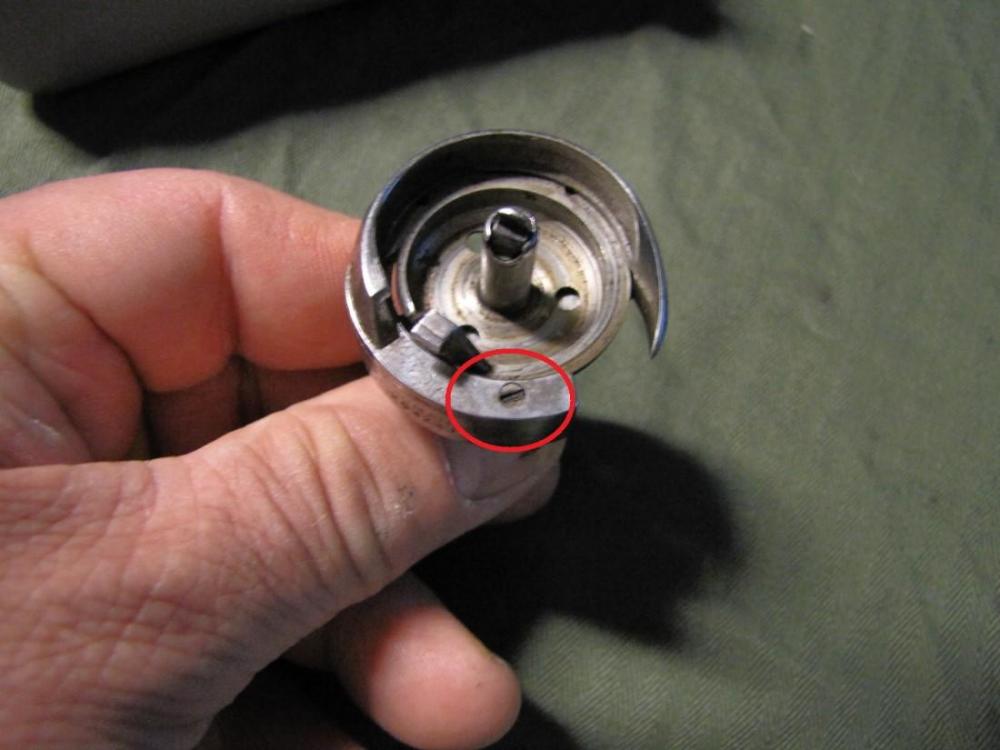


-
the cutout in the needle in which the feed dog moves can limit the stitch length too. There were 45K needle plates with shorter cutouts and smaller feed dogs. maybe you can post some pictures of your machine and how it is set up.
-
As you figured you don´t need a double needle machine but it is faster and more accurate (depending on your skills) as you see in the sneak peek picture of that video the seam stitches are not 100% equal (this may matter or not depends on your or your customers expectations.)
-
Singer 51W SV 2 Post Bed Machine Restoration
Constabulary replied to Constabulary's topic in Leather Sewing Machines
You said thread guide so I assumed the wire thread guide on the needle bar. So you mean the upper needle bar guide, right? I took a long presser foot bar screw with same diameter as the needle bar from my spare parts junk box so I have used is as upper NB guide. I think it came form a Durkopp machine. I glued it in with JB quick weld and while curing I turned the and wheel so the NB went up and down. That ensured a straight position of the NB guide. My idea never was to have a historical correct machine - my focus was on a properly working post sewing machine to replace my former 34K5 which had a tooo long post and the use of 135x17 / 135x16 needles as on most of my other machines. The smaller size of the bed also allows me to use it in the same table as my 107w1 and 143w2. -
In short - "Walking foot" is rather collective term for machines where a presser foot is moving the material forward. Often "walking foot" is equated with triple feed but it actually is not the whole story. Most double needle machines you find are needle feed machines (feed dog + needle feed the material). Some are triple feed (feed dog + needle + presser foot feed the material) machines but you cannot turn a needle feed machine into a triple feed machine. Quick guide to ID a triple feed machine : it has 3 bars (2 presser foot bars + 1 needle bar) and the needle feed machines have 2 bars (1 foot bar + 1 needle bar) This video may be useful to ID different feeding mechanisms:
-
Consew 206RB-5: Not picking up bobbin thread
Constabulary replied to MtlBiker's topic in Leather Sewing Machines
to me the tip on the installed hook (shown in video) does not look bad at all. I doubt you have to replace it. It´s juts not correctly timed. -
Having problems binding around corners
Constabulary replied to chrisash's topic in Leather Sewing Machines
I have to admit binder are a special topic but the cheap ones are not against you. It´s just tinkering and knowing how to set up the binder. I´m using the freakin cheapest binders I could find (back then) and they work very well. Mine came from kits for flat bed machines like these (just minor differences): https://www.ebay.com/itm/353465220561 and I modified the brackets to fit my 108w20 cylinder bed machine. Zero issues - really! You can find complete 111w binder kits like this one: https://www.ebay.com/itm/300921860528 Pretty sure College Sewing has all the components. -
You are welcome. I`m using Singer machines only and that for a reason - or several reasons. But each to his own - others love Pfaff for their own good reasons.
-
Let he check I may have one. If not check this post here
-
Singer 51W SV 2 Post Bed Machine Restoration
Constabulary replied to Constabulary's topic in Leather Sewing Machines
just wanted to post a link Yeah, thats the needle plate + feed dog combination one I´m using. The thread guide on the needle bar came with the needle bar. The NB came from a German made Singer 111D and has a wire type thread guide mounted on the backside of the needle bar. Is your missing? -
Consew 206RB-5: Not picking up bobbin thread
Constabulary replied to MtlBiker's topic in Leather Sewing Machines
The instruction manual is pretty clear with the timing values - SARK9 posted an extract above. If you do not have the complete manual download it. -
New Options for cutting and folding leather straps
Constabulary replied to RockyAussie's topic in How Do I Do That?
Indeed - well done -
Having problems binding around corners
Constabulary replied to chrisash's topic in Leather Sewing Machines
Thats the point! Just as everything in sewing - it has to be set up properly... needle bars, hooks, feed dogs, feet... you name it... edge guide, binder brackets and attachments. And sometimes it requires to modify parts cause not everything comes of the shelf and is a universal fit part. There are just toooooo many variables in sewing. @chrisash the swing bracket may be a solution but is not guaranteed to be the solution that works "of the shelf" For the 111 there are special raised throat plates + feed dogs for binders, built up slide plates (for drilling holes and taping thread) and feet sets for binding... just dig through their 111 parts side (also look at the Singer 211 and Juki 562 / 563, Seiko STW 8 / LSW part sites) -
Don´t look up the full number, everything after 442 is the subclass that describes technical feature which may or may not come with the machine (machine could be technically altered). Here are some files for the 442: https://www.manualslib.com/manual/1226488/Pfaff-441-O.html#manual https://usermanual.wiki/ACE-EASTMAN-PDF/Pfaff442144272004.1282822958 If it was me I would look for a Singer based double needle machine (like Seiko, Consew, Mitsubishi, Juki, Singer of course) because parts and accessories like feet and gauge sets (for different needle spaces) are a lot easier to find and a lot cheaper. I have a Singer 212G141 needle feed machine and I´m pleased with it
-
Consew 206RB-5: Not picking up bobbin thread
Constabulary replied to MtlBiker's topic in Leather Sewing Machines
if not the safety clutch then IMO the NB is too high AND the hook is too far away from the needle scarf. -
What diameter is the pulley on the servo? A small pulley will help too. The lowest setting on my JACK Servo is 500 but it actually starts at 200 and I have a 1:3 reducer + 40mm motor pulley. That lets my Singer 111G156 sew super slow
-
you could add a speed reducer. https://www.google.com/search?client=firefox-b-d&q=speed+reducer+site:leatherworker.net/forum/
-
Having problems binding around corners
Constabulary replied to chrisash's topic in Leather Sewing Machines
Binder is too far away from the needle, bring it closer to the needle and if necessary cut down the inner foot. -
Brother LT2-B836-5 Double Needle Machine
Constabulary replied to Jholden0's topic in Leather Sewing Machines
For spacing between the needles. The bars seem to be fixed in space but the different needle holders (one for each NB) are available for different needle spaces. Split needle bar machines are a bit different compared with plain double needle machines. -
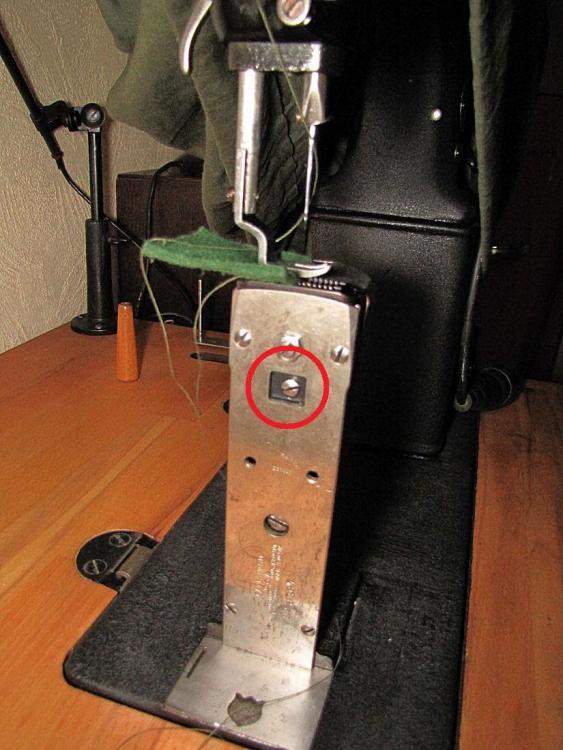
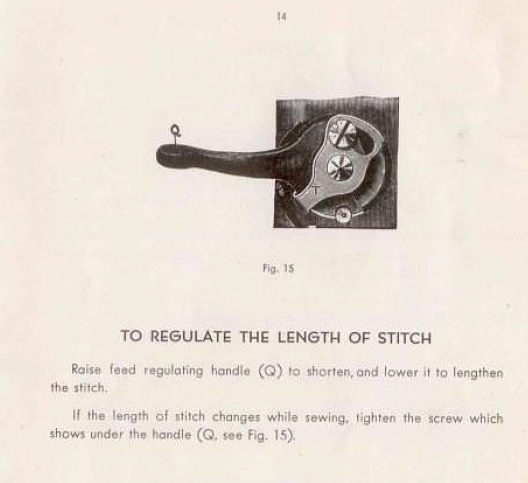
loosen this screw and you can raise or lower the feed dog. Removing the front plate (held by 4 screws) makes it a bit easier. Yes, that´s the only mechanism. Have you checked the stitch length adjuster? Lever up is short lever down is longer. If the lever does not move then loosen the set screw on the front side
-
The days of OEM Singer parts are over (almost) and no one will offer the complete set I guess. So you most likely have to buy the single parts and assemble them. Also make sure your cam on the top shaft has the bevel gear mounted.