


silverwingit
-
Posts
537 -
Joined
-
Last visited
Content Type
Profiles
Forums
Events
Blogs
Gallery
Store
Everything posted by silverwingit
-

I messed it up
silverwingit replied to Dunluce's topic in Purses, Wallets, Belts and Miscellaneous Pocket Items
Good work, Dunluce! Your stitching and edges are great having only started. And you definitely made the right decision following through even after you realized your mistake. Look at all the experience you would have missed otherwise! A less intelligent leatherworker would have tossed their work as it was hoping to quickly move beyond the evidence of their error. They would have learned nothing and would probably be destined to repeat their original mistake. I have a "boneyard" of projects that failed for one reason or another. I keep them as reminders to avoid those mistakes in the future and to revel in how much progress I have made since I made them. My good work is being used by my many satisfied clients. Keep it up! Michelle -
My NEW Leather Apron
silverwingit replied to Jess Jones's topic in Purses, Wallets, Belts and Miscellaneous Pocket Items
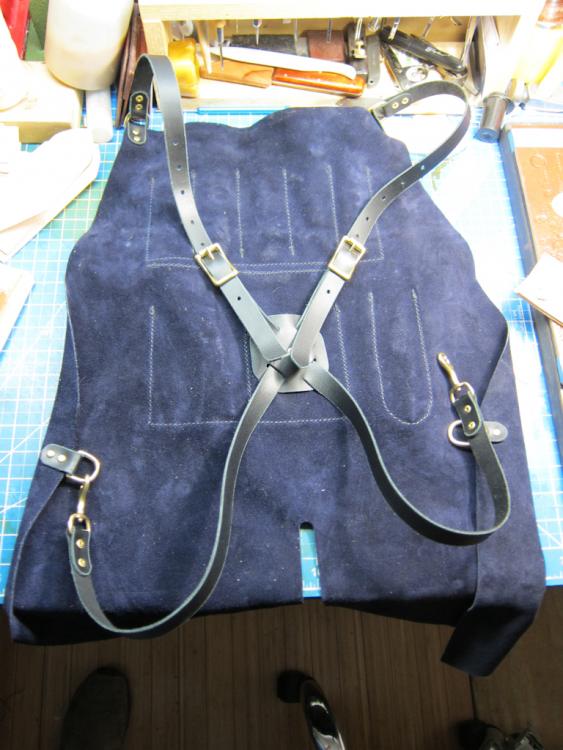
Well, I should have done this a looong time ago! After getting a nudge from your post, Jess, I took a break and went ahead and made an apron from some chap suede I've had laying around. Unlike yours, it has short flaps to cover my upper thighs, that part of my legs that is exposed as I sit at my workbench. I stitched in a row of pouches for tools and pens and such, a pouch for my leather shears and a couple pockets with cover flaps for miscellaneous items. I've had surgery on my cervical spine so I made adjustable crossed shoulder straps to avoid having the weight on my neck as would be the case with a simple neck strap. The apron fits me like it was made for me (it was!) and the straps don't bind or chafe. There's a little heft to it but in a positive, comforting way. It is a joy to use. It took me a little while to get used to putting tools back in their respective pockets instead of on the bench top. At first I couldn't find anything as I searched the bench top out of habit, only to find the item in my apron pocket. But once I got into the habit of using the apron, I was freed from the ritual of stopping progress to hunt for a commonly used tool buried somewhere on my bench along with other tools, pieces of leather and such. And just yesterday a leather strap that I was applying edge dye to got away from me and swiped across the apron -- instead of a perfectly good shirt. I haven't had it happen yet but I've bloodied my legs before with an errant dropped awl or knife. No more. One last silly little thing. I feel more like a professional leatherworker when I wear it. Now all I need is a Chan Geer-style leather-billed hat to match the cowboy cuffs I also wear to protect my forearms. Thanks for the idea, Jess! Michelle
-
New wallets
silverwingit replied to jakc3's topic in Purses, Wallets, Belts and Miscellaneous Pocket Items
Try casting your stitches to maintain that angled look. Start watching the Master at 5:52 to see what I mean. Michelle Michelle -
My NEW Leather Apron
silverwingit replied to Jess Jones's topic in Purses, Wallets, Belts and Miscellaneous Pocket Items
I sit at my leather bench but I'd like the benefits of an apron. I've thought of making one of some spare chap suede but I've been torn between a short one like yours and a longer one possibly with a split for my legs. Right now I'm favoring the latter because I would like to protect my legs in case of a spill or if I should drop a sharp tool or the like. I'd also put in some purpose-driven pockets for pen/pencil, awl, leather scissors, ruler, etc. -- things I'm always reaching or looking for on my bench (when it gets a bit cluttered). I appreciate you posting this, Jess. You've spurred me to go ahead and design and make an apron for myself. Michelle PS: I wonder what finish you used? A few splatters from some BBQ grease might change your apron's lovely appearance pretty quickly. -
I LOVE Youtube but the quality of YT videos, like that of any other internet content varies wildly. You have to sift through tons of videos to find a good one, but when you do it can be revelatory. The thing I hate is when some dufus records a half hour video on the first time he did something. Please! Michelle
-
A few things regarding snaps. First off, I HATE segma snaps! Hate 'em! I'll never try to use another one ~ever~ again. I can't tell you the misery they've caused me. I've wasted dozens trying to get them to set right (I never bought dies for my presses 'cuz I dislike them so intensely). Now I use spring snaps exclusively for thinner leather. I have thousands of them, looking for a good source. I finally purchased a Goldstar press & dies just for spring snaps. Their spring snaps aren't bad either, though there are better ones. They work OK and are dirt cheap. When used properly they work fine (Arthur Porter, who is a big exponent of Goldstar presses and snaps, uses them incorrectly in his teaching videos on the subject). The press is the deal, though. Next, I learned some time ago to not pinch pennies when it comes to snaps. Snaps are the only leather hardware that is subjected to thousands of "engagings" and "disengagings" and in that sense are the only leather hardware item that is subjected to that sort of intense use. (I'm not including items like belt buckles that just rotate, but am referring to items that engage and disengage). Steel snaps are to be avoided in general, though I've found some steel spring snaps that work OK (Goldstar's are steel). For larger snaps like Ligne 20 or 24, though, forget steel snaps. I never want one of my products to be returned because of a silly bad snap. Bad for both my time and my reputation. http://goldstartool.com/ One thing to be aware of is that Goldstar's and Tandy's snaps and presses are incompatible. And yes, there are far better sources for snaps and all manner of other kinds of hardware used in leather products. I use Ohio Travel Bag for all my leather hardware and many tools as well (except spring snaps as above). https://ohiotravelbag.com/ There are other sources but I know of no other single source that carries just about every sort of hardware imaginable from Segma snaps to genuine Birkenstock shoe parts and OEM Samsonite luggage repair parts. (Ironically their stock of spring snaps is anemic at best -- that's the only contradiction to my above statement I'm aware of. Understand that I am a spring snap nut because I make a lot of products out of garment leather where beefier snaps are inappropriate.) And, even with OTB I choose only solid bass snaps. It's a bit more time-consuming but one of the great things about OTB is that they carry many variants of their snaps so you buy by the individual component rather than as complete sets. I particularly appreciate being able to choose different post lengths for my rivets and snaps. Yes, I also choose solid brass rivets. OTB carries their hardware items in many different "finishes," such as plain solid brass or nickel plated solid brass, painted SB, anodized SB, etc. The only potential drawback is that OTB sells only wholesale so you need a tax ID. They also have a minimum order of $30, but you can eat that up in a hurry. They do sell in any amounts from single parts to thousands. Good luck, Michelle
-
You could make a design on the surface of a small steel jeweler's block with some needle, checkering or "riffler" files. Michelle
-
Why do you want to use a log in the first place? Nige's always seemed a bit clumsy to me. The tool loops are a nice feature but don't hold nearly all the tools I need. The surface is also pretty small for many of my projects and you really have to have a workbench as well anyway (Nige does). Finally, I have a bad back and wouldn't want to have to hover over a log like that very long. Don't get me wrong. I have learned volumes from Nigel and am deeply indebted to him not only for his videos but his responsiveness with emails, etc. He's even been so generous as to help me via Skype (before he became famous). He's the reason I can saddle stitch well. In fact, my mantra is, "WWND" (What Would Nigel Do). But this is one thing that Nige does that I don't get. Maybe he'll read this and chime in. A well-lit, nice, solid workbench with a good-sized chunk of marble or granite flush-mounted into its surface and a tool rack along its back is as near perfect a leather workbench as I've come across. I only wish I could say it was mine! I will admit, though, that a leatherworker could do a lot worse than emulating everything Nigel Armitage does down to the last detail! At least that's the way I see it. Michelle
-
Very elegant and pretty bag with nice stitch work. I agree with thefanninator about the handle. It s crude by comparison with the rest of the bag and seems like it would be uncomfortable with seam as prominent as it is. There are more streamlined ways to construct a handle. The other weakness I can spot, and I had to look closely, also relates to the handle, but this time how it is attached to the bag. The loops that go through the brass square rings are stitched all the way across the straps. This perforates the straps across their widths, weakening them significantly. I'd suggest making them in an arc across the strap or a rectangle inside the strap's widths instead. Overall the stitches also seem a tad long but that is mostly personal preference. But, like I said I had to look close. That is a bag to be quite proud of. Michelle
-
No other finish required, though a coat of floor wax and some buffing might put a mirror finish on it. Please let us know how it works for you if you try it. Thanks, Michelle
-
Well I will agree to disagree with the expert with regard to using belly leather. It's saved my hide (literally) on many occasions. But there are bellies and there are bellies. As I said, use a good belly, not one that has been through the wringer. And I was really referring to those designing your own patter from scratch and for those making their first holster. If you are using a proven pattern and have experience, then by all means, start with prime vegtan. But if you are designing your own pattern or it's your first foray into holster making, I stand by what I said about "practicing" or "developing" using belly leather. Chances are very good you will make some mistakes. I know I do. I use belly leather until I get "close" to an acceptable design and then switch to prime vegtan. Saves me a lot of money. Maybe JLS can arrive at a pattern wasting only $10-$15 of good vegtan, but not me. I treat my interiors with a good coat of neatsfoot (I dye my leather before assembly), then a healthy coat of Carnauba cream. As I rub these in these I try to find and follow the direction of the grain of the flesh side. When I am done with each application, I give it a good rub with a piece of canvas, again in the direction of the grain. Finally, I give it 2-3 coats of Bag Coat, once again with the grain. Then I rub the grain down as much as possible with a bone folder of burnishing stick. before it is completely dry. Works for me. Inserting and withdrawing the handgun with use will polish the ares of contact even further. Michelle
-
Smooth impressions on vegtan
silverwingit replied to grumpybearholsters's topic in How Do I Do That?
You could try inverted carving. You just leave foreground plain. The look may appeal to you. Michelle -
All excellent advice here. I would only offer a couple of twists. 1) I think lining holsters is vastly over-rated, especially if it's your first. It significantly increases the degree of difficulty and offers little in the way of additional functionality in the field. A holster made from top-grade Hermann Oak or Wicket & Craig vegtan with a properly treated interior is just fine in every way with no lining. 2) I'd start with some good belly leather. By the time you are satisfied with your prototyping you will have learned volumes and avoided ruining a perfectly good piece of prime vegtan. One last thing. Although it is an Avenger model, I think you might find Eric Adam's video series informative. Good luck, Michelle
-
-
0000 steel wool after sanding and I bet those horns shine. I know it works great on bone and antler. Michelle
-
I hate to sound glib, but your answers can be found in Bob Park's tutorial on edge finishing at the top of this very forum. Two takeaways: No shortcuts and forget gum tragacanth. http://leatherworker.net/bob-park/FinishingEdges-2-15-11.pdf Works for lots of leathercrafters. Should work for you too. Michelle Edit: Now that I see you've used saddle soap and beeswax, here is a little truth that no one, even Bob Park will tell you: Even those Filson edges will never look better than the first day they are burnished in. I've never found an edge treatment that will hold up to a lot of flexing, abrasion or exposure to weather.
-
Sharpening A Splitter Blade - Am I Doing This Right?
silverwingit replied to rhinez0r's topic in Sharpen it!
A well-sharpened splitter blade is a dream to use. A dull one does a terrible job, ruins a lot of leather and is actually dangerous to use. I think electrathon is on the right track but I take his method a step further. Instead of glass, I use a granite surface plate. Same chunk of granite I use for tooling. Perfectly flat. $42 delivered. No leather workshop should be without one. http://www.grizzly.com/products/9-x-12-x-3-Granite-Surface-Plate-No-Ledge/G9648?utm_campaign=zPage I use progressively finer grits of sandpaper up to 600 grit but then I switch over to 3M polishing papers. http://www.amazon.com/Zona-37-948-Polishing-11-Inch-Assortment/dp/B001BHGC7G These polishing papers can be used wet or dry and range from 30 down to 1 micron grit size. I do what machinists call "lapping" the blade, which amounts to moving it in a figure 8 first in one direction and then the other, from the coarsest down to the 3 micron grit. You'll need a loupe or Opti-visor magnification and excellent lighting to see when the previous grit's scratches are completely removed before you move to the next finest grit. NO shortcuts! When you are done lapping you will have a mirror surface. You need to do both sides of the blade. It is time consuming but your time and effort will pay off big time. As with any other edge, the last step is to strop the blade to remove any micro "wire" left from the lapping process. Once polished to a mirror surface, the blade will produce super-smooth cut sides and only require a strop now and then. You'll be able to split wider straps than ever before. And, the next time you do need to sharpen, you'll only need to use the finer grits and re-strop to return the blade to the same ultra-sharp condition. Give it a try and I guarantee you will enjoy a splitter that works better than ever before. Better than you thought it ever could! Michelle -
It's far from ideal but it works. I've found that the only way to get a regular stroke along the full length of the tines of a diamond stitching chisel is as follows. The difficulty, of course, is sharpening the surfaces between the tines. I take a thin but wide stainless steel ruler without cork backing and hold it tightly onto the edge of my workbench or granite block so that there is enough of the ruler sticking out over the edge to insert the tines to their hilts. Then I take a strip of wet or dry sandpaper and place it on top of the ruler to that it is flush with its outer edge. The new 3M paper has a mildly sticky back that helps you keep it adhered well enough to the ruler but it's a bit thicker so it may not work with tightly spaced tines. Plain old sandpaper is thinner but it would probably need some double sided tape to keep it from sliding around on the ruler. Or maybe tape both ruler and sandpaper to the granite block. It is a tedious and time-consuming process but you can use the usual progressively finer grits of sand paper to achieve nice smooth surfaces between tines. You will soon develop a "feel" for when you have the chisel at the proper angle so that the inter-tine surface you are working lies perfectly flat on the ruler. As usual move your arm, not your hand or wrist to generate nice, long even strokes, maintaining the proper angle so that the surface you are working remains in full contact with the surface of the sandpaper. In order to sand the inter-tine surfaces all the way to the point you need to tilt the chisel with respect to the ruler towards the end of your stroke. There are twice as many surfaces you must treat for the number of tines on any particular chisel, counting the two outer and all the inter-tine surfaces so be prepared for a long session for each chisel. When you're satisfied that all the inter-tine surfaces are smooth with, say 400-600 grit sandpaper, you can apply some polishing compound to a piece of 3x5 card and use it with the ruler to polish the hard to access inner surfaces. Sharpening the outer surfaces is much easier. You can simply drag the flat surface of the chisel along the sandpaper or strop, tilting the chisel upwards at the end of the stroke to sharpen all the way to the points. I've been quite surprised at how rough even expensive pricking irons all the way down to cheap Chinese diamond-shaped stitching chisels are. It's not so important with a pricking iron but since a chisel goes all the way through the leather, those rough edges are problematic when it comes time to pull the chisel out. A rough chisel will go in easily enough when driven with a good maul, but removing it is another story. You need to use so much force and tilt the chisel back and forth so vigorously that you can easily bend or even break a tine. A chisel with a bent tine is trash. Once you've polished one chisel you still have the rest of the set to do. But when you're done your chisels will be a dream to use. A quick poke into a block of beeswax and they will be easy to remove. I do find that it is still very important to pull even a sharpened chisel out of the leather with force that is perpendicular to the surface of the leather. Tilting a chisel back and forth to remove it will eventually damage it so if you do have to tilt, do it in multiple passes tilting to very small angles one way and then the other. Think of tilting only to break the static friction that holds on the chisel. Stop your tilting action as soon as the static friction is broken, and use only that steady perpendicular force to finish removing the chisel. Even with good quality Japanese chisels it is very easy to bend an outer tine. Once bent, they're useless. Try to bend the tine back so its parallel and it will break off. You can tell I've ruined more than my share of stitching chisels! Give it a try and let us know if it works for you. Michelle
-
What Can You Use 3Mm And 2-2.5Mm Leather For?
silverwingit replied to Retrospads's topic in How Do I Do That?
You could make all sorts of little projects. Tandy has dozens of how-to videos. https://www.tandyleather.com/en/free-leathercraft-instructional-videos.html They also offer many different patterns. https://www.tandyleather.com/en/category/leather-craft-patterns Or, you could dive into learning real leatherwork. If you want to do that, buy Al Stohlman's book on hand sewing and get a few tools to learn how to do that. http://www.amazon.com/Art-Hand-Sewing-Leather/dp/1892214911/ref=sr_1_1?s=books&ie=UTF8&qid=1463156341&sr=1-1&keywords=al+stohlman Then buy Volume 1 of Al Stohlman's Book on making cases. http://www.amazon.com/Art-Making-Leather-Cases-Vol/dp/1892214946/ref=sr_1_3?s=books&ie=UTF8&qid=1463156341&sr=1-3&keywords=al+stohlman After taking either of those paths, you will no longer have to ask this question. Good Luck, Michelle -
You might find this video helpful. Michelle
-
My dehydrator gets too hot. It would curl and maybe even crack the edges of the leather. I wouldn't do it. Leather needs to dry out slowly. In general, heat is not good for untreated leather. Michelle
-
Making a wallet - question about thickness
silverwingit replied to Mujician's topic in How Do I Do That?
I like to use Kipskin for inner pockets. Inexpensive, thin, and it will take dye like your 5/6 Oz. outer. In fact there are many reasons to keep some Kipskin around the shop even though you don't hear much about it. Michelle -
Since no one has mentioned sharpening a swivel knife blade, here is another helpful Youtube video. Bruce Cheaney has a number of useful videos on his channel. Many relate directly to your question. Anyway, a keen swivel knife sharpening jig is essential to getting a sharp edge at the right angle. Impossible for mere mortal humans with bare hands. Here's how: Get one and learn how to use it before you strop. Michelle
-
A devout Youtber has these helpful suggestions. First case and treat your leather properly. I find this trechnique helpful, espcially the paprt about the use of saddle soap. I also found these swivel knife finesse tips helpful. Finally, there is no better practice than finger carving. And nobody does it better than our own Bob Park. https://www.pinterest.com/pin/434949276487978368/ Good luck, Michelle
-
I'll share my experience. It may change your mind about spending a lot of money modifying an arbor press. I modified my arbor press as Albob suggests. 3/8" hole in the ram and a thumb style set screw, with carefully aligned 3/8" hole in the rotating anvil. I had tools of several different diameters so I had my machinist make slotted bushings of the appropriate diameter to fit the various tools in the ram. Works just fine. But then I learned some things from experience. 1) I didn't need the bushings for many operations. The set screw grabs the tool off-center from the ram but that makes no difference since you center the tool visually anyway for them. 2) The rig is inconvenient for me to use because it has to be bolted down and I bolted it to the end of my workbench. So I have to get up, go over there, set the dies up, set the snap, etc., remove the dies and return to my stool. For most of my work I get the job done just as well and much more quickly with my hand setter. Grab it, boom, done. 3) I ended up buying both the Tandy and Goldstar presses. They are much more convenient because they really don't need to be mounted, and if you do mount them only a small, narrow platform is necessary. My intended use for the Tandy press is the large inventory of Ohio Travel Bag snaps and rivets I use. The Goldstar press won't fit them. But I use a lot of spring snaps and I have trouble with hand setting them. I bought a gazillion Asian spring snaps and the Goldstar press is used exclusively for them. I didn't care for Tandy's spring snaps and didn't want to spend $90 on a set of dyes. 4) In the end, my arbor press gathers dust. Honestly, the Tandy press also gathers dust. I can't justify buying more dies and I can set most everything but those finicky spring snaps by hand. 5) If I had to do it all over again and if I didn't have such a large inventory of Ohio Travel Bag hardware (that doesn't fit the GS press), I'd I'd go for the Goldstar press and associated dies and hardware. I'd have saved a ton of money with that hindsight. An arbor or hand press sounds appealing but when you get down to actually using one in a productions environment you find out how clumsy and time consuming it is to mount the two sets of dies you need to set one snap and you arrive at one of two conclusions. You would do very well to practice hand setting as it is far quicker and more efficient unless you can justify buying a hand press and associated dies for each type of hardware you use. That's my experience and opinion. YMMV. Michelle

