


silverwingit
-
Posts
537 -
Joined
-
Last visited
Content Type
Profiles
Forums
Events
Blogs
Gallery
Store
Everything posted by silverwingit
-
I am fortunate to live in Colorado for many reasons, one of them a very arid climate. I just leave my wet molded projects overnight and they are ready for me in the morning. Based on this experience, if I lived in a very humid climate I would make a drying box and put a smal dehumidifier in it. No heat, just dry air. Michelle http://www.amazon.com/Eva-dry-Edv-1100-Electric-Petite-Dehumidifier/dp/B000H0ZDD2/ref=sr_1_5?s=home-garden&ie=UTF8&qid=1462819040&sr=1-5
-
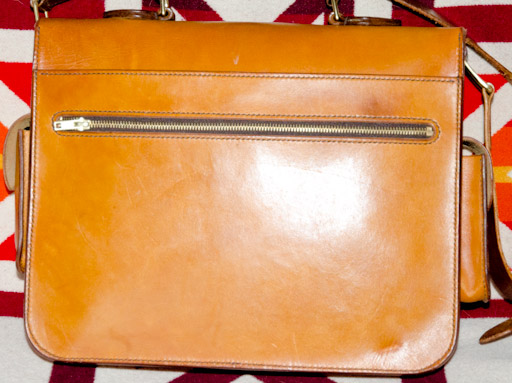
Very strong opinions here. But there is more than one way to skin a cat. I disagree that dip or spray dyeing are the only ways to produce a professional product. Some of it depends on the look you want but I really like block dyeing large areas. I happen to like to enhance the natural marks on a hide on some of my larger projects. I think the fat lines, insect bites, barbed wire scratches and on occasion even a brand give great character to a satchel or bag. I dislike leather that has been treated so heavily that you can't tell it's leather by looking at it. But that's just me. I make a wooden block from a 6" length of 2x4, sand the edges and corners so they are nicely rounded off and then staple a six or eight layer folded t-shirt tightly up around the sides of the wooden block. Then I make a 2:1 or 3:1 dilution of a Feibing's oil dye with alcohol and saturate the cloth pad with it by holding it right side up and pouring dye until it's almost ready to spill over the edges. The t-shirt pad will absorb amazing amounts of dye and it quickly and evenly distributes. I've essentially made a giant ink stamp pad. Then I apply the dye with light pressure and even wide sweeps across the piece. It's critical to use well-diluted dye and overlap the sweeps in different directions to achieve an even, streak-free piece. What I like is the way that the little depressions or raised spots take the dye just a little differently from the surrounding perfectly flat areas. This is what enhances the natural appearance of a large piece of leather in a way that appeals to me and my clients. Here is an example of a satchel I made. If you look closely you can see the little marks I am talking about. And I would argue that the dye is applied quite evenly enough for a professional appearance. Without an air brush or a huge mess from a dipping it in a large enough container of dye to do the job. Michelle
-
The look superb, Colt! Big time kudos! The only change I might make if I were so skilled would be to use longer bolts so I could avoid the threads for a more user- and maul-friendly top end. Could you share a little more about what power tools you used and how you used them? Thanks, Michelle
-
He stitches it with a machine but here's Arthur Porter making a similar bag. Michelle
-
need to make a stiching clamp, looking for input.
silverwingit replied to RustyMarlin's topic in How Do I Do That?
+1 on the cam clamp. It not only makes for a super easy way to clamp/release your work piece but it also goes a long way towards removing frustrating thread tangles with bolts, knobs, etc. Rockler's are very affordable, too. Get one! (Or two. Rockler's come in pairs.) Michelle -
Second Hand Tippmann Boss HELP!
silverwingit replied to AppaloosaBeadsLeather's topic in How Do I Do That?
Could be as simple as a bent or dull needle. Try a brand new one and make sure it's installed inn the correct orientation. Michelle -
Stitching and carved belt pattern questions
silverwingit replied to PJCustomLeather's topic in How Do I Do That?
Use a copier or scanner to minify the pattern to the desired width to get whatever border you like. The smaller pattern will be more difficult to tool but it will allow your wider border. Michelle -
That's a great case but I'd give my eye teeth for that cribbage board! Michelle
-
How about returning it?
-
I like the page's new looks but what happened to the advertisements at the top? They were obtrusive no doubt, but having those links to commercial resources were helpful to me. Are they eliminated or just somewhere else?
Thanks,
Michelle- Show previous comments 2 more
-
Bob, work may have some kind of ad blocking software installed to prevent you from clicking on things at work. If it works from home, might be an IE thing as well after the update. I'm using Firefox on Linux
-

Because I have been working on the adserver for the last few days, I'm not sure what you have seen or not. I hope to have it restored today. Next time I'll just take the site offline for a few days so there is no confusion.
-
NNNNnnnnoooooooooo we'd all die from withdrawal to the site!
We (mostly) appreciate all the hard work you have been doing Johanna so don't let the few complainers get to you
-
The biggest problem I see is that you awl is waaay too big for the size thread you're using. The two strands of thread that go through each hole should pretty much fill the hole. You need to either get or sharpen down a smaller awl blade or some substantially bigger diameter thread or both. If your thread and awl blade size were properly matched the visibility of the un-dyed leather in the holes would be greatly diminished. Your stitching should look more like this: Michelle
-
Sharpening a swivel knife blade is an art. I wouldn't try to grind it. You should invest in some sharpening equipment. On your list should be some sharpening stones (preferably diamond) and a Keen swivel knife sharpening jig. http://www.tandyleather.com/en/product/craftool-keen-edge-sharpener?sSearch=keen%20swivel%20knife Here is a video on how to use them. https://youtu.be/OiuebQtqTsk Good luck, Michelle
-
Here's a good place to start. http://www.holstersmith.com/vcom/index.php There are a number of others. Michelle
-
Folded Leather Bag
silverwingit replied to CarlGabriel's topic in Purses, Wallets, Belts and Miscellaneous Pocket Items
Carl, point-by-point: - As to vertical stitching, I don't see the difference what direction you stitch as long as you can get your hand into the bag. Here's Nigel Armitage stitching a round box. He has huge "meathook" hands and manages it. https://www.youtube.com/embed/_3Vux9RY9Vw - As to an alternative means of construction, I make lots of box-style cases very similar to what you are doing. One reason I like this design is that it is amenable to rivet construction, enabling me to sell at lower prices than if I had to hand sew. I close both sides and attach d-ring straps with a total of 4 rivets. I have several lengths of square cold-rolled steel bar stock that I clamp to my bench and use as anvils that I can insert inside the box to set the rivets. - I don't think you understand my point about the forces imposed on the slot. I may be wrong looking at the pictures but you o-ring strap loop appears to be stitched some distance above and below the slot. With the legs of the strap loop stitched both above and below the slot that way, any way you tug on the shoulder strap, the o-ring strap loop will want to pull the slot apart. Since the bag is carried vertically the upper aspect of the slot will receive the brunt of the weight. If both legs of the strap were pointed downward, there would be no stress pulling the slot apart. The slot would be only a way for the o-ring strap loop to exit to the outside. (It helps being a physicist and knowing a little vector mechanics. ) - To strengthen your o-ring attachment, I would install a rivet or two in strategic locations on the strap loop instead of stitching it any more. I don't think they would be inconsistent with your design if they are the same color as the o-rings. - In general, sharp corners on leather projects are to be avoided. They will curl and wear unevenly where even a slightly rounded edge won't. Hope that helps. Michelle -
Edge Paint Getting Where It's Not Wanted ..
silverwingit replied to CustomDoug's topic in How Do I Do That?
I must admit that I cringe every time I see someone (with the possible exception of Nigel) have at an edge with a spatula full of edge coat. Too risky for me! I've arrived at two solutions for applying dye and then also thicker edge coat that work for me. For applying regular leather dye that is very thin and viscous Short lengths of 1/2" x 1/2" hard felt strip held in a clothespin are ideal. They have a large, flat surface that is far more forgiving in my hands than the refillable felt-tipped pens that are available. It's too easy for that pointed felt tip on the pen to slip off the edge down the side of the project. You have to be pretty far off to have that happen with a 1/2" square surface of the felt strip. One tip: I dip the felt in the dye to fully load it, but to reduce the problem of having too much and risking dripping, I daub the loaded felt on the flesh side of a piece of scrap leather before touching the edge. For thicker edge coat or paint I've had reasonably good luck with Tandy's Craftool Pro Edge Dye pen. http://www.tandyleather.com/en/product/craftool-pro-edge-dye-roller-pen Not unexpectedly, the key is loading the grooved applicator with just the right amount of coat/paint. A few minutes practice will clear that up. Good Luck, Michelle -
Folded Leather Bag
silverwingit replied to CarlGabriel's topic in Purses, Wallets, Belts and Miscellaneous Pocket Items
That's a very nice looking bag, Carl! I wonder, if you don't mind my asking, what was your thinking about the regularly spaced stitch lines down the side panels and how they relate to the d-ring attachment loop? Were they decorative or were you concerned about strength? Two small suggestions. Those squared-off corners on the bag and the strap will eventually wear and start to poke outwards. That's also there the lining will want to start de-laminating. You might put even a very small radius on the corners of future projects to avoid those issues. It's difficult to see but it appears that the stitch lines on your d-ring attachment loops are both below and above the slit through which they exit to the outside. The way it is, gravity will focus its force on the upper aspect of those slits making the slit separate and deform. Next time, I'd suggest that you put both legs of your d-ring loop downwards. That will focus the force of gravity where you want it -- on the stitches rather than the top of the slit. That's why a saddle maker will make the stitch lines curved or arrowhead-shaped and avoid crossing the strap. A straight stitch line across the strap like you've used basically perforates the leather and reduces its strength. Here's an example of this sort of attachment, only it's on the outside of the bag do you can see what I mean. https://s-media-cache-ak0.pinimg.com/236x/b6/aa/a9/b6aaa9c52cc40d419ec5f22557581807.jpg Remember, you did ask for constructive criticism. Keep up the good work! Michelle -
3 Christmas Bracelets
silverwingit replied to Otto6294's topic in Purses, Wallets, Belts and Miscellaneous Pocket Items
Negotiating those tight corners on a Cobra 4 while keeping your stitch length constant and right in the ditch is quite a feat. Musta had lots of practice. Congratulations! Given your success, I have a few quick questions. I'm quite curious what foot you used and how you kept it from marring either the leather or the stones. Did you back way off on foot pressure? Also, I don't see where you back-tacked. How and where did you finish those stitch lines? Any other tips you might offer? I particularly like the effect you achieved with the different stitch lengths. I'll have to give that a try sometime. Good on ya, Otto. Thanks, Michelle -
A little suggestion... Those cam clamps are the cat's meow for a stitching pony. They allow quick and easy thickness adjustment, tight clamping, easy release, and they greatly reduce problems with tangling your thread compared to, say, a wingnut. But you've compounded the tangling problem on the other side with that overly long bolt and wingnut. If you have to stitch a project that requires longer stitching runs, you will go crazy keeping the thread off that bolt. And, the thing is, it isn't necessary. That cam clamp spins easily, allowing a sufficient amount of thickness adjustment for any of the projects I stitch. A quick spin and clamp down and you are good to go. I'd replace that long bolt and wingnut with a smooth-faced carriage bolt (I hand-carved a square indent in the hole I drilled in my oak pony to fit the carriage bolt and keep it from turning). Tangling problems will be a thing of the past. Though I haven't run into it, if you really need to clamp something thicker than the throw of the cam clamp will permit, just swap in a longer carriage bolt. One other thing that I've found helpful. Sometimes I have a project that requires a deeper throat than the position of my carriage bolt/ cam clamp will allow. I've put another hole lower down to give me that longer throat when I need it. Having a hole with a shorter distance to the top of the pony's jaws give you ore clamping force so that's where I usually keep it. Works great for me! Michelle
-
Jus' Usin' Up The Leftovers ...
silverwingit replied to JLSleather's topic in Gun Holsters, Rifle Slings and Knife Sheathes
That's great. I've been thinking of similar uses of integrating little gems of pieces of exotic leather into larger projects. Mostly out of curiosity I ordered a sample pack of fish skin leather a while back. Yes, fish skin. I figured it would be very thin and fragile and smelly. Not true. Thick robust and... pretty! The only problem is it is from Scandinavia and is super expensive. So since I'll never order larger pieces (these are ~3" square). My idea has been to use it as inlays for larger projects. Thanks, for sharing, JLS. Michelle -
Finished My Cowboy Rig
silverwingit replied to Larry's topic in Gun Holsters, Rifle Slings and Knife Sheathes
I really like the tooling and the construction. Super deep, clean and well executed. Something to be truly proud of! Now, I don't mean to be the lone dissenter, especially in the face of the respect I hold for such otherwise nicely done work. I would really prefer to give you a nice pat on the back and move on. But that won't answer any questions or allow me (or you) to progress in our technique. So I am going out on a limb here and offering what I hope will be constructive criticism that will be received in the positive spirit in which it is given. I just wish there was a better way to line up letter stamps. I find it nearly impossible to line even two letter stamps up together correctly. When I go to three or more, the problem of getting the letter's bases on a straight line is compounded by the difficulty of getting the space between them uniform. I've used straight edges taped to the leather (problematic in its own right). I've made custom plastic jigs with spacing marks specific to each project. I don't want to think about the number of times I was absolutely certain I had the stamps lined up precisely only to find out how wrong I was. And, of course, once the letters are struck, you will live with them for a long time. Having had such difficulty with my own letter stamping I am now highly sensitized to the appearance of other's work. Your letters are probably within a fraction of a millimeter of being placed spot-on. But the fact that they just slightly off, I am sorry to say, make them stand out like a sore thumb to my over-critical eyes. It's probably just me but my eyes are drawn past the wonderful tooling and construction and directly to the the initials. So I ask, does anyone have any suggestions that might help me and Larry line up our letter stamps... perfectly? I haven't found it and as a result end up carving and tooling letters that I line up and print on my computer. Is there a better way to put alphanumerics on vegtan leather? Thank y'all very much and please forgive my candor, Larry. Michelle -
Another Belt
silverwingit replied to mpluc1's topic in Purses, Wallets, Belts and Miscellaneous Pocket Items
Rivets tend to bend if they are too long for the thickness of leathers to be joined. Try clipping/grinding off a little of the end of the rivets to that just a small length remains protruding through the hole. Then they won't "wander" so much when you set them. Michelle -
Floral Laptop Sleeve
silverwingit replied to HudsonRanch's topic in Purses, Wallets, Belts and Miscellaneous Pocket Items
You would do well to shake the Tandy habit and treat yourself to some high quality Hermann Oak or Wicket & Craig carving leather. Also, Fiebings Professional Oil dyes and Antique pastes are superior to Tandy products and will yield a better looking end result. In general Tandy provides a good service making leatherwork materials and tools available to the hobbyist who walks in off the street. But the work you aspire to demands better quality tools, dyes and finishes than Tandy provides. You are off to a great start. Now try Barry King tools and Springfield Leather for good quality HO leather cut to dimensions for you. Learn to saddle stitch from Nigel Armitage's videos. http://www.barrykingtools.com/ http://springfieldleather.com/ https://www.youtube.com/embed/TGuiha5S2oE And good luck! Michelle -
A #2 or #3 Barry King grooved edger will put a nice edge on 7-8 Oz. vegtan, depending on whether you want your edges to be rounded off (#2) or just about round (#3). http://www.barrykingtools.com/edgers.htm A few swipes on a Weaver Strop Board will keep them razor sharp for nice, clean cuts. http://www.weaverleathersupply.com/Catalog/ItemContent.aspx?ItemNumber=8708&CatalogId=001&CatalogDetailId=44&NSM=Y As to advice, like many manual operations in leatherwork, the key is in using the shoulder and elbow to move the edger, NOT the wrist or hand. The depth of the cut will be determined by the angle it is held against the leather. It is therefore paramount that you maintain the same angle through the length of the cut. Going around corners you might find that it is often easier to move the leather under the edger than vice-versa. Good luck, Michelle
-
From the FWIW section, I make pigskin suede-lined wet formed harmonica pouches but I apply the lining after I've wet-molded the vegtan. http://silverwingleather.com/wp-content/uploads/2013/05/SDiatonic3.jpg I see no need to line your pouch before wet molding. Michelle
-
One caveat regarding Acrylic Resolene and antique finish. The last step in applying antique finish is sealing the finish so it won't rub off. There are many sealants you can use to do this, so on my first antiqued project I used Resolene directly on top of the antique finish. BIG MISTAKE! I was horrified when I saw the Resolene dissolve the antique finish out of the tooling impressions and spread it out all over my project. RUINED! If you notice in that Keith Valley tutorial, he uses Tan Kote to seal the antique and then Resolene for a permanent waterproof seal on top of that. Too bad he didn't mention why. Bottom line: NEVER uses Acrylic Resolene directly on top of Feibing's Antique Paste Finish! Michelle