-
Posts
428 -
Joined
-
Last visited
Content Type
Profiles
Forums
Events
Blogs
Gallery
Store
Everything posted by Nuttish
-
As I said, PVA is a great filler and on its own burnishes beautifully. It's durable and remains flexible enough for our purposes. However, it remains porous to water and could always stand to be mechanically stronger. I make my solution based on protocols from academic articles from polymer and materials science journals. I'd rather not completely give away the secret sauce, but with these search terms you'll easily be able to figure out what I'm doing with cheap and readily available ingredients: crosslink PVA glutaraldehyde.
- 48 replies
-
We use something similar to PVA glue that's more flexible and has a high gloss. Several applications of a medium thin solution allowed to dry completely then sanded with 150 will fill the loose fibers marvelously. You can then do whatever other edge treatment you want. Sand with 100 grit to rough the surface up for acrylic edge paint, but you won't need to do lots of applications to build nice smooth layers because it doesn't need to penetrate and will adhere evenly and smoothly. PVA burnishes like a dream. You're essentially impregnating the edge with flexible plastic which you can then polish however you wish just like any other plastic. Just use progressively higher grits and burnish as usual with canvas and a thin solution, then let it dry and hit it with a felt wheel loaded with carnauba wax for a nice shine.
- 48 replies
-
Cleaning brass buckle and keeper
Nuttish replied to epiphanist1248's topic in Hardware and Accessories
This is what ultrasonic cleaners are for. Degreaser or mineral spirits should help a lot.- 2 replies
-
- brass
- brass-plated
-
(and 4 more)
Tagged with:
-
I ended up getting a great deal on a Kwikprint 86A at an industrial auction and repurposed the press for rivets and snaps. It worked great though.
-

kwikprint Best machine to achieve quality blind emboss impression
Nuttish replied to OnceFoundCo's topic in Leather Machinery
Production quality machines come up on industrial auctions very frequently because they're used in so many industries. Smaller ones are within your budget. Check bidspotter.com. I got a pneumatic Kwikprint 86 with a hundred pounds of foil and loads of other stuff for $300. -
I've got a 1445 with the unusual double round post setup that can use the binding foot. Do you have any more double round post pieces or the binder guide bracket thingy?
-

Wishing for new motorized edge burnisher. Thoughts?
Nuttish replied to Tallbald's topic in Leather Machinery
Check out one of my most recent posts about the horizontal burnisher I made out of a free treadmill motor. It produces absurdly good results with absurdly little effort. The key is going SLOW. -
Check out https://www.riogrande.com/ for good quality parts and tools, as well as a good resource to learn more about what's available and how to use it. Their prices are very good for what you're getting.
-
I cut them to 4' and use 8" diameter. They hold several loosely rolled sides and allow them to be inserted deeply enough to avoid dust and light but still be easily accessed.
-
Thick and stiff leather is more difficult to split or skive than thinner softer leather. It requires a very sharp knife, clean emery or steel feed roll, higher feed roll spring tension balanced with the distance between the bell knife and leading edge of the presser foot, and correctly setting the curvature of the presser foot to be concentric with the bell knife. If your piece is getting stuck, your knife is too dull, there's not enough tension on the feed roll spring, or your knife is too close, or a combination. I'd start by making sure your knife is actually sharp. If you take a corner of any leather and dip it against the running knife it should cut with no drag. I'll post a walkthrough with pics of skiving and splitting thicker leather on a similar machine if you want.
-
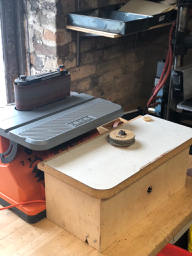
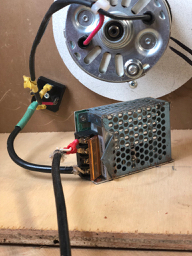
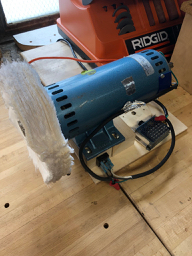
Grinders and buffers are wayyy too fast and use AC motors so aren't easily speed controlled. They're also more expensive than the DIY alternative. You can come in under budget with a more useful machine by getting a DC treadmill motor and using bolt on arbors with soft buffs. You can often get treadmill motors for free if you haul a busted treadmill away for someone - the controllers die first, but the motors are usually good. The merit of these motors is that they are easily speed controlled because they're DC and are designed to generate high torque at low voltages. We burnish and wax polish at hundreds of RPM vs thousands. Parts list: (1) treadmill motor - free, (2) assortment of wire terminals - less than $10 and useful for tons of projects, (3) extra IEC cable or other computer component cable you have lying around, (4) cheap Amazon voltage regulator with potentiometer knob - around $15 shipped, (5) cheap full wave bridge rectifier - less than $5, (6) length of 14 gauge wire and wire nut - you probably already have The horizontal burnishing setup cost less than $50 plus wheels. See pics. The edge burnisher got a custom work table so it fits in front of the sander and the wheel runs horizontally. The shaft is 5/8" threaded for a left handed 1/2-13 nut. This required a custom reducing bushing/flange in order to use the Italian polishing wheels from Campbell Randall. A non-threaded shaft would require an arbor for regular cotton buffing wheels or in the case of the vertical polisher I fabricated flannel polishing wheels with integral set screws that go in the shaft's keyway. You should definitely electrically ground yours and cover your wires. Not sure if you can post videos here or I'd post one proving that you get far superior results burnishing at very low speeds.
-
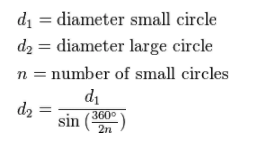
That's exactly what the equation I gave does. You wish to know the circumference of the circle around which you wish to stamp. You already know the number of impressions and size of the stamp. Plug and chug.
-
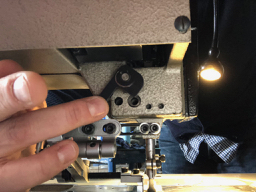
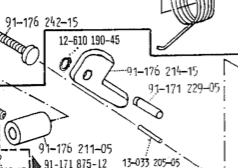
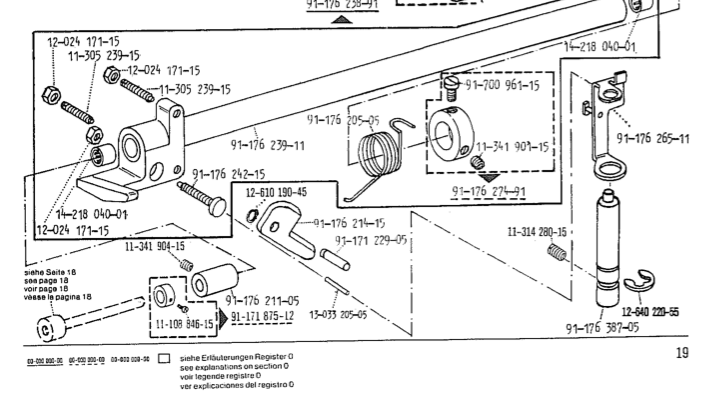
Does yours have a hand operated toggle on the back of the head for locking the needle bar in the raised position? It would help a lot with syncing the feeds, setting the bottom feed dog height, centering the needle bar, and adjusting the hook box. If you don't have this, I'm pretty sure there's a hole for it and that the part is going to be available because it was used on several machines. Worse comes to worse, I'll be happy to make a rudimentary technical drawing the part - it looks like it would be easy to fabricate by hand.
- 6 replies
-
- needle bar frame
- eccentrics
-
(and 2 more)
Tagged with:
-
I would recommend a servo motor for nearly anyone who doesn't need a 1HP + motor. You can get decent 550W (3/4HP) and 750 (1HP) motors for less than $150 and $200 shipped if you look. We use ones like this on two lockstitch machines. They appear to be rebranded Consew or acceptable quality knockoffs. They have needle position sensors and allow you to program min and max speeds, speed ramp up, and needle up or down. I quite like them. I have a Rex motor without control unit or position sensor, but that does allow max speed control with a dial on the motor, on an overlock machine. It's good if you don't care about those extra features, which don't make sense on an overlock machine anyhow.
-
Do I understand correctly that you want to know the diameter of a circle around which you want to distribute a given whole number of smaller circles (enclosing your stamp)?
-
Campbell Randall's new site doesn't list much of their stock. Call to order. That part will definitely be in stock likely with choice of Italian or OEM German.
-
Yes, you can change it from 3 phase to single phase 110 or 220V with a VFD, but you'd need one for each motor if they're different powers (and I think they probably are) and even "cheap" Chinese VFDs may cost more than used single phase motors you can run off a normal wall outlet. Depending on the type of VFD, you'll also lose a nontrivial amount of power. So I'd just switch them out with appropriately powered single phase motors. You'll also need new pulleys if those are the original German motors because they'll have metric shafts, but cheap. Mind posting pics of the badges on the drive and blower motors?
-
Neat that it was made for the US market. It looks like Leonhard Kurtz now makes foils and has subsidiaries for machinery and tools. What you've got has some of the same design features as a small Baier, so I'm thinking they have made your machine with the Leonhard Kurtz label before getting bought out in 2012. Super nice looking machine. Would you mind taking a picture from the front please? I'm curious what the typeholder and table look like. BTW it's easy to update the machine to use a cheap PID to get more stable temps than were possible with the kinds of switches on older machines. http://www.kurz.de/en/ http://www.baier-praegetechnik.de/baier/en/home.nsf/contentview/0A213D52B1109457C1257BFA003555A7
-
The most versatile and elegant way to secure the blade I've seen is to cut the collet end off a pin vise and epoxy it into a very slightly oversize hole in your haft. You just want collets with a removable cap so you can switch out blade sizes. Check out Starrett and Brown & Sharpe to see what the top end product looks like and go from there. They have knurled caps. You can get ones with hexagonal caps like Barry King Tools uses on Amazon. They look a lot cooler.
-

WICKETT & CRAIG leather selection
Nuttish replied to pentelaravi's topic in Leatherwork Conversation
They'll split for free but also keep in mind that their very nicely done flesh sides get cut off in the process, but you can pay extra to have them sand and re-paste. In other words, you're not really getting the exact same product when you have them split it down unless you don't care about flesh sides. -
I would contact a letterpress printer in Denmark and ask where to get magnesium plates made. Those who make letterpress plates sometimes also make plates for heat embossing, such as foil stamping on any medium. Dies made from these plates are better than lasered Delrin and can be used cold with an arbor press or clamps. If you're making your mark with a mallet, you can mount your die on the end of a piece of scrap steel with whatever the Danish equivalent of JB Weld is. Magnesium is just fine. Cooper isn't necessarily better. Brass is Ideal because it's more difficult to damage, which is just a fact of life, but expensive. Plates are priced by area, so putting all your art on one plate and cutting the dies out with a bandsaw makes them very cost effective (several dollars apiece vs. the huge amounts people are paying for "custom stamps" made exactly the same way). Order at least 1/4" deep raised wrong--reading unmounted (in other words not "type high" since you're not using it on a letterpress). I'm certain there is at least one company near you who can make these.
-
The large stamped fields with raised text are similar to a blind deboss in letterpress printing. Even more so with leather, that technique requires even steady pressure and it is difficult to make a crisp, durable impression without heat. So trying to make that impression by whacking with a mallet isn't going to work well. At the very least you'll want to use an arbor press or clamps. We've made Delrin stamps in an Epilog and a Universal, which have dedicated rubber stamp modes that allow you to create a shoulder. With a paper stamp, since they don't make debossed impressions, you need a shoulder to build up thin lines so they don't deform. With a leather die, the shoulder is a double edged sword. Without it fine lines in your art will translate to weak structures that tend to get crushed and deform with use. On the other hand, the shoulder will create a larger top than bottom of your impression, which might make fine lines less sharp. I don't believe the Boss software has a stamp mode. If it allows you to assign different powers to colors, you might experiment with creating your own shoulder. Regardless of the machine, it helps to run your job multiple times at lower powers, ever so slightly adjusting focus down to approximate the material surface. Better yet, engrave a square on the corner that you can use with your focus gauge rather than estimate. I say run the job multiple times because I've found that the heat from engraving small areas like dies will cause your kerfs to sag and can affect fine lines. And regardless of all this, you can only get so much detail out of a cold stamp making a deep impression like that. So you might experiment with that as a design constraint.
-
For some assembly we use an adhesive similar to double sided tape but without the film. A similar product is called something like Tanner's Bond. It's painless to use compared to any rubber cement where all you're doing is sticking things together well enough to sew. Don't try sewing through it or you'll gunk up your needle and thread. I've never seen any Horween leathers expand or contract enough to notice. Maybe the dry unfinished horse butt strips but honestly I doubt it. What you're describing is a traditional repair strategy. Go for it.
-

Hammer, Maul, Rock? What do you use and how heavy?
Nuttish replied to Killerwork's topic in Leatherwork Conversation
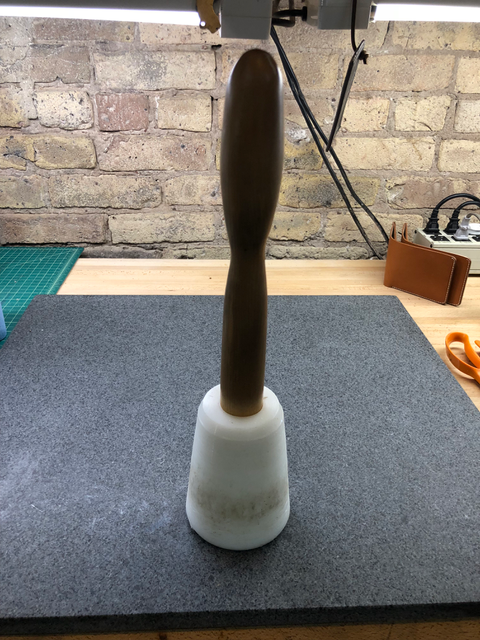
I don't do any tooling so the only maul I need is for punches. It started as a 4" HFPE rod from McMaster chucked up in an engine lathe and turned to a slightly conical shape with a countersunk hole for the handle. The handle is a former maple chair leg chucked up in a wood lathe to turn a round tenon for the business end and sand a rounded grip to fit my hand. In case anyone's considering turning HDPE on any lathe, do yourself a favor and screw it to a plate instead of chucking it up. It deforms under pressure and will eventually wobble its way free. I can confirm from experience that something weighing several pounds getting thrown from an industrial machine is in fact terrifying. It weighs 1.5 lbs including the handle. This one's been in service for several years with no real damage to speak of. Also well suited for home defense. -
Pardon my being late to the game, but I was looking around for photography tips and saw this underused forum. Pieces of 22 gauge steel strapping cut to length, ends covered in duct tape because I was too lazy to file them smooth, bent to shape. This is just what I had laying around. It's springy, holds its bend nicely, and you can get as much as you want from the dumpster behind Lowes. Steel from empty mineral spirits and acetone cans is also good. Be careful of sharp edges. Removable double sided tape to hold things like flaps down and pockets closed.


