


bikermutt07
-
Posts
5,016 -
Joined
-
Last visited
Content Type
Profiles
Forums
Events
Blogs
Gallery
Store
Everything posted by bikermutt07
-

First attempt at a Ranger Belt
bikermutt07 replied to Alamo's topic in Purses, Wallets, Belts and Miscellaneous Pocket Items
Really nice on the stitching and burnishing. -
Cool.
-
Gotta use that green somewhere..... My hat is off for the situational awareness. And you had fun, most important part. Bag looks cool.
-
Workin on some orders...
bikermutt07 replied to YinTx's topic in Purses, Wallets, Belts and Miscellaneous Pocket Items
They are looking great. I'm totally curious about the card pockets. I read above how you said t pockets are easier, but I'm not sure how you are constructing these slots. Any enlightenment would be appreciated. -
I like it.
-
Well, that's pretty crappy. Granite goes for 40 sqft. Around here, but nobody would charge that for a scrap piece unless they cleaned up and polished the edges. Granite is very physical work (even on small pieces). I could see him charging that for a decent square or rectangle piece that he made presentable. Guess he was a jerk. How big was the piece?
-
I hope you can follow that act with some insane picking. That is really really beautiful.
-
I work in a granite shop. Anyone in the Arklatex feel free to contact me. I got some free ones in the back yard. I posted a thread about it, but nobody replied.
-
Simple bifold wallet
bikermutt07 replied to AKworkshop's topic in Purses, Wallets, Belts and Miscellaneous Pocket Items
Very goog looking wallet. -
I use fiebings aussie leather conditioner. According to the container, it beautifies, conditions, strengthens???, and waterproofs in one simple step. Great for bitter cold or extremely hot climates. All this is according to the label. I haven't used it long enough to test these claims, but gathers a nice sheen with some rubbing.
-
Did he clean up the edges for you?
-
Tiger bonded polyester will be the best thread for you on your side of the pond. Thread size, needle size, stitches per inch, and even awl sizes are related to each other, but I haven't figured that out yet. Some linings are sewn, some are glued. There are no rules. Welcome, and have fun.
-
Totally out of my league here but I'm gonna throw this out there. How about doing tooling on smaller (thinner) accent pieces/trim. Then you could wet form your armor. Make some trim shapes. Tool those then just attach them to the armor. This will also give you an avenue to add some different color to the piece. (Goes back under rock to eat popcorn)
-
Workin on some orders...
bikermutt07 replied to YinTx's topic in Purses, Wallets, Belts and Miscellaneous Pocket Items
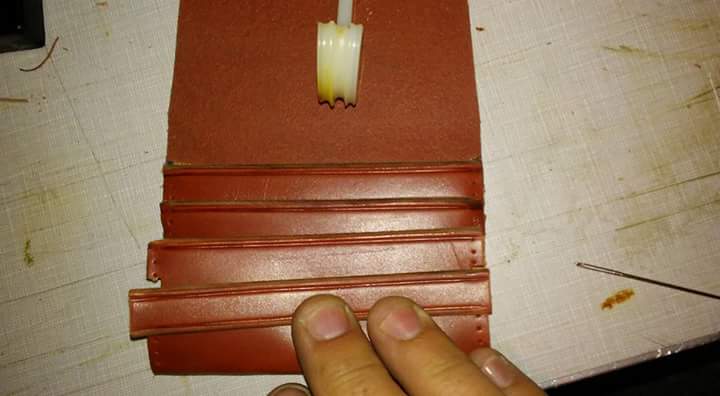
So, I tried the controlled wrinkle. 5 vertical lines down the inside of the spine. It looked great too. Right up until I went to line up the pockets. That's when I realized I had the bottoms an 1/8 different from the top. Crap. I decided to try and burnish the whole area. The cruddy Tandy leather needed it anyway. I pulled out the tragacanth and went to work. The inside looks much better, but you can still see the lines faintly. Just thought I would share. -
Slam bonded thread by Lekoza.
-
Bump for fellow newbies.
-
Oh yeah, everything looks great. Looks like you been having lots of fun.
-
Welts are pretty easy. You just oversize the area along the edge of the blade. Cut a filler, glue it in, sand the edge and stit.....err, rivet it together.
-
I was just having some fun, pay me no mind.
-
Tote bag
bikermutt07 replied to Windrider30's topic in Purses, Wallets, Belts and Miscellaneous Pocket Items
It came out looking great. -
It's like the movies, Jeff. You can rehash the same story over and over again for each generation. And make a mint.... "Yojimbo", "Fist Full of Dollars", "Last Man Standing". I have read of this technique at least three times and haven't tried it yet. Why? Full time job and a three year old make for some tough planning. Maybe when he's ten I'll run across this again and try it. Lol.
-
Well, you are off to a great start. Keep having fun.
-
Don't dismiss that fork idea either. That's downright genius. I didn't know jls had bits of leather to be had. So, I got to learn something too. I love this place.
-
Being from hobby lobby there is no telling what it might be. I have a grab bag from them that I bought in the beginning, I can't do anything with. It's just junk. Let's look at straightening out those stitches a bit. Do you have a straight edge or ruler? Use this with a common razor knife and the will straighten up those edges. Then (since you don't have the wing divider) use your straight edge and something to get a crease line going. That crease will help get those stitch lines a lot straighter. Get creative with things around the house/shed. You need something that will create a little friction. If I didn't have the divider I would use my plastic slicker/bone folder. But you can use a lot if things as a substitute. Sharpen up the back end of a toothbrush or maybe try an old credit card edge, or even the spine of an old comb. Any hard plastic edge will do. Here is a picture of a crease line I did with my bone folder. If you can get your edges straight and then put this line around your edge with ant of the household items above your stuff will improve dramatically. Like I said, get creative. And don't get discouraged. My first two wallet type items didn't fit anything in them. Keep having fun.
-
Great thinking.