YinTx
-
Posts
3,794 -
Joined
-
Last visited
Content Type
Profiles
Forums
Events
Blogs
Gallery
Store
Everything posted by YinTx
-
Lookin good. Show us some action shots, and results! YinTx
-
 cjartist, thanks for piping up. I was beginning to think I was the only to ever get EcoFlo dye to work on this forum! I know others swear by the black EcoFlo dye because they can use it on the inside of belts without worrying about it rubbing off on clothes, like the USMC Black from Fiebeng's might do if you don't buff it so long your arm falls off... YinTx
 -
Cseeger, I finally turned off my brain and just did the antique. Came out pretty good I think, no dye, no resist, just Fiebeng's Antique Paste, followed with Tan kote then an acrylic finisher. Now I'm excited and can't wait to stitch it all up, but its going to have to wait until I can plow my way through some orders... mike and retirediff, I have several airbrushes, but lack the skill as of now to utilize them. I tried to airbrush the backside of a large piece of leather with the Iwata airbrush, ended up with zebra stripes. Perhaps it was a bit too fine a pattern for the task. Another learning curve for me, and a skill I look forward to developing as well. One thing at a time. bikermutt, Thanks much for the positive encouragement! I get frustrated sometimes, so its nice to know I am still moving forward and improving! sorry the lighting isn't so good on this picture...
-
gandgphi, that entirely depends on the type of dye you use and the use of the leather. Veg tan leather that is going to be flexed like this phone case would generally require some nourishment, and the Eco flo dyes tend to prevent oils from absorbing into the leather, so I tend to put neatsfoot oil on before hand. I think for this type of dye, you would not necessarily need a final finish. For the solvent based Fiebeng's dyes, they dry the leather out, and you need to renew them with oil and/or other beeswax/wax/oil mixtures. Sealing them is usually recommended as well - use Resolene, acrylic finisher, leather balm with atom wax, tan kote, bag kote, etc depending on whether you have tooled it, want a matte finish or shiny finish, etc. YinTx
-
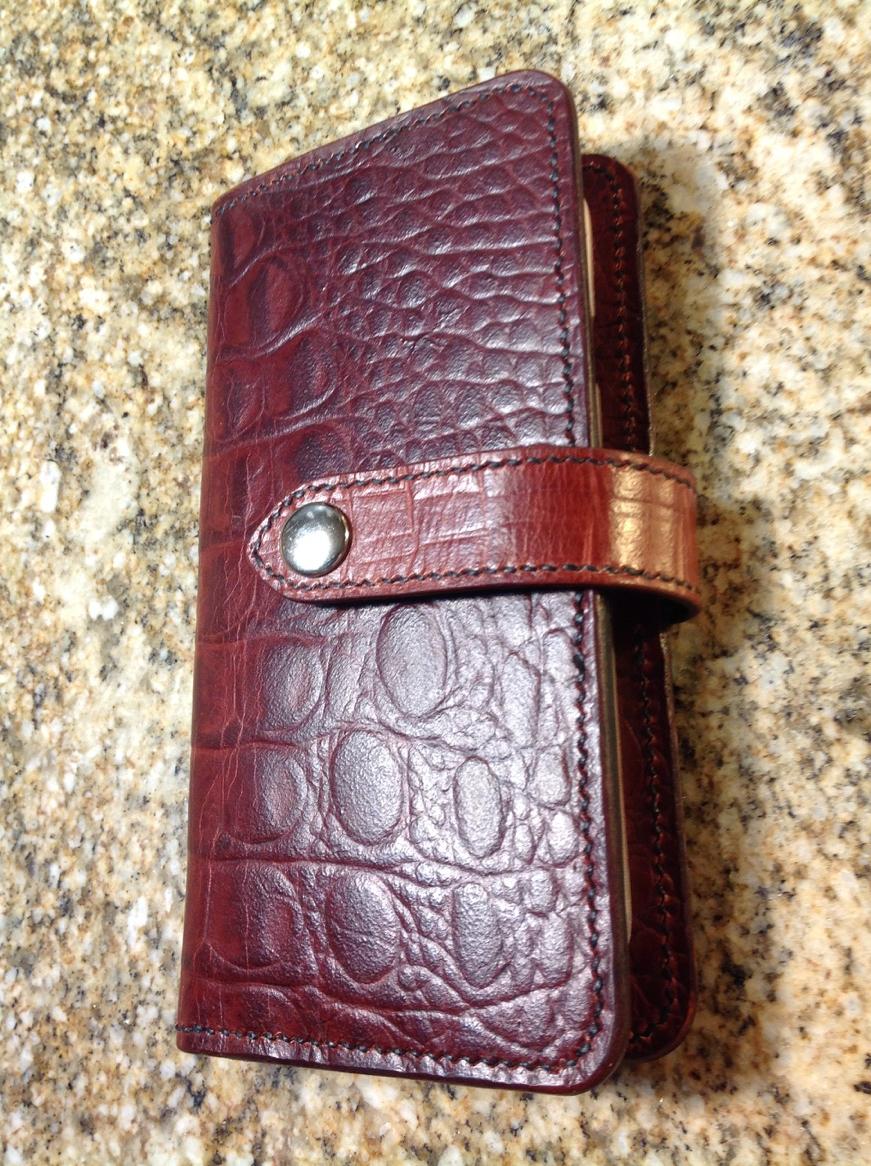
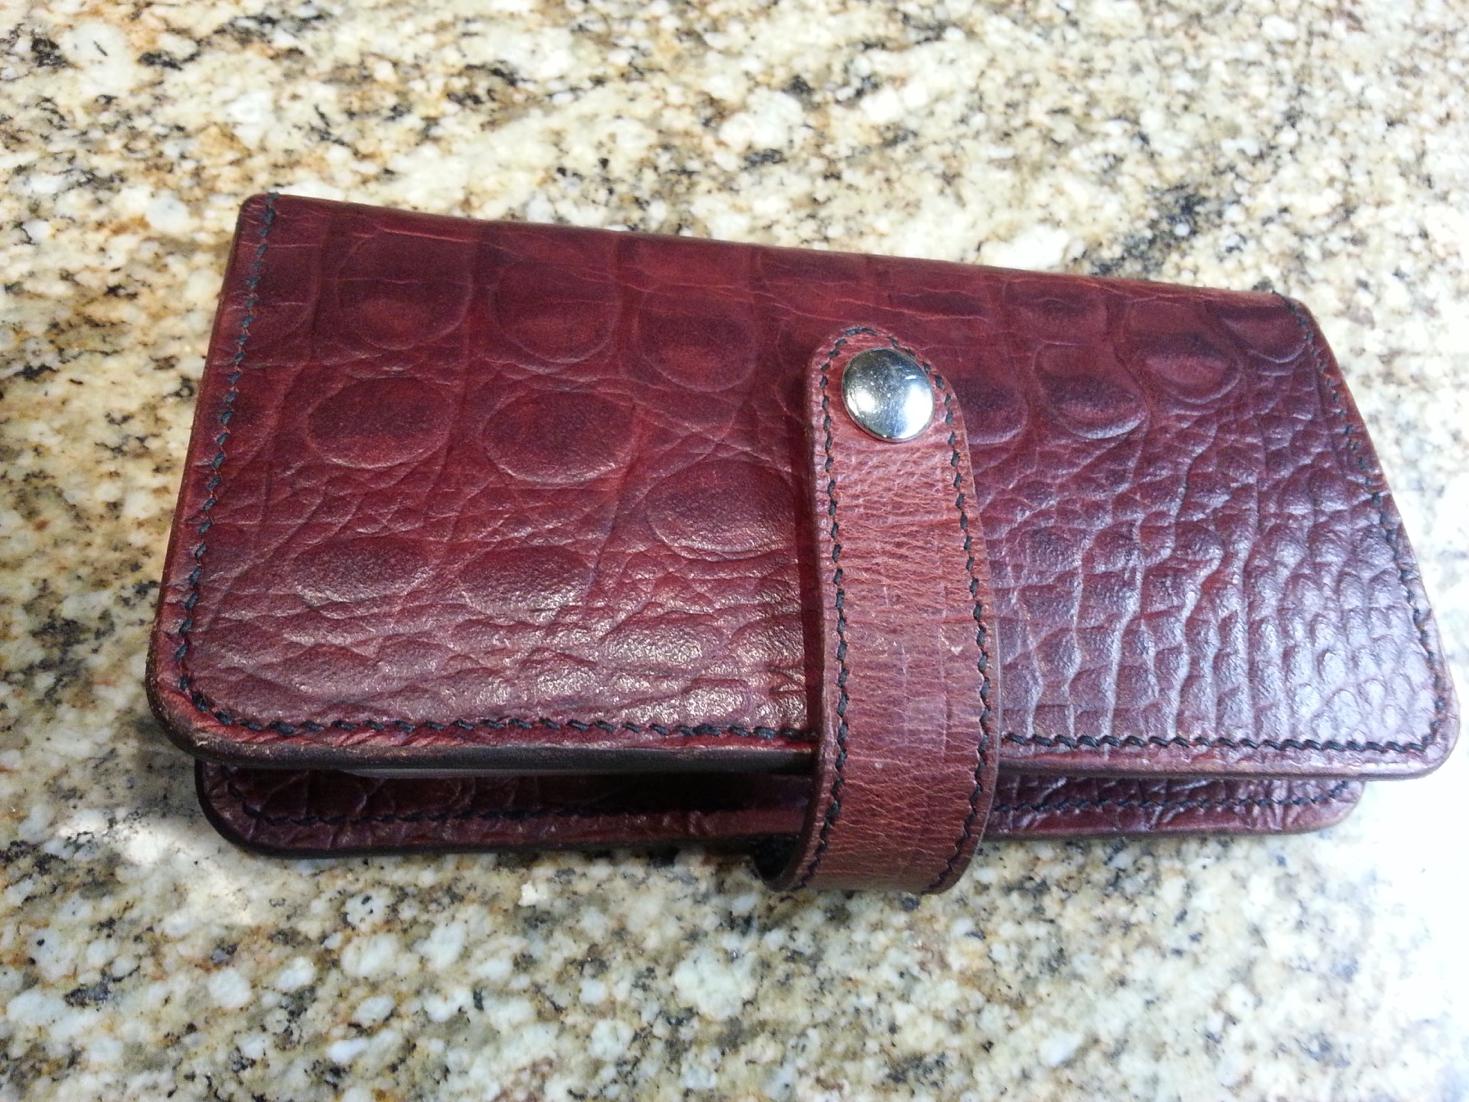
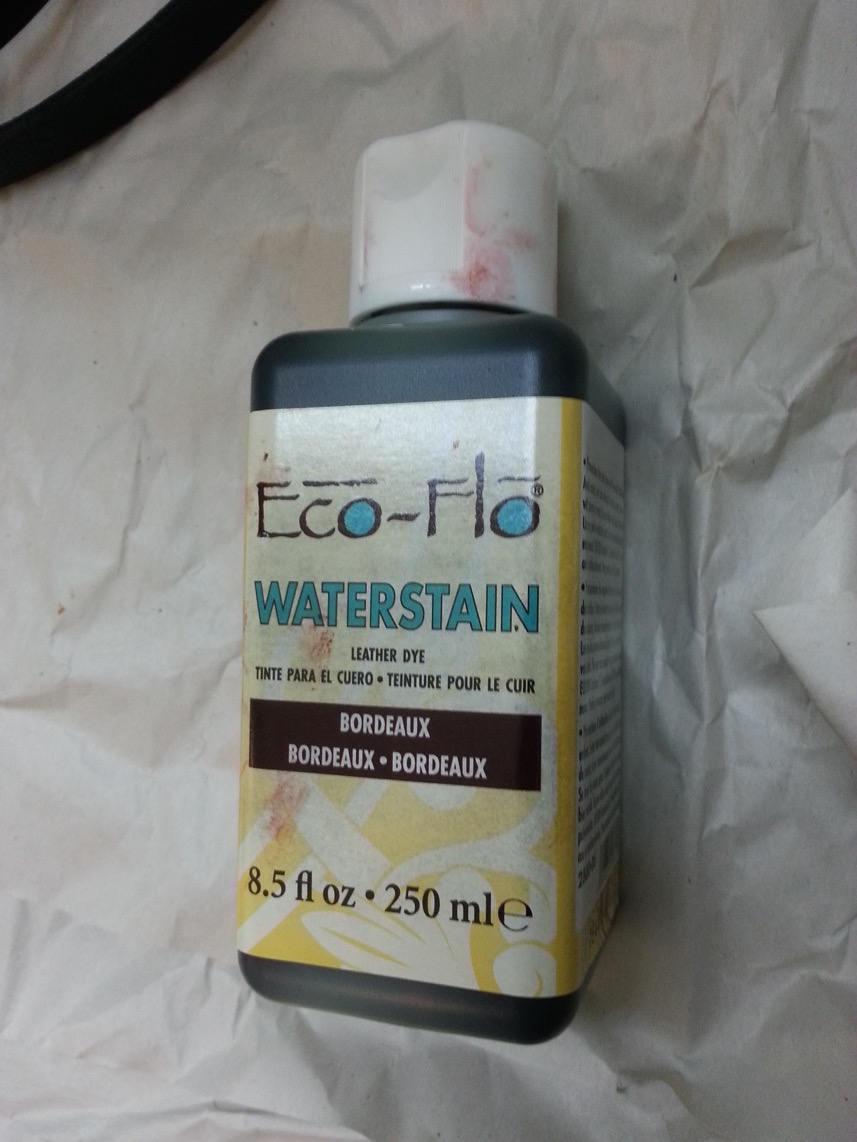
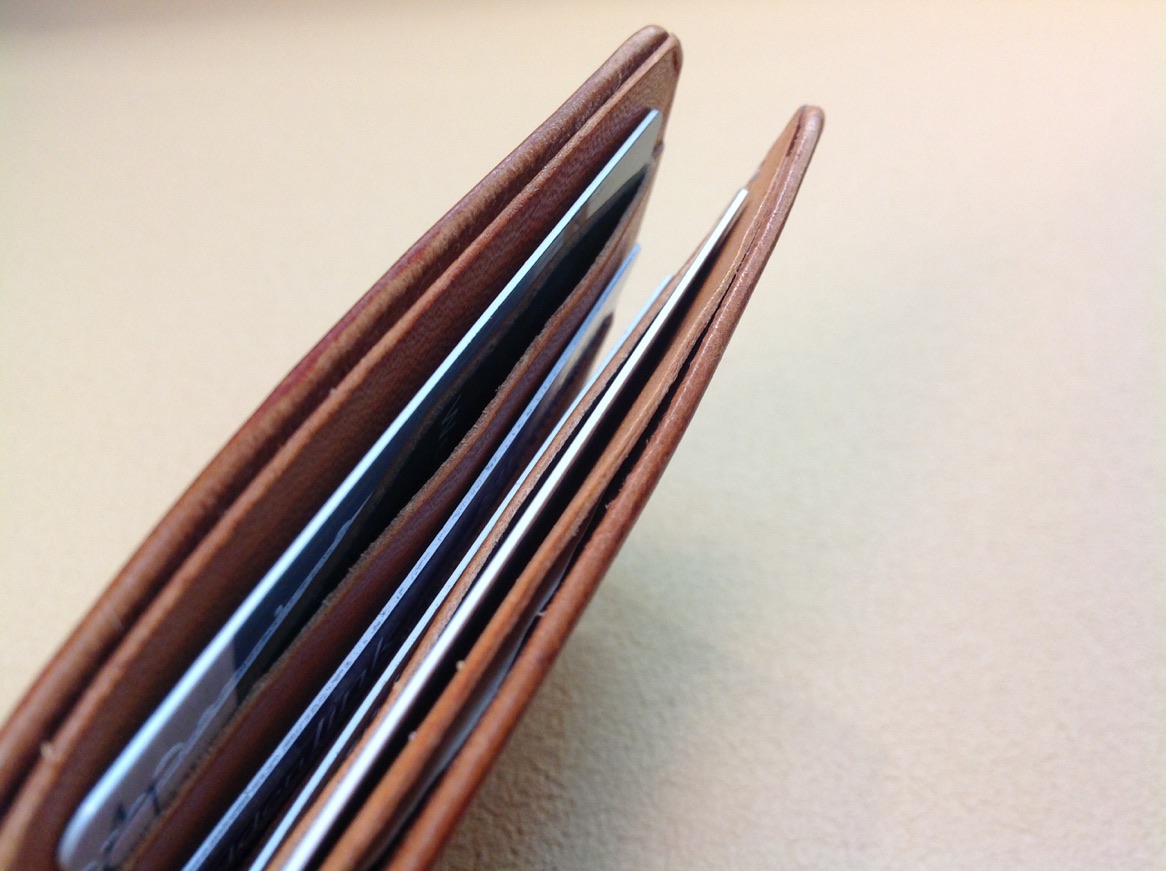
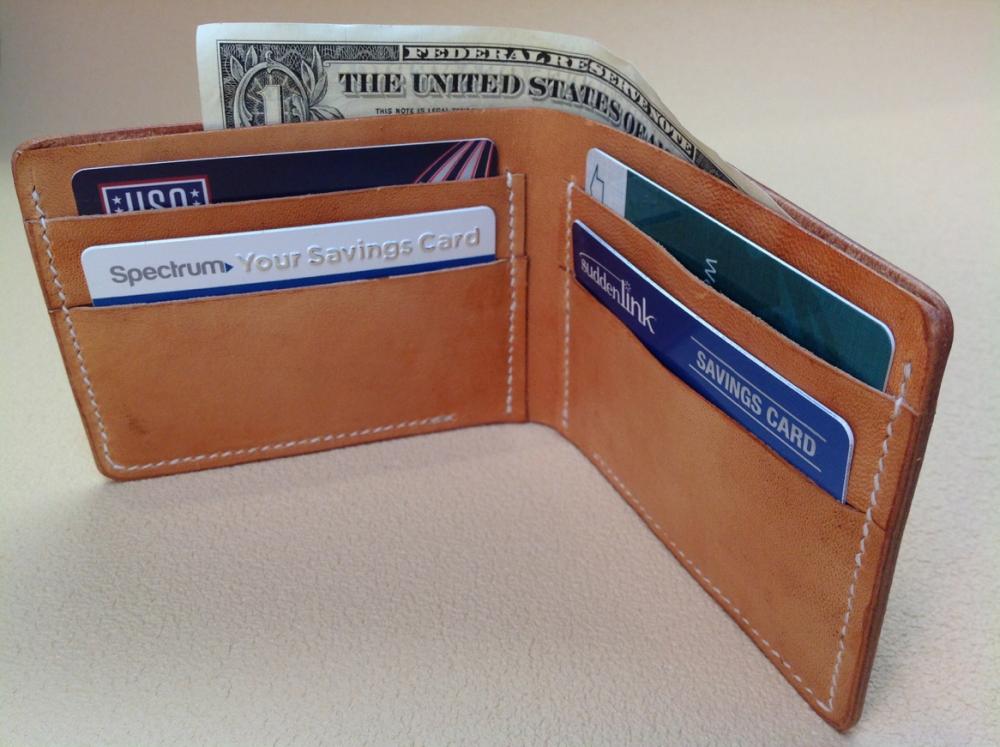
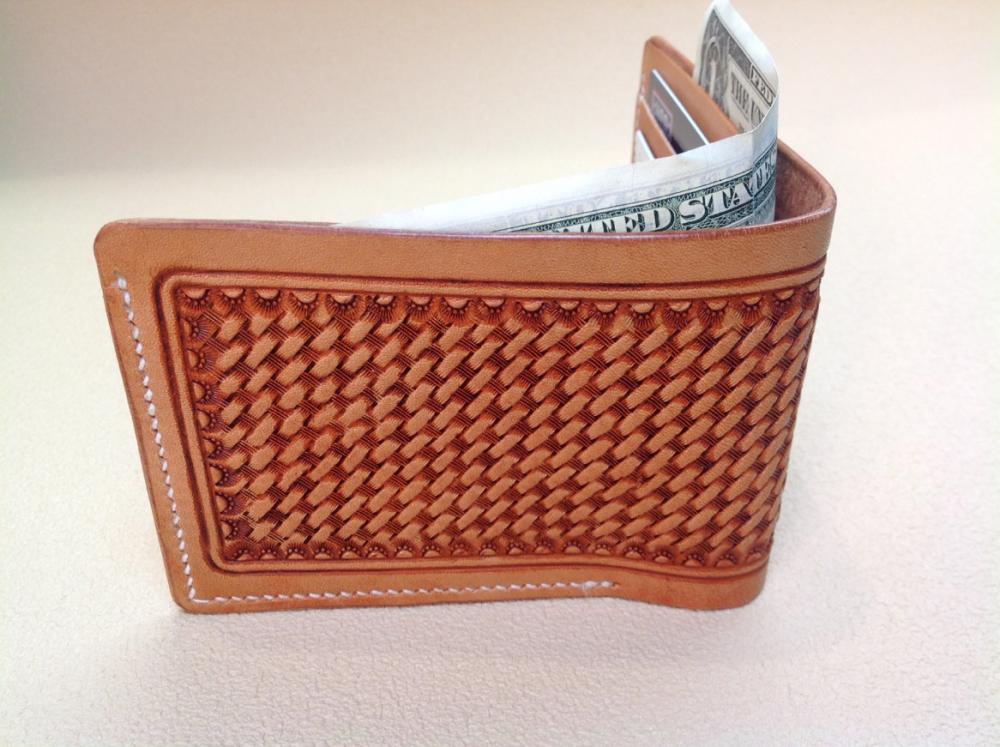
Try this instead of using a dauber. Use a cotton round (one of those little circle thingies, quilted, that you get at CVS, Walgreens, etc in the makeup section). Apply the dye like a lotion, rubbing it in until it is absorbed into the leather. If you want it darker, add some more. You can rub in quite a bit of dye this way. Then with a soft cloth, buff it while it is still wet, until it is dry. Don't press down hard, just buff it lightly. It will start to shine some. Then, let it dry. Here is a photo of an Iphone wallet I made a year ago using the Bordeaux Eco-Flo Waterstain. The leather was a Tandy Alligator print... so not the best. Also photos of the same wallet after 1 year of continuos daily abuse. And trust me, day long daily abuse. Like open/close fifty times a day - at least. Thrown about, dropped, tossed into the bag, wet, food spills, etc. I don't recall putting any finish on top of it at all - if anything, I may have rubbed in some Aussie Conditioner just to give it a bit more shine. I have not done anything else to it in the year it has been in use, either. Never had any color rub off. I think for all the negative spew Eco-Flo gets around here, it's held up purdy darn good. Day 1 One year later The Dye YinTx


-
Ok, so the OP has a bottle of ECO Flo dye he'd like to be able to use, presumably. ECO flo dyes work differently than Fiebing's. I have used both with success, and won't hammer on either, since I am fully aware that my capabilities are what tend to limit my results. There are some who swear by the ECO Flo brand as much as those who swear by the Fiebing's. All that being said, how did you apply the dye, gandgphi? Perhaps we can see if it was applied incorrectly, or maybe using the atom wax is the wrong thing. Certainly wouldn't have been the first seal coat that I would have thought of for Eco Flo. YinTx
-
Huh. Yeah. I think I'll not buy any - any time soon. and hope no one asks for it! YinTx
-
Now I'm baffled. I had heard time and again not to use Leather Balm with atom wax on tooled items, because the tooling will fill up with white chalky wax that is hard to get out. I like leather balm, but haven't used it on tooling because of these comments. How are you doing it without the issue? Thanks! YinTx
-
No doubt! Those are cool! and look like a lot of work to put together. YinTx
-
I'm a bit baffled by the Saffiano leather craze as well. I've seen it in high end stuff, and I've seen the leather for sale, if you can call it that. Perhaps there is some inherent quality that I am unaware of.... YinTx
-
Onto the third bag....
YinTx replied to motocouture's topic in Purses, Wallets, Belts and Miscellaneous Pocket Items
??Huh? You put the liner in after you are done stitching the bag? How do you attach it? New row of stitches? Hope you photo document this one also, it has been enjoyable watching this bag come together.. YinTx -
Thats what I was thinking! A lot of stitching for a single layer belt if it isn't! But I do like it. Black leather really allows you to show off a lot of different colors of thread if your customers are willing. YinTx
-
All I can say is practice on a piece of scrap before attempting the real deal. Springfield sells it I believe, works great as a resist and a seal. Some folks don't seem to like the lacquer finishes, claim they are plasticy, but I must say, I use mine thinned, and it soaks into the leather, and afterwards you wouldn't even know I put it on.... thought occurs to me, maybe just the thinner would do the trick for you, and you might already have something like that laying around to try out? YinTx
-
Not an expert opinion here, just a bit of experience. I was putting some clear lac on a piece of leather that had some black acrylic paint, and the clear lac stripped it right off. Everyone here said, yah, don't do that. Not sure if it would work in your case. YinTx
-
Indeed, beautiful work. Just curious: has the oil dissipated yet? YinTx
-
Goldshot Ron, I first saw that water bottle trick last month, but he used a small soda bottle instead. He drilled a small hole in the lid, and used the shearling to seal the hole when done. Just squeezed out what he needed onto the shearling (trimmed super short, btw), spread it where he needed it, and put the shearling back on top of the bottle. Brilliant. My next investment in leather working tools is a bottle of soda. Also, use gloves. HF has boxes of 50 for like $8. I can get several uses out of each pair easily. YinTx
-
Two knives from two different makers with the same problem might indicate it isn't the steel. Just curious: what kind of leather are you using it on? I've heard that some veg tans have clay in them, which is murder on knife edges. Chrome tans are also hard on edges from what I've experienced. YinTx
-
CHRISTINA bag, recently finished.
YinTx replied to Simeon54's topic in Purses, Wallets, Belts and Miscellaneous Pocket Items
What an amazing selection of materials! And well put together. Thanks for sharing it with us! YinTx -
LOL, yeah it was a pretty long winded explanation of the knife. But, I think at the 3:02 mark, that might be a piece of leather making a brief appearance... YinTx
-
Russet hide bag for 15.6" laptop
YinTx replied to Mallethead's topic in Purses, Wallets, Belts and Miscellaneous Pocket Items
Awesome! Will be interesting to see the patina after a few years use.. YinTx -
Nobuyoshi is supposed to be a very high quality blade. I don't believe that is a blued appearance from getting hot, I believe it has to do with the types of metal used in the construction of the knife, and the polish done by the craftsman on different sections. The metal is very hard, can be brittle, and difficult to sharpen. It will however be capable of sharpening to an extremely thin edge that will hold for a long time. San-Mai are layered, and can give the appearance you see, as the Jigane and Hagane may take on different hues that shows up in the Shinogi. These knives are a different world from most knives you see in the leather world, and as such have their own learning curve. I have yet to master mine - it is the Nobuyoshi , when it is sharp look out. When it dulls, a challenge for me to get it back to rights again. Nobuyoshi is super blue paper steel, which is the Aogami steel, which is a very high grade of paper steel. It is difficult to work with and temper correctly, so it is possible you have one that didn't come out right. But supposedly this company has been doing it for many years, so they should have the process down pat. Again, extremely hard metal, difficult to sharpen. Don't give up on your knife just yet! Possible you've seen these, but good review on this knife here: And a tutorial on sharpening this type of knife here: YinTx
-
Thank you for sharing your pattern! Here is my go at it: YinTx

-
My very first Leatherwork - Part 2
YinTx replied to MacB's topic in Gun Holsters, Rifle Slings and Knife Sheathes
Very cool. Looks like veg tan, it can crack after you dye it with alcohol based dyes and then try to bend it. You can help prevent that by applying neatsfoot oil, and also by wet molding the leather to relieve the internal stresses and create some flexibility. Keep up the nice work! YinTx -
Yes, I get that, but also a part of it is finding the one you are willing to spend the $ on. I have seen several for sale, but not one I have been willing to shell out the asking amount for. When I find that one, I'll consider myself lucky as well. Do you use your bell skiver for strap ends, belt buckle ends and to thin down wider strips of leather for wallet interiors? I've been wanting the splitter for that, ...and I wasn't sure a bell skiver would do it... YinTx
-
Monogrammed 1911 Holster
YinTx replied to IngleGunLeather's topic in Gun Holsters, Rifle Slings and Knife Sheathes
Super clean work. YinTx