fredk
-
Posts
5,975 -
Joined
Content Type
Profiles
Forums
Events
Blogs
Gallery
Store
Everything posted by fredk
-

Cannot access any advertisers! This comes up on every Ad!
fredk replied to JREESER1's topic in Leatherwork Conversation
sounds like one of those hacking spams thingies -
McDonalds are actually franchises owned by the local business person. McD supplies, sets guide prices and runs the advertising campaign but actually has no real input in that local, unlike a hop such as Tesco or ASDA
-
how to lay out your measurement on a pair of chaps
fredk replied to hickok55's topic in How Do I Do That?
thick paper pattern; trace around and mark the special areas -
Neatsfoot oil and tea
fredk replied to Davm's topic in Dyes, Antiques, Stains, Glues, Waxes, Finishes and Conditioners.
POIDH -
I wrap the item in tissue paper. Not very carefully. One large sheet of tissue paper wrapped around it. Then it goes into a white carboard box for posting or in to a white paper bag which has handles on it if its being collected in person I keep a lot of leather on hand, in what I call me ready-use boxes. Every thickness from 6mm to 0.5mm. Its all kept in plastic boxes. The main thing is I keep a computer spread sheet and a paper copy of a list of which box has which leathers in it I moved from a good generous sized shed to the spare bedroom in a small apartment. I have one main work table, a smaller one for dyeing and one for small assembling. What I'm thinking of doing this year is making a ginormous wood tray for doing the dyeing on. It will sit on my cutting / prep table when needed and after dyeing it can lifted away and stored vertically till the next time its needed
-
I forgot to mention; whatever board you use, if you are going to glue the leather on - seal the board. I use two coats of thinned waterproof PVA glue to seal the board. Without sealing your glue will soak into the board and not give a good bond to the leather
-
Ivan does this clicker die https://www.ivan.tw/collections/craftplus/products/craftplus-spiral-cutting-dies
-
I went through my stock of needles and measured their diameters with my digital callipers. Then I wrote their size on the packet. It'll do as long as I remember to to put the needles back in the correct packet - which I don't
-
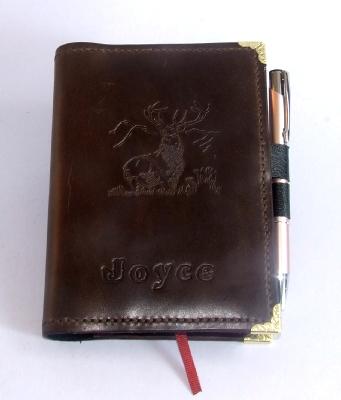
Nice re-purposing there But I gotta ask, what size are US check books?!? Cheque books here are only about 2.5 inches high by 7 inches long, so covers ain't that big
-
The 'mahogany' antique I have, Eco-Flo Gel, tends to be a bit reddish
-
I'll suggest you try out this cutter from Tandy; https://www.tandyleather.world/products/craftool-lace-maker?_pos=13&_sid=bf4384696&_ss=r Start with a piece of leather with a central hole, insert tool and cut lace from inside to outside Quick to use, but takes time to learn the knack of keeping the lace even or for straight pieces of leather https://www.tandyleather.world/products/table-top-lace-cutter?_pos=3&_sid=d18ee9da7&_ss=r A simpler version can be made by embedding one or two box cutter blades in a block of wood and drawing the leather through them. Good for making non-standard custom widths
-
Glue and fabric combination (for wallet card slots)
fredk replied to Spyros's topic in How Do I Do That?
yes, a bag I made for no.1 dottir about 16 or 18 years ago, I glued the fabric part of the zipper to the back side of a piece of leather to make an inside pocket. Still holding true -
Happy birthday to you May you have many more
-
Glue and fabric combination (for wallet card slots)
fredk replied to Spyros's topic in How Do I Do That?
There are specialist fabric glues. An example; https://www.amazon.co.uk/Bostik-806702-Simple-Fabric-Adhesive/dp/B01N91BB9O I've not used this one but another and it sticks any usual fabric to leather and remains very flexible -
1. the wood I use is thick MDF which is more stable that plywood, especially the plywood I can get here 2. For the leather to MDF/wood, whether its veg or chrome tan I use either 'copydex', a rubber based glue, or a contact adhesive. Which one depends on which one I reach off my shelf first 3. I have a 4 inch wide brayer. A smaller one might do just as well. After laying the board on the leather I flip it over and use the brayer. Going from the centre to the edges and corners, working around in a star design fashion. 4. I do opposite edges next. I usually use contact adhesive on these. I hand press the leather onto the edge then run the brayer over it a few times. Here I must add, you must round off the top and bottom of the edge/side to get the leather to go around it easier 5. Holding the board up with its leather covered edge on my cutting mat I cut the glued leather away from where its longer than the width of the board. I cut it straight, using the board for where to cut 6. These days I cut my leather large enough so that I can bring the leather that's on the edge round onto the bottom of the board as well. I glue this now 7. Now I do the same for the other two sides. For cutting the excess from the corners, I use the outside of the leather already glued on as the cutting guide. This gives a neat over-lap. Sometimes, usually a little extra glue is needed here. But when it comes to the bottom of the board as I glue the leather on I use a sharp knife to cut through the two layers of leather to try and get a 45 degree angle from the corner. This gives a tidier butt join hth, if anything is not clear just ask again
-
1. set your project down 2. at each corner or where the stitching changes direction poke a circular hole there 3. if you are using chisels to make sewing holes; working from each corner in turn, make your holes so they meet up in the centre of the strip. If you are just using a stitching marker, same applies 4. As your holes get closer to that centre you can adjust the spacing of the holes slightly. Where your two lines of holes will meet you may end up with a spacing either larger or smaller than the others. This won't matter. It will not be noticed, except by you
-
Sharpen your diamond awl all the way the handle. Basically I do what chuck does, but I use a whetstone. On my awls I find just going over one edge is enough. I just use the whetstone to keep the point of my scratch [round] awl very sharp. I've read that some ppl use a dart sharpener On that video, near the start, he shows the distortion of the leather as pushes the awl through. I use a cork block on the back side of the leather to push the awl into, thus no distortion. You can get a large cork block in a hardware store for just a couple of $$. Cut it down to a handy size
-
They should be razor sharp. So sharp that when you poke your finger you don't feel it and only know of it when you see the blood. I use a small whetstone to keep my blades sharp. A whetstone of very fine grade
-
When using my clamp thingy I sew right to left and away from me/near to far
-
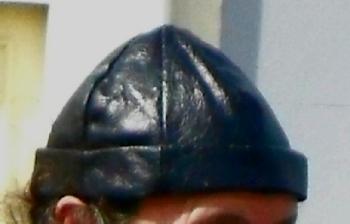
When I make these hats using soft thin-ish [about 1.3mm thick] upholstery grade leather I eye-ball the stitching. Usually I don't even mark the stitching line. The leather is so soft I use a sharp glover's needle, sewing from the top down firstly then [hopefully] using the same holes back to the top and tie off the thread. Roughly 10 minutes per seam hand sewn. The seam is on the inside, no-one really sees it or inspects it and as I've gone both ways with the stitching any irregularities in the spacing is covered up
-
When I did a sheath for a skean, which is similar, I followed the details of some sheaths found in archaeological excavations. Firstly, I made a wood copy of the blade, plus about 8 inches longer to hold it by. I wet formed the leather around the wood blade and brought the two edges of the leather to meet along the 'back' of the blade; not the thin back but the wide 'back'. The two edges were turned outwards at right angles, like this - ] [ and then the two edges were sewn together, very closely to where the leather turned out. The leather was still damp during sewing. After sewing the leather was again wetted and it was made to conform to the blade better. The excess of the ] [ was carefully cut down close to the sewing and what was left was rounded over and burnished Doing the point neatly was a real bugger though An alternative to the ] [ was to just butt the leather edges together and sew it up using a X stitch hth
-
are dividers and creasers used for the same task?
fredk replied to dans79's topic in Leatherwork Conversation
A creaser will do the same job as wing dividers. I prefer the dividers for making the stitching line as I can get more pressure onto the leather, the dividers can open wider (not necessary at all really) and I find their adjustment is finer. On my dividers I filed one leg shorter so that there is more of the longer leg following the edge of the leather. On my creasers there is very, very little difference between the two legs, and even after filing one down they just don't work as easily as the dividers Heating the creaser is like using a steam iron on your clothes, the heat helps make the impression more permanent -
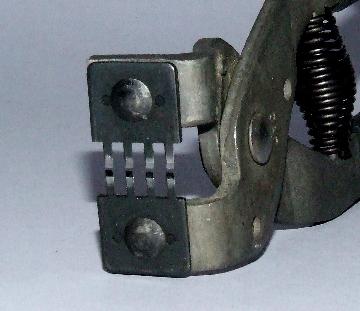
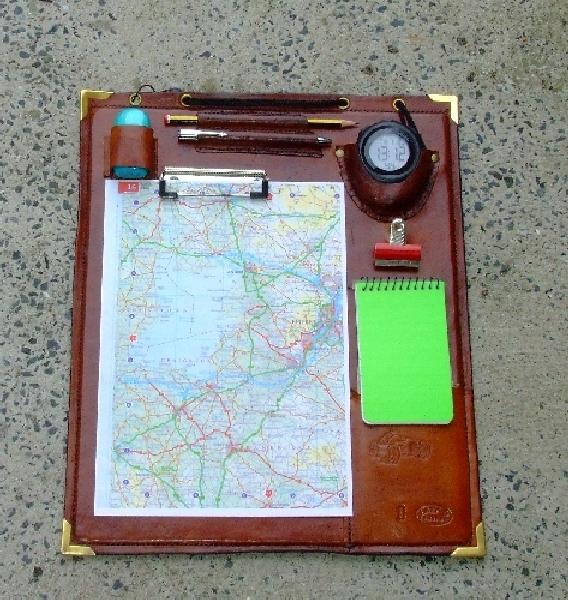
1. I've found that some of these pliers don't have the teeth sufficiently hardened, thus they can be easily bent, to varying degrees, giving a poor straight line. And its not a case of the cheapest being bad. I've found both cheap and expensive ones which had the problem. In fact my ones that I have now were quite cheap - under £10 a pair ($15?) 2. On some items I make a stitching line, top and bottom with a wing divider. Just an impression in the leather, then I put the top teeth into the line and by feel I can make sure the bottom teeth are in the bottom line. Over lap by at least one tooth, preferably two. If I'm in a real hurry I chance it and have no over lap. 3. On the Navigator's board, there was a 3mm MDF panel enclosed by the leather. I just put the plier's teeth up against the board. The board edge kept my line straight. I make other things in which I enclose thick card as a stiffener and use the pliers in the same way. yes, horses for courses. I don't make holsters or sheaths, just bags, belts, beanie type hats, light-weight stuff so my pliers work very well for me, but their maximum cut is about 4mm (10oz), they struggle at any thing over 4 mm (10oz). Also they are only good for as far as they can reach from the edge of a piece of work, about 25mm / 1 inch afair. On the Navigator's Board, the pocket, bottom right, the inside stitching line was pre- done with the pliers then an awl through the main piece after the pocket was glued down
-
The antique gel I use can get through several coats of a 'resist'. On my game boards I have to put on five / 5 coats of resist to stop the antique staining the squares. Even then the top layer of the resist is stained. I clean off most of the resist back to clean leather then varnish again. Its because both the antique and resist both have the same base carrier; the antique dissolves the resist slightly. I think the OP is not putting on enough resist
-
Each to their own way For a lot of my stitching I use these pliers for making the holes. They are really fast in use. I can go around the perimeter of a book cover for an A6 book in just about 2 minutes [I've timed it]. A few minutes longer for a cover for an A5 sized book Available with 4 teeth/prongs and 2 teeth/prongs the type of book cover I'm talking about Also used on the perimeter of this Navigator's Board. It took only a few minutes to punch all the holes