


fredk
-
Posts
5,974 -
Joined
Content Type
Profiles
Forums
Events
Blogs
Gallery
Store
Everything posted by fredk
-

Bee workers tool sheath
fredk replied to sbrownn's topic in Gun Holsters, Rifle Slings and Knife Sheathes
That looks good and fit for purpose -
The only thing left to try is cellulose thinners, aka lacquer thinners. I use it to remove just about all top finishes, including polishes and lacquer finishes
-
Nickle plated steel or stainless steel, or almost any plated steel or aluminium Brass is the one not to go for
-
Mentioning where the leather is from is often a marketing ploy. Basically, good leather is good leather irrespective of where it originates* but some people, especially the end user, put large importance on where the leather is from. eg some people I've come across think Italian leather is better than Spanish or Scandinavian and these people expect to, and are willing to, pay more for something made with Italian leather. One exception to this, European car manufacturers prefer to use Scandinavian leather as it is better. Better as far as scars and marks but not general quality. Scandinavians do not use barbed wire and they have far less tics to bite cattle, thus their hides are cleaner. Source other leather sellers and ask if they have US or Canadian leathers, but don't ask for 'American' as that will include Mexico and all the countries in 'South America' * a whole topic is devoted to this in another area but I'm keeping it to basics.
-
Culture differences. Here in N.I. / UK we measure leather thickness in millimetres. I can picture that thickness in my mind better than by the ounce. Your 2 - 2.5 oz = about 0.8mm to 1mm, your 3 - 3.5 oz = 1.2mm to 1.4mm but that link shows 3 - 3.5 as 1.1mm. I reckon that's just about too thin. For what you want I'd be going 1.6 to 2 mm. or 4 to 5 oz. Also, on that link, is a second menu choice, with the square footage, when you choose your thickness then choose your footage the price automatically changes I think vgni is just the store code for veg, natural, India There are loads of discussions on; tools, beginners, for the use of, on this ere forum. Do a search for them
-
There is a method of sewing where you can hide one side of the stitch, or not have it go right thru the leather. One piece of leather needs to be quite thick for this, at least 3mm unless you are real good at sewing Instead of the thread going right thru both leathers, on the thick piece you go thru the middle of the thickness and up and out again. You use a curved awl and a curved needle for this. Sew the panels together like this then add a gusset sewn on the outside
-
Some of us have taken to saying 'Bueller?' when there is no response to a question or statement. Taken from the film 'Bueller's Day Off'
-
Thanks. That makes sense. Cricket, the insect, is rare in N.I. but not the game. I suppose the closest here to that saying is 'hearing the fairies whispering'
-
It happens a lot, not just here but on other forums I'm on. Just about 1 in 2000 will come back to acknowledge any advice given PS: what do you guys mean by 'crickets' ?
-
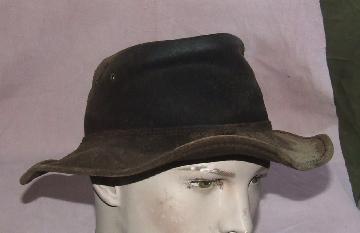
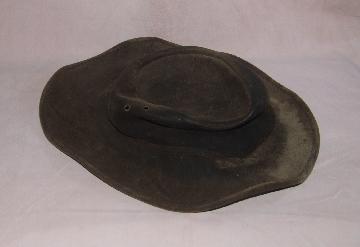
When you find out tell me cos nowt I do will stiffen up my hat again
-
Those photo links aren't working for me. You could put the photos on here directly
-
If there are no instructions then its usual to cut on the line. But I err with caution and cut a wee bit outside the line. Its easier to trim to size than have to cut out a whole new piece if the first is cut too small
-
what carboard is good for building a jewelry box
fredk replied to ToddW's topic in How Do I Do That?
Perhaps its compressed card, such as found on good quality photo/certificate envelopes. Perhaps you could ply a few layers to get the same thickness as the original -
If you were, or indeed are, in the UK or even Europe and you use 'stock' photos or someone else's photos of their work areas to represent your workspace you'll be in mighty big trouble with UK Advertising Standards Get your work area sorted out and get a professional photographer in
-
I dunno if they have a special name but I come across them as 'Sam Browne Studs with Ring', or 'Chicago Studs with Ring' and various other descriptive names, eg: https://www.ebay.co.uk/itm/10pcs-Brass-Nail-Rivet-Chicago-Stud-Screw-Round-Head-Ring-Button-Leathercraft-SG/303672380645?hash=item46b448cce5:g:zIwAAOSwwYpaqNiT
-
There is a section called 'How do I that?' https://leatherworker.net/forum/forum/36-how-do-i-do-that/ I'm working from page 339 (the oldest) forwards and from page 1 (the most recent) reading bits as the mood takes me. Lots of good info in there
-
Welcome to the mad-house. You'll get plenty of info on here. Nice stuff for your (motor?)bike
-
umm, you've not being doing this lark very long have you ? (thats a joke btw) A bit off topic; when my local library was open, over a year ago now, the librarian used to order in any new leatherwork books which came up on the system. Then she kept said books aside for me. In just one occasion she had 10 new books. I / we went through them. All the books followed the same format - lots of pages on tools and explanations of leather. Then, basically, all the books had the same projects in them, the only variations were in construction or style, and only one book was really different. The author did all the projects on an industrial sewing machine and he insisted that you needed an industrial leather sewing machine to do his projects (umm, no, they were standard projects which could be sewn by hand). Who, just starting out, is going to spend over £2500 on his type of sewing machine for a few 'home' projects ?. Other than this book, not one, not a single one, explained how to use a sewing awl, choice of needles and why, or even how to sew. None of the books explained how to fit a 'snap' - it was just eg 'Stage 5, fit the snap' imo, Someone needs to take the best of Al Stohlman's instructions, up date them and add them to some thought provoking interesting projects. Skip the 34 pages of showing tools and variations of leather and get right to the casing of veg tan for tooling. enuf waffle
-
Dog collars - always worked flat?
fredk replied to Klara's topic in Collars, Cuffs, Leashes and Leads
Fairly even. And with saddle stitching any small difference was covered by the thread. If I was to do these now I would use a wing-divider to mark the spacing. Plus; I would go to my local woods and look for a big branch or wood log for my former. (There are NO wood turners left in N.I. !! for me to get a piece of wood turned for a former) -
Dog collars - always worked flat?
fredk replied to Klara's topic in Collars, Cuffs, Leashes and Leads
I don't know if this will influence your thinking; When I used to make the occasional archery arm bracer for my medieval display team I got a 2L cola bottle and cut the top off, then I filled it with plaster to make a form. Mostly the bracers I made were lined with thick suede, about 2 - 2.5mm thick. A bracer only needed to be about 2/3 round the bottle form but I wrapped the suede all the way round. I used double-sided adhesive tape to hold an over-size piece of suede to the bottle, then I glued on the padding, if requested, then glued the outer leather over that. With good contact adhesive it was all glued up in minutes, no need for clamping. Whilst the bracer was still on the bottle I ran a gouge along the edges, about 3mm or 4mm in, for a sewing line then I used a scratch awl to mark my sewing points. These marks were quite deep, almost all the way through. Then I took the bracer off the form and sewed it all up. When that was done I trimmed the suede and finished off the edges. Most of my bracers were held to the arm by lacing so the holes for this lacing was punched towards the finish. If buckle straps were requested they were prepared and glued in place at the time of gluing on the padding -
A most excellent book. I have it and I can recommend it
-
Resolene Substitue?
fredk replied to muzzleblast's topic in Gun Holsters, Rifle Slings and Knife Sheathes
My version of M&G is cinnamon scented. But the scent goes away very quickly. Very quickly indeedy -
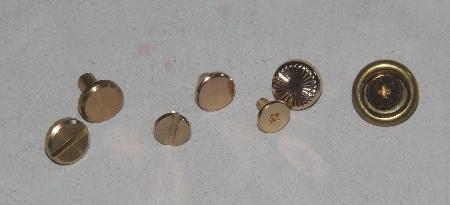
Here, in UK, I buy snaps, aka 'poppers' or 'Press studs' here by the diameter of the head which is also usually the same as the spring part of the snap I erred in my statement above. I put the screw part of the Chicago Screw (hereafter just CS) through the part which has the spring. In this photo we have, from left, what I call a proper CS, pure brass and heavy duty, then next, to the right, is a light weight one, still brass but not as heavy, then next right, a CS type with a fancy head and finally a screw part from the fancy CS inserted into a snap. Its just held there by a bit of bluetac. The snap is 15mm diameter. I have a few 'Line something-or-other' snaps from Tandy but I've classified them as 12mm diameter and have them stored as such afair the parts of the proper CS fitted into an 18mm diameter snap but I rarely go that size * some people say the part with the spring is the top. To me it doesn't matter which is top or bottom. It works either as top or bottom.
-
If that is the sort of thing you are looking for; I can put the screw head, the slotted bit, of a cheap Chicago Screw thru the center hole of the snap base (as in the photo above) and then screw the counter part to it thru the leather
-
I have been known to staple pieces together before sewing. On soft leather drawstring bags I staple along the sewing line then try to get my thread spacing so it goes through the staple holes. On some other items, I cut the leather oversize by about 6mm, staple in that excess, sew the item, then cut off the excess with the staples