


fredk
-
Posts
5,974 -
Joined
Content Type
Profiles
Forums
Events
Blogs
Gallery
Store
Everything posted by fredk
-
Very nice. You asked for it - I presume the bumps on the rear are due to the bells' mountings. I think those areas will show wear eventually. I think a third layer, sandwiched, with cutouts for the bell mountings. It need not be full width and length but skived to feather edge and glue onto the front piece then the rear piece sewn on over.
-
3rd photo of 1st set. the scissors - left set are tailors or dressmakers scissors, the large ones on the right are tailors shears. Small ones in the centre - are the blades bent slightly? if so, they are tailors snips
-
I agree it looks like a printing block. There is nowt to indicate the size but it looks large 4 x 8 or 6 x 10 inches? afair they are made from a magnesium alloy so would be pretty light weight and not really feel like metal. They need attached to a solid wood block, about 1/4 inch minimum. It really needs to be used in a press. Use a bit of plate steel or aluminium, about 3 or 4 mm thick, on the back to take the press pressure. Without a press you could cobble up a pressing arrangement with C clamps and that piece of steel plate
-

Historical western belts
fredk replied to Mungo's topic in Gun Holsters, Rifle Slings and Knife Sheathes
from me too. But it may be the print of the book. Not all printings are the same. Mike's book may have a clearer print than ours -
circular holes or holes cut out - is there a difference?
fredk replied to NeilMott's topic in Sewing Leather
afair You say you like the look of the larger spaced stitching - this could be 'you', your look, so go for a 6, its a good all-rounder as well. But also get a finer one, like 8 or 10 spi, small subjects like watch straps look better with a finer spi -
I would make it a double fronted book cover. This a cheap version of a book cover I do. The book covers slip into pockets front and back I would have the back cover of one book slip into the right side pocket and the back cover of the other book into the left pocket; the whole thing has to be turned upside down so that the second book can be used This folds closed ok and that strap pops closed ok too


-
Historical western belts
fredk replied to Mungo's topic in Gun Holsters, Rifle Slings and Knife Sheathes
Ideally you would want about 3mm or slightly more available to peen over - thats about 1/8 inch -
Those nippers are kinda expensive. I bought mine for under £10. They've gone up in price but can still be bought for under £15 ($18 or so?)
-
Top set of photos: 3rd photo - Lower left are 3 sets of feeler gauges, usually found in automotive work for setting points and spark plug gaps, above them is a compound-lever bolt cutter, not common to wood workers but more-so in automotive work Last photo - those are tin smiths metal shears
-
Historical western belts
fredk replied to Mungo's topic in Gun Holsters, Rifle Slings and Knife Sheathes
not so, if you look at the rivet, it is hollow and the edge has cracked as it was crimped over - this can be seen more clearly in the photo in the book. Also, hardware like this was being turned out by machines since the 1780s. No smith would bother with making anything so small as a rivet - its too fiddly, too time consuming -
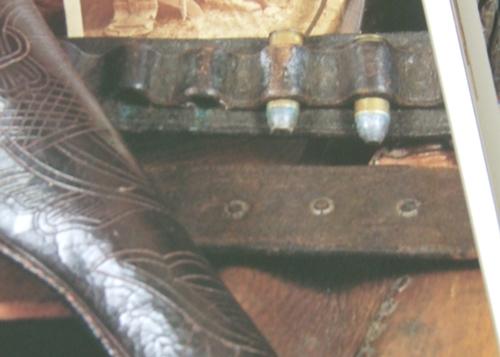
Historical western belts
fredk replied to Mungo's topic in Gun Holsters, Rifle Slings and Knife Sheathes
Too much work. Like us, back then the maker didn't want too much extra work. He would have used something handy and commonly available. I'm thinking a small calibre bullet shell, maybe a .22 or .177? Punched thru the leather the empty tube of the shell would have filled with the waste of the belt rather than removing it. -
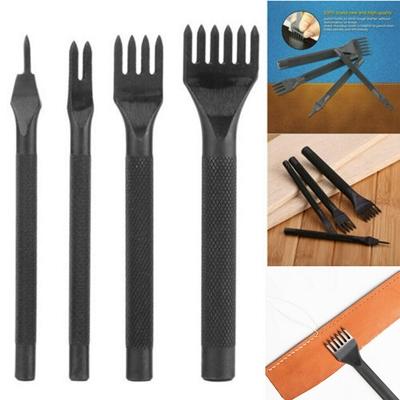
I like to use a multi-pronged chisel which will punch many holes at a time. They can be bought with 1 prong, 2, 4, 6, 8 and 10. I only use an awl now to open up the punched holes if I need to. Another tool I use more frequently is a pliers type with four teeth which punches 4 holes at a time, from both sides. Whichever you use, with a multi-pronged/toothed punch, put the first 1 or 2 teeth into the last 1 or 2 punched, this will help keep the line straight. Pliers type; Stitching punches
-
Historical western belts
fredk replied to Mungo's topic in Gun Holsters, Rifle Slings and Knife Sheathes
Here is what is being discussed; The page 93 of 'Packing Iron' book. As said by the OP the holster is dated 1875 to 1880. Maker unknown A close up of the belt showing on the right The caption for the photo says the bullet loops are individually riveted to the main belt. The way the rivets are split where they are crimped over certainly makes them look like hollow rivets. I can't make out any rivet heads on the front side and it looks like rivets are filled with something - this could be just a century worth of grime and wax polish. Sometimes, fittings can be found on things made much earlier than we reckon. eg. I was told that the 'Sam Browne' stud was invented about 1850 but I have seen them on equipment made in about 1812 - 1814 and a version of it on equipment from about 1646 -1650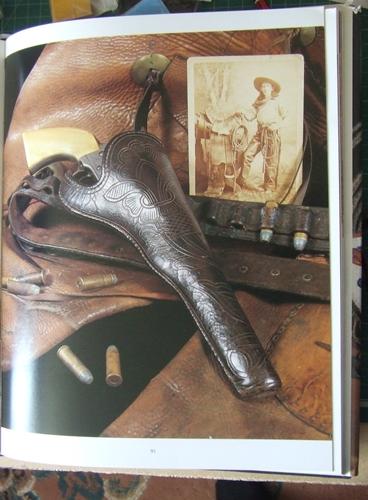
-
On hand stitching I go back over the stitches, using the same holes. I go back about 3 stitches. This locks the thread, then I cut it off neat to the leather surface and rub in a wee bit of wax. I think the same can be done with machine stitching.
-
Historical western belts
fredk replied to Mungo's topic in Gun Holsters, Rifle Slings and Knife Sheathes
As long as the picture put here is clear that is from the book and says it comes from it then it would be allowed as it is bring used for 'reference or research'. -
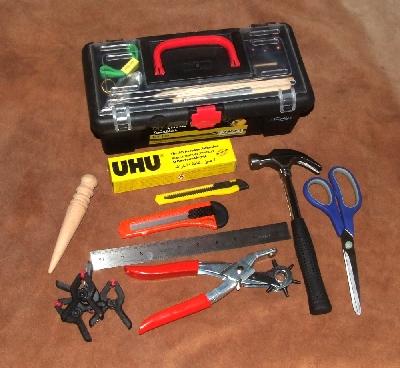
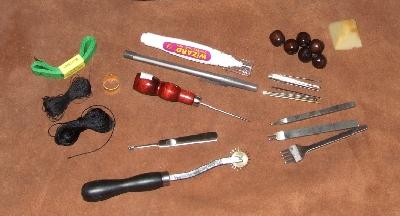
I have a small number of basic starter leatherwork tool kits for sale These are left over from some classes I held a few years ago. All these kits are brand new, never used The items are in a small tool box and include 2 craft knives [colour may be different to the ones in the photo] Bees wax block; approx 16g weight Brass lacing needle, x1, small size Correction fluid pen; for marking leather Flat lacing needle x 2 Glovers needles – 2 sizes, x 2 of each Harness needles – 2 sizes, x 2 of each Groover/edger Light hammer Measuring tape Pen Plain scratch awl Rotary hole punch Scissors – medium/heavy duty Slicker, wood, 'carrot' shape 3 different sized grooves Small spring clamps Steel ruler – 10 inch long Stitch marker, rotary, spiked wheel, (also known as a pounce wheel) Thimble ring Thonging chisels x3 : 1 prong, 2 prong, 4 prong [2mm wide prong at 2mm spacing] UHU glue Wood lolly sticks 6 beads Magnet Tool box plus I usually throw in some pieces of different types of leather and some thread so the recipient can have a practice The value of the individual items is between £40 and £50 - depending on where you buy the items from I'm looking for £22 per kit which includes postage within the UK
-
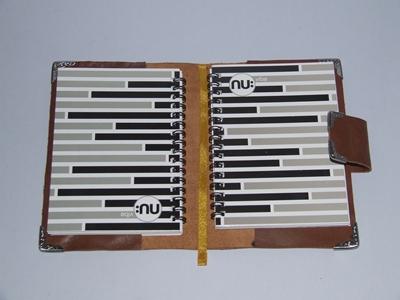
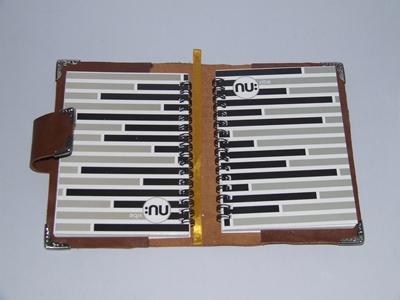
Notebook Covers
fredk replied to cbossio's topic in Purses, Wallets, Belts and Miscellaneous Pocket Items
A. the notebook covers are very nice. The same but each slightly different, true OOAKs B. clever way to cut the circular holes C. What are 'Challenge coins'? Not something I've come across in the UK -
This is my old car, with No.1 son driving it. Its a 1930 Austin 7 Ulster, a road-going racing car. Engine capacity is 847 cc - about 52ci - or put it another way my whole engine capacity is about equal to 1 cylinder of the above cars. The Austin is 10ft 3 inches long and 35.5 inches wide. Top speed is about 50mph. It has only three gears. Brakes are on all 4 wheels, 6 inch diameter drums and 1.25 inch wide. With them its a case of applying them a week before you need to if you want to stop. No.1 has a collection of old cars, including a 1978 model Cadillac Coupe DeVille and a number of old Skodas and BMWs. He has maybe about 20 - 25 cars in his collection.

-
Distressed Plainsman Holster.
fredk replied to Forester's topic in Gun Holsters, Rifle Slings and Knife Sheathes
Looks well. I concur. No more to distress it. When you think it needs 'just a wee bit more' - thats when to stop. Less is more -
We all have our own ways of working. What works for me may not work for someone else. When hand thumping I use a brass headed hammer, weighs about 1Lb 5oz, heads are 30mm diameter. This is easy to use on bolt heads. I use 'coach' bolts. They have a head about 25mm or greater diameter and having a curved/domed head they are dead easy to hit when 'walking around the clock' When doing a single small stamp I don't bother with the full casing. Wipe the leather over with a wetted sponge, get me bits n bobs ready for stamping, clear the stamping block, then stamp away. About 3 minutes from wetting leather to stamped. I've successfully stamped fully finished veg tan long after its gone away. Come back, want name or initial put on it afterwards. Even fully finished leather is never totaly water proof - water can still get in. Question: is your stamp letters? or a design of thin lines or does it have broad areas? Thinner lines give deeper sharper impressions than broad areas.
-
Presuming your stamp has a handle (?)** 1. Strke once with stamp flat. 2. Holding the stamp in place, tip stamp slightly to the left, strike again 3. Tip slightly to the right, strike again 4 & 5, tip to top and bottom striking again each time If your stamp is large enough, say 40mm or over 6, 7, 8, 9. Tip to each corner and strike each time You can mix these and 'walk around the clock', eg left side, top left corner, top, . . . . . Veg tan leather should always be damp to slightly wet for best impressions Heating the stamp is usually for Chrome tan leather Moisten the leather all over - more wet where the stamp goes, less in the other areas to avoid tide marks. I usually dampen on the flesh side, this also avoids tide marks ** If not drill and tap a hole in the back of the stamp, if its not already provided, and screw in a 4 to 6 inch long large headed bolt for a handle. My brass stamps come with a M5 tapped hole in them
-
Simple key fob
fredk replied to Rossr's topic in Purses, Wallets, Belts and Miscellaneous Pocket Items
Nice wee item agree, a Chicago screw, but with a daisy head so it can be unscrewed with a thumb. The ring will loosen up -
Notebook Folder
fredk replied to Carnivore's topic in Purses, Wallets, Belts and Miscellaneous Pocket Items
That is nice -
More: the strap on the ends are to hide the seam and to re-enforce it. The strip across the top sides I think covers a metal bar which makes the side shape and holds it. These bags are commonly called 'Gladstone' bags and have a metal frame within the tops of the sides