


fredk
-
Posts
5,999 -
Joined
Content Type
Profiles
Forums
Events
Blogs
Gallery
Store
Everything posted by fredk
-

Dying pre-existing colored leather that is not veg tanned?
fredk replied to JC2019's topic in How Do I Do That?
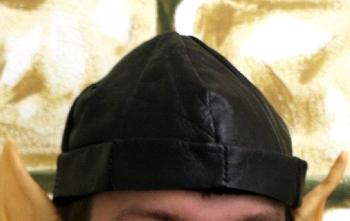
I cut thru the lacquer coat with cellulose thinners. This usually removes some of the dye as well. On occasion I have left it partially dyed, then put fresh resolene on to seal it. It was done for a customer who wanted a 'well used' look to the item. Other times I have re-dyed in dark brown or black, then sealed that with resolene These hats were made out of chrome-tanned, pre-dyed upholstery leather. The brown hat on the left is untreated, the black one was done as said above;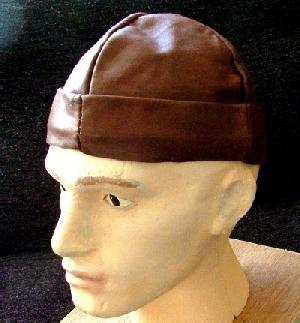

-
yes. make sure to use a top quality glue and ensure all areas are well and truly coated, especially the edges. Maybe use a brayer to press the two pieces together.
-
In N.I. a name beginning with X has that letter pronounced as EX not as Zee. Thus Xena is Exena, Xavier is Ex-aavi-eer, not Zav-vier. Is it the same in France? H and Th have their own ways of pronunciation here as well
-
If, If, it suits your needs, go for it. What is a drive to get what you require? Decent roads, plenty of rest places, a tankful of motion-lotion. . . . In my reckoning; If I can drive there and back inside 24 hours, then its 'local', thus all of the island of Hibernia and most of Scotland is 'local' to me
-
USA potential new tariffs against China
fredk replied to chrisash's topic in All About Us and Off Topic
aye, I've always found the same. Whenever I needed something made in the US, or for US companies, it was often very much cheaper and sometimes quicker to obtain it from a US retailer than a UK based US supplier eg. camera lens, made in Korea for a US company. about £1500 in the UK, imported from Honest Abe in New York, including s & h and all UK taxes £350. Delivery from Honest Abe; 4 days, from UK supplier estimated at 3 months. UK supplier was a US based professional photographic dealer for whom the lens was made. -
Well, no-one has jumped in to answer you Is that light spot just lacking dye or is the leather worn away as well. What I would do is; wash the area down with cellulose/lacquer thinners. Do an area well beyond that which needs doing. Then dampen the leather and apply coats of thinned dye until the area reaches the density of the rest. Let that dry thoroughly, buff up then apply some coats of a thinned sealant. Start just doing the fixed patch, then after a few coats extend the coverage bit by bit over the old areas. When that is dry and looks well rub in some good leather feed as the cellulose thinners will have removed oils from the leather which the feed will replace. It'll take a few days, maybe a week to do properly.
-
1. Take a wet rag and really buff over the part you've already dyed. Use a light coloured cloth. Rub hard. If dye comes off your deglazer hasn't done its job 2. I use meths and water together to dilute resolene. Either just water or just meths will do, sometimes I just use water. 3. Yes, I do up to about 5 coats of thinned resolene. Sometimes just two or three is enough. Only if I want a matt finish will I wipe over with a rag wetted with meths. Meths is methylated spirits; a wood alcohol. In the UK it is purple coloured and usually sold by chemists shops 4. You'll not need to do very much. If it gets wet, just hang up in an area where slightly warm air can circulate around it to dry it. Don't leave it inside a car where the sun will bear down on it and overheat it. Maybe once a year wipe it over with a good brand of leather cleaner/conditioner
-
buy pre-dyed leather? try making your own dye? I only use Feibing's Acrylic dye as I cannot import the Pro-dye either. I just get on with the acrylic dye. And I've used some of Tandy's Eco-dye as well. ~Used proper its ok.
-
How long did it take you to buy a sewing machine? And a press?
fredk replied to JC2019's topic in Leatherwork Conversation
Yes, they sell sets of letter stamps. They range from about 3/8 inches high to about 1 inch high. They are mostly upper case letters [capitals] but sometimes they do matching lower case letters. The range and availability comes and goes. eg. I got a set of upper case letters from Tandy but the lower case had been long discontinued - I found a set in a US dealer's old stock heres an example; https://www.tandyleather.eu/en/product/craftool-standard-alphabet-sets -
How long did it take you to buy a sewing machine? And a press?
fredk replied to JC2019's topic in Leatherwork Conversation
1. 18 years. I only got one to meet a customer's requirements. That job has been on hold for a few years now so I've not yet used the s/m. Now I've ended up with 5 of the durned things! 2. Press; 17 years. Only got one for to be quiet. I live in a ground floor flat [apartment] Up to then I could hammer stamp during the day whilst neighbours were at work but a change means they're more at home during the day and don't like my hammering -
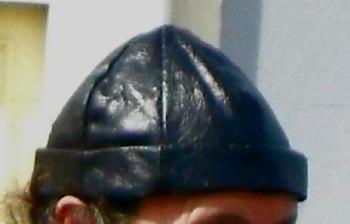
Now I have a cup of tea in ma hawn All points; I use Resolene, and or SuperSheene now These hats were made of pieces of upholstery leather which had been pre-dyed and lacquered. The pieces were different shades of brown. I prepped the leather by giving it a surface wash of cellulose thinners, then dyed it black and then sealed with several coats of resolene. It is fairly rain proof. Note that its not possible to make leather totally waterproof. I have sold quite a number of these hats in the past. No dye comes off, no water stains after rain. The insides of the hat are not sealed so the leather can breathe or be treated. Initially the resolene stiffened the leather but a bit of time working it in the hands returned it so suppleness. Many coats of resolene can give the item a gloss finish, as can be seen in the photo on right. Up to about 4 or 5 coats of resolene thinned 1:1 will seal the leather but only be just starting to give it a gloss finish. To make this matt I wipe it over with a rag wetted with meths alcohol. You can buy Resolene either from Tandy or try on ebay I would check that you Angelus Dye Prep/Deglazer has really worked. I find that many do not work as they should thats why I use straight cellulose thinners for de-glazing and prep
-
I doubt that the threads originally used were cotton but perhaps more likely linen. If you want to replace with traditional thread, waxed linen or the hemp is what I'd use. I've found that even the best cotton thread is unsuitable for sewing and joining leather. My preference for traditional is waxed linen
-
Not everyone on this site is on 24 / 7. You need to give some time, more than just a day, for folks to come along and give a reply if they have anything to offer edited to add; it would help if you give your location in your 'profile'. We have members from all over this wee planet earth. Knowledge of where you are will help with answers
-
As the OP asked his question over 4 years ago I reckon he got the waterproofing done But just to point out; there is a vast difference between canauba wax and carnauba cream. The cream is water soluble so will not waterproof for very long. Carnauba wax is very hard and will, if melted into the leather, waterproof [aka make it water resistant] for a some time. Usually carnauba wax is mixed with beeswax to lower its melting temperature and its hardness. A carnauba/beeswax mix is easier to apply and will last just as long. @paloma : do not worry about getting the right words or language. This forum has members from all over the world and most of us on here allow for the fact that not everyone has 'English' as a first language. I also allow that sometimes what someone writes on the forum comes across not how they meant it to sound. I put this through google translate twice; ne vous inquiétez pas pour obtenir les bons mots ou la bonne langue. Ce forum a des membres du monde entier et la plupart d'entre nous comprenons que tout le monde n'a pas l'anglais comme première langue. Je permets également que, parfois, ce que quelqu'un écrit sur le forum ne soit pas ce qu'il voulait dire.
-
Bring up beyond room temperature. If its in a reasonable sized container set it in a bucket of very nearly hot water for a while. After some time give it a vigorous shake. You might need to repeat this a few times. It'll come back to normal. It's only 'off' if it smells rancid
-
Basic answer; no. What you could do on the next one is to either use two layers of leather along and around the snap, with a hole in one layer so the snap is recessed, or use one thicker layer and skive around the snap place so its sort-of countersunk
-
I'm suggesting waist sizes; basically the strap from the buckle end to last hole. You'd want more for the strap folding around the buckle bar, a bit more along the back to hold the keeper on if you don't use a buckle with a keeper, and then maybe 4 inches past the last hole. Thus a mans belt for waist size 38 inch to 46 inches would be: 2 inches [on back] + 46 [from buckle to last hole] + 4 inches = 52 inches [roughly] Suggestion; for craft fairs, make long belts but don't punch the holes. Do that on site as a bespoke service. Keep a note book to note down what sizes you had to punch for. Then for future fairs you can make some belts pre-punched in some of the sizes.
-
I got what I ordered
-
One of the easiest questions to ask and one of the hardest to answer. For men; range from 32 inch up to 54 inch For women from 30 inch to 40 inch Men; you can have belts going 32 to 40 inch in holes on them, and ones going 38 inch to 46 inch, and 44 to 54 inch ~ that sort of range Women: similar but smaller groupings; 30 - 34, 34 - 38, 36 - 40
-
a. Only paper work is the standard Tandy packing list. No VAT number, I didn't ask for one as I don't require it b. I've found there is no need to keep any paperwork for any longer than 2 years or so, then only for HMRC purposes and audited accounts. When I had Limited Companies the necessary papers went into the files at Company House. I've bought from the US and the business sellers have paid the necessary duties/taxes at their end and the item just floated to me Tandy keeps telling me when I order I'll be paying VAT just as I have always done. Whether this time is a one-off or the norm only time and more orders will tell us
-
I asked both Tandy and DHL about customs, taxes and VAT and never got a real clear answer However, after some palava and missed delivery dates by DHL and me chasing Tandy via emails I finally got my order at approx 15.00 BST today. No customs duties, taxes or VAT had to be paid by me. The £440 I paid directly to Tandy was the full and total amount Evidence from DHL says it went thru UK customs clearing
-
Where are you getting your leather from? I rarely clean or prep veg tan leather before working on it. I've never had any problem of any area refusing dye. I do have some upholstery leather which is pre-dyed and has a sealant on it. To cut thru that I wash down with cellulose thinners aka lacquer thinners [?] I wash down the leather with cellulose thinners once or twice. I mean wash it, not just wipe it over. I use a rag well soaked in the thinners. This does remove oils from the leather but I put some back later with a nfo mix
-
What Is This Tool Called, And Where Do I Find It?
fredk replied to conceptdiba's topic in Leatherwork Conversation
A lot of soldering irons take a 4mm diameter bit. I'd not touch this with the proverbial barge pole. They've altered it from original spec. You can buy low powered soldering irons for as low as £5 [ $6.50-ish?] When I kept bees I altered a 40w soldering iron to operating at a low temperature by simply wiring in a resistor -
This is the message I got in answer to my queries about taxes et cetera; quote Hi Fred, Orders will be shipped by DHL Express. Customs and duties will be prepaid. We will be charging UK customers a flat fee of 10 British pounds per order, regardless of weight. DHL is telling us to 2-3 shipping days once it leaves our warehouse. end quote As for DHL delivery time to me; as I've said elsewhere it can take DHL anything up to 2 months to deliver 'Express 48' items to me. So their quote of 2 to 3 days to Tandy is already false. By Tandy's timing I should receive the parcel today, not next Tuesday.
-
I'd not use WD40 on this as WD40 leaves a residue which lint just loves to stick to. Nor would I use any of the motor oils. You can get superthin sewing machine oil, but I use good ole 3-in-1 oil To clean this I would wash and rinse it down using paraffin oil. That will wash off the old oil and take away the stuck on lint. use a 1" stiff paint brush to help. Then re-oil using s/m oil or 3-in-1