Dwight
-
Posts
5,261 -
Joined
-
Last visited
Content Type
Profiles
Forums
Events
Blogs
Gallery
Store
Everything posted by Dwight
-
It is touchy . . . but you can take wax paper . . . run it thru your printer . . . with the image you want reversed . . . then lay it on your leather . . . and the ink will transfer. I've messed around with it just for kicks and giggles . . . never made anything I really wanted to keep . . . also did my son's portrait on a piece of pine doing the same thing. May God bless, Dwight
-
Experience speaking: line the holster . . . for 2 reasons, it protects the firearm better than any product you can put on the flesh side of a holster (unless it is one of those plastic-fantastic firearms that you can't really hurt) and a holster made of two 4 oz pieces instead of one 8 oz piece . . . will ALWAYS hold it's shape better and longer. Don't line the straps . . . but make sure you pick really good leather for the straps with no fur balls or trash on the flesh side. Also give the flesh side a good coat of Resolene and then work the straps so that they are supple. Also make sure you give the holster . . . straps . . . mag carriers . . . all of it, a single good coat of neatsfoot oil on the hair side only of the leather . . . after you have created it . . . but before you dye it. Let it hangout for at least 24 hours . . . then dye and finish. THAT process makes a good looking and good wearing rig. May God bless, Dwight
-

The most expensive wallet on my life (with greetings from Spain)
Dwight replied to JanLeather's topic in Member Gallery
I am not sure what it costs me for every leather project I've done . . . I hope I have made more than I've spent . . . but it might be a toss up. I've certainly not won enough in my firearm shooting skills to make up for what I've spent . . . but like Spyros said . . . it's a lot cheaper than the psychobabblers and their couches . . . or what I could have spent at the state store if I were so inclined to go that way. May God bless, Dwight -
I had a customer one time who might have argued with you . . . it would have been in fun . . . but an argument anyway. He wanted a single revolver western fast draw type rig . . . and I made it for him. His "girth" was 53 inches . . . so of course I made the belt 4 inches longer as per usual for cowboy rigs. When he showed up to get it . . . it was 3 inches too short . . . his girth was now 56 inches. So maybe leather does not shrink . . . maybe the subject grows??? May God bless, Dwight
-
I am not sure why you cut a square corner in your project . . . But unless it is absolutely necessary . . . it is almost a cardinal sin in leather work to do that. Make a rounded cut . . . it makes all the world of difference as to your ability to edge the item. This is my carry holster . . . as you can see there are two really close rounded cuts Those cuts are made with a punch . . . then I come out from circle on each side with a razor knife to make the opening. Later I go in on both sides with a edging tool . . . gets it completely and no problems that are not solved when I burnish the edge. May God bless, Dwight

-
First thing . . . can you post a picture of an example of your problem . . . Secondly . . . I use those cheap Tandy bevelers . . . and never have a problem . . . So I think there is probably something I don't quite grasp . . . in your post. May God bless, Dwight
-
Beautiful saddle, you are a credit to the industry . . . I would be very proud to ride that saddle . . . May God bless, Dwight
-
That's one beautiful saddle . . . you are a credit to the industry.
May God bless,
Dwight
-
I have never noticed it making any difference as far as the shape is concerned . . . but the holster will definitely be a bit more firm coming out of a hot box. My hot box is very similar to Lobo's . . . but I have 3 bulbs in the bottom . . . May God bless, Dwight
-
The Bible book store I got my last one from . . . used a machine such as you describe. They simply loaded in the name . . . warmed it up . . . pressed it onto the Bible . . . and the name was there. Still there some 35 years later. May God bless, Dwight
-
Tom Threeperson Holster
Dwight replied to Wykoni's topic in Gun Holsters, Rifle Slings and Knife Sheathes
Not sure how the OP did it . . . I do mine so that it is in a place where the gun does not touch the leather . . . and it can be tricky. May God bless, Dwight -
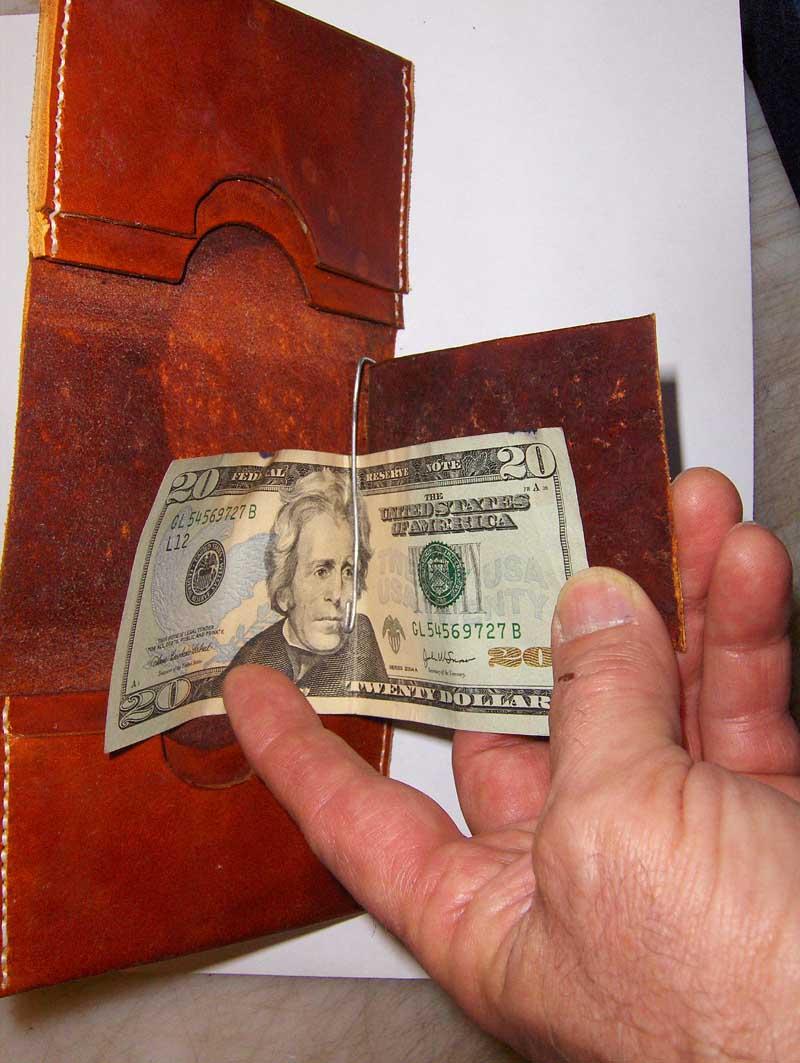
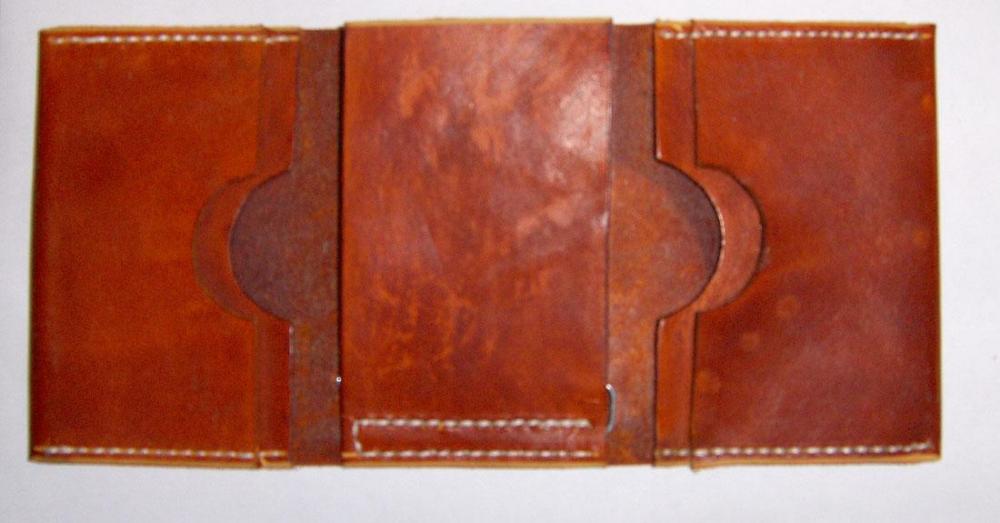
Several years back . . . in a Tandy shop . . . a fellow came in wanting someone to make him a wallet. The manager sent him over to me as I just happened to be there. The story was his daughter had bought him a wallet some 25 years before . . . it was now worn out . . . he needed as near as possible an exact replacement. I looked at it . . . saw it was very simple . . . we agreed on the terms . . . he unloaded the wallet and gave it to me for a pattern . . . and away we went . . . the finished product was sent to him a couple weeks later . . . and I got a very pleasant thank you note from him. This is the "practice piece" I did just to get the feel of it. It is a trifold . . . couple of pockets on each side . . . with a bill holder in the middle. May God bless, Dwight

-
Much better there Cyberwolfe . . . May God bless, Dwight
-
In The Process For A Wheelchair Mount
Dwight replied to AzShooter's topic in Gun Holsters, Rifle Slings and Knife Sheathes
Looks good partner . . . is that 1/2 inch or 3/4 inch wooden dowel you used??? And how long is it?? May God bless, Dwight -
In The Process For A Wheelchair Mount
Dwight replied to AzShooter's topic in Gun Holsters, Rifle Slings and Knife Sheathes
Looking fwd to the picture. May God bless, Dwight -
I really cannot comment on the Outlaw . . . but I've had a Tipmann Boss for over 15 years . . . and it has pretty much done all I ever wanted it to do. I can also make another comment . . . which pertains easier to me because of location . . . when I've had a problem with it (twice) . . . I laid it in the passenger seat . . . and two hours later, I'm standing behind Ben . . . he is fixing the problem . . . and I'm back on my way. Your location will not work for that . . . but they are solid on fixing any problems that arise. The worst problem I've ever had with it . . . it does not like to go around circular corners . . . never figured out why . . . it just doesn't . . . and sometimes the back side of the stitching is a bit less than optimal. It's great for holsters . . . dog collars . . . knife sheaths . . . but belts can be a pain if you have a shoulder problem. Put it to prayer . . . let the Lord help you with the decision . . . that actually is my best piece of advice. People ask me if the Lord is my steering wheel or my life preserver . . . I claim He is my GPS . . . gives me the directions before I get there. May God bless, Dwight
-
On a question of "How To" . . . How do we get rid of the pictures of the junk yard up at the top of the screen . . . and get some useful and decorative leather work pictures in their place?? If this were Sanford and Son . . . I could understand it . . . but this is a leatherwork forum . . . not a showcase for derelict mechanical junk. May God bless, Dwight
-
Mom taught me that trick 65 years ago. It still works too. May God bless, Dwight
-
How do I avoid cracks when bending leather - Example of Small Bag
Dwight replied to GinBerlin's topic in How Do I Do That?
Those are not cracks . . . they are wrinkles . . . they are produced by the bending of the leather. Getting it fairly wet with water that first time you bend it will alleviate some of it . . . but also using a thinner leather will also make a big difference. The thinner leather will not wrinkle as bad. You may skive the area that bends . . . do that on some practice pieces . . . it may be your ticket. Also you can bend it around a dowel . . . slowly and incrementally making the dowel smaller each time . . . pulling it around by the loose end . . . rather than just bending it over the piece. BUT . . . wrinkles are part and parcel to leather and leather work. It proves your work was not done in wool, cotton, or plastic . . . May God bless, Dwight -
Instead of carving it . . . do a control C of the pic . . . paste it into a MS Word page . . . and print the page. Use waxed paper and a ink jet printer . . . and if I remember the process correctly . . . you then just transfer the wet ink to the leather . . . rub it with a rag . . . till you see there is no more ink left on the wax paper . . . you are done. NOW . . . I'm going from memory . . . did it 10 or so years ago . . . check out the internet for better directions. You WILL GET a really nice image if you take your time. I did my son's face on a piece of leather . . . was really good. OR . . . if you don't want to do that . . . print it on white paper . . . use school latex glue to glue the paper to the leather . . . then use a wood burning tool to trace and add the lines to the leather by lightly burning it. Make sure the burner is turned low . . . and take your time. It also produces a beautiful image if you are patient as you do it. May God bless, Dwight
-
A tight and durable seam on an 8oz veg tan quiver?
Dwight replied to SeyR's topic in How Do I Do That?
A. Make sure your two edges are exactly 90 degree cuts . . . and as near perfectly straight as you can make them. B. Contact cement the edges together C. I would (for a simple quiver) use a much simpler stitch pattern than Garypl used .. . . just a simple XXXXXXXXX stitch straight down the seam. D. To help insure it stays together . . . I'd put my shoulder strap attachments at the top and bottom of the seam . . . with a 3/4 inch or so wide strip running down the outside . . . with the ends of it becoming the anchor points for said shoulder strap. For garden variety pratice arrows . . . nothing needed . . . but for my broadhead arrows . . . each one goes into a separate plastic tube liner. May God bless, Dwight -
Chris . . . the easy way to do this . . . forget about the 7/8 oz leather you would have used. Get some really good 3/4 that is closer to the 4 side. You make two sheath blanks . . . mirror cut from each other. The piece with the hair side out . . . inlay your snake . . . sew him in place . . . . then contact cement both together and from that "one piece" continue making your sheath just as you usually would. I regularly make 6 shooter holsters this way . . . and when done. . .the nice thing is they are really sturdy. AND . . . you don't have to skive anything here . . . May God bless, Dwight
-
Rivets are usually put in cheap stuff . . . so it won't come apart. They don't put in a welt . . . so the knife cuts the stitches . . . voila . . . it comes apart. SOooooo they put a rivet in there to keep it together . . . and your knife drags across the rivet . . . dulling it faster than skinning two democrats. Nahhhh . . . no rivets . . . put in a good welt to protect the blade . . . that is the American way. May God bless, Dwight
-
Rhino 60DS Holster
Dwight replied to thawk8541's topic in Gun Holsters, Rifle Slings and Knife Sheathes
Looks good from here. Revolvers . . . especially in western rigs are really OK with home grown models . . . semi-autos in CCW rigs are a different story . . . but it CAN BE done. Hang onto that model . . . word gets out . . . you may be Mr. Chiappa . . . May God bless, Dwight -
I use a concoction of 50 % by weight . . . pure bees wax and 50% by weight . . . neats foot oil. Not the compound . . . the real OIL. I put it in a jar . . . suspend the jar in a pan of hot water . . . it melts the beeswax . . . they get melded together . . . Rub it on the leather . . . polish . . . you'll like it. It's a 100+ yr old recipe . . . add more oil if you want it a bit softer. I've made and use both. May God bless, Dwight