Dwight
-
Posts
5,257 -
Joined
-
Last visited
Content Type
Profiles
Forums
Events
Blogs
Gallery
Store
Everything posted by Dwight
-
Yep, RockyAussie figured that one out. May God bless, Dwight
-

Getting good straight cuts and issues with stitching.
Dwight replied to rckt1rcn's topic in How Do I Do That?
That video and that visual advice was almost as dumb as the music. Pull the blade . . . you push buttons. May God bless, Dwight -
Getting good straight cuts and issues with stitching.
Dwight replied to rckt1rcn's topic in How Do I Do That?
Drywall razor knives are just about all I use . . . have for 20 years . . . and an aluminum 48 inch ruler is your straight cutting friend . . . especially LONG straight cuts. You need to take a 2 inch by 10 inch piece of 7 oz or thicker leather and rub it real good with green polishing compound to make a strop . . . then strop those razor knife blades to keep em sharp. For stitching and lacing . . . put a mirror up in front of you so you can see the tool as it stands up . . . and watch the mirror as you hit the tool. You are somehow knocking it sideways if you are starting in the groove . . . but coming out differently on the back. Buy a couple of belt blanks . . . groove em on both sides . . . practice until the holes on the back side are in the groove just like the ones on the front side. Or buy a sewing machine (that's what I did). May God bless, Dwight -
Assuming you did the same to the mag carrier . . . there is your test bed. Whole lot easier to make a new mag carrier than holster. You can buy a product called mineral spirits at wally world or Lowes . . . it will take off the wax. 6 to 10 buck investment for you. Put it on a white tee shirt cloth and rub, rub, rub. Not sure what it will do to the leather . . . but I think if you are careful . . . you won't destroy it. Just don't get it soaked in it. I've gotten all sorts of solvents and stuff on leather in the past . . . and got away with it . . . you probably will. As for the finish . . . a couple of light coats of Resolene or Mop N Glow will seal it . . . you can then wax it to your little ol hearts content. May God bless, Dwight
-
Like caressofsteel . . . I get my edges done first . . . on a small Harbor Freight belt sander. When the edges are sanded and straight I use my stitch groover . . . make the groove. I then stitch before I bevel . . . as it gives my sewing machine a better surface on which to run. Sometimes there can be a softer piece or softer place in the leather and it will let the machine move slightly . . . and it aggravates me to no end to look at a belt or holster I just sewed up . . . and one or two stitches are out of line. It does not happen often . . . but waiting to bevel . . . takes away some of that opportunity if you are sewing on a machine. I then bevel . . . dye the project . . . burnish the edges . . . and final coat finish. Sometimes coming back and burnishing the edges again for a final shine. May God bless, Dwight
-
Lots of prayer . . . Resolene actually doesn't change the color of dyed pieces "a lot" but there is a minor change. Some folks swear that Mop N Glo is as good as well. They would be the first ones I'd try . . . but it depends on what you are going to do with it afterwards . . . or what kind of product it is. You didn't say that. May God bless, Dwight
-
Belly-Band Holster Tutorials???
Dwight replied to RVM45's topic in Gun Holsters, Rifle Slings and Knife Sheathes
OK . . . I understand your question and need. From my own experience . . . my first thought for the "foundation" of it . . . I would go to Harbor Freight and see if any of their back braces are big enough for you. This one is supposed to be: https://www.harborfreight.com/lumbar-support-belt-xx-large-94106.html Making a leather holster of say 6/7 oz that would allow the belt to slip thru . . . would allow you to reposition it exactly on a daily basis where it is most comfortable or more accessible / more concealable . . . as the day demands. You could make two holsters . . . mag carriers . . . etc . . . and move / remove / exchange as you needed to do them. The big plus for me if I did that is the suspenders. They would help carry the weight so that the belt does not have to be cinched up really tight. I have worn this belt many times when working construction . . . it is comfortable for an all day run . . . and made the difference when I was also carrying a 12 pound electrical pouch . . . or 6 or 8 pounds of other misc tools. And actually if I did ever decide to go belly band . . . this is the way I would go based on past experiences with what is available out there. May God bless, Dwight -
Belly-Band Holster Tutorials???
Dwight replied to RVM45's topic in Gun Holsters, Rifle Slings and Knife Sheathes
As cheap as they are . . . why bother??? PLUS . . . before you put down the cash . . . borrow one from a friend. His is probably tucked in a drawer to keep it from gathering dust . . . he wore it twice and put it away like all the rest. I know folks who've had them . . . still do . . . but they just are not used. It's kind of like that second spare tire in the trunk . . . just in case . . . but never used. May God bless, Dwight -
First pancake style holster. Need help for next one!
Dwight replied to Akers's topic in How Do I Do That?
Well . . . I use my fingers . . . and I do all the forming, etc . . . before I dye. Sometimes the tool marks will kinda "lift up" when I do the dying . . . if not . . . I just live with them . . . OR . . . make sure I add another coat of Resolene so the overall appearance is as bright and shiny one place as it is the others. May God bless, Dwight -
Reinforcing Mouth Of Iwb Holster
Dwight replied to asbandr's topic in Gun Holsters, Rifle Slings and Knife Sheathes
A lot of my holster making techniques I learned from John Bianchi and Lobo . . . reading things they wrote . . . and looking at their designs. As well . . . I would never sell anyone a holster that I thought would even conceivably necessitate 2 hand re-holstering. As well . . . I would laugh at myself and say that the Lone Ranger and Hoppalong Cassidy would both be disappointed in one of their fans if that was all I could make. May God bless, Dwight -
I always kind of laugh to myself when I run across someone from Holland, Scotland, Ireland, France, or Wales. Most of my ancestors came from those places . . . so while the connection is 10 generations or more distant . . . I might still be talking to one of my cousins . . . however distant. But anyway . . . from the (this morning) stinking cold damp state of Ohio . . . welcome . . . glad to have you. May God bless, Dwight
-
If you go to Joann Fabric . . . get their 40 or 50 % off coupon off the web . . . go to their back end . . . look for the vinyl that is about 24 bucks a yard . . . has a cotton backing . . . buy a couple yards of it . . . it is I think . . . 45 inches wide . . . gives you a bunch of product to work with. Then make your beginnings of the pattern with old manila file folders . . . transfer that to the vinyl . . . sew up the vinyl in cheap thread . . . once you get the thing you want in the pattern . . . cut the threads . . . and use it to mark and cut your leather. Just remember to add a tiny bit for the thickness of the leather . . . being thicker than the vinyl . . . it is my "go to" for making patterns . . . virtually never fails. May God bless, Dwight
-
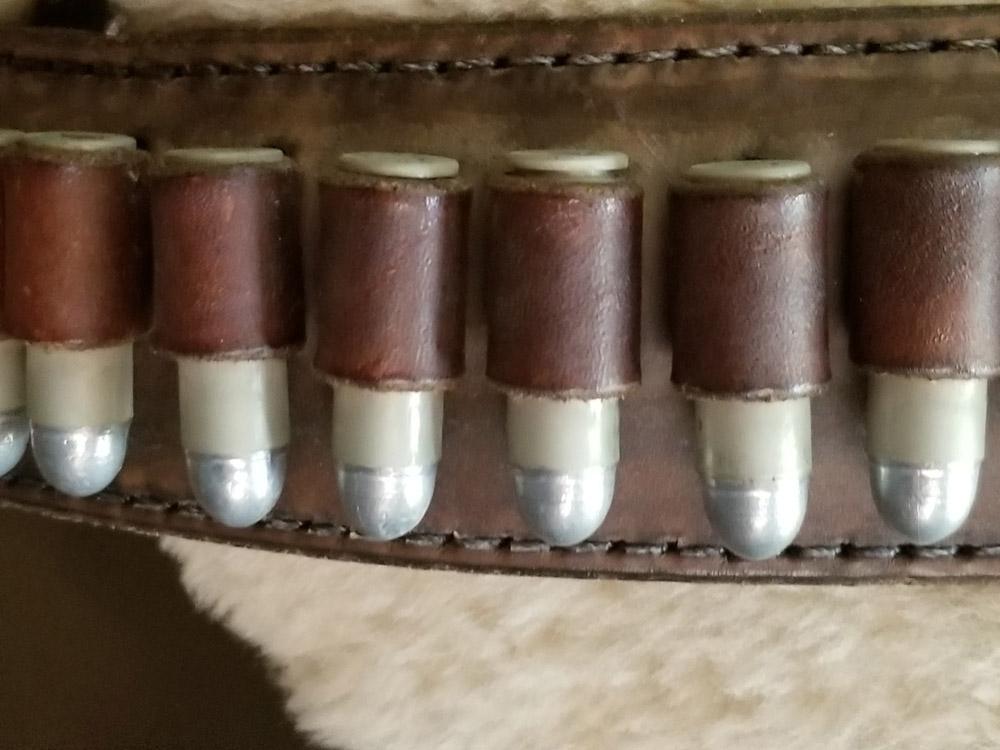
Looks spot on to me . . . the rivets combined with the holes being big enough to allow leather to move in and out of them . . . combined to make just enough extra leather come into play . . . bullets fall out. BUT . . . and I didn't mention it before . . . rifle bullets are some heavy animals . . . need a pretty good piece of leather holding them . . . beyond that little loop that holds handgun ammo. I don't do like tsunkasapa and make two loops . . . but I'm sure it holds them well. AND . . . if you look at say M-60 machine gun ammo . . . the metal holders for them are the full length of the wide part of the ammo . . . not a small loop by any stretch. May God bless, Dwight
-
This is my "go to" manner of making ammo loops. Have no clue how many I've done. NEVER had this problem. Off the top of my head . . . something has to be happening allowing more leather to get around the bullet . . . loosening up the grip. I have always tried to curtail that possibility by making my loop leather wider by at least 1/16 to 1/8 of an inch. It makes pulling the straps pretty tough at times . . . especially since both pieces are in the same hole . . . and I do not rivet the loops either. I make all my belts double layer . . . so you never see the inside of the loop area . . . and that is all contact cemented into one piece anyway. I get my loop leather "wet" not slippy/sloppy . . . but wet . . . pull it tight around each round . . . then let it get back to casing color before I remove the round and let it completely dry. Again . . . never have had your problem. Let us know what you figure out . . . my interest is peaked in this. May God bless, Dwight
-
If the customer doesn't like it . . . you won't have much trouble finding one who does. May God bless, Dwight
-
Mexican loop question
Dwight replied to dikman's topic in Gun Holsters, Rifle Slings and Knife Sheathes
Since the holster is done . . . we cannot add good quality veg tan leather . . . which would have stopped that completely. 3 or 4 good coats of 50/50 Resolene / water . . . "might" cure it. Vinegaroon will not make it substantially stiffer. Being very careful how and where you put it . . . a small concho (or 2) on the strap should hold it . . . and the strap should be so tight on it that you have to work serious hard to get the holster up thru it. Honestly never had the problem. May God bless, Dwight -
What he ^^^^^ said. May God bless, Dwight
-
If I were concerned about scratching a knife blade . . . I would offset a piece of leather on the sheath . . . locate the snap there . . . and forever be free of worries. Or . . . as I have done on a very few holsters . . . put a decorative piece on the front of the sheath . . . locate the snap in it. You also want to follow Josh Ashman's advice of using T nuts to hold the male snap piece. The T nut will also hold the male snap piece better than a regular snap piece, . . . as well as making it a simple task to replace that piece in the future . . . even years from now. May God bless, Dwight
-
Davm . . . when I make a cowboy gun belt . . . there is only one way I do it . . . in and out the same hole. I have NEVER had a problem with it. I use 6 oz leather (calf leather when I have it) and the holes I punch are 1/16 of an inch smaller in width than the leather I'm pulling thru. I wet the leather good . . . not sopping wet . . . but much wetter than for tooling . . . and keep it wet throughout the process. I pull thru the hole . . . go back . . . and slip a cartridge into the loop . . . pull it tight . . . go on to the next one. I leave the cartridges in the loops until the loops dry back to natural leather color . . . then gently ease them out to let it finish drying. When laid down flat . . . my loops gently touch each other. I can make this belt pretty much as fast as I can sew one . . . just don't like sewing the things . . . plus I think it is a stronger belt . . . and it looks nicer in my opinion as well. The picture is my personal cowboy belt . . . some 20+ yrs old . . . laying across the back of a chair. The other pictures are "how I do it". May God bless, Dwight


-
As I only do mostly gunbelts and holsters . . . items that can and will get abuse . . . my preferred finish is Resolene. 1. Never had any dye rub off with it. 2. It is not "water proof" . . . but it sheds water easily 3. It is easy to apply . . . and looks good when it is done. I mix it 1 to 1 with tap water . . . put on with a bristle brush . . . have never had one complaint about the finish on anything I've ever done. May God bless, Dwight
-
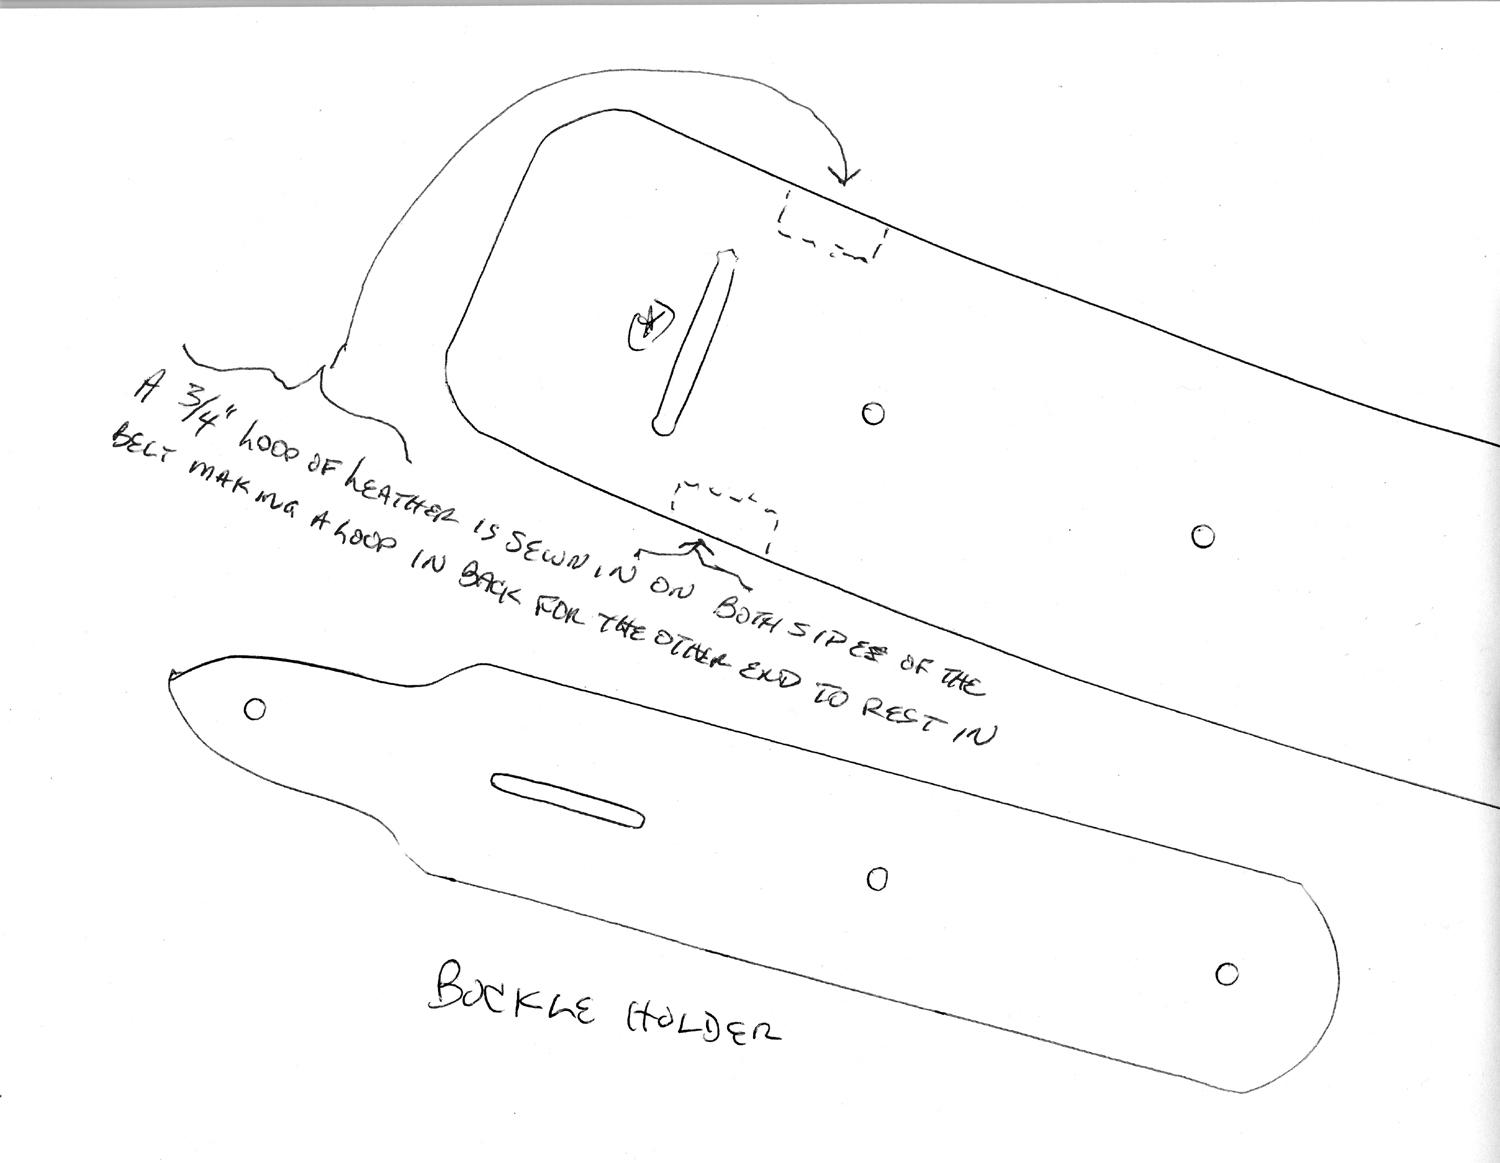
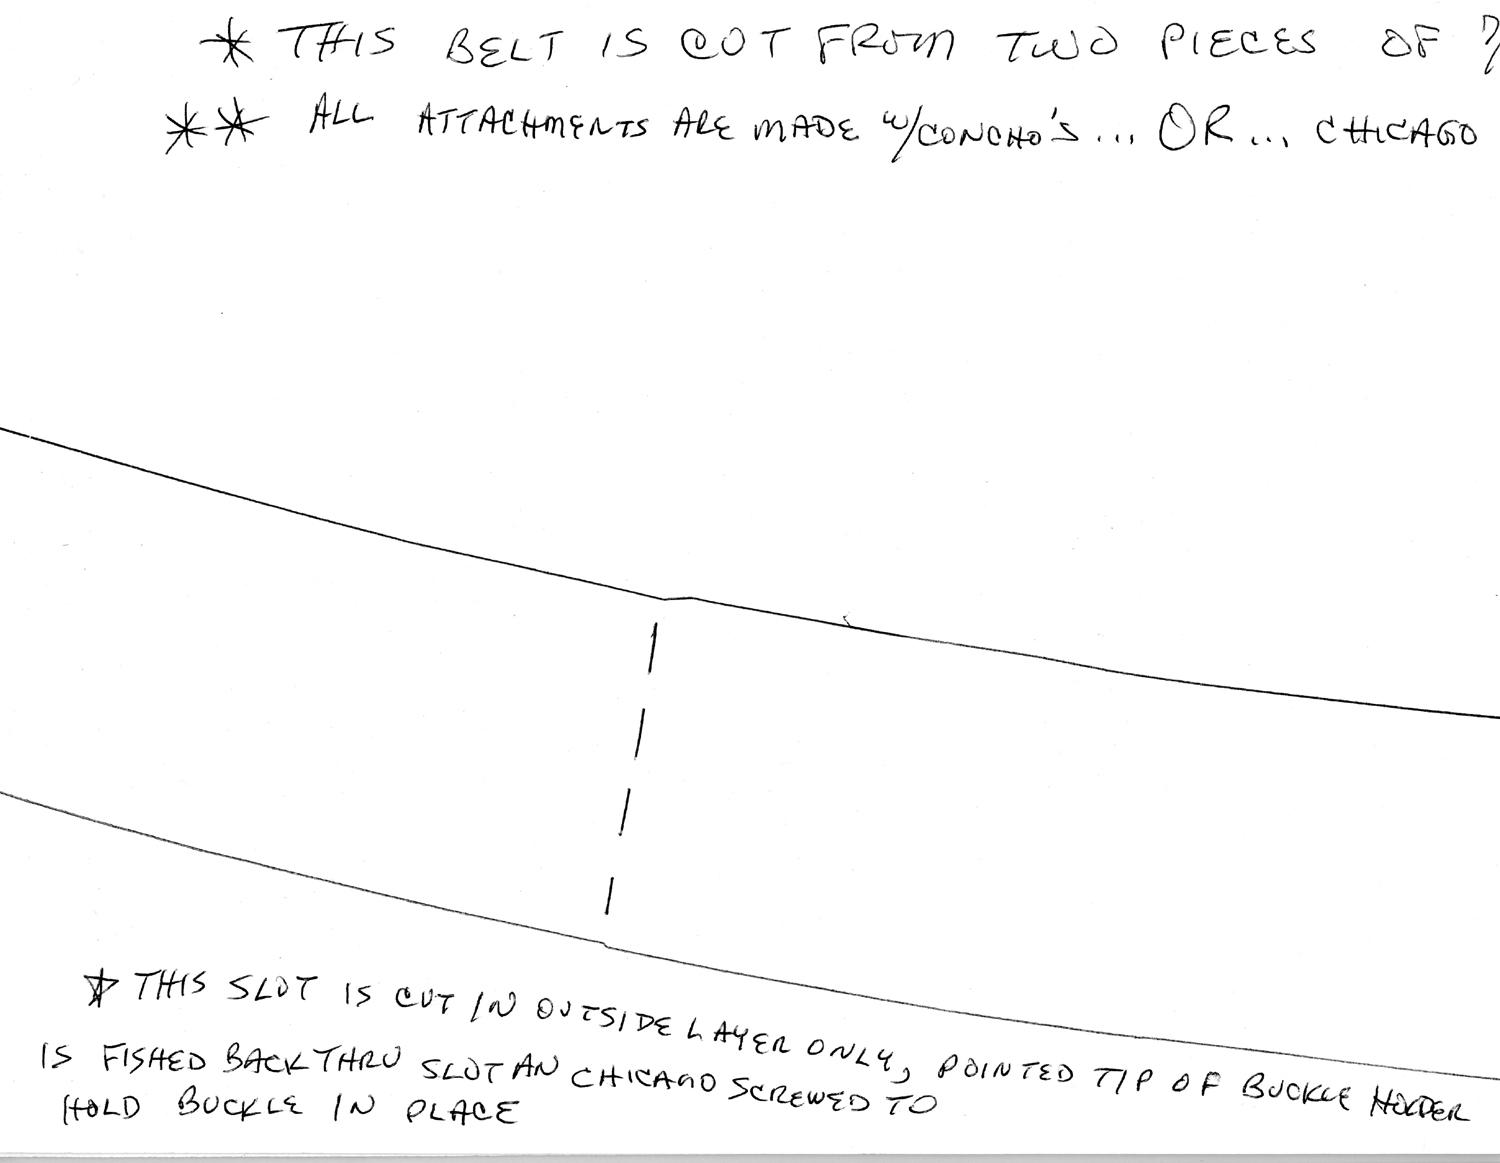
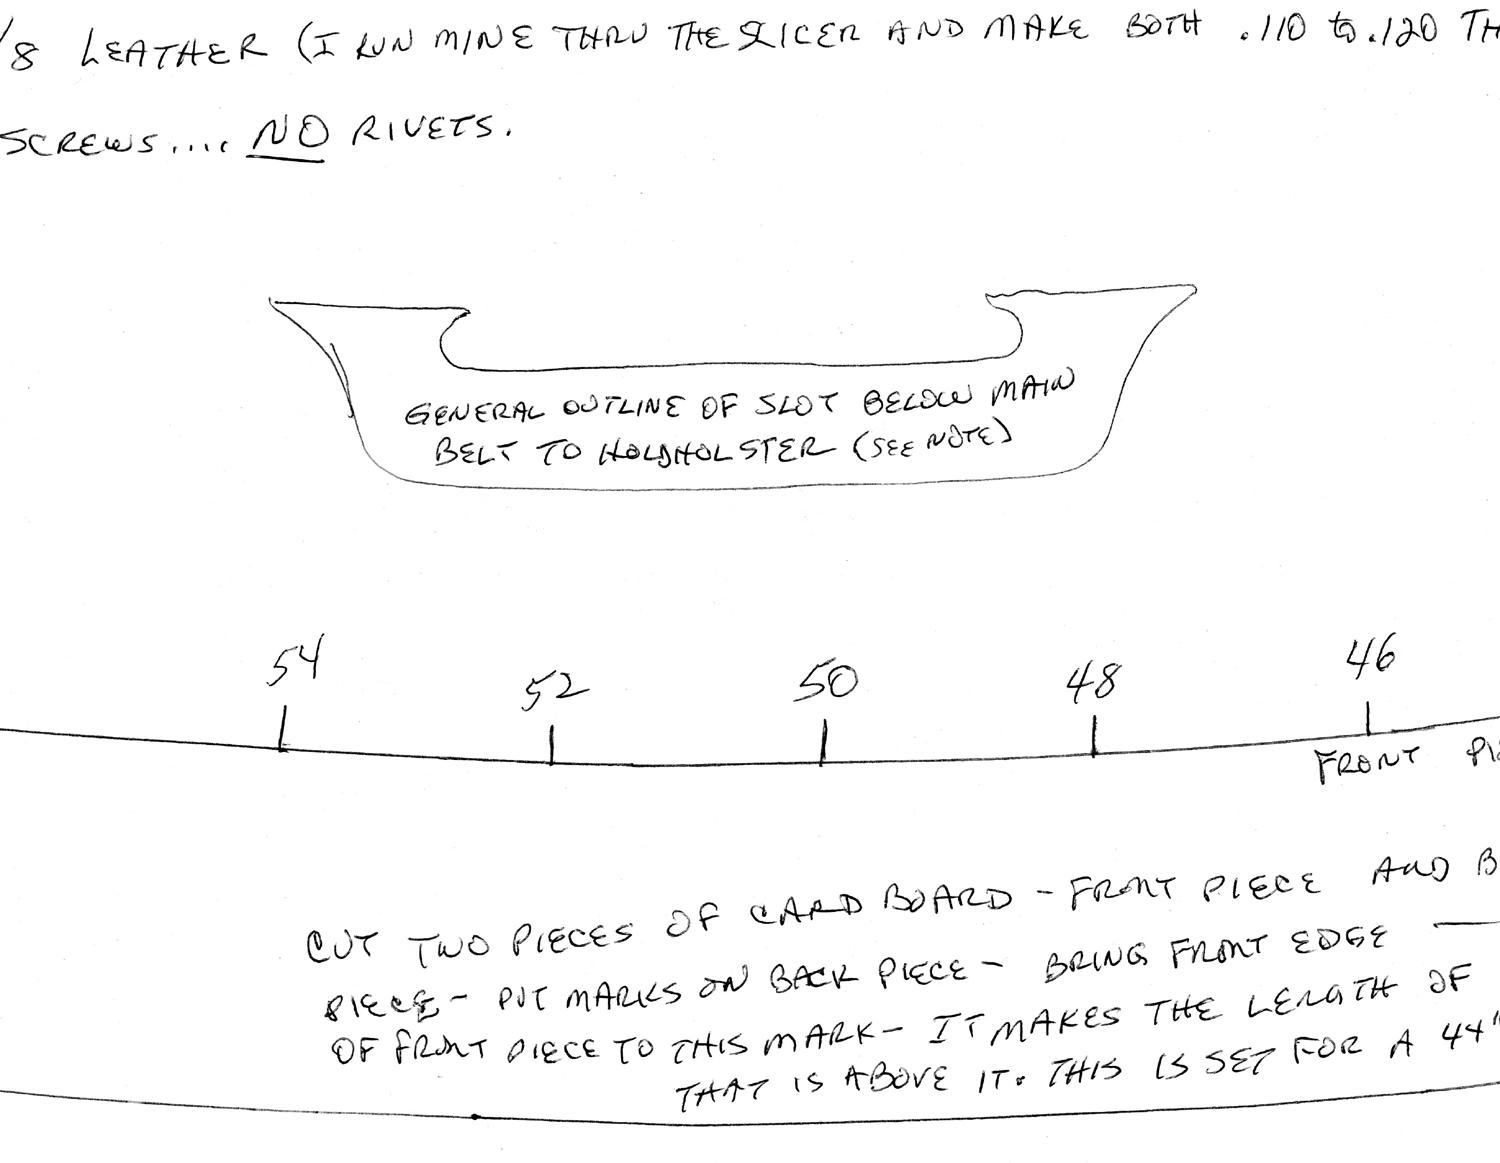
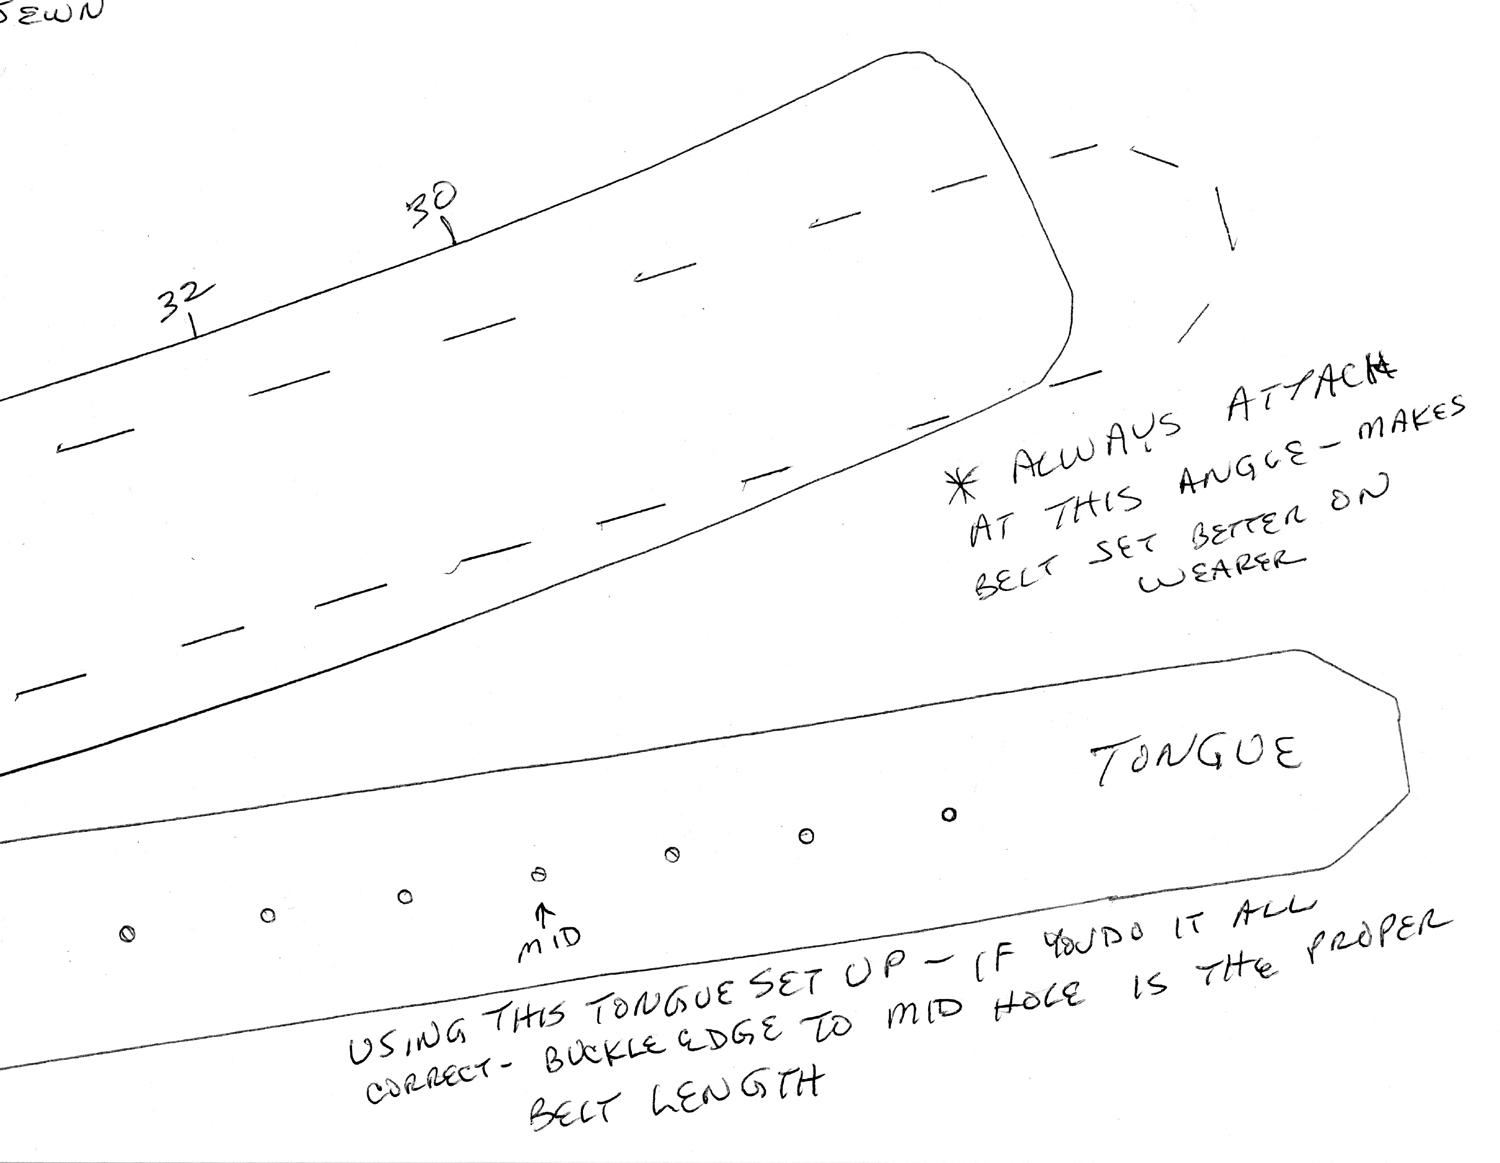
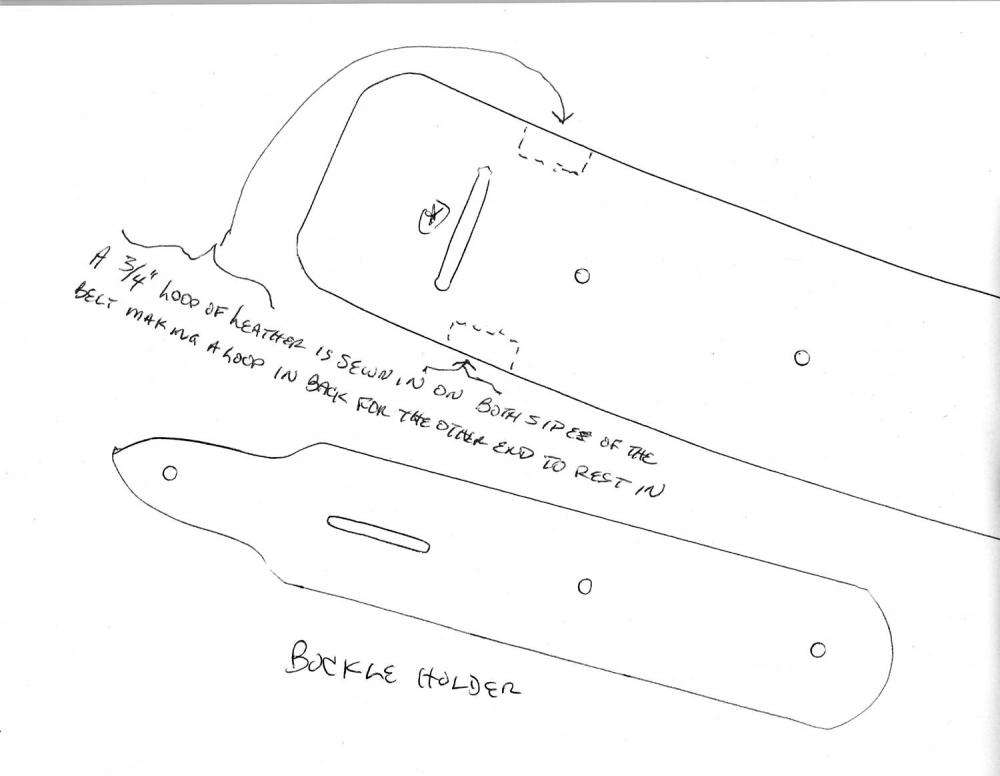
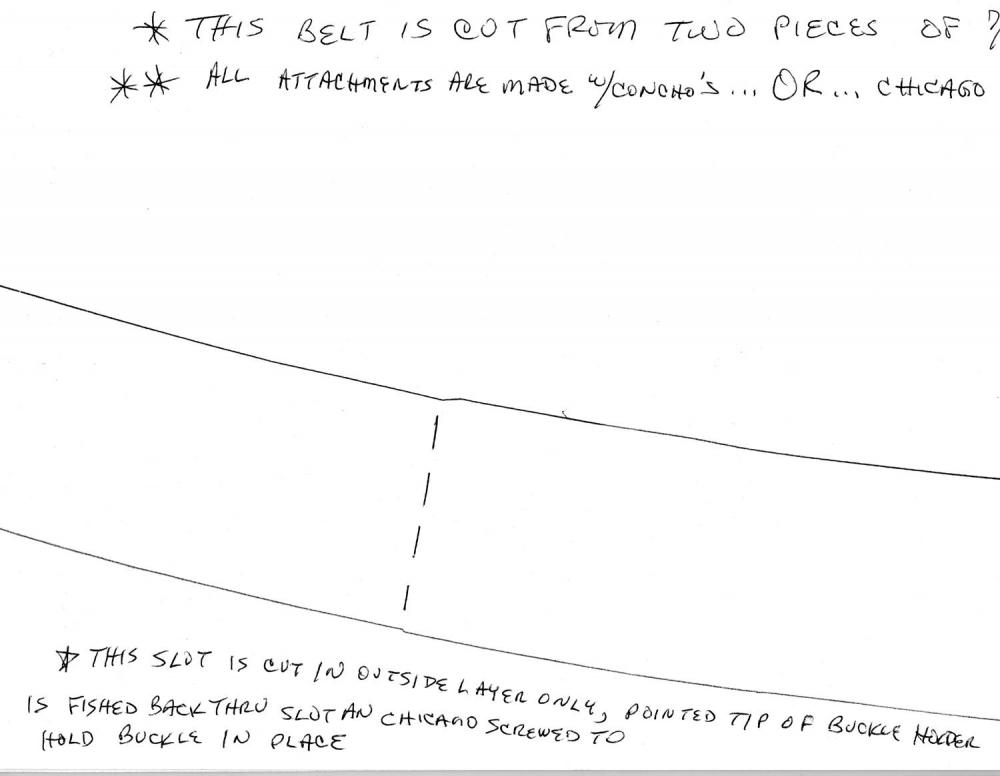
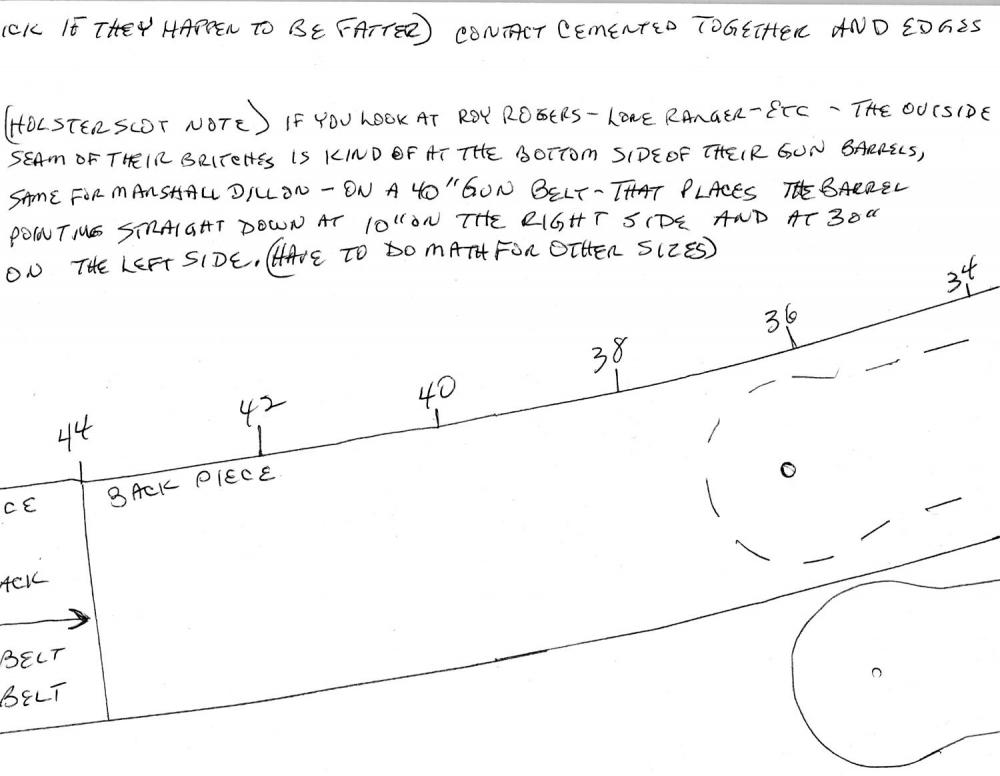
It is actually something most of us lose in the translation . . . which is a simple geometry problem. The top of the belt is actually slightly shorter than the bottom . . . so when you buckle it . . . it becomes a belt that is sort of like the sides of a bell . . . and becomes somewhat of a girdling effect when pulled tight. There used to be an old fellow in my neck of the woods years ago . . . tried to break into the cowboy line . . . didn't really know what he was doing . . . his answer to belts falling was to line the back with suede leather. Nobody bought them and he quit the busines so I was told. And the girdle works. My gunbelt is heavy . . . but I don't have any real problem keeping it up . . . because of the trick John Bianchi showed us. OH . . . one important thing I forgot to say earlier . . . print those pics landscape . . . full size on the paper . . . you then have a perfect full size pattern . . . cut it out and transfer it to something more sturdy. Mine is cut out of bag stiffener . . . works like a champ. I just line up the outside edge with the waist size number on the top of the back piece of the belt pattern . . . tape the two together temporarily . . . lay out my belt pieces on the leather . . . outline them . . . and start cutting leather. May God bless, Dwight
-
James . . . Here is how I make gunbelts for cowboys. Take 5 sheets of regular printer paper . . . copy the enclosed pictures with no margins . . . tape the 5 pieces together . . . shows how I make a 2 1/2 inch wide gun belt. I've made 3 inch wide . . . most guys like the 2 1/2 better. Pretty much all the info is on there . . . holler if you have any questions. This is the "technique" I got from John Bianchi's old VHS tape series a guy loaned me about 20 years ago. The only think not on here is the belt loops for the cartridges. May God bless, Dwight


-
IT IS a buscadero if it does one thing . . . the holster hangs from a loop on the bottom of the cartridge belt. That is the only requirement to turn a normal holster into a buscadero. My comment comes from the teaching of John Bianchi . . . (super master holster maker) . . . who stressed that any gun belt that was cut so that most or all of it was pretty much one straight piece . . . you just couldn't get it to hang on a buttless cowboy . . . an age related thing that happens to a lot of men. Their butt does not disappear . . . it just moves around front above the waist line . . . leaving bones and cheek skin . . . needing a curved belt to keep up the three pounds of shooting steel and 2 or three pounds of ammo from falling to their ankles every time they cough or sneeze. May God bless, Dwight
-
JamesRiley has it all correct from my understanding as well. Plus . . . I personally would never make one like that. Without the proper curvature of the belt . . . lots of the "buttless cowboys" would never be able to keep the gun belt from sliding to their knees every time they coughed or sneezed. May God bless, Dwight
-
I Tried To Make A Pancake
Dwight replied to AzShooter's topic in Gun Holsters, Rifle Slings and Knife Sheathes
I never worried about the blue gun (or green gun or red gun) popping . . . I was just afraid some day I'd get a Glock or other plastic fantastic wonder . . . and the "pop" would not be a friendly sound. I know the odds of it happening are really infinitesimally small . . . but I'm the guy who collects those small odds. Bought the Vac pump at Harbor freight . . . made the bags myself . . . sold off the rubber and dismantled the press. Haven't been sorry for a second. May God bless, Dwight