Dwight
-
Posts
5,249 -
Joined
-
Last visited
Content Type
Profiles
Forums
Events
Blogs
Gallery
Store
Everything posted by Dwight
-
Using the same pattern as the tote bag . . . make a canvas one or vinyl one using the same pattern. Cut it slightly smaller if you use vinyl . . . same size for canvas . . . on the rim of the tote bag . . . put a border . . . sew the lining to the inside of the border . . . works really well for what few I've done. May God bless, Dwight
-

1871-82 Open Top Rig
Dwight replied to JWheeler331's topic in Gun Holsters, Rifle Slings and Knife Sheathes
Good looking work . . . May God bless, Dwight PS: Glad I didn't get born into that era. Not sure I could have survived . . . -
You will have to be seriously gentle . . . but there is a product called SOFT SCRUB and it will take it off. If you rub hard . . . it can also damage the original finish . . . that's why I said be careful. But IT WILL take it off. Just don't get in a hurry . . . take your time. May God bless, Dwight
-
I don't know if it was Lobo . . . but I do recall a "drying box" thread we had on here some couple years or so ago. I built one and think I posted pictures on here . . . still have it . . . use it occasionally. Nothing more than a tall box with regular incandescent light bulbs at the bottom . . . thermostat in the door up at holster level . . . and I really like it. Using it adds a level of hardness to my dyed holsters that I don't get from my regular drying process hanging them in the shop. And it only takes a couple hours and they are DRY . . . dry. May God bless, Dwight PS: I don't use it on belts . . . holsters, knife sheaths, etc. ONLY
-
Advice needed - Hairline cracks in belt finish
Dwight replied to Windrider's topic in How Do I Do That?
Couple things, Windrider . . . one is the oil thing . . . ALWAYS add one light coat to belts and holsters especially and things like purse straps . . . suspenders . . . anything that will be flexed a lot. Second . . . I'm not "slamming" whoever you got your belt blank from . . . but my personal adventures with them is they are cut from second rate leather . . . and although I might buy one for me . . . I'd never pass one on to a customer. Too much of "premaide" blanks and stuff is cut from a less than optimum hide . . . which is of course the only way that they can be offered for the low prices they get. May God bless, Dwight -
Don't recall what it was some years ago . . . tried olive oil . . . never tried it again. May God bless, Dwight
-
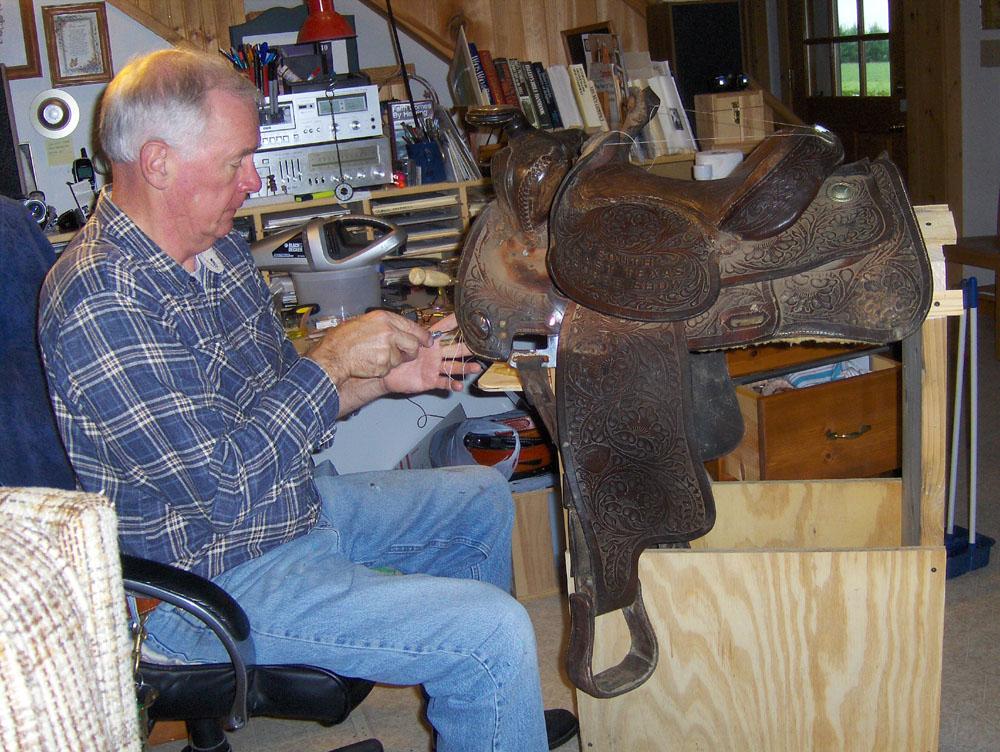
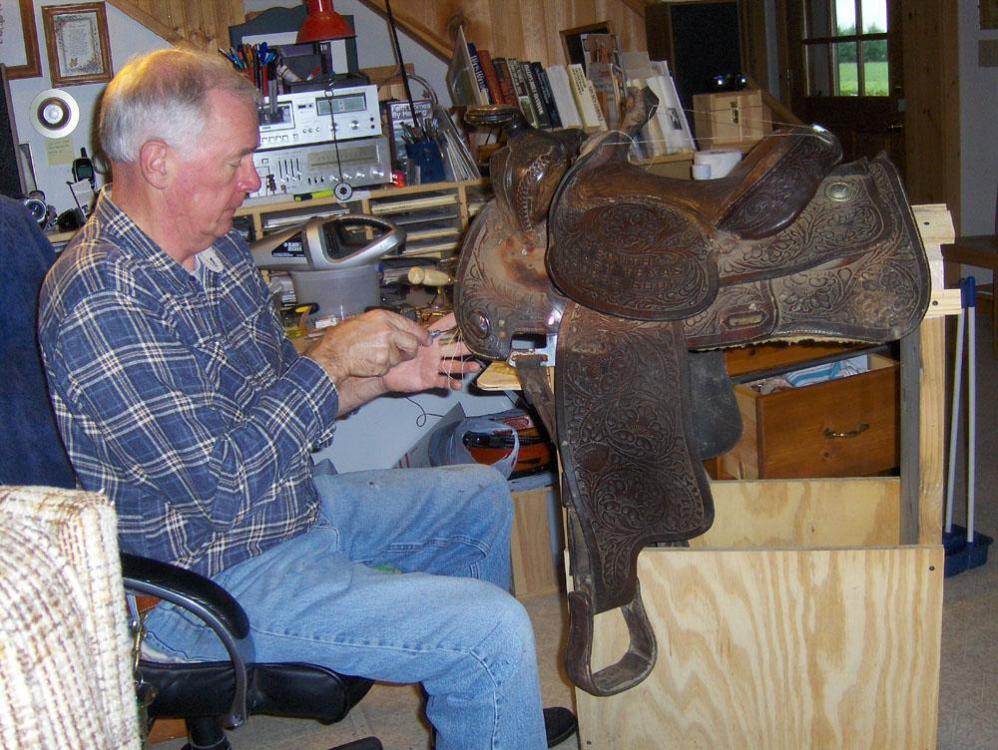
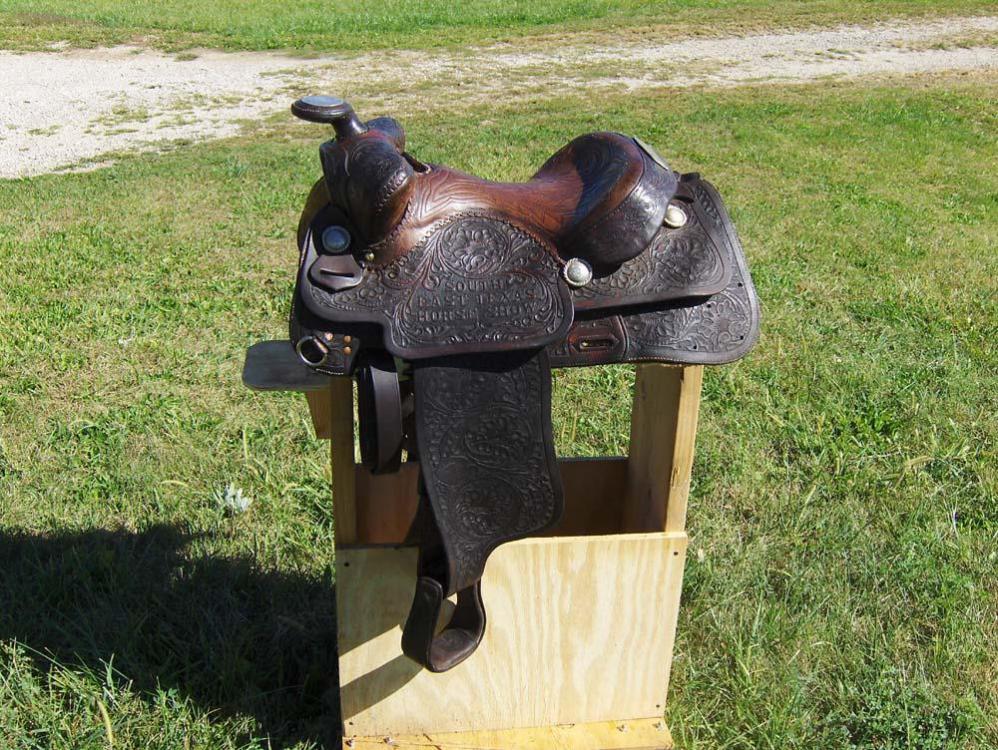
A friend had a fairly dry saddle . . . and the wool had started coming off it . . . he asked me to "fix" it . . . I had to rip off the old wool . . . leather backing was ripping all over the place . . . and like I said . . . it was a tad dry. The picture inside the house was before neatsfoot oil . . . the outside picture is after. May God bless, Dwight
-
Recurve Bowie Sheath
Dwight replied to Scootch's topic in Gun Holsters, Rifle Slings and Knife Sheathes
I don't have a picture of mine . . . but it is shaped the same . . . something in the neighborhood of 55 yrs old . . . A classmate had one back in the early 60's . . . brought it to school for show and tell . . . I fell in love with it . . . had to have one. Bought mine aboard the USS Hamner in 64 or 65. May God bless, Dwight -
The only oil I use on my leather is neats foot oil . . . and there are two products there. One is neats foot compound . . . and it has some other stuff mixed in with it. I have always been and have always advised against it . . . but rather the REAL neats foot oil . . . 100% stuff. It will supple up some dried out leather . . . and will make whatever you put it on water resistant. It is not water proof . . . just resistant. And yes . . . it will darken the product . . . but it by "being there first" will expell other products trying to invade the leather. I'm not familiar with Kodiak leather . . . but I believe if you try a small piece . . . you may find it will work well for you. Best wishes, may God bless, Dwight
-
Burnishing edges have gummy residue
Dwight replied to TangledTreeStudios's topic in How Do I Do That?
I make 2 piece belts for CHL . . . and holsters of course. I use Weldwood contact cement exclusively . . . have never EVER had a problem with it in almost 20 years. I put on a light smooth coat on both pieces . . . usually take a wire brush to any flesh side that is being glued . . . makes it stick better . . . and after the glue is put on I take my heat gun and go over it until I can touch the whole thing and absolutely NONE of it is tacky or sticky. Put it together . . . I use a roller on my belts and I generally sand the edges and then sew them together . . . then and there. Same with the holsters . . . position it . . . stick em together . . . sand the edges smooth . . . use my stitch groover . . . and sew it. Key to it all is let the cement or MAKE the cement be DRY before you try to put them together. If it is still wet . . . it'll not only move . . . but sometimes little gooey globs will sneak out and mess up your edge. One thing bad about contact cement . . . if you get it on the finish surface . . . it WILL NOT TAKE the dye. That is when I toss it and start over. Anyway . . . have fun . . . leather working is good for the soul. May God bless, Dwight -
How to do a lining for a weekender bag?
Dwight replied to panchoskywalker's topic in How Do I Do That?
No . . . you do not fasten my bottom piece to the bag. It is a friction fit . . . that way if something leaks or spills out . . . just run a finger under it and pull it out. I'm not sure I've ever known a woman who at one time or another did not have something spill in their purse or tote bag. Plus you can just lift it up on one side and the bag will then fold flat fairly easily for storage. May God bless, Dwight -
How to do a lining for a weekender bag?
Dwight replied to panchoskywalker's topic in How Do I Do That?
If I were building that bag . . . I would get a piece of masonite . . . 1/4 inch (6mm) and wrap the lining material around it . . . contact cementing it to the back side of the board. The board would be cut so it fits snugly into the bottom. Almost everyone using a bag like this will one day look down in it . . . something liquid has spilled . . . and the bottom bears the stains and maybe the stink. If it was done my way . . . the board could easily be removed . . . cleaned up . . . new fabric . . . and you are good to go. But there certainly is more than one way to skin a cat . . . this is just my way. May God bless, Dwight -
I very seldom use toe plugs . . . as I believe they are unsafe. The slightest obstruction in your barrel could send you to the ER in a heartbeat. Closed up holsters are a trap for trash . . . bugs . . . and anything else going around. I make my holsters so "stuff" should either fall thru . . . or if big enough . . . get pushed thru. Just my way of doing things. But I use Chuck123wapati advice when I do put one end . . . and I harp a bit on the new owner when I deliver it . . . making sure he knows about the possibilities of his getting hurt. May God bless, Dwight
-
Steel Belt Liners
Dwight replied to MarlinDave's topic in Gun Holsters, Rifle Slings and Knife Sheathes
Yeah and Columbus was sailing across the Atlantic before any of us were born . . . Chinese make junk . . . plain and simple . . . nothing coming out of China is worth it's weight in fresh cow dung. They may have done some good things in centuries past . . . but their leaders for the last 50 years have constantly hammered that quantity is superior to quality. I've personally seen a number of their belts . . . that I am convinced were made of leather . . . in the way we make OSB out of wood. Grind it up . . . submerge it in glue . . . and put it in a mold to make the product you want. American made leather is far superior to that ching chong china crap that's peddled for leather. May God bless, Dwightg -
My first attempt would be to stuff the boots full of sheets or towels or something to stretch that part of the leather real tight . . . then take my thumbnail and scratch it off. The same thing happens with a strop used to sharpen knives . . . and the metal can be scraped off the strop . . . would think it would also scrape off of boots . . . especially if there was polish underneath. May God bless, Dwight
-
Not really sure what you are doing . . . but almost 20 years ago I bought my Tippmann Boss machine . . . and I sew holsters, belts, and other assorted leather work with it. I've sewn leather thin enough to make sturdy billfolds . . . and I've sewn stacked leather almost 3/4 of an inch thick. I've replaced the wool on the underside of a saddle with it. It is hand operated . . . no electric needed . . . clamp it on a sturdy surface . . . and go to it. Their main plant is up in Ft. Wayne . . . go up there some day . . . ask for Ben . . . he'll take you back and show you what it does . . . how it does it . . . and will probably let you yank a few stitches. They're on the East side . . . where 30 comes into town. They've been wonderful to work with in my experience. It's a bit farther away . . . but over in Toledo, Ohio . . . is another really good company to deal with . . . and they have a great selection . . . https://www.tolindsewmach.com/ . I've dealt with them as well. May God bless, Dwight
-
If the Weldwood was a problem after stitching . . . my shop would be full of returned two piece belts. Best I know . . . never had one returned in 15 years. Only a very select few for certain purposes were single layer . . . all the rest are double layer . . . sold as CCW belts. One I got on right now is 15+ yrs old . . . pretty scratched up . . . stained . . . but still holding together . . . packs 44 oz of 1911 and more with mags and cell phone. Oh . . . keeps my britches up as well. Seriously . . . don't worry . . . here is a little video I made for putting it together. . . . https://www.youtube.com/watch?v=fOiADFuEGrE&list=UURg-Mif53wUyT8e3BoYzhwQ&index=169 May God bless, Dwight
-
Mike . . . look up front of the loop . . . you'll see what looks to me like 3 stitches . . . My guess . . . that is his technique. May God bless, Dwight
-
One part has a slot . . . the other an arrowhead shape . . . Edges of the arrowhead keep if from backing out of theslot . . . and arrowhead is tapered to a zero thickness . . . makes it look nicer than if you didn't skive taper it down. May God bless, Dwight
-
Nylon or polyester thread
Dwight replied to ps0303's topic in Gun Holsters, Rifle Slings and Knife Sheathes
No . . . my bad . . . it's braided polyester . . . heavily waxed . . . works great. hotheart10 is the seller's name on Ebay . . . May God bless, Dwight -
An excellent pattern material can be found at Joann Fabric shops. Ask them about their marine vinyl. It's a tad pricy at 19 to 25 a yard . . . but the yard I believe is 45 inches wide . . . and you can get 20, 30, 40, and sometimes 50% off (one item) coupons on the internet. It is my go to pattern material. It mimics leather in many ways . . . but can be easily hand sewn or a good home sewing machine will also sew it . . . and you can play with it all day long. I've used it for chaps . . . bags . . . gun cases . . . a little with holsters, but I don't usually need it there. Have fun . . . may God bless, Dwight
-
Rattler holster
Dwight replied to Sblades76's topic in Gun Holsters, Rifle Slings and Knife Sheathes
Beautiful work . . . exceptional actually . . . But even dead . . . dried out . . . and stitched in place. I ain't gettin' that close to no snake . . . just ain't happening. May God bless, Dwight -
From the website description . . . piece of cake. Lay out on the backside of the strap . . . holes that are 5/32 in diameter . . . the size of your bell plus 1/4 inch apart. If you have 1 1/2 inch bells . . . holes need to be spaced 1 3/4 inch apart. Use a pop rivet gun (sold at any half decent hardware store) to shove the rivet thru the backside of the strap . . . then into the back of the bell . . . pull the handlel on the gun until it breaks the rivet stem . . . and it is a done thing. Watch this little video if you've never used a pop rivet gun. May God bless, Dwight
-
Some simple templates . . . if I envision this correctly . . . it is wider at one end (or both ends) than in the middle . . . those templates are easily made and work wonderfully. Take a piece of 1/16 inch aluminum bar that is 1 inch wide . . . and at least 3 inches longer than the narrow part of the strap. Then file or grind down the middle area such as in the little drawing I have included. You then clamp it at both ends on the edge of your work bench . . . with the strap underneath it . . . put your thumb on the back side of it in the middle . . . and use a very sharp razor knife to make the cutout. In this case I believe we were going from 24 mm to 20 mm . . . so the area ground down in the template needs to be 2 mm. Once you have cut the one side . . . flip it over and do the same for the other side. If you take your time and make your aluminum template well . . . it will serve you for the rest of your life . . . barring some unforseen accident. May God bless, Dwight

-
NEVER had that kind of problem with weldwood May God bless, Dwight