LatigoAmigo
-
Posts
1,012 -
Joined
-
Last visited
Content Type
Profiles
Forums
Events
Blogs
Gallery
Store
Everything posted by LatigoAmigo
-
Engraving/burning onto leather smudging
LatigoAmigo replied to dikman's topic in 3D Printers and Lasers
The batches of this that I've made, which I keep in jars, have lasted years without turning rancid. -
Engraving/burning onto leather smudging
LatigoAmigo replied to dikman's topic in 3D Printers and Lasers
Then I misunderstood you, sorry about that. The document I posted was something I found years ago. It may have come from this site: https://whips.wordpress.com/2010/02/15/easy-braiding-soap-recipe/ -
Engraving/burning onto leather smudging
LatigoAmigo replied to dikman's topic in 3D Printers and Lasers
That is not a link, but rather an embedded PDF. It should either open or download when you "click" on it. -
Engraving/burning onto leather smudging
LatigoAmigo replied to dikman's topic in 3D Printers and Lasers
You might try applying the neatsfoot oil and dressing to the leather before you engrave with the laser. I often use this braiding soap recipe to coat the leather, and find that it helps keep the residue from penetrating the leather. Easy Braiding Soap Recipe.pdf -
As they say up in Maine, "Hard sayin' not noin." I kinda doubt if it's really leather, as it looks like a manufactured material. Maybe you could order some and see. Or provide the link and we can all take a closer look, as it is hard to tell by just looking at the photo.
-
That material is cut and layered, like rows of roofing shingles, so there is more to the process than simply cutting the leather with a laser, which results in a flat piece of material.
-
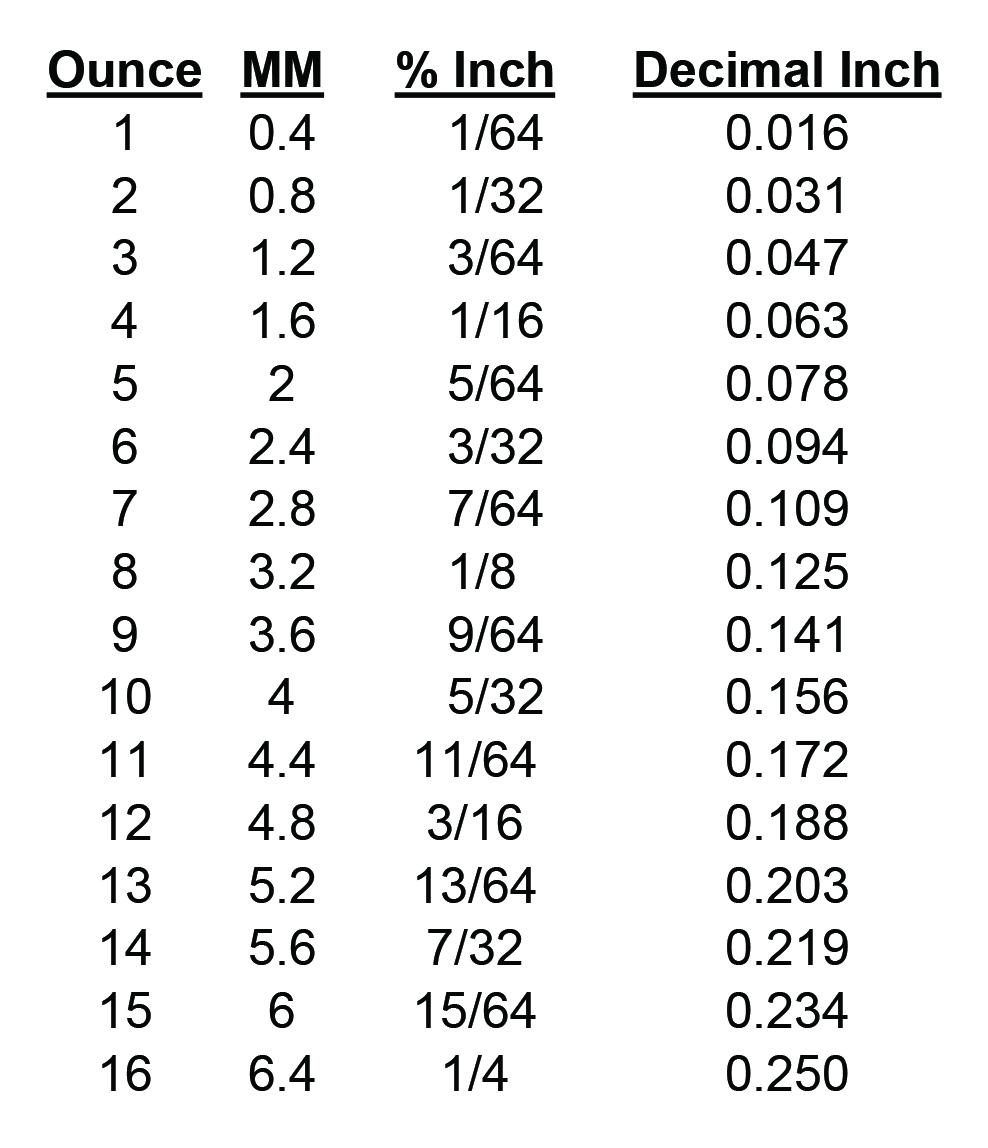
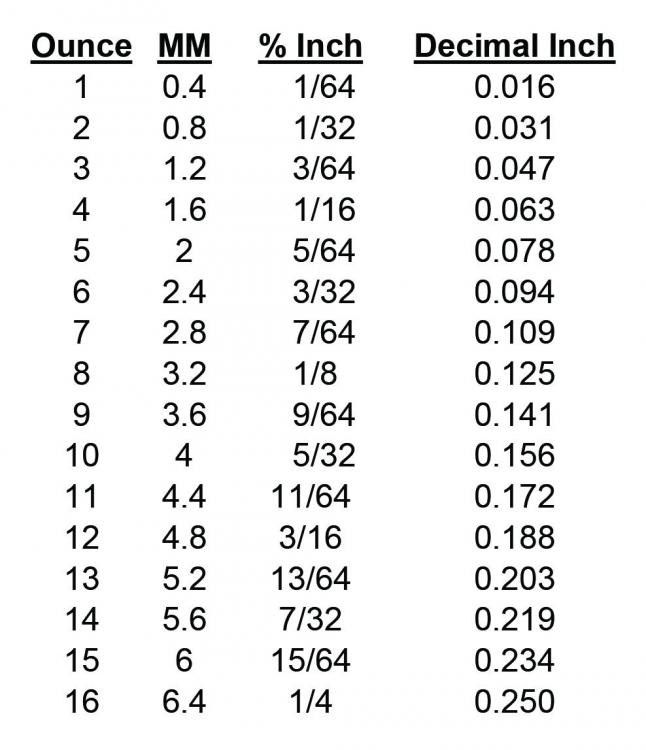
Thanks for the kind note. No problem, I saw it as a very smiley face. What happened was I converted a spreadsheet to a JPG, and when posted it appeared very large, so I replaced it with a somewhat smaller image to make sure it was not too obnoxious.
-
Here is a conversion chart for all to see...
-
That's pretty wide for splitting with a fixed blade. I have an Osborne 6" splitter and find it a challenge to split anything over 5" wide. There is waste on the leading and trailing edges, plus some stretching due to the amount of pressure necessary to get the leather through the splitter. I have see that some suppliers will split your leather down to the thickness you want.
-
I'll bet if you post a photo of your strap cutter, people here familiar with these kinds of tools might find a way to help you.
-
Buckleguy.com ... and shipping
LatigoAmigo replied to Bennyleather's topic in Hardware and Accessories
I could not agree more... but my solution is to buy in volume (usually X 10, but sometimes more), then I don't feel so bad about the shipping costs. Of course, I have a shop filled with buckles, snaps, rivets, rings and fasteners that I will probably never use, but I figure if I used it once, I might want to try it again. That rationale eases the pain. -
Buckleguy.com ... and shipping
LatigoAmigo replied to Bennyleather's topic in Hardware and Accessories
A single postage stamp costs nearly as much as your buckle, so how would it be possible to ship for less than that? Throw in the packaging, labeling, insurance, overheads, etc., and you will know that we should all thank our lucky stars that Buckle Guy is in business to provide us with all of the wonderful products that they carry. -
My first leather project
LatigoAmigo replied to KenJWan's topic in Shoes, Boots, Sandals and Moccassins
Those are FANTASTIC! Please tell me that you trained under a leather working master. I can't wait to see what else you have to offer. -
You might ask your friends at Maverick's about their goat... thin and firm.
-
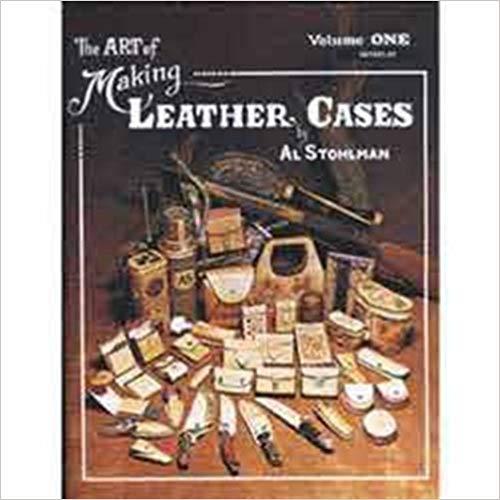
Not sure if this will be the right fit, but you might consider buying "The Art of Making Leather Cases, Vol. 1," a classic leather crafters' book, by Al Stohlman. It is available from Amazon for around $20.
-
All of my belts vary, so it seems there is no standard. By the looks of what you've done, I'd say these look just fine.
-
Saddle Sewing Machine? Need Help Please
LatigoAmigo replied to MRoyster's topic in Saddle Supplies, Tools & Trees
My hobby is printing, so then we get into the topic of color mode, which also has a impact on the file size. Changing from RGB, which is what cameras use, to CMYK, which is what printers use, has caused that 641 kB file to mushroom to 1.68 MB. -
Saddle Sewing Machine? Need Help Please
LatigoAmigo replied to MRoyster's topic in Saddle Supplies, Tools & Trees
JPEGs are funny animals. I created a black 800 x 600 pixel image in Photoshop that had a file size of 17.2 kB, a white image the same size that was 11.7 kB, and then resized a high resolution image down to 800 x 600 and it was 641 kB. Go figure... -
Saddle Sewing Machine? Need Help Please
LatigoAmigo replied to MRoyster's topic in Saddle Supplies, Tools & Trees
Would be, but sometimes you really want the detail to show up, so without doing a close-up, that calls for a higher resolution image. Maybe if it acted like an IPhone and offered various sizes... now that would make life easier for many of our fellow leather workers, and possibly allow us to see more of their work. -
Saddle Sewing Machine? Need Help Please
LatigoAmigo replied to MRoyster's topic in Saddle Supplies, Tools & Trees
The size of an image in bytes is not directly related to that image's resolution, i.e., pixel dimension (width x height), and I read once that this site has pixel dimension limits (not sure what exactly those dimensions are off the top of my head), although from a thread I just read, the size limits are in bytes, but are different for members than for moderators. Plus, not everyone uses an IPhone to take their photos. Some of us, sometimes, use real cameras, although phone cameras are quickly catching up, if not surpassing, to the quality of stand-alone camera images. -
Probably just cut a "V" into the webbing, then glued the cut edges together to create the taper. At least, that's what I would do.
-
Saddle Sewing Machine? Need Help Please
LatigoAmigo replied to MRoyster's topic in Saddle Supplies, Tools & Trees
That's one way to do it, but you don't really have control over the size, only that it can be made "smaller." -
The actual size is much larger than a standard sheet of paper. In order to print it in actual size, you will need to "tile" it, which will print the image onto many sheets of standard (8 1/2 x 11) paper that you can tape or staple together, or better yet, you can have it printed on large format paper at a place like Kinko's. When you open the file, drag your cursor to the lower left of the image, and Acrobat will display the image size so you can see what to expect.
-
Saddle Sewing Machine? Need Help Please
LatigoAmigo replied to MRoyster's topic in Saddle Supplies, Tools & Trees
It may have worked once, but is now more than six years old. Using links to display photos/images is not the best idea, but sometimes people have problems getting images downloaded to this site due to their large size. Oh well. -
Here are PDFs for the two pieces we've discussed, to your dimensions, so you can see what they might look like. I always have to make a prototype and sew it together before I cut any leather, as there always seems to be some necessary adjustments. This may or may not be exactly what you are looking for, but it has been fun for me to go through the exercise with you. I do, a Tuff Shed in the backyard, but I don't this to sell things, I just like designing. Small Backpack BackBottomFlap.pdf Small Backpack Front.pdf