


RockyAussie
-
Posts
3,265 -
Joined
-
Last visited
Content Type
Profiles
Forums
Events
Blogs
Gallery
Store
Everything posted by RockyAussie
-

cylinder machine seat/foot pedals
RockyAussie replied to Treesner's topic in Leather Sewing Machines
Yeah, I don't think I would like to have the weight that far forward. It would make it a fair bit more shaky I reckon. If you can get rid of the castors would be good. Lower and more stable and less clearance problems. -
cylinder machine seat/foot pedals
RockyAussie replied to Treesner's topic in Leather Sewing Machines
THAT is very true and I brought that up with them. It only takes a bit of angle tucked in under the table and that is how I believe all models will now be done . Steel at about 12mm thick. Yeah it is heavy and stable which is good I reckon. Not so great on casters with an uneven floor though. I have to get it onto the proper feet provided when I get space to move it into my factory sorry I meant studio........whatever. -
cylinder machine seat/foot pedals
RockyAussie replied to Treesner's topic in Leather Sewing Machines
This video should be checked out before thinking of using a U shaped table. -
Techsew SK-4 Leather Skiving Machine with Vacuum Suction
RockyAussie replied to IrwingGama's topic in Old/Sold
Do you have a link you can share to be able to see the video? -
cylinder machine seat/foot pedals
RockyAussie replied to Treesner's topic in Leather Sewing Machines
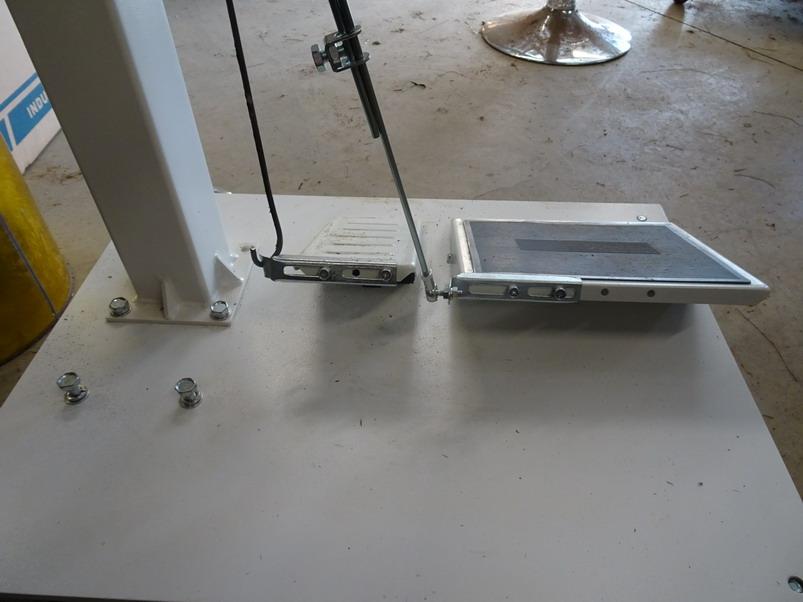
I found I ran into the same problem with the base and by moving the whole lot forward on the stand leg it worked for me. I have not as yet put in 2 front bolts. The pedal axle on yours is different and may present a problem doing the same thing but moving it forward did help a lot for me.


-
Very good effort. Maybe you can do a roller and flat that has enough of a recess to clear the feed dog and go under the feet. In out in with perhaps 2 or 3mm up in the out.
-
Very good to hear you have it solved. Thanks for the update. Now we get to see some of the work you can do with it I hope.
-
Best beginner sewing machine for making leather goods.
RockyAussie replied to RockyAussie's topic in Leather Sewing Machines
@suzelle The recommended needle range is 18 to 23/160 which means that the thickest thread should be 138 (20m). This is limited because ...1.to have the hook not have to be changed left or right between the thread ranges 2. the needle hole in the feed dog starts to get small if wanting to go to a larger needle. I have done a trial with 207 thread in a 23 needle with tension high on top and low on the bottom and can get reasonable result but not perfect in my opinion. A size 24 or 25 needle would be better but then I would need to slide the hook carriage back a touch and drill out the needle hole. This means the hole would then be undesirably large when wanting to do fine thin or soft stuff. If you had a spare feed dog then it would take maybe about 5 minutes to change it over. Pretty simple. Whether you needed to move the hook back closer for the thin needle stuff I don't know. If you know what your doing that would take another 5 minutes. If I get time over the next couple of weeks I will load up a video showing it stitching to maximum thickness (10mm) and at maximum thread as is. If 10mm or less but conditional as above. No. If you check the video you will see where I show that the 69 Adler has the typical binder type feed that it only moves on the one level back and forward. The tang out the front side would make it not possible. -
I will chase it up with them asap. They are doing an Ag show this week so I would expect it will take a few days to sort out. Good tip, sounds a lot easier than cutting up a coke can to shape One thing at a time. Lets see the video with the feet down sewing first. Make sure the stitch length is very close so that the foot is near to the middle of the throat plate where it will be touching. Another thing I thought of....Being a new machine it may be possible that the shuttle race body is not fully seated at the back. One little bit of paint in there scratched off when assembling could be the cause. I have had one recently that was very tight to move and I had to do quite a bit of fine sandpaper sanding to get it smooth enough to move as it should. I also oiled it up when I finished to improve it.
-
They do have some shims over this side of the pond but I am thinking that the distance piece in this case is already too thick for the needle size so would require a thinner distance piece. Push to shove getting the distance piece reduced by a bit should work if other options were not available. I know that when going to a lot smaller needle size that it has been possible to use a coke cut to shape to make a slim shim to get the hook a bit closer. If the op wants to give me the thickness of his distance piece I could do a check with the dealers here to find out if a thinner one is available.
-
As @kgg said a video showing without the needle plate in place might help. I will load up the manual I have that shows what is called a distance piece which comes in various thicknesses to set the hook closer or further away from the needle. They normally come with a standard piece that suits most needles and I do not know if it is possible to get a piece that is a better thickness for your needle size or not. Look for the page that says Hook driving shaft components and see the part 17-23. CB4500+Instructions+&+Parts+Catalogue.pdf This video done by member @Uwe shows some of this part quite well. (He always does GREAT videos) At the end of it all I am not sure if what you are seeing is all bad or not and a video showing without the needle plate would help I think.
-
Best beginner sewing machine for making leather goods.
RockyAussie replied to RockyAussie's topic in Leather Sewing Machines
It is a copy of the Juki 246 if you search that maybe. I have to admit I have been pushing hard for a couple of years to get the dealer here to get me one in. Probably will not show up on the Hightex site for some time yet. There is a couple on order to Australia at the moment and maybe some more if this video can stir them up. -
This is my latest video which shows the best sewing machine I could recommend to any beginner wanting to make leather goods. It is capable of fully sewing most products we make at Wild Harry. I hope that this helps anyone starting off wanting to make high end products like we do. Check it out to see the machine and some of the products being made.
-
No I have a couple of other options that I can use for my line of goods. A Cowboy 6900 = (CB 1341 in the US I think) and a Cowboy CB246 which is the smallest size cylinder arm in the range. If I did not have them options though I would design my gussets to use the holster plate ground down I think. I hope to come up with another cross breed version but that will be awhile away yet I think.
-
I might have to have a look into it. It sure would help at times. I think I just got into the habit of slowing down when I see the smoke forming. I make a habit of slowing down as I reach the last 6 inches or so because if you stop while it is smoking it will burn through for sure. I found by slowing down slowly I get away with it. Another thing that seems to help is running the thread through a felt kept wet with oil. That helps to reduce any glue coming up and sticking to the needle as well.
-
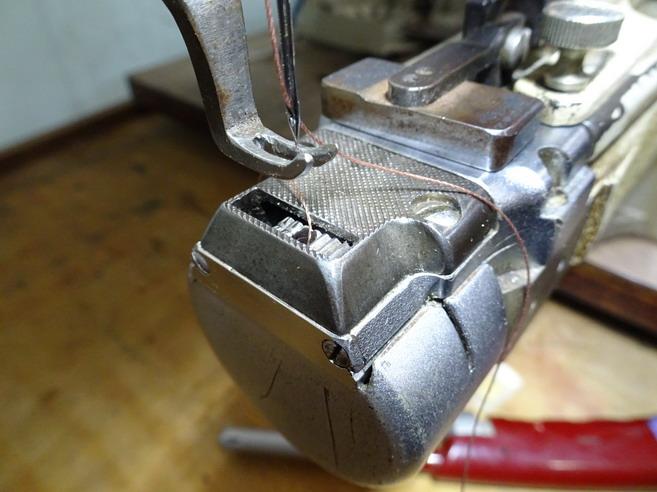
The thread is a metric 40 (TKT69) and the needle is an 110/18 schmetz. Shuks now ya gone an got me all embarrassed. Truth is mate I couldn't use half of these high tech machines even if I wanted to.
-
Very frustrating loss of bobbin tension mid-stitching, help!
RockyAussie replied to medion's topic in Leather Sewing Machines
I am thinking that after you lift the presser foot you are at the same time having the tension discs open up which then do not come fully closed as quickly as they should. Try and see if there is something catching the little rods that opens the discs or the rod that pushes the plate that opens them. Might just need a bit of oil.On the other side of the machine check if the parts that push that little rod are not moving as freely as they should as well. If all this gives you no joy....try lifting out your needle until only the tip is in place then only partly lift the presser foot and then do your turn. If you have the needle positioner on your machine you may have to disable it first. -
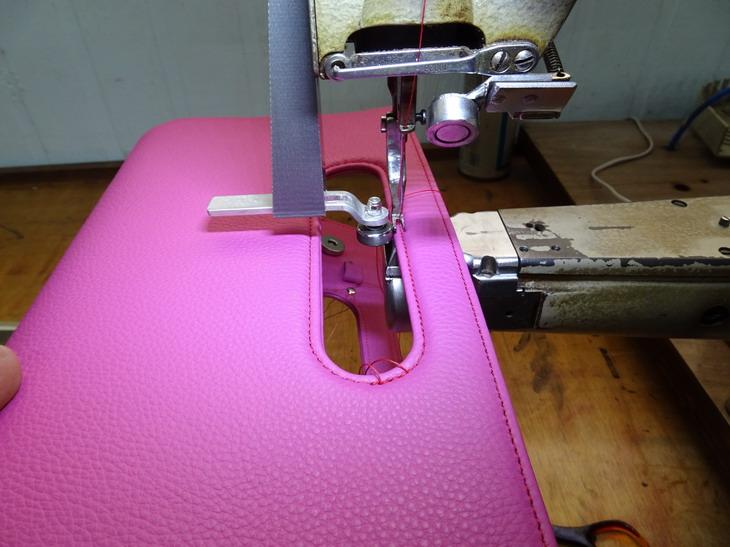
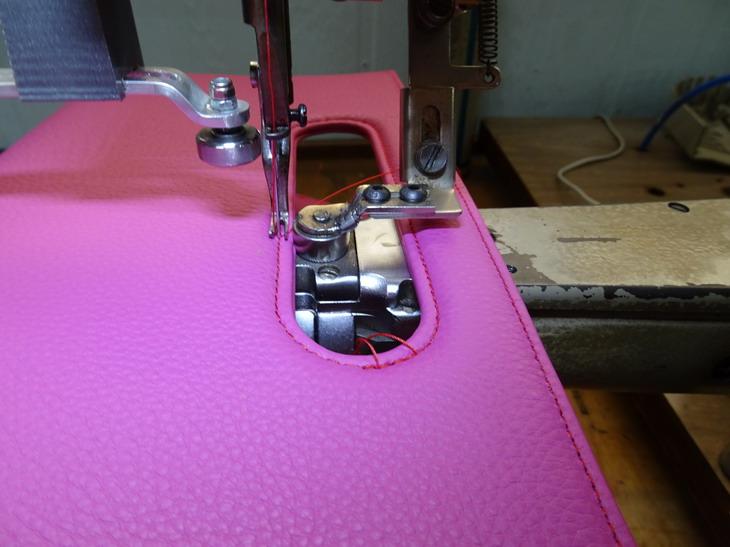
The guide used in that video has enough play in the screw holes to be angled that way. Many other guides may need to have a little more work to achieve the desired result. An example is the roller guide set up on my Pfaff 331 which I have replaced the roller with a 1/4" piece of flat. This is probably where I first found that I could get this effect because when I first tightened the screw to hold the flat it wanted to feed the work away all the time and by setting it in at the back I then found it fed the job into the guide. This shows the roller as original And this as modified which gives the flat to work with and an angle if I want it. note you can see the angle goes in closer at the rear. Sometimes though a roller is still better at getting into things like this bag handle A bit of 3D printing involved with the left guide in this case. Just thinking now I should go and try my new tall post machine on this job. It might do it all in one go. @alpha2 you may be able to change your roller over as I have done in the pictures above. As long as you can get the bolt to hold nice and snug I cant see why not. Dammit ....now I gotta go an do one for myself.


-
This is a short video showing how I set up my sewing machine guide before I start stitching. A guide that is not set up well can actually make your job want to veer away from the guide and the results can be a wobbly stitch line through to even running off the edge of your work. This video shows me doing belts but the same set up can help on many other projects as well. This video is also the first in a few videos I intend to do showing off the capability of the Cowboy cb246 sewing machine and how most of the products we make at Wild Harry can be made using it. I do believe it to be an ideal first machine for anyone wanting to make small leather goods such as wallets and purses and handbags. Please consider liking and subscribing to my channel if you find the content to be worthwhile. Oh yeah and SHARE
-
Do you have any pictures that show the gussets you want to stitch that you could share? AS you have previously been alright with rounding the throat plate etc I would consider looking at the holster plate instead of the stirrup plate as you don't need to take out the feed dog then. The holster plate could be ground down (rounded) a lot closer to the needle hole slot quite a bit without any loss to the back foot holding power. Have a look and see what you think anyway. It looks to be chrome plated the one I have here which may mean an all over the top clean up perhaps.
-
My first carved holster.
RockyAussie replied to dikman's topic in Gun Holsters, Rifle Slings and Knife Sheathes
That would have been one scary stitching exercise for sure. Remembering to open the stitch length on the last quarter 1/2 turn while trying to keep the line true and tension right. Congratulations. -
Does this Hobbs meter thing tick up the hours when the power is on? If so that may be partly a good idea so long as people remember to turn the power off. Sometimes with these new servo motors its hard to remember that they are still on. I tried a cheap rev counter thing once and it was a dismal failure at keeping up with the machine. Your welcome. Hope I get time to do some more soon.
-
Techsew 5100 Binding attachment?
RockyAussie replied to Runzeigrun's topic in Leather Sewing Machines
The binding tape type can make a world of difference here. Weave that goes straight across and looks like gross grain will work better. Try some leather instead as you may find it better. -
For any of you that may be reading this and have bought a set please check this post out if you have not already done so which shows some adjustments you may like to know about -
-
Sounds like a great idea if you can find out how. One of my tecky staff purchased a phone that can pick up and show heat differences on things and I would have to guess that any bush or bearing surface would likely show up more if it was needing to be oiled more urgently. I an sorry to add that in my opinion that as far as I have seen in most manuals and videos a great many points that should be lubricated do not get shown. For instance why do you think that most presser bar adjustment screws have a funnel shape at the top? Seems to me that it acts as a bush for the presser bar to go up and down in and the engineers thought some oil should go down there. Maybe a bit hard to put red paint there so some of the manual writers though lets skip that one. Same with the needle bar on these machines which often has a rubber cover over the hole. How dose oil lubricate that shaft if you don't put some there? Take some time out to look for every moving surface on your machine and know that in most cases it will need to have lubrication at some time or other. Some parts rarely and some like the 2 I just mentioned a lot. How long and how well a machine operates is in YOUR hands at the end of the day. (2 to 3 drops minimum per hour in the shuttle race). It will sound quieter and smoother.
