RockyAussie
-
Posts
3,265 -
Joined
-
Last visited
Content Type
Profiles
Forums
Events
Blogs
Gallery
Store
Everything posted by RockyAussie
-
 Had one come in to be retimed last week was getting that way. They had not oiled the hook for 6 years among a whole lot of other parts. Good thing that the parts are able to be replaced still. Yes they had a manual ...just did not think unless something was wrong they would needed to look at it.
 -
132k5 Help needed to adjust clearance between needle and hook
RockyAussie replied to Damas's topic in Leather Sewing Machines
You worry to much. The bushing is there for the shaft to run in not for the hook in any way. Even if you ground it on an angle and did a butchers job it would not matter as long as you get the clearance your looking for. It should not be touching the bush anyway. -
132k5 Help needed to adjust clearance between needle and hook
RockyAussie replied to Damas's topic in Leather Sewing Machines
Why not just sand a little off the back of the hook now you have it off? -
Techsew 5100 back stitch problems
RockyAussie replied to ZacharyR's topic in Leather Sewing Machines
Very good point there @Wizcrafts No accounting for experience and thank God and you we have this forum to help and gain assistance with these issues these days. Might have to have a look for some good instructions on loosening the spring pressure on the check spring yet. Lets hope not for now. Good to hear. Now tell me ...can you see any reason to change back to the standard set? I have not yet myself. I get messages nearly every day asking me how much the narrow foot needle plate set costs and I will take this opportunity to say that due to different costs of postage around the world it differs but as most sell into the USA the cost all up is $110 US anywhere there. If you are after a set you can pm me on here and please leave me your full postal details and an email to send the invoice to and I will get back to you normally with in 24 hours or sooner. -
Techsew 5100 back stitch problems
RockyAussie replied to ZacharyR's topic in Leather Sewing Machines
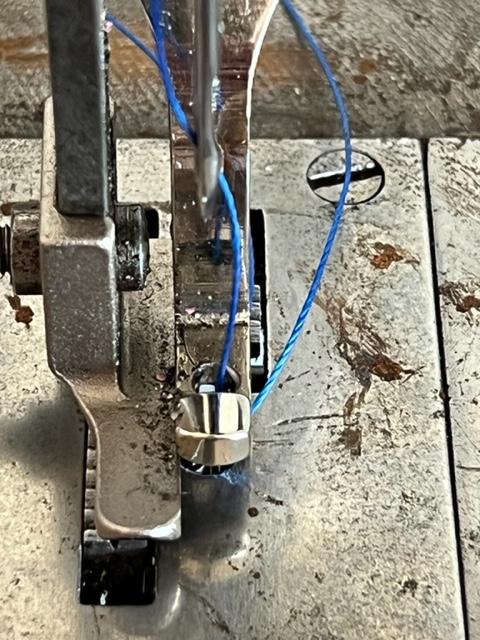
Posted yesterday Zachary. The smallest leather point needle be it 794x4 Dia or Lr or S will only go down in size to 23. Anything less will be a fabric round point needle. If the leather is soft/spongy then it can be easy with a fabric needle for the thread to miss the hook due to the elastic nature of that leather. Try using the size 23 needle with the #92 thread instead as the holes don't show much on soft stuff generally. The tension will need to back out a few turn on top. With these very long needles a fine needle is super easy to deflect away from the hook with anything but the most practised hands doing the job. The hook spacing from the needle is generally set up for the larger needles and if you want to stick with the smaller threads then you may want to get a fine shim spacer that moves the hook closer to the needle. Ask the seller there first and if no luck get back to us. I am fairly sure Jess has some in stock. Question......are you using an open toe centre foot? -
Thank you @Constabulary that helps a lot. Yes I did remove the 2 screws that hold the bar 97730 in place among others. I think I am going to have to find a replacement arm 97729. The 3 pins on it allow the whole set up to move enough for the feet to collide. Probably going to be at that unobtainable place I think. Thanks again . Sorry for hijacking your thread @shadowryder. . I should have started a 132 K6 post of my own.
-
@Constabulary here is a couple of pictures of the areas where I think something may be missing. Would it possible to take a picture for me to see on yours?

-
801-1 Skiving Machine Sharpening Problem
RockyAussie replied to VIIXCIV's topic in Leather Machinery
Glad to hear good news. -
Thanks @Constabulary. The machine is here now and the most recent owner seems to have no idea what oil is and what it does. BAD wear on a lot of the wear pins. Late now so I will load a few pictures tomorrow. I think that may be a part missing as well. Oh and yeah the centre foot after a good struggle getting it off turns out to be some piping foot. Lots of wear marks on it from rubbing the other foot.
-
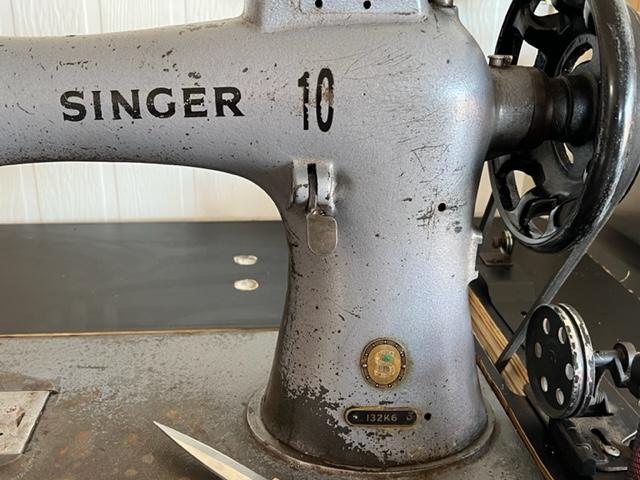
Hi @Wizcrafts Are all the 132 K6 machines walking foot models? I am just doing some homework on it as I have one coming in for repair today. Looks like in a move they may have bent the outer presser bar in enough to touch the inner foot which in turn leads to the odd miss stitch. Only dealing with pics and vids as yet. The metal shavings on the top of the presser foot note.The 10 on the side is what is throwing me at the moment. Broken thread guide before needle as well by the look in above pic.-

-
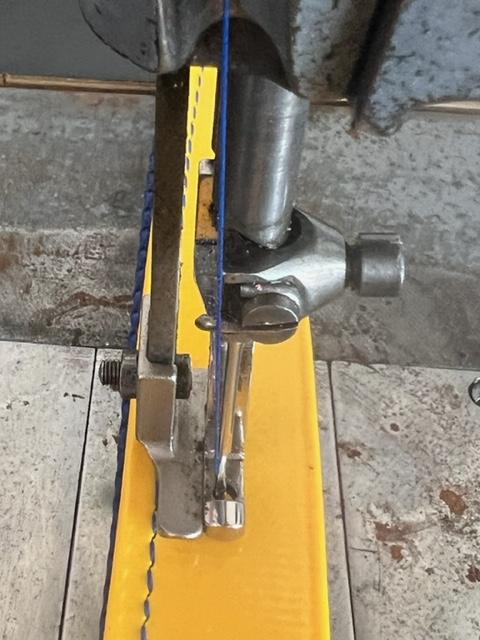
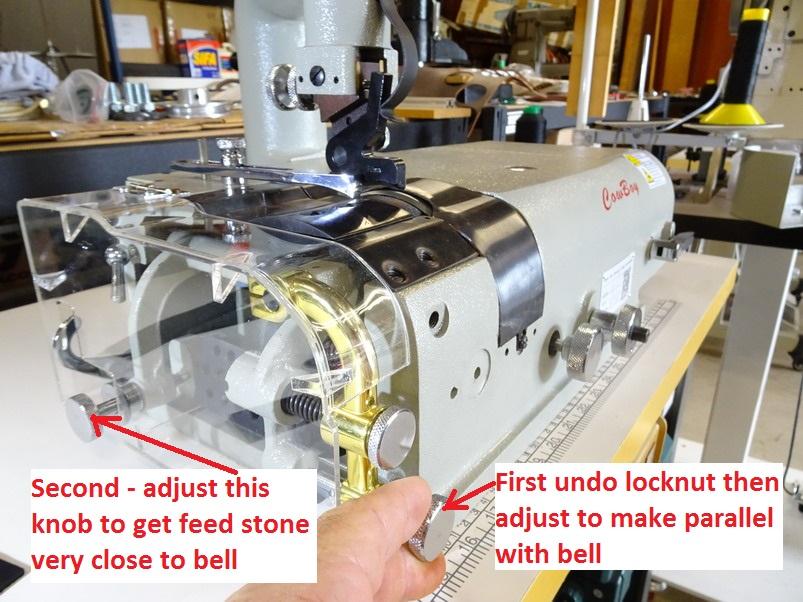
Lighter spring pressure (the hook thing on the side) will let the leather push the feed stone down more easily so in fact it should skive out more. That could mean that you may then need to raise the presser foot up so as to not take out too much when you run the leather through. You could do all that but you should be able to see by eye fairly easily as in the picture of mine compared to yours above. If it gets too close to the bell with the feed running you should hear it quite easily. If you let it do that too much it will ruin the edge of your bell and the leather will always want to dive in and cut holes in your job. That said I often will let it touch very very lightly for a couple of seconds if I am cleaning up a heavy burr after a heavy sharpening. Crocodile has bones in it sometimes around the flank areas and that can take a good chip out of the bell edge which then takes a fair bit to sharpen back to level again. I am not sure if your edge is sharp or not but as I said do a video of the leather running through and I may be able to advise from there. A bell is NOT sharp if the leather wants to pull back away from you when it is being fed through. With soft leather if you push it up against a blunt bell or a bad presser foot or too tight a spring presser it will concertina up and that makes it chop out hollows and holes.
-
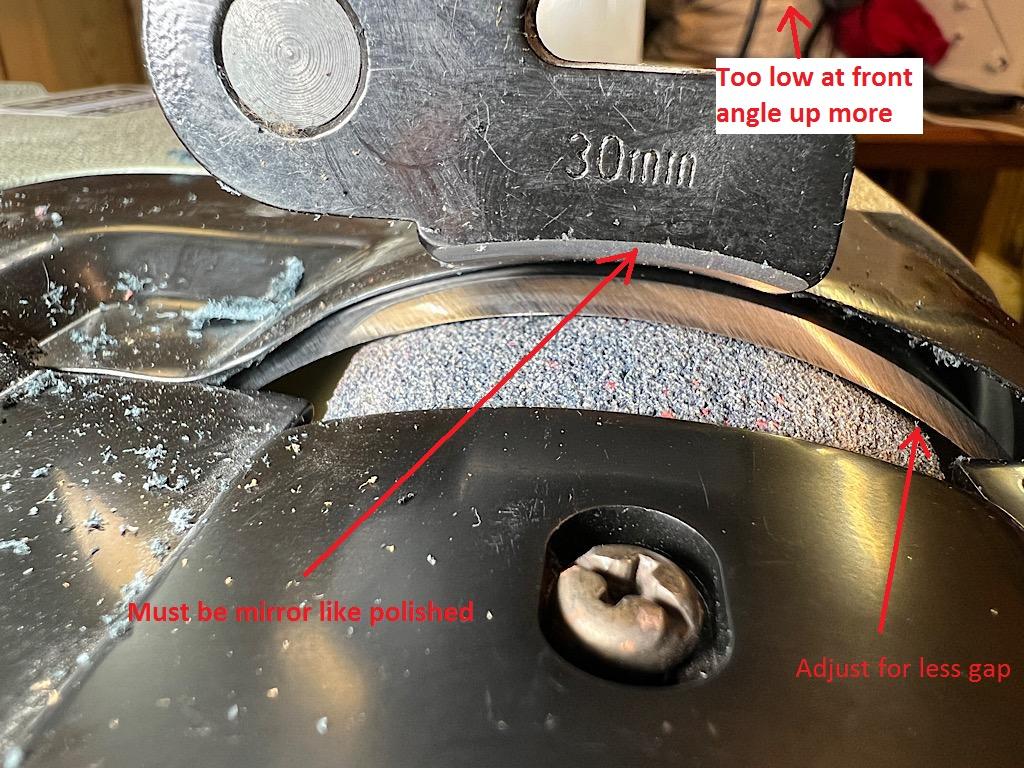
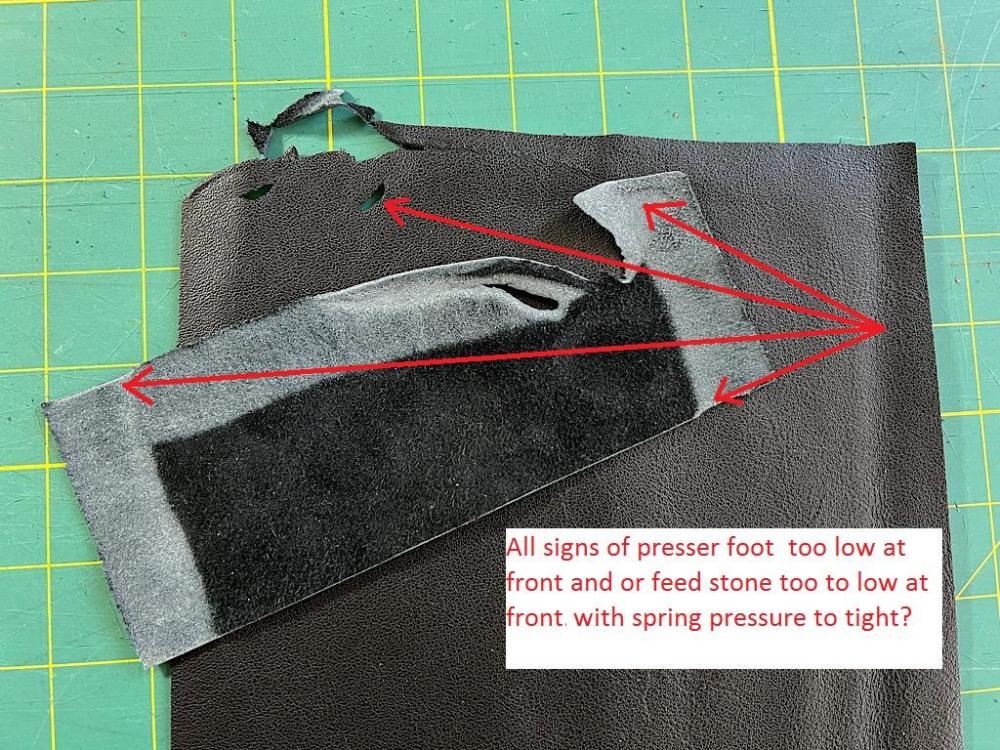
A video of you prior to feeding and then feeding in some leather would help. For now I think that your feed stone is too lowly angled at the front. Your presser foot is angled down too much so that it cuts in a hollow more so than the outer edge. Your presser foot has been shaved and perhaps not polished enough. First up here is an edited picture of your leather sample above This picture shows that your feed stone has too much gap at the front - Mine for you to compare - Showing what to adjust- turn front knob clockwise firstly in your case.

-
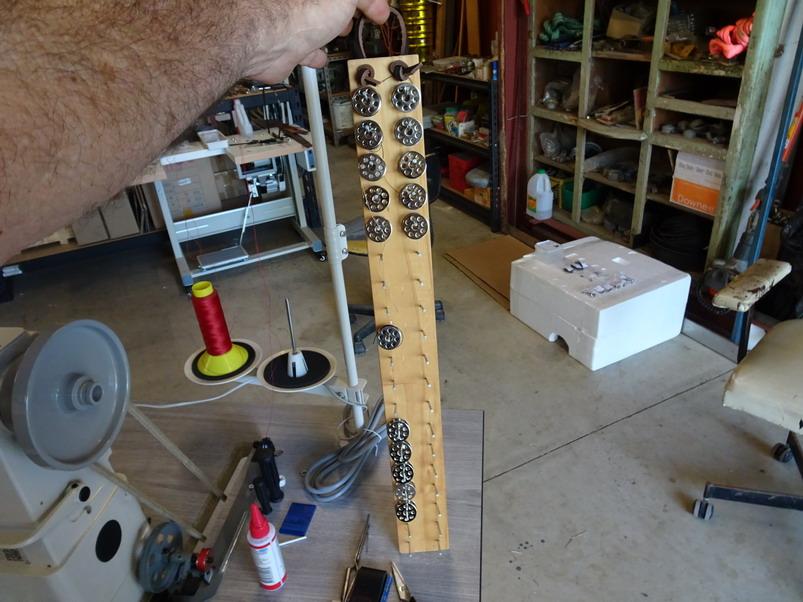
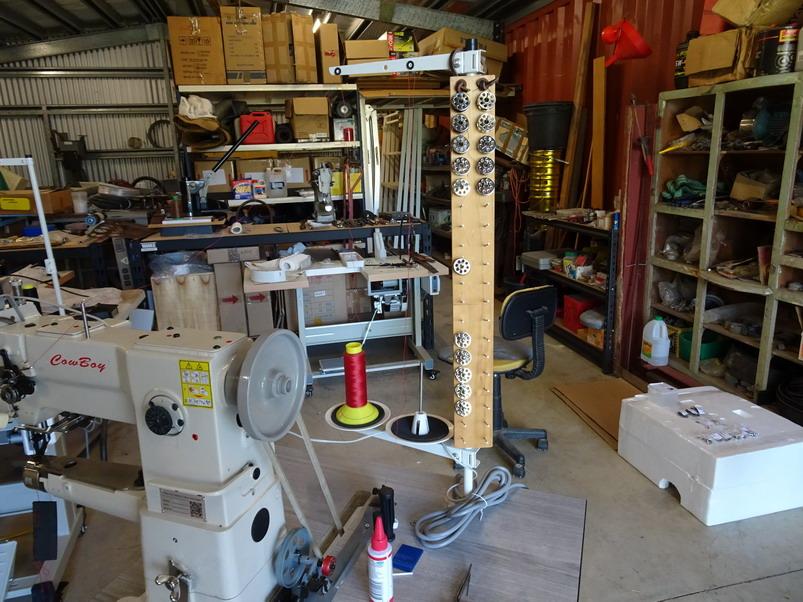
I am with you on this mostly but I have to say this new idea for holding my bobbins I am very happy with. I have done a few 3D printed bobbin holders but I don't like them on my table top either and with different machines I have in the past had to get loaded bobbins from different machines. This one gives me 19 pairs (38 total) of bobbins hung conveniently close and easily moved from one machine to another. Taint pretty being wood and nails but here it tis - Hangs on the thread stand.
-
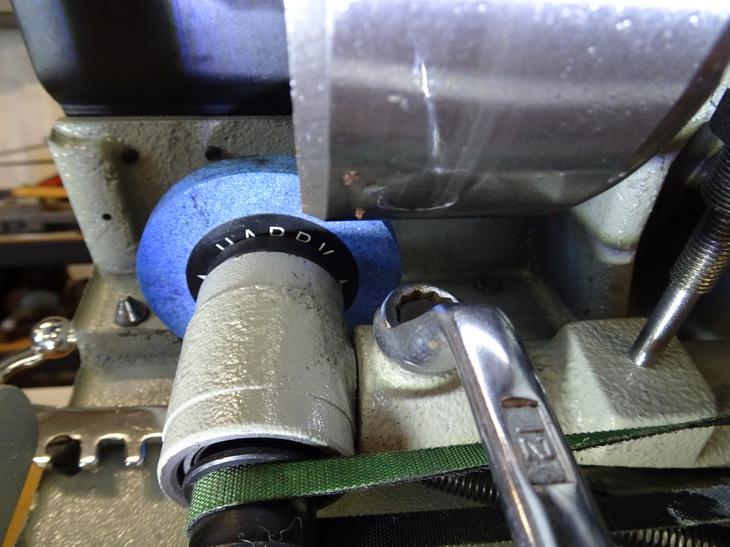
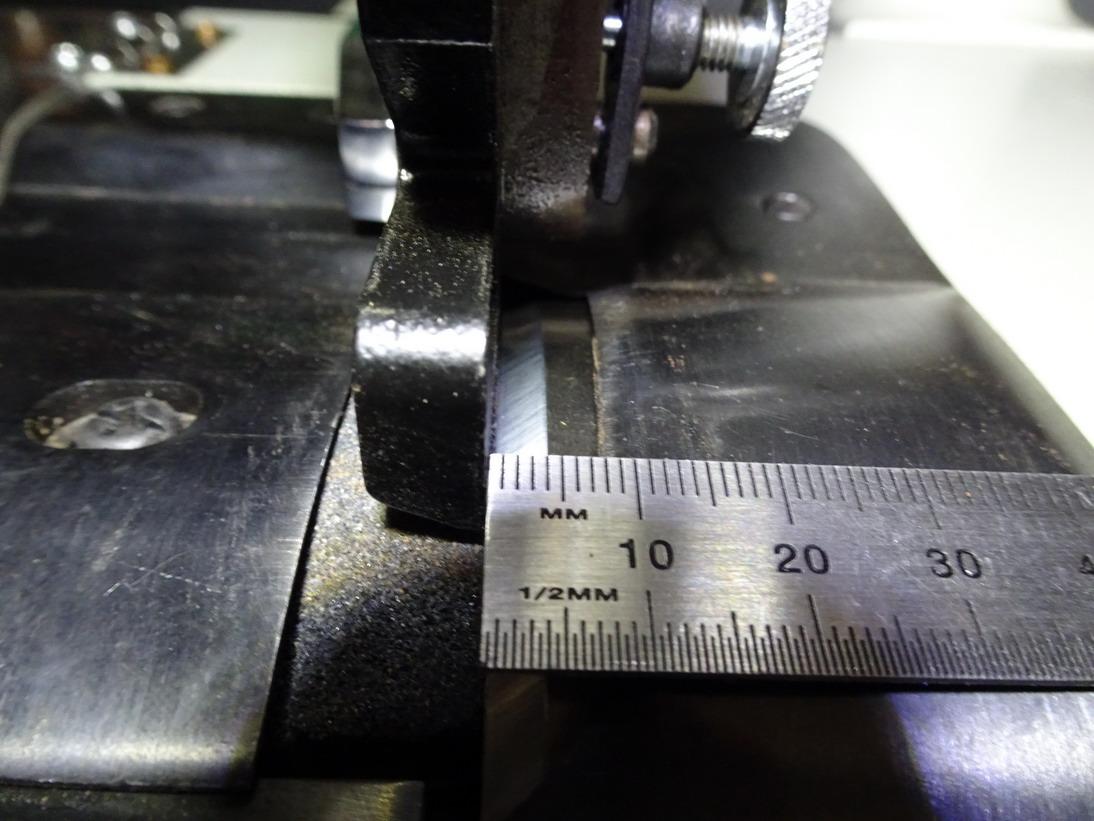
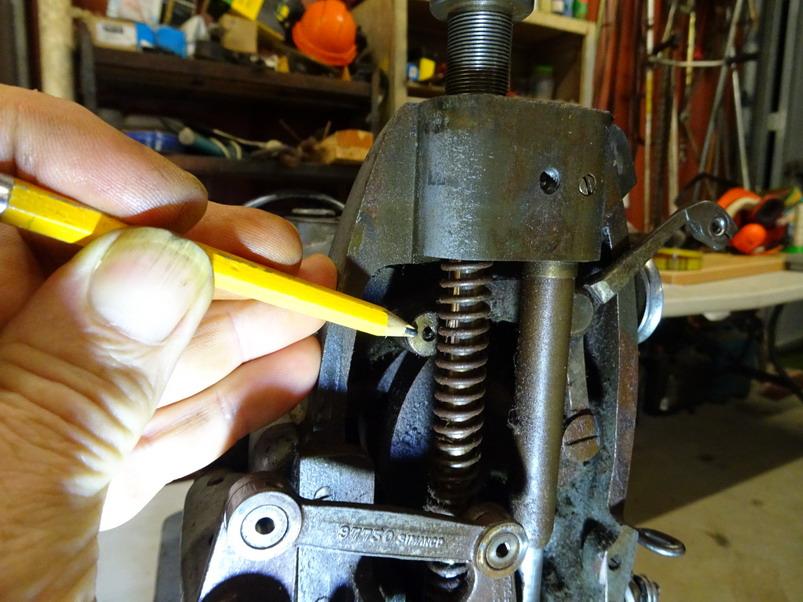
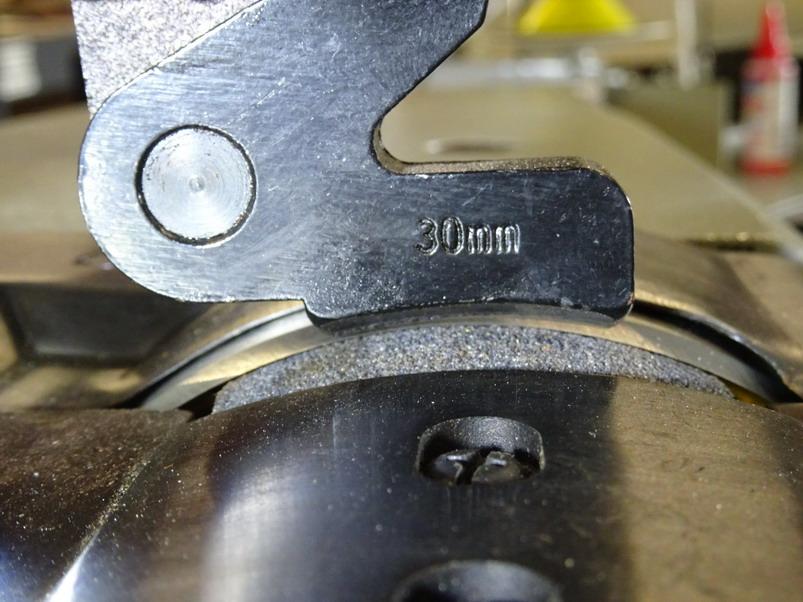
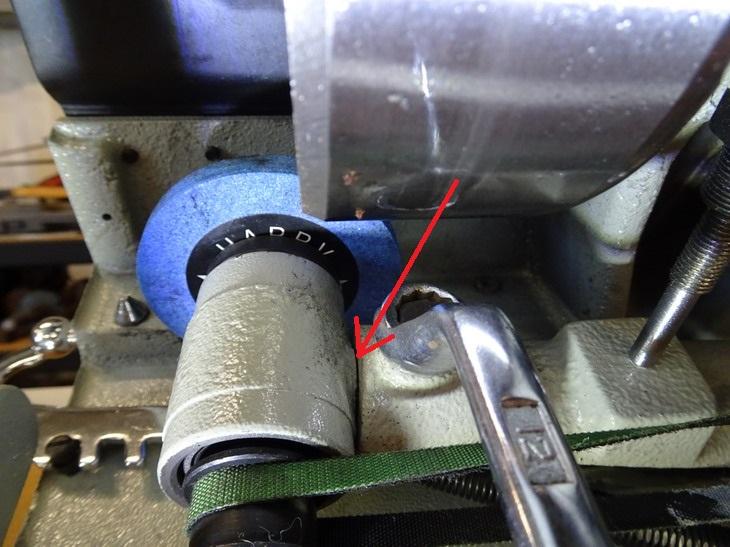
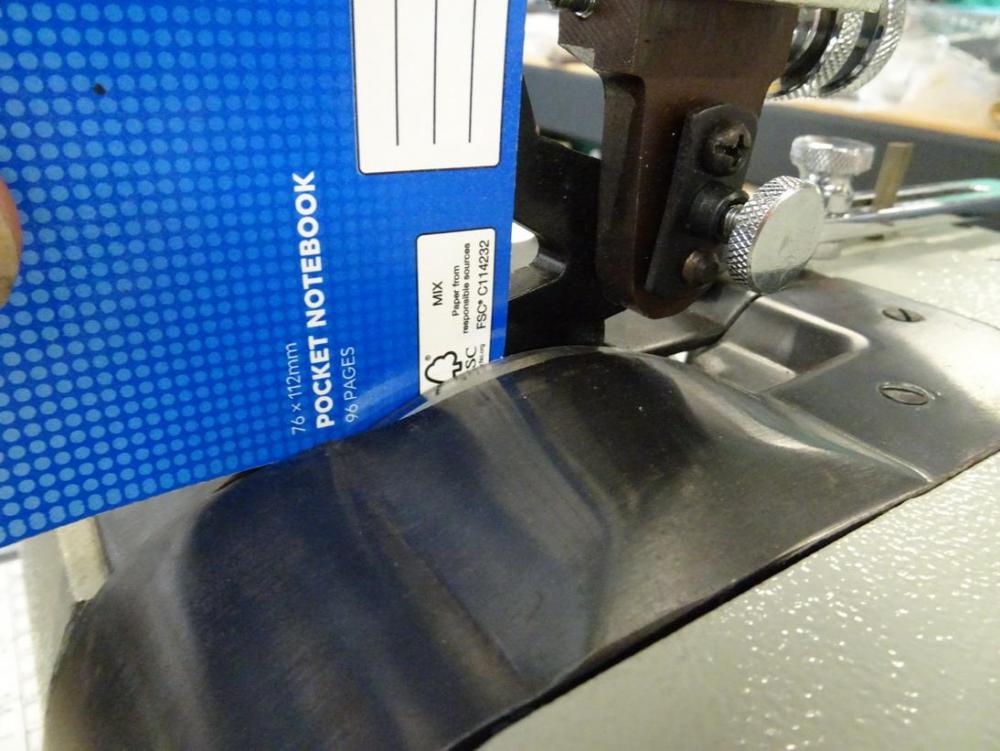
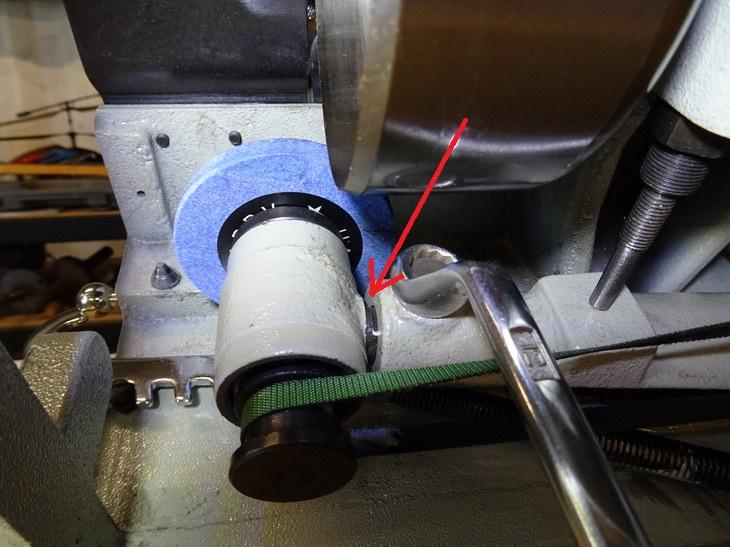
I have decided to add this bit of info in now due to a few occasions that I have had to post it in other locations. You do not have to move your bell back and forth to sharpen you need to adjust the sharpening stone location. With a 12mm spanner you can loosen the bolt that allows the sharpening stone shaft to be moved in or out as in this picture below. Note the red arrow shows where you can see the shaft. Move it in or out as above until you get more of a full across the edge sharpen on your bell edge. I recommend for medium to soft leather a gap of .3mm from the bell edge to the presser foot. This cardboard note book cover is .3mm thick For hard or thicker leathers it is best to move the bell back to around .5mm and for very thin skiving on soft leathers move it in to about .2mm. For most skiving you should end up with around a 4mm bevel as shown below.


-
801-1 Skiving Machine Sharpening Problem
RockyAussie replied to VIIXCIV's topic in Leather Machinery
First up I am thinking that your sharpening stone is not properly clean. If you have a look in this post I did recently you will see a link to a video I have done showing the sharpening process. You will see in that how there should be a fair amount more clean sparks coming off as the blade is sharpened. Next up - You do not have to move your bell back and forth to sharpen you need to adjust the sharpening stone location. With a 12mm spanner you can loosen the bolt that allows the sharpening stone shaft to be moved in or out as in this picture below. Note the red arrow shows where you can see the shaft. I suspect yours is adjusted way back as shown here - (move it out as above until you get more of a full across the edge sharpen) I recommend for medium to soft leather a gap of .3mm from the bell edge to the presser foot. This cardboard note book cover is .3mm thick For most skiving you should end up with around a 4mm bevel as shown below. Be VERY careful not to let that rubber feed to ever touch the bell edge with it going as you will most likely wreck it.
-
Could be right there. Hope I reach that status before I get to my 70's though.
-

-
Your welcome. If by how much leather, you mean how much Croc skin ....it would have been 2 croc skins around 42 to 44cm. Over here they measure croc skins across the belly from the 3rd scoot down across. Some places measure across the widest part of the belly.
-
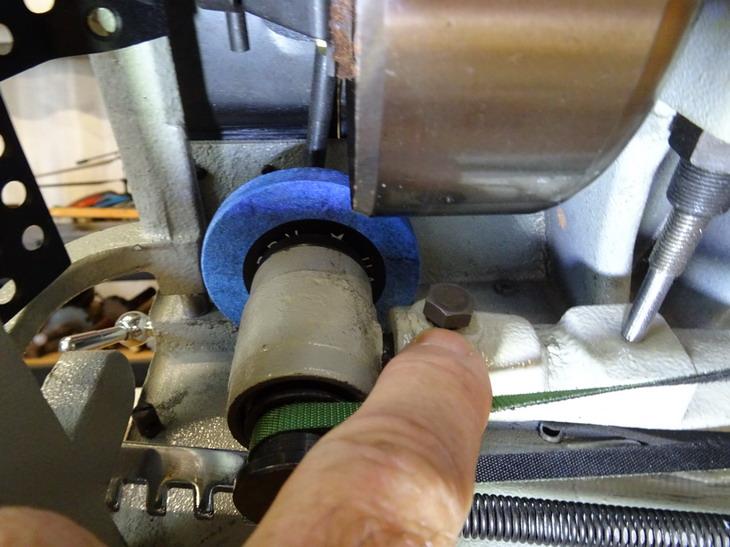
With some leather they have a loose top surface and that generally runs through in the same direction through the hide. This I think is something that is caused at the tanning stage when the put the skin through rollers to apply coating or to soften and break up the tension in the hide. To the left in your picture above you see a saw cut appearance and that is a sign of a small chip in the blade. The chopping out like that is most likely the top loose skin moving as it tries to feed itself through. The skin top gets pushed back by the presser foot and that creates an extra thickness that then gets pushed down into the blade cutting all the way through until that thick bit is gone and again and again until you get back onto firmer leather. Its a bitch yeah I know but it can be less of a problem with a roller presser foot. Also less spring pressure on the feed. Also some wax polish or silicon spray on the top to reduce the friction of the foot. ALSO a VERY sharp blade. Run a piece of medium temper leather (DO NOT ask me to explain that) through VERY slowly. This sort of acts like you are stropping the edge by smoothing out any rough bits from the sharpening stone. If your bell drive is not separated from your feed that may not work so well. Please post some pictures of your machine if you keep getting any more problems. Mostly where the spring adjustment pressures are and feed stone to bell relationships are laying etc. ( everyone goes through this at the start so do not expect that you will get it all right from the get go) Last thing...on soft leather make sure that you have a wide bevel on your bell edge as in about 4mm from the presser foot edge as shown below. Any less and the extra pressure required to push the leather through will give you more chopping out as well. If the blade is sharp and you don't have about 4mm then you either need a new sharpening stone that is bigger and rounder or you need to move the sharpening stone back as shown in the pictures below. The bolt to loosen Note the gap below is about 2 or more mm. Here the gap is fully in but I would not move more than 1mm to start with on a fairly new sharpening stone Make sure that the stone is squared up to the bell edge when you tighten it. Disclaimer.....if you cut yourself or whatever else whilst doing this ...............someone else wrote all of this. BE CAREFUL around sharp or hot sh.t OK. .


-
Ha Ha I was hoping that you might get to see it. There is a LOT more info I will need to add as I can find the time and hopefully I can make them better without all the background noise involved. This video is only a starting point and many other settings need to be explained yet . Thankyou @suzelle Thanks Wild Bill, very kind words. I hope following vids get better. Doing the editing and adding words and such in Corel video studio is taking a lot to learn for me Keep in mind I have been using these machines for nearly 30 years. Each machine type has its own peculiarities and some settings like spring pressures will vary somewhat. Many people when things start going wrong make the mistake of tightening these spring pressures up and find that the machine just keeps getting worse. Be careful not to bevel the inside of your bell when sharpening as this will encourage the leather being split to bite in and skive out too deeply. Thick and stiff leathers need a little tightening adjustment (second or third notch normally) and sometimes even a little bit of back angle on the feed stone if after a heavy bevel skive. Softer leathers you will get the best results by having minimal spring pressure (first notch on the outside normally), a very sharp blade and the feed stone at a minimal distance from the bell. If you want VERY thin leather then set the bell (.2mm) from the presser foot like as I show in the video . For very thick leather take the bell back so that you have a .5mm gap. With leathers thicker than 3 mm and you want to do a heavy skive try doing the skive in 2 stages instead.
-
Here is another link that shows some skiving I do with a bell skiver when making crocodile belts. Not part of the series but shows what can be done with one in a production setting.
-
Regards to the attachments, I hope you have not wasted tooo much time looking. I designed and made them myself with my 3D printer. If you get a machine and want a set or any particular size let me know. On the price...you will find quite a surprise with shipping and remember that the dealers normally go over and fix up any electrical issues and the like. With regards to the finger guard and safety...That is a very thick piece of acrylic on mine if you look and to make it easier and quick to change over I offset the bolt holes so that I only near to loosen the screws and turn and pull the guard off. Any which way I reckon they are pretty good value.
-
Many leather workers will go on to own their own bell skiver at some time. For most at the start these machines are very difficult to learn how to use and the instructions that come with them are generally not very good. Most video's I have seen to date are full of bad information often made by very inexperienced machine operators or dealers who don't have a clue how to use them. Some of these are well done video's and by charismatic people that look good if you don't know what you're seeing is so wrong. My video's are very rough as my life is making leather goods not making video's. If you can stand to watch your way through them you will see that the results I achieve with the bell skiver are way in front off the other 99% you will find out there. Skip to 15 minutes in if you want to be sure of that. ( A properly set up skiver does NOT need you to pull it through at all) This video shows you the first most important step in using a bell skiver and that is how to sharpen the bell. Remember to follow my channel if you want to see more. I hope that this series will go on to help some of the very talented people out there that are struggling to learn how to operate them. This video series is being made to go along with a manual I am making for the bell skiver and it will have references to these videos within it. Do me a favour.......hit the like button on the youtube and share it around.
-
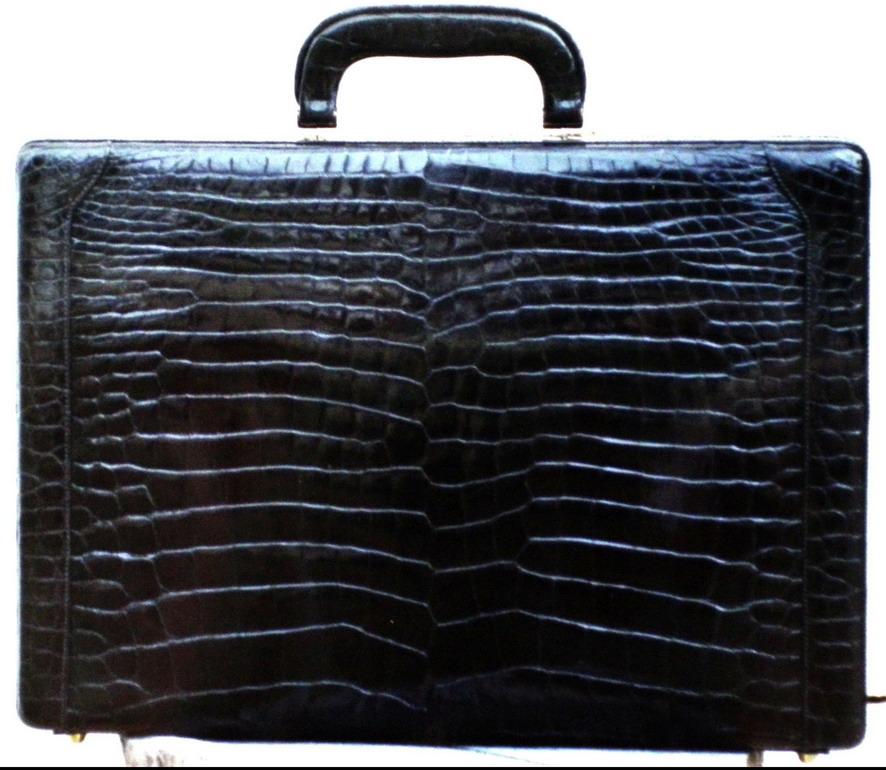
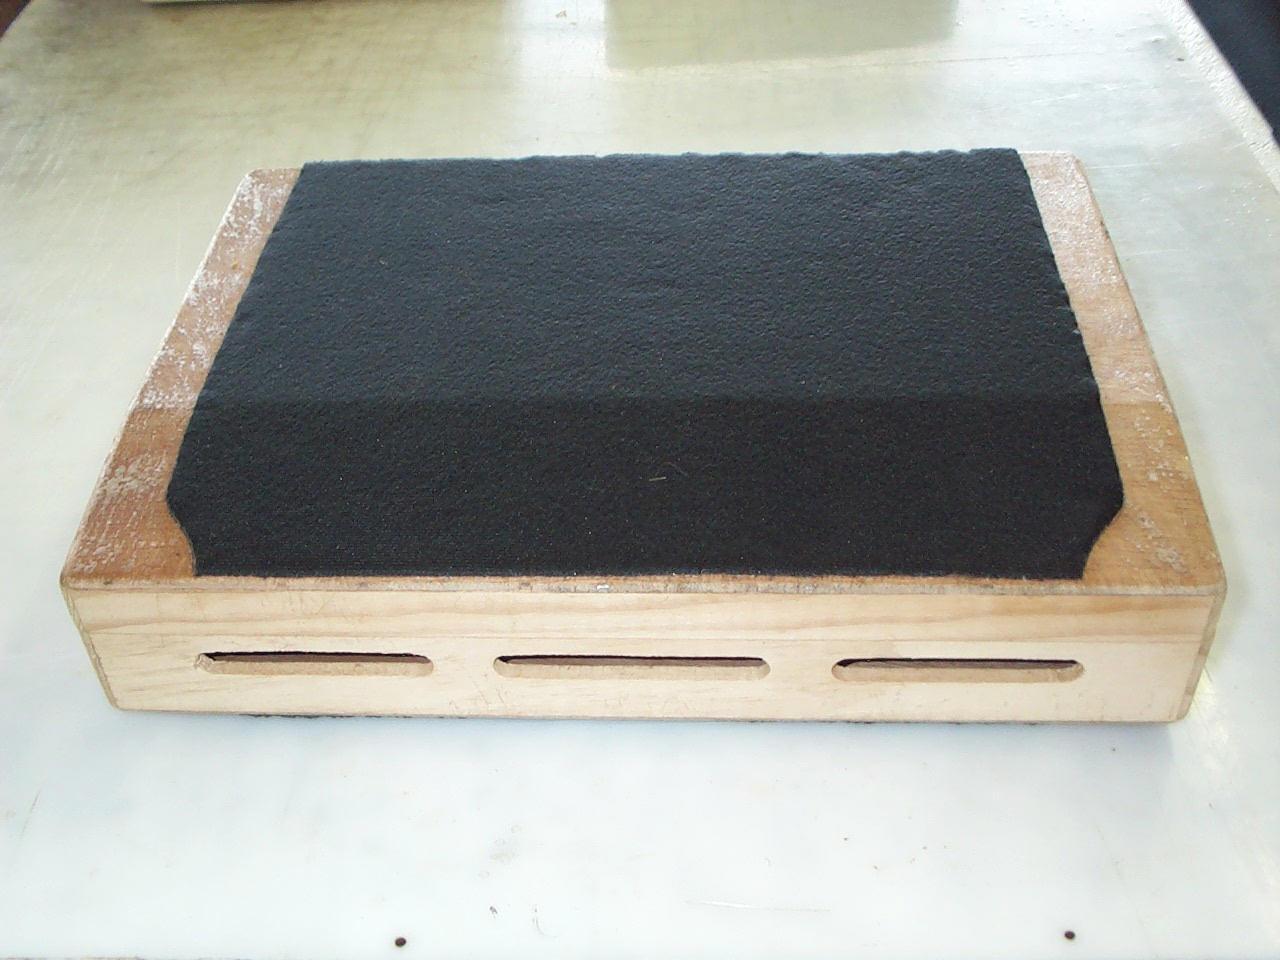
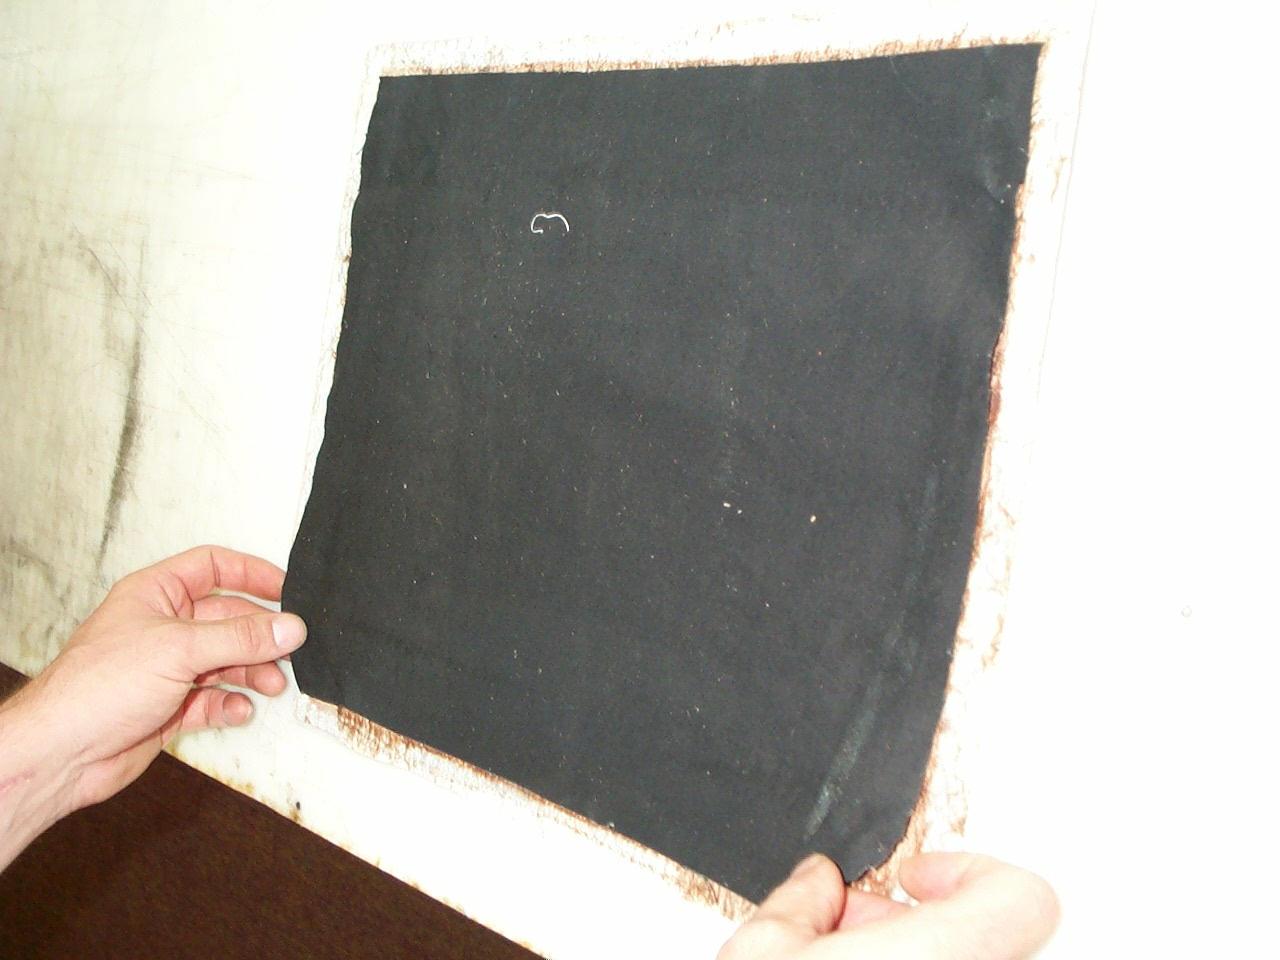
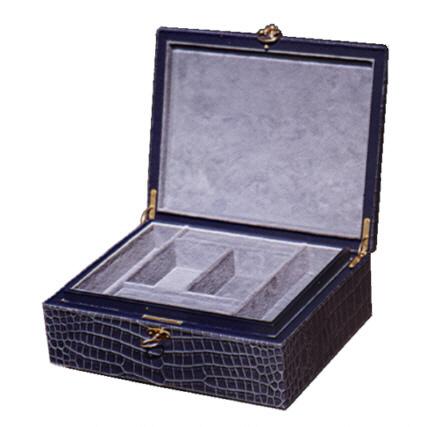
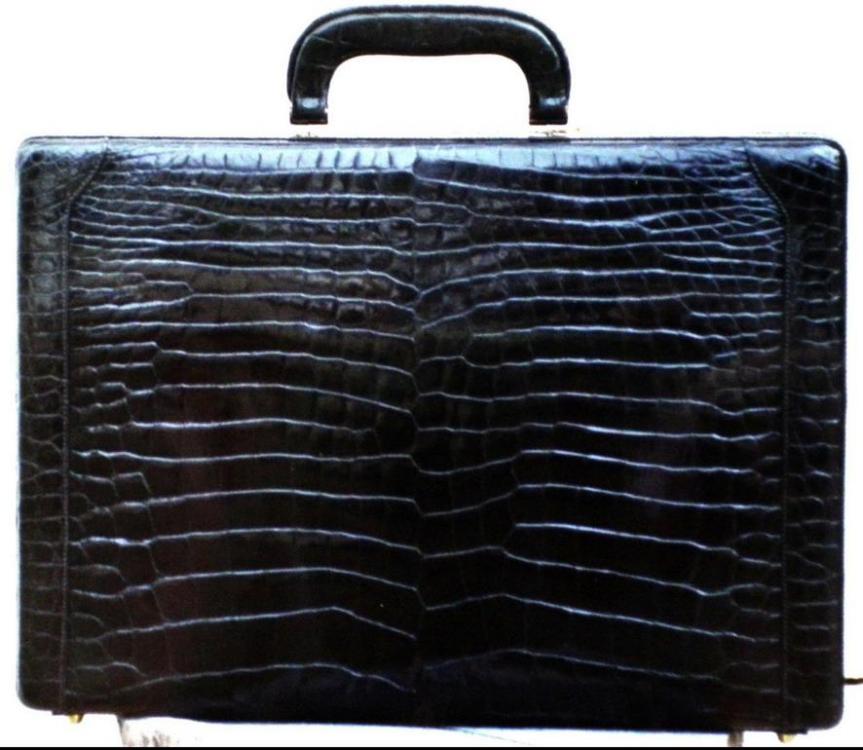
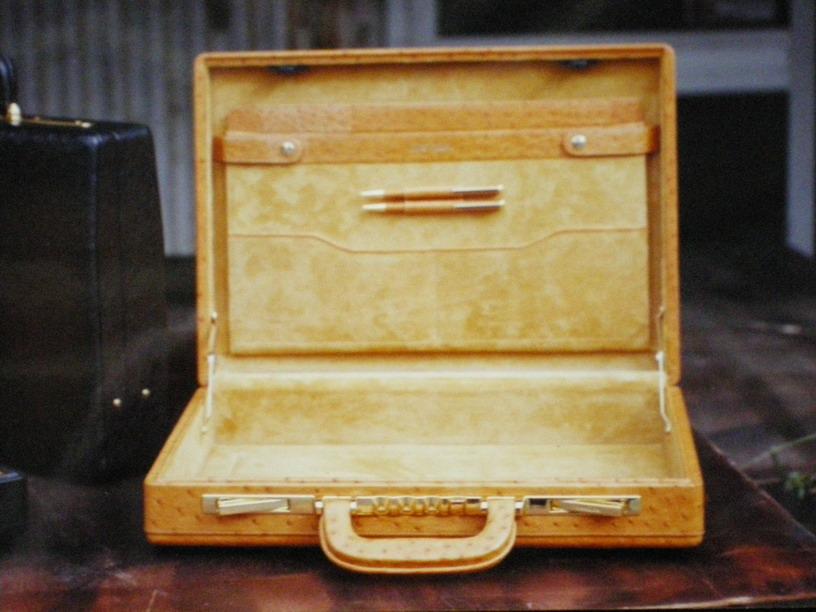
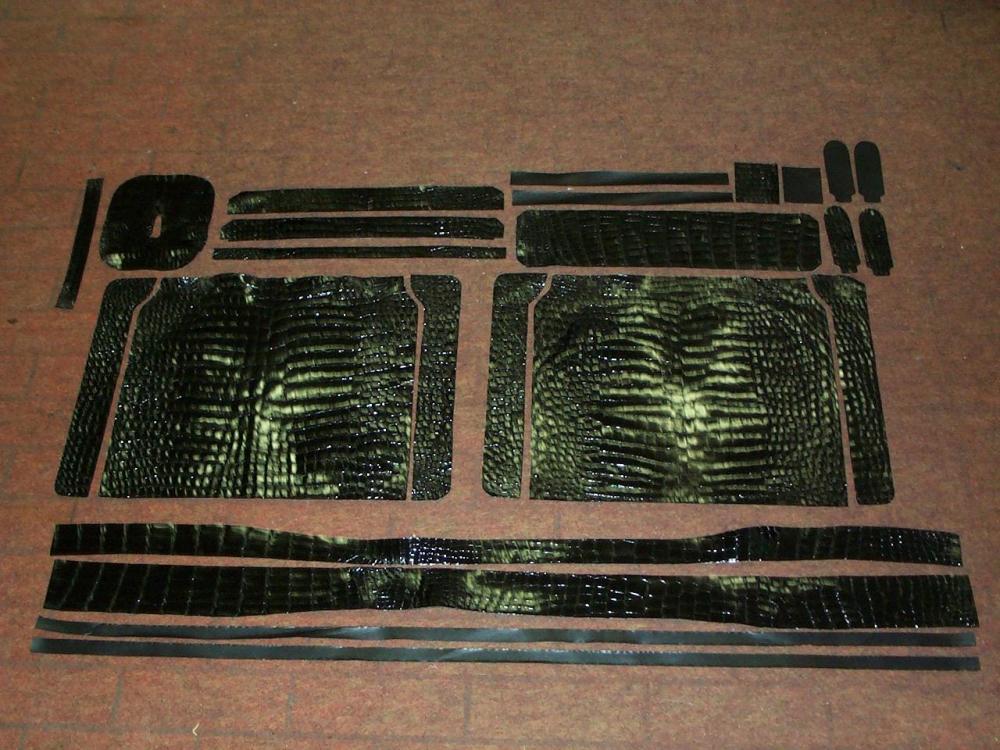
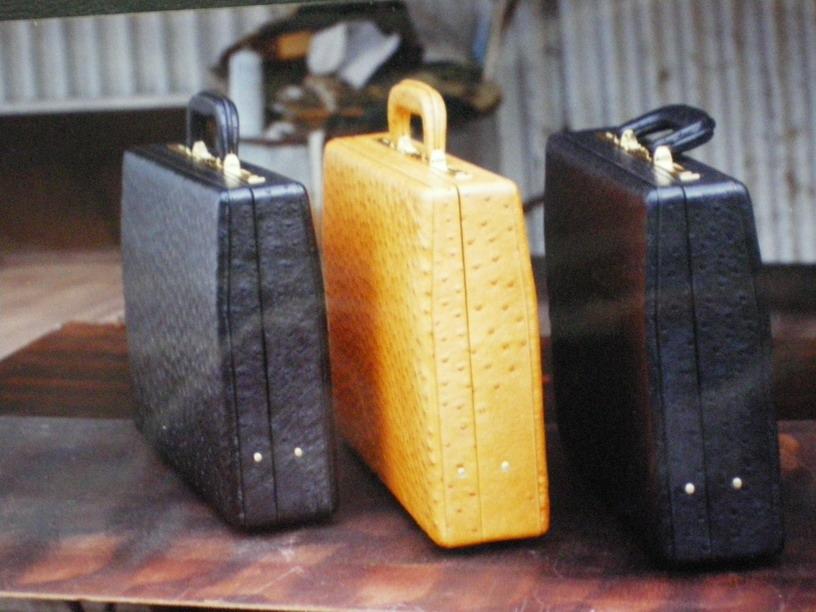
@hickok55 I got your pm and for the benefit of other members interested I have answered you here. Yes I work a lot with croc and produce a wide range of products with it. As to the question of veg or chrome it does not much matter but most croc that you think is veg tanned is often partly chrome tanned to speed up the process and then finished with a veg tan to give a better colour depth to the finish. This is particularly true when the skins have to have a glazed finish. The chrome tanning also helps to reduce shrinkage. Croc skin is quite suitable to attach to many different things be it metal, wood and plastic and so on. That said a few things that have to be taken into account when using crocodile skin is that it comes from a round shape animal and the stretch has a tendency to go up and down and wherever it likes. To overcome this on pieces that are large or from near elbow areas it is common practice to glue a fabric to the back to stabilise the stretch. What fabric chosen will depend on the end use and the size of the finished product as well. Quite often on large sections a padding is used as well to give a better feel to the product. These following pictures were taken a while back and the quality is not so good but they should do for now I believe. This jewellery box has the top done with a foam padding attached to the box followed by the croc attached over the foam and down onto the side edges. The sides are then done by attaching the croc to a thin cardboard and folding the edge then wrapping around the box to attach over the top and base. In this briefcase example it is a little similar Here you see some foam attached to the wooden box frame I made on the lid and back. This shows the cut out croc pieces used to make it Here I am attaching a fabric to make the croc sit right and note that the fabric does not go all the way out on the edges. These 2 pictures although not croc use a fairly similar process as well and show the briefcase better than the croc picture I have above. Hope that helps for now. Brian


-
In the start of your short video above the cutting edge of the bell looks like it is very rough and probably the sharpening stone is not in the correct position. It may be too far forward perhaps and making it sharpen on the very edge of the bell only. I would have to see some pictures of the machine from underneath to be more sure. From under the machine with a 12mm spanner you can loosen this bolt to allow the sharpening stone to be moved further forward or backward to change the bevel angle where the sharpening happens on the bell. A little forward as shown in this picture would be best for heavy leather and would produce a steeper/blunter angled bevel - For softer leathers a longer angle is better as shown in this position.Note that the shaft is further back. This adjustment also helps to maintain a wide bevel when the sharpening stone wears away and needs to be moved back to keep the wide angle. After you have finished sharpening the blade fully you should have a bevel on the bell that measures about 4mm from the presser foot as shown in this picture below. (Note: roller presser feet require different settings to these.) I have loaded up a video for now to help you see how to go about the sharpening process. I may not be a good video maker but if you would care to look at about 15minutes in on the video you will see that I can get a bell skiver to do its job a lot better than 99% of the other less experienced video makers are capable of. There are a LOT of videos out there on this subject and a lot of untrue information in them as well. Follow the steps I show in this video and you should get good results. I will make a few more on how to use these machines occasionally so subscribe (follow) me on my youtube channel if you want to see them.