


RockyAussie
-
Posts
3,265 -
Joined
-
Last visited
Content Type
Profiles
Forums
Events
Blogs
Gallery
Store
Everything posted by RockyAussie
-
I have one here and use it fairly often. For the money they are very good value. I have made a few video's on them you can see my channel and here is one if it helps -
-
There is quite a bit that does not look right in this video. Why are you not using a guide to start with? Secondly, the edge of the bell knife looks very rough and I would say that has not been through the sharpening process properly. I am concerned that the sharpening stone is not in the correct place for your type of work as well. They can be adjusted to do longer and shorter bevels in the way they sharpen the bell and yours may be way too short. I will take some pictures tomorrow of a few places I would like you to take pictures of to help me see what is wrong. I will try and get a short sharpening video done as well. These machines can take a long time to master as they have a lot of variable adjustments to do what every job you want it to do.
-
Make sure they see your video because I think you have been making the screws tighter. They may need to use an impact screwdriver. Pauline... why are you wanting to take out the bell? It does not look like it has much wear if any. Normally you can get them down to about 25mm before they need to be changed.
-
@vovo I don't have a machine like that but do a fair bit with sewing machines. As far as that foot lift lever ....does it lift the presser feet or not? Normally this part would not affect the presser feet action other than to lift them. Unfortunately I am up in the Rockhampton area.
-
The 277 thread and the 25 needle combination should be correct. That said some threads I have have gotten from some suppliers varies quite a bit from another supplier. 2 things other than that possibility come to mind and one is have you rubbed/tapped the threads down and 2 the focus is all on the threads here because there is no burnished edges. I think that an LR or S point needle would also improve the look.
-
Pauline...That has got to be about the most dangerous thing I have seen in a long while. Do NOT hold the bell knife with your hand like that. Please get someone to help you. Get the stronger to use a good quality screwdriver to unscrew the screws while the other holds the shaft at the other end where the belt goes around it. Sometimes an impact screwdriver may be needed but normally it can be done with a good screwdriver and strong hands. Once the screws are taken out a tap with a plastic hammer on the back of the bell could be necessary to get the bell loose. Let me know if you get it as I am doing some video's and a manual one one at the moment. I could do a quick one up for you if need be.
-

Fortuna SAS Leather Splitting Machine - Band Blade Replacement
RockyAussie replied to Nick777's topic in How Do I Do That?
That is an excellent detailed set of instructions on how to do this job @Nick777. Thank you very much for sharing here on LW. -
Very nice work there @Spyros. Some good design ideas there as well. Front fitting catch is a extra nice feature.
-
Good job and way more practical in use. I do like the foot pedal set up that way myself as well.
-
BGMC Model SHS (441) - Presser Foot not working
RockyAussie replied to DDBlanco's topic in Leather Sewing Machines
Good to hear. Look forward to seeing some belts and sheaths done with it sometime. -
Hi Noel, Welcome to the forum. I am up in the Rockhampton area and mostly into producing Leather goods (Wild Harry) and dabbling into the machinery that I make and use. A check of my profile would fill you in more. Cant help you much with the tooling as I don't do it much any more but there is a whole lot of members here that can for sure.
-
Croc overlay holster and mag pouch.
RockyAussie replied to immiketoo's topic in Gun Holsters, Rifle Slings and Knife Sheathes
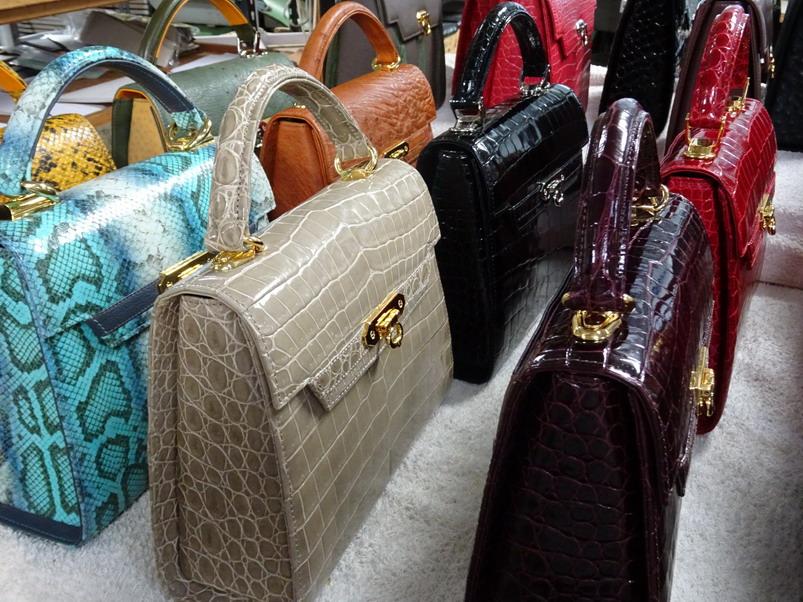
Quite difficult with croc and time consuming. If I were not recessing it I nearly always attach the croc skin to something that keeps it from going everywhere it wants. IN the case above I would put in a firm veg backing about 1mm thick and skive the croc edges to about .6 to.8mm if needed. Any less and you stand the risk of the knife knife cutting through the soft area between the scales/tiles. when combined, any thickness less than 2mm is easy to edge and gives a good looking finish. . After that I second cut them both to size then colour the edge before attaching. If the croc is veg tanned (pretty rare) you may be able to burnish if you prefer. -
Whether it is worth the trouble would depend on how much you would find having a bell knife skiver for your work. I have seen on aliexpress or alibaba where it was possible to get that whole arm in one piece at a reasonable price.
-
Lets talk about sales (or lack thereof)
RockyAussie replied to Spyros's topic in Leatherwork Conversation
Don't forget to get some videos and share some here. They could assist in getting even more. -
It looks to me like you may be missing a major component that would look like the part I am showing in the following picture. That section has the feed wheel attached to it and the shaft that is hanging down in your fits into the end and drives the feed wheel.
-
Lets talk about sales (or lack thereof)
RockyAussie replied to Spyros's topic in Leatherwork Conversation
Great news and I believe that it will be more rewarding more every time. shoosh -
Will a cb3200/3500 be overkill?
RockyAussie replied to Dominicgetsgnar's topic in Leather Sewing Machines
I have to ask before I say too much, how much work of this type would you be putting through??? Is it for several hours in a day every day of the week? Is 3/8" the maximum you would ever need? This is a link to what over this side of the pond is called the Cowboy 6900 https://www.youtube.com/watch?v=_Tjjs5DPgJM This machine will handle up to 1/2" thickness and for production work has a self oiling wick system which can be handy. It also has a knob up on top which allows you to raise the feet alternating height on the run if you get an extra thick bit, with a simple turn. Basically it is a copy of the Juki LS 1341. The feet use the very common Singer 111 feet which has a far far wider variety than the other 2 machines you mention. You can see the bigger brother of CB 4500 of the CB 3200 and CB 3500 in my other youtube vids. It has a longer arm and where the CB3200 can handle 1/2" the CB3500 and the CB 4500 can get you up to 7/8". https://www.youtube.com/watch?v=a83lCJe4JKo -
Huh????
-
Thanks @Wizcrafts Now that I have the Cowboy 246 which uses the Singer feet I can afford to give that a try. If not the CB 6900 lifts a little higher (1/2" as against 3/8") and has that beautiful square drive AND uses the Singer feet as well. I do like the smaller cylinder diameter of the CB 246 when it comes to doing the gussets though. I will let you know how it goes on the next batch.
-
There is no blue stiffener used only blue lining leather and the blue leather trim on the gusset. On the gusset edge there is a stiffener inside which has the outside leather folded over it. In the past I have used a flexible cardboard there but these days have gone to using a shoe heel grip material (Aquiline) http://www.texon.com/consumer-applications/texon-aquiline/ which has better flex and strength as well. All of the fittings used have a double ring for separate attachment of the shoulder strap. I have never had or heard of any issue with regards to any chafing and I have been making this model for over 25 years now.
-
Looks to me that your presser feet are not ideally shaped for the foam edge to needle distance. I don't think it will work well on a flatbed as the foam on the bottom side will be pushing up and stopping the strap from laying flat enough to give reliable stitching. The stitches would be likely to miss more as well. If you could load a picture of the strap sitting in place on the machine might help to give a better idea on getting some suggestions. The good thing about using the cylinder is that the swell of the foam can be off the edge of the needle plate and allow the needle to come down squarely.
-
Here is the video where you can see me doing my best to stay on the edge of the handle with the Adler. I think it will be easier with a zipper foot set perhaps ground back a little instead of the back foot I made myself from scratch. In there you can also see some of me stitching one of the gussets in place.
-
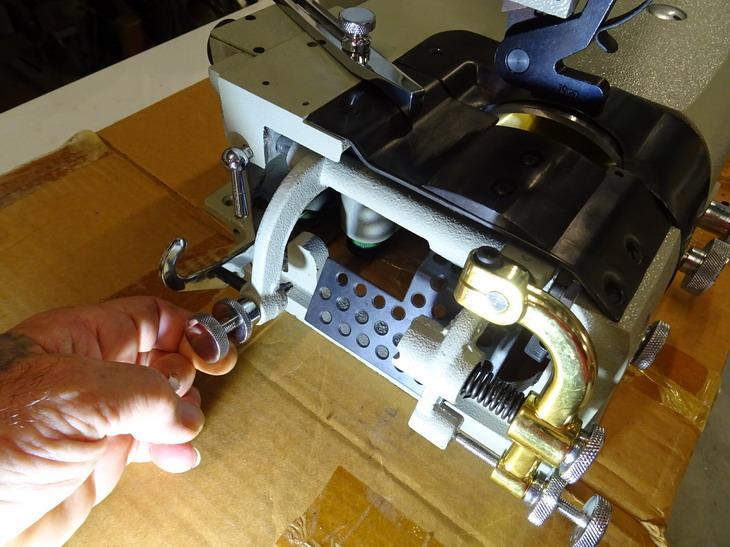
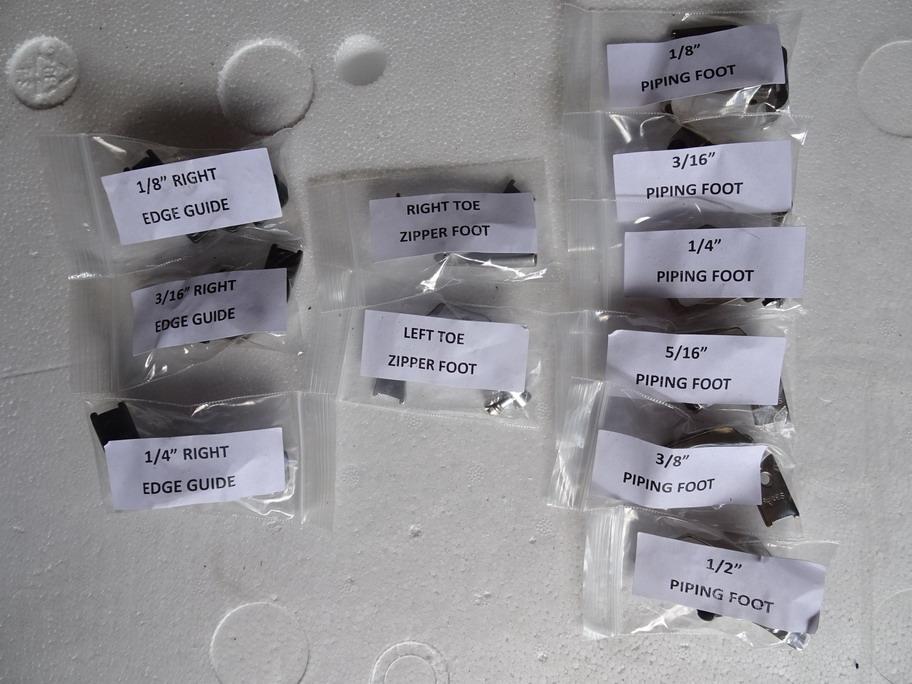
I forgot to mention that this machine takes the very common Singer 111 feet that are VERY affordable and come in more variations than you could imagine. Other than the standard feet here are a few of the other feet versions I decided to get with this machine when I bought it.
-
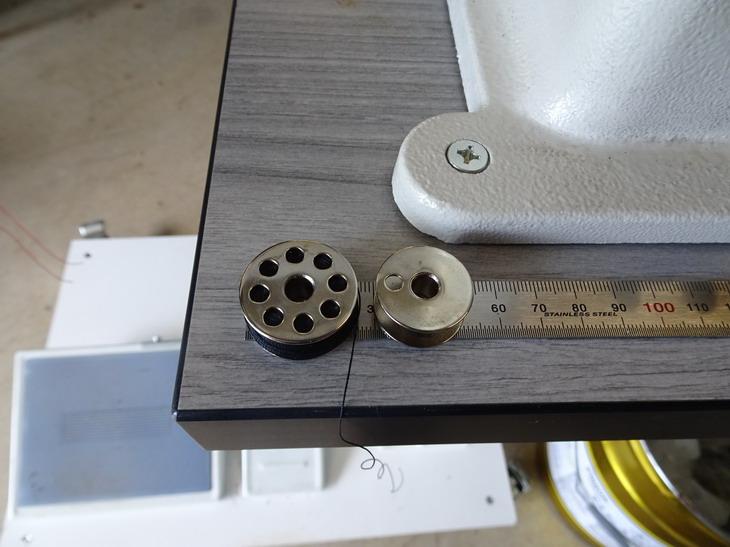
Hey @toxo I am in the process of editing up a video that shows a little where I am using the Adler 69 to sew some handles and my new Cowboy 246 which came in just after I finished stitching the handles. The 246 is a copy of the Juki 246 and has the advantage of the large M bobbin as well as a reciprocating dog foot feed. The end cover for the bobbin shuttle area is a coupe of mm wider than the Adler 69 but with a little grinding and polishing I have them pretty close in usefulness. The big machines that I designed the narrow needle plate set for have a far larger diameter at the bobbin end and I doubt they would suit your purpose for several reasons, one being that the smallest leather point needle for them is a 23 (160) and any threads under the 138 (20m) will not work so well. Following the link to the site that Constabulary put above you can see a version of the 246 on this other page of that supplier if it helps - https://www.sewtex.de/SIRUBA-Naehtechnik-243/FREIARM-STEPPSTICHMASCHINEN--CYLINDER-BED-LOCKSTITCH-MACHINES-246/Cylinder-Bed-246--Pfaff-335--1-needle-Cylinder-Lockstitch-Machine-with-Unison-Feed.html?XTCsid=933fc58973a36148c018499a1fd2fd50 Note that lower down on that page they show a DCS Juki in action. in the next few days I hope to have a video showing one of the bags shown below being stitched and showing why having a small cylinder is handy for stitching around the tight gusset sections. 246 bobbin on left 69 bobbin on right
-
If by fur rugs you mean hair on hides we get quite a few in from Italy and use them in quite a few of our handbag designs. They are generally pretty popular with sales. This is a link to my website in the tote bag section where you can see a couple of examples - https://wildharry.com.au/collections/tote-bags/Felicity