RockyAussie
-
Posts
3,265 -
Joined
-
Last visited
Content Type
Profiles
Forums
Events
Blogs
Gallery
Store
Everything posted by RockyAussie
-

Pfaff 335, Adler 69 type Cylinder arm caps.
RockyAussie replied to RockyAussie's topic in 3D Printers and Lasers
Mate I would love to try and help you there but I don't have one of this style of machine and from the little i have found online so far it looks that it can not be thinned down much. The only area I can see potential is down on the bottom appears to have room for some chamfering but without seeing I can not be sure. If you want to take that cap off and post a few pictures here it would help to decide if its worth giving it a try. So far this is the only picture I can find and as you see there is a fair bit missing. At a guess I would say that the cap is round and it may be possible to taper back until you are near the gear section. I will ask around and see if anyone local has anything similar.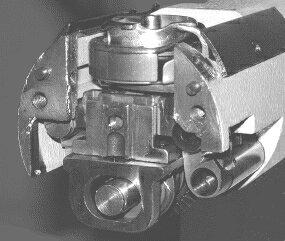
-
Pfaff 335, Adler 69 type Cylinder arm caps.
RockyAussie replied to RockyAussie's topic in 3D Printers and Lasers
Yeah it sits in on my 335 a fair way as well but still cleared everything alright so I thought that being shorter would just give even better clearance away from gusset walls and such. It is very easy to make a longer if you want in Curra as you can just add some extra percentage in the direction you want. Likewise if your printer prints a little looser than mine and you wanted the fit a little tighter you can reprint at say 99%+ - over all in the Curra scale. Let me know if you need any instructions on this procedure. -
Pfaff 335, Adler 69 type Cylinder arm caps.
RockyAussie replied to RockyAussie's topic in 3D Printers and Lasers
I would be happy to send you one if your happy to cover the postage. I will have to check out what that is and how to best package it. PM me your details if you like. Please check that it is the smaller bobbin model. The cap diameter should be at present around 46mm not 50mm. I am just taking a stab in the dark but I think the postage is likely to be around 20 to $25.00 au. What brand and type of zippers do you you use if any? I am just thinking that a box for the cap would be able to hold a whole lot more like the zipper guides for no extra postage cost . -
Pfaff 335, Adler 69 type Cylinder arm caps.
RockyAussie replied to RockyAussie's topic in 3D Printers and Lasers
Ha Ha good one.... I started using this colour awhile back due to my super messy workbenches and just old age and bad memory. I think I spend more time looking for something than I do making stuff sometimes these days........What was i going to say.......Ogh well it'll be there somewhere. -
Nova-Pro 15000mw 800mm x 400mm laser
RockyAussie replied to bermudahwin's topic in 3D Printers and Lasers
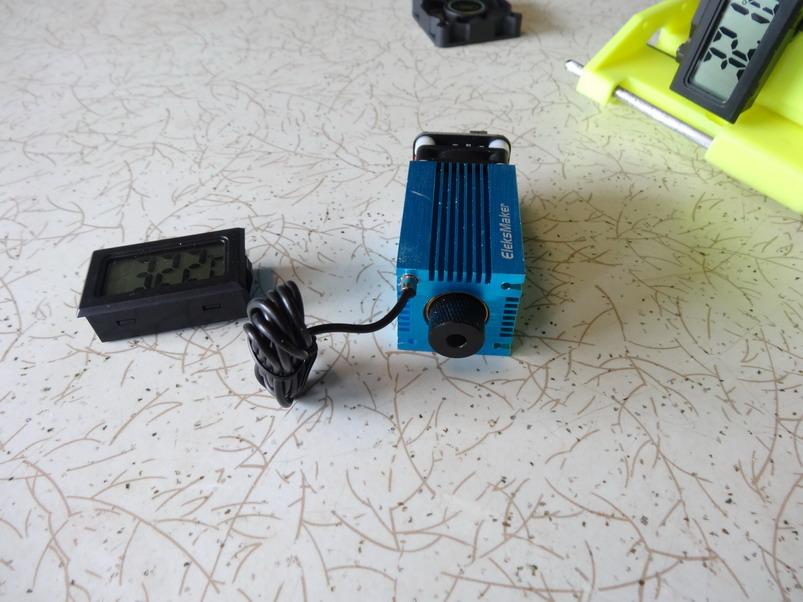
Looks nice. I checked out the web site and I do have to ask how you come to get 5 hours continuous run time with 15 watts? Is this conditional on being run in an cooled air conditioning room? The temperature here runs hotter than ideal when the machine is not even on. See picture showing an average day temperature in centigrade. Do you sell the 15 watt piece by itself?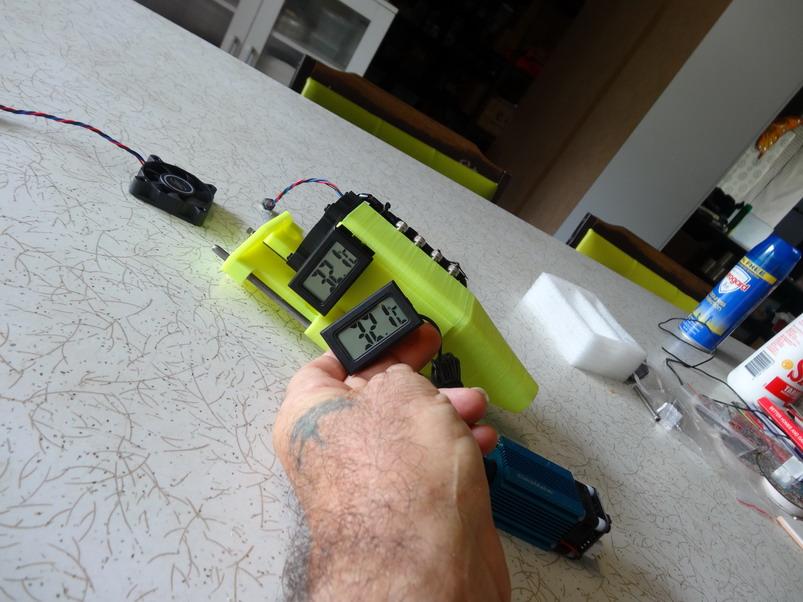
-
Pfaff 335, Adler 69 type Cylinder arm caps.
RockyAussie replied to RockyAussie's topic in 3D Printers and Lasers
WOW that was quick. Looks better than my yellow coloured ones. I am hoping that a few of the other members that have clones of these machines will try them out for fitting. I would like to have a list of the various machines clones etc that it will fit onto to advise everyone. Also if there are any negatives as to where the cap may be improved. For 27 cents of filament electricity included. its not that big a risk really. So far mine have tested in use well and I will do a few more little changes once I am confident it will fit a wide range of other clones as well. I am thinking of putting this thread into the sewing machine section in order to get some more feedback. Thanks for the feed back. Brian -
Pfaff 335, Adler 69 type Cylinder arm caps.
RockyAussie replied to RockyAussie's topic in 3D Printers and Lasers
File sent in PM . -
Nova-Pro 15000mw 800mm x 400mm laser
RockyAussie replied to bermudahwin's topic in 3D Printers and Lasers
WOW some serious power there. Congrats. Pictures? -
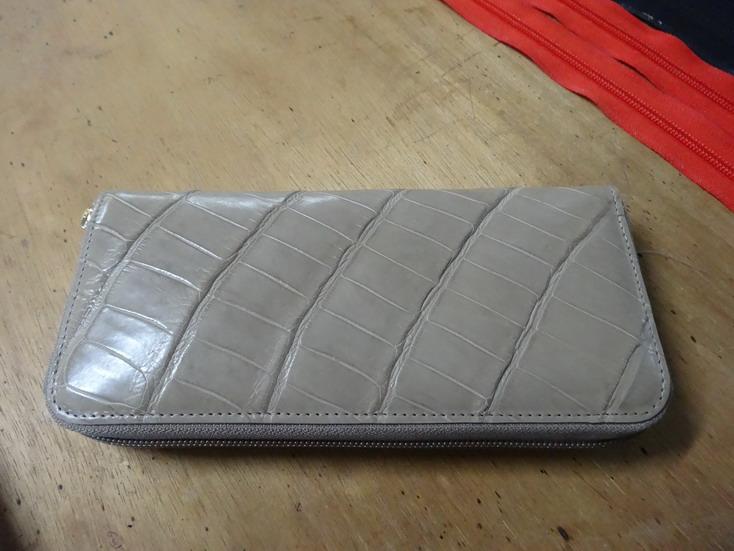
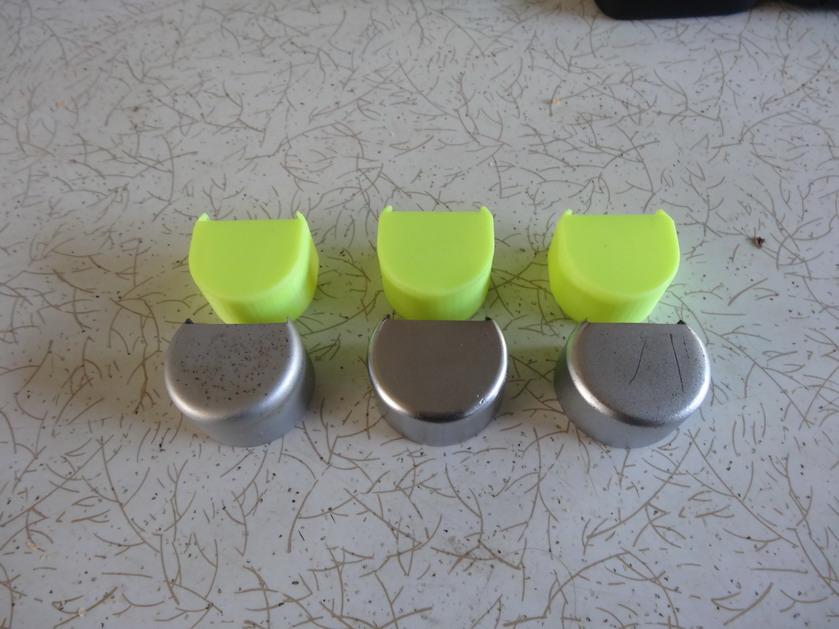
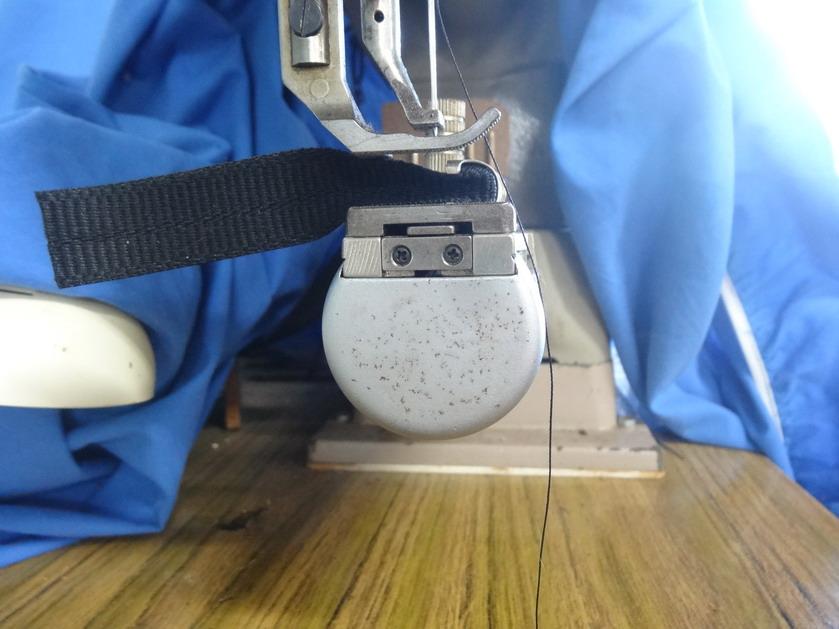
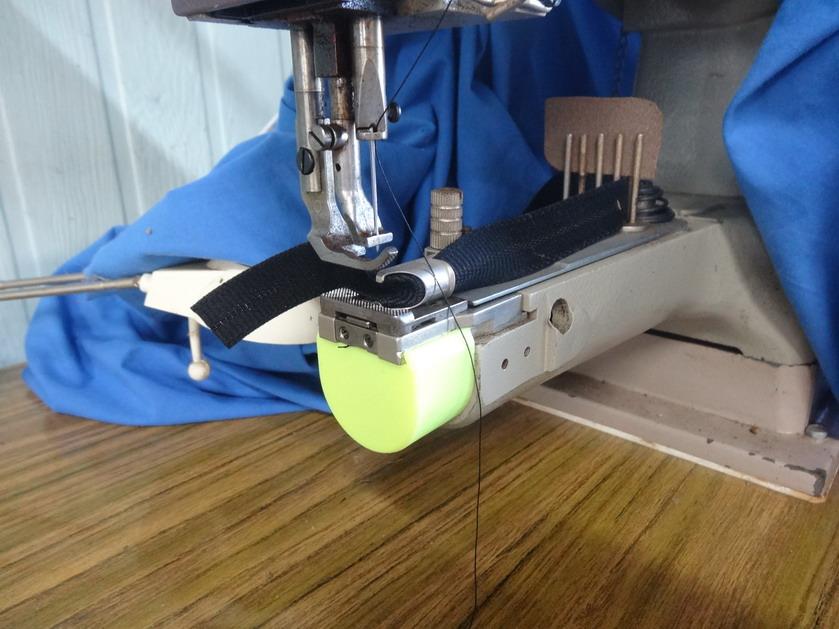
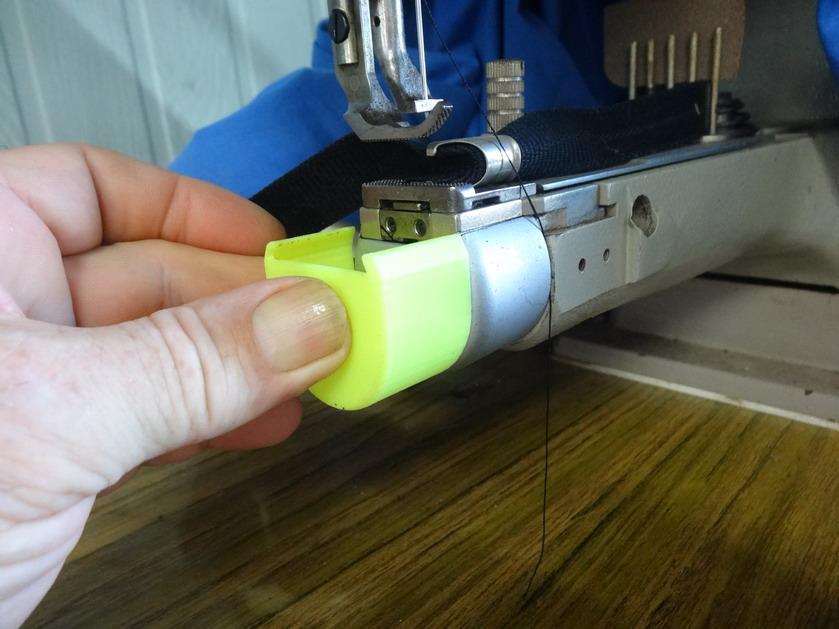
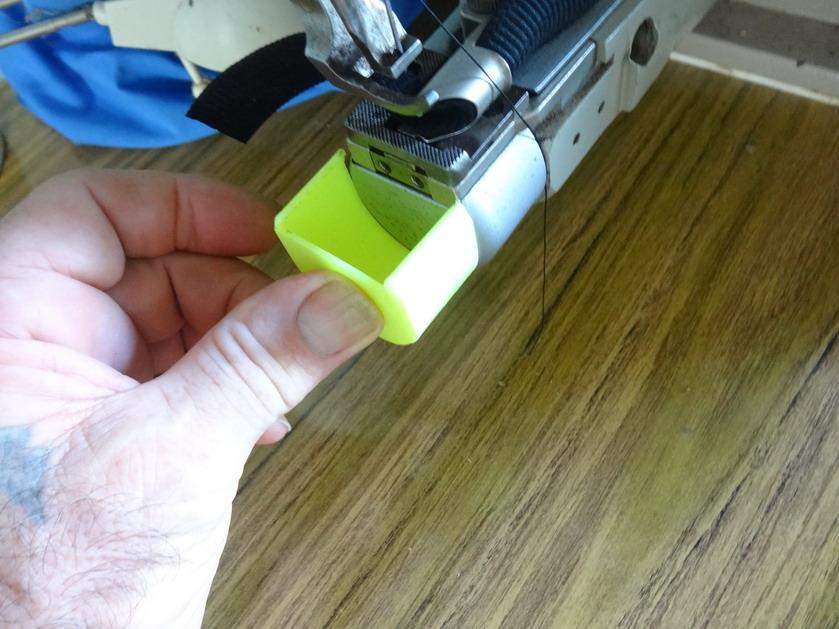
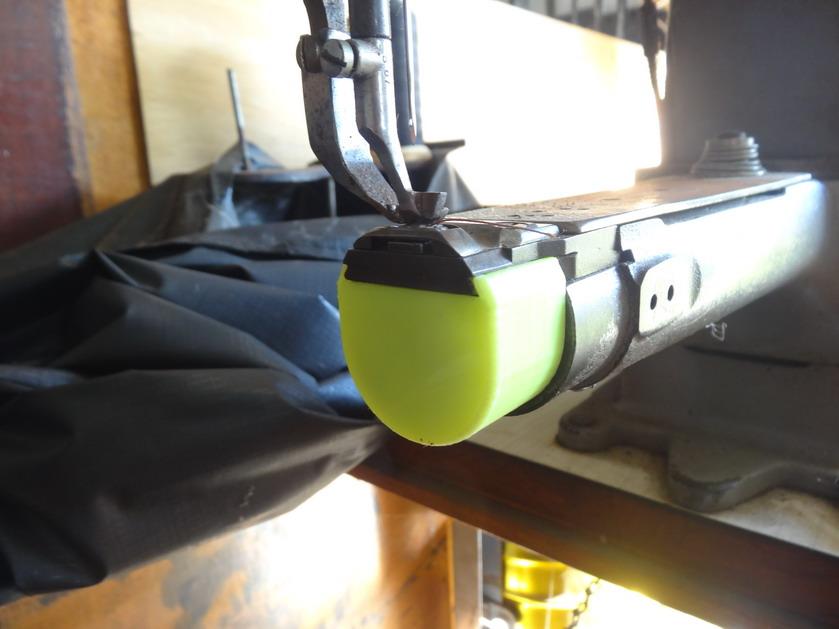
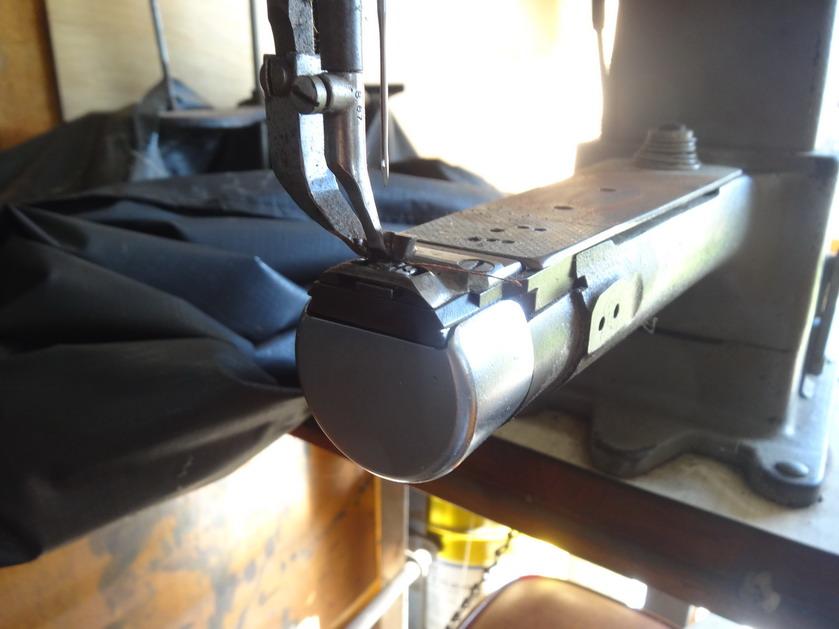
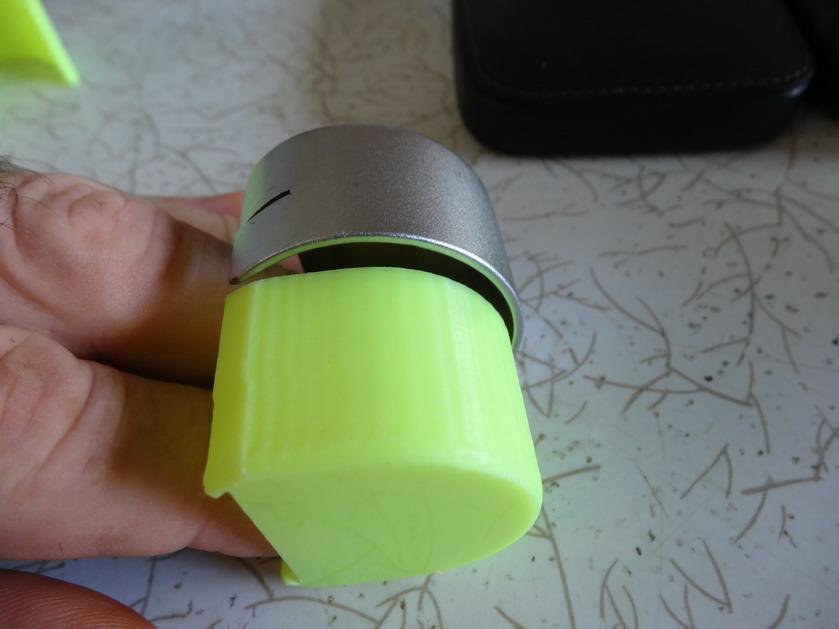
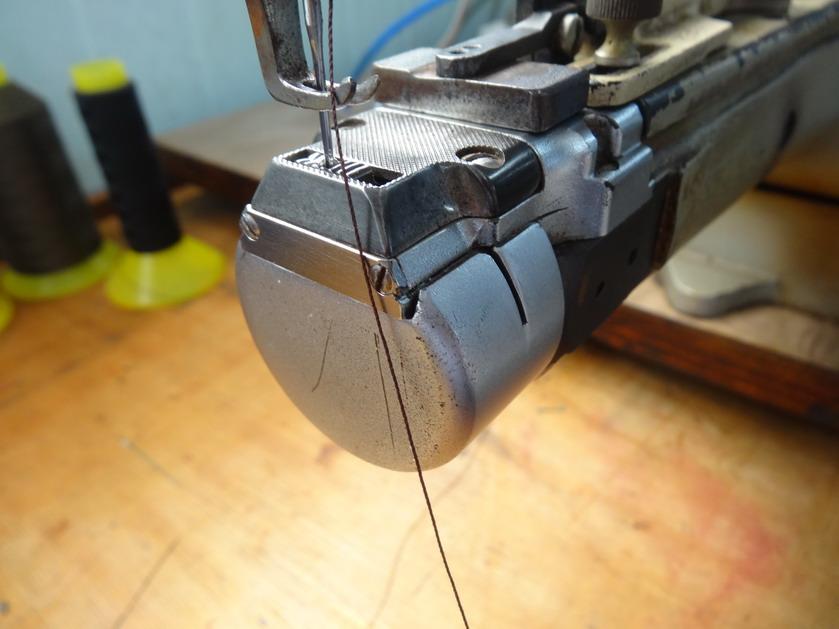
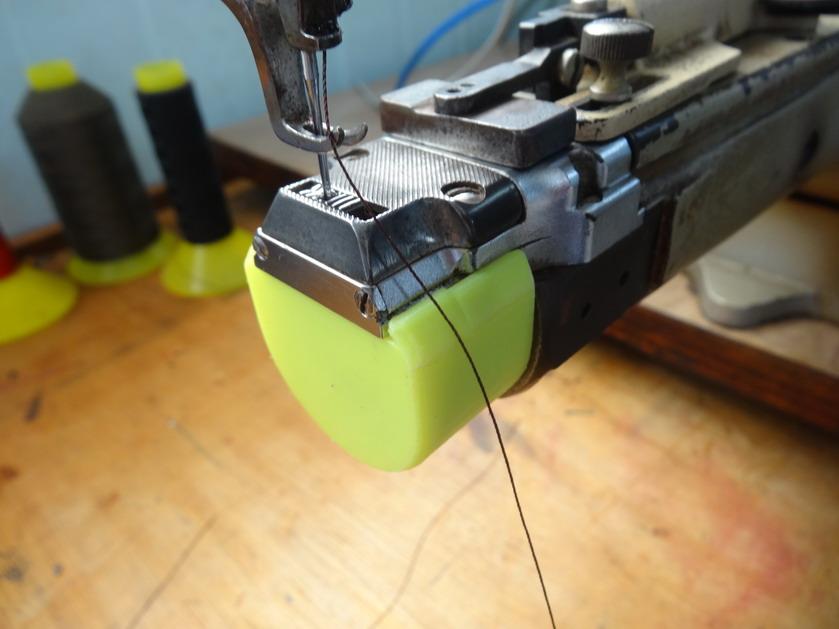
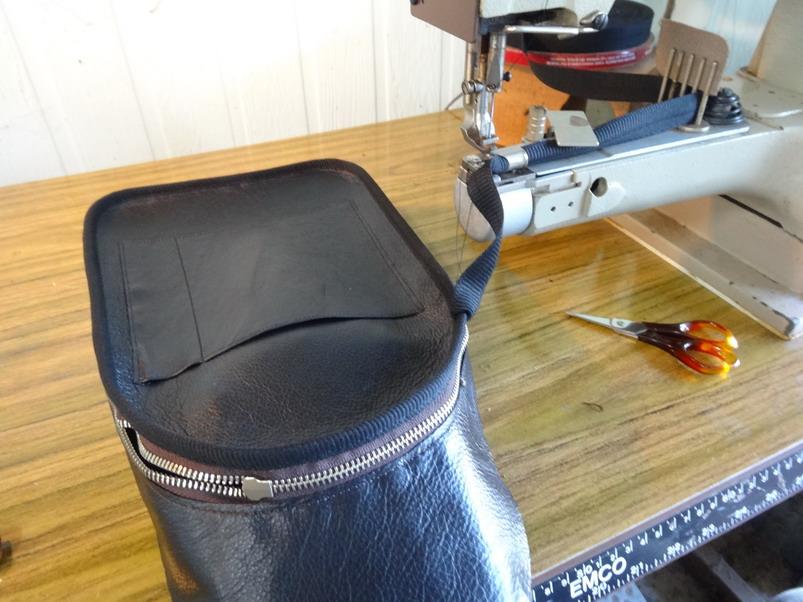
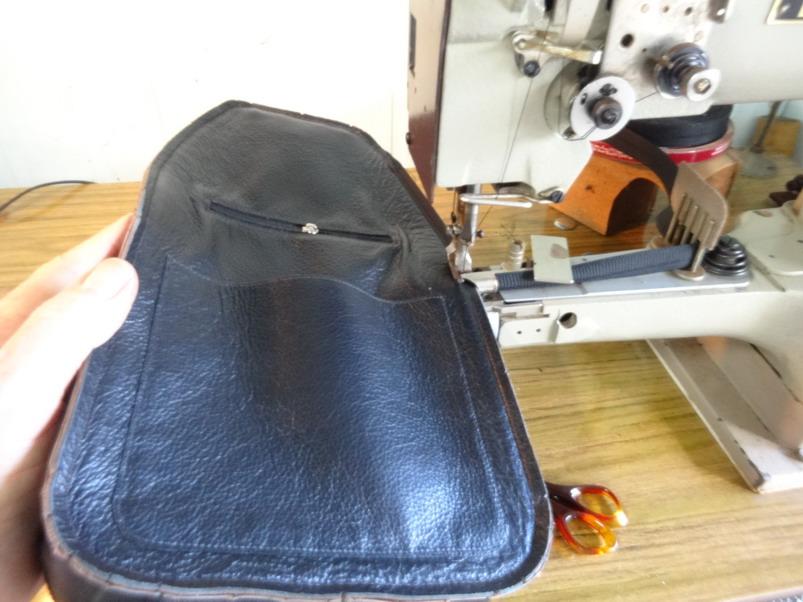
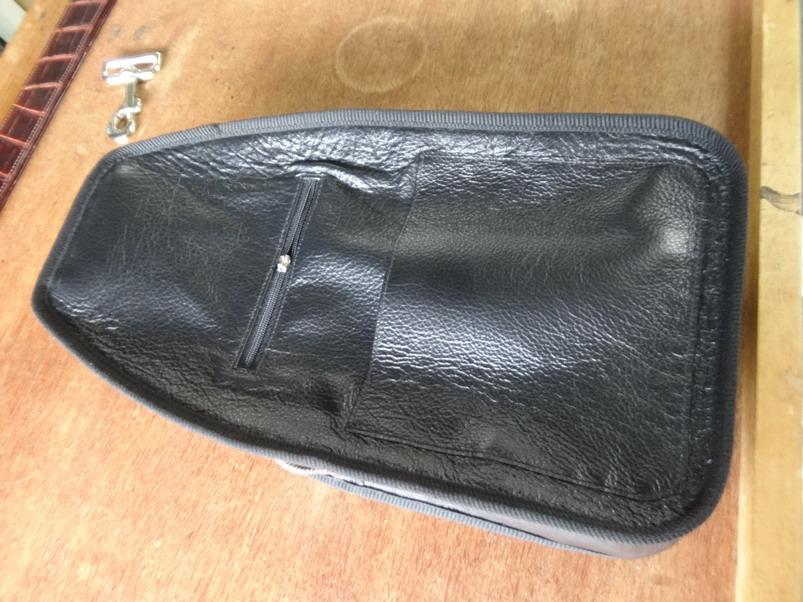
I have been doing a few projects recently that need a very small cylinder machine to enable me to get into the tight corners and such. This is still a bit of a work in progress but so far the results have been good. A few more tweaks and they should be excellent. I have a 335 Pfaff , 69 Adler, Tk 335 Elizabeth and a 331 Pfaff that I have finished of some new cylinder caps for. After doing some measurements and tests the width of the caps have now been reduced from 46.6mm down to 41.4mm. ( a bit under 1/4"). The depth has reduced a couple of mm and the length a couple as well. NOTE: except for the Pfaff 331 which has a little more room for reductions, all of the caps fitted and they are all the smaller bobbin variety. The first picture shows 3 of the 4 caps just finished as against the ones being replaced. This is the TK335 Elizabeth cylinder showing some comparisons. This one below shows the Adler 69 fitted well This one below on my favourite Pfaff 331machine (needle and dog foot feed and no pesky walking foot) Here are a couple of samples of work where this kind of reduction comes in handy. I do like to be able to stitch around a product fully and try to design for this and the sewing machines capability. Here I think the difference shows fairly well If any of you have printers and one of these style machines let me know and I will get you a stl file if you want it. If you have one of these machines and are one of my followers and do not have a printer... PM me if you would like one. I know the colour is awful and I could have done them in a metalic silver colour but at least they are easy to find now. Brian

-
@Antonia May I ask what type of sewing machine are you trying to sew this purse with? This could have something to do with it.
-
Mine are inoperative as well and I would not want them operating anyway. A lot of factors come in to how often a blade will need to be sharpened and generally 30 seconds to a minute is fine. Some leathers, even soft leathers will blunt a blade in no time and some you can go for a half hour or more. Generally the split will start to look choppy and sawn and therefore it needs to be sharpened. Except for foam I never have the blades sharpening while splitting and that is rare as well. A new blade can take a half hour to sharpen. Make sure to clean the felt guides well when changing the blade and on the odd occasion as well. I tend to scrape them with a knife and sometimes rough sand them if they need it.The blade should be fine sandpapered to get rid of the rust and sometimes I give the blade a light sand on the run but THAT IS SUPER DANGEROUS and absolute full undivided attention is a must. I should be saying DONT do it. Make sure the blade only barely wants to go backward toward the wear blocks (gibs) and do plenty of quick stop starts after to check that it does. TOO much will create overheating of the blade and wear blocks. New full size grindstones will make sharpening a matter of seconds instead of minutes unless your rubber belt that runs the grindstones is overstretched and worn out. Another reason why auto is no good. With regards to the top plate tightening it would be best to check with the manual. My Comoga has 11 screw downs with 11 screws to set the stop points. Main thing is when the blade is in position when you do the front ones up and they put any pressure on the blade when you are hand turning it you back it off just barely and reset the stopper. A piece of paper should be too thick to go between the blade and the upper or lower plates at the front. I try and get all bolts to touch and then back off until I can turn the blade just freely. If it can deflect up or down overly then so can your thicknesses. Getting the blade to show even amounts either side when sharpening is a must and helps to keep the blade in the middle of the gap and therefore the consistency of the split thickness. @Danne The idea looks good and your drawing skills are excellent but I have to say the person doing the adjustments would have to know these machines very well. Is it desirable that both blocks should be the same measurement and if not what should it be??? When you cut a piece of leather by hand is it easier to have a broad flat blade and cut in one hit or a angled blade that slices through? How important is it to run the job exactly in the centre? Many job pieces are not square so that changes the pressure points as does the spring pressures left as against right on the feed roller. The variables in that area are a more difficult thing to get adjusted to be suitable and improvements in that area are more important in an engineering sense to me. So far if a piece comes through thick one side and thin the other you either may need to adjust one side tighter or looser or sometimes just move the job further to one side. I do think your idea has merit but perhaps only in the manufacturing stage as elongating the slots would take a fair bit of expense for the little bit gained.
-
Hey @Matt S, Congrats on obtaining a splitter. Just a thought on those wear blocks (gibs) check the depth of the groove wear in them as they can help generate excessive heat if they come over more than 1/2 mm or so. The excess wear on the right is normal as the way the blade spins it is the first to cop the pressure. I normally grind them down until there is only a minor wear line from the blade left and check from there. The steel is super hard like tungsten or something on both the Elbiko and the Comoga I have, but interestingly the Comoga also came with a few extra wear block that I think are teflon or some extra hard nylon at any rate. They do wear faster but don't seem to generate the heat as much. If the heat is too much it transmits through the blade and you will find that they put cracks all around and through the blade until of course they snap through. The German blades are better and last way better. Feel the back of the blade occasionally and sand of any excessive burring. On the adjuster for adjusting the blade forward there is a spring that pushes a steel tab into the toothed wheel you turn by hand. It is not in your pictures but I assume you have it and the tab piece. Make sure that spring is fairly strong as some times when the leather goes through it can knock the adjuster back and of course the blade goes back with it. Better to check now and not have to pull it all off and have to go through the joy of having to carefully adjust the top plate down again. Amazing how a great hunk of steel can bend around like butter. Last thing ....check that the blowers air intake is clear and that there is plenty of air flow blowing down the chute right across. Just hold a leather strap in the chute and see if it shakes around and wants to go through. Some times the chute can get clogged up and it is super annoying when you find that the leather your trying to feed through is obstructed by a build up of waste in the chute. This is one reason I like my old Albeko better as it's waste comes out to the front and straight into a bin to the side. Have fun and again congratulations on a fine pick up.
-
I could not do without a machine for sure. Like knives though they take a bit of learning to get the right results. This link shows a video I made and if you check my profile there you can find a couple more. https://youtu.be/1yxXV09EYHk
-
Thanks for sharing @MudBugWill I always find it strange the interplay of using beeswax and the use of dye later in the process. Because I mostly work with crocodile and the hard and soft nature of it I only use edge painting processes which require a fair bit of difference to get a good end result. Instead of a mini plane I use high speed sanding machinery mostly to start with followed by several coats of paint with sanding and ironing between some coats. The beeswax comes only into the polishing at the end.
-
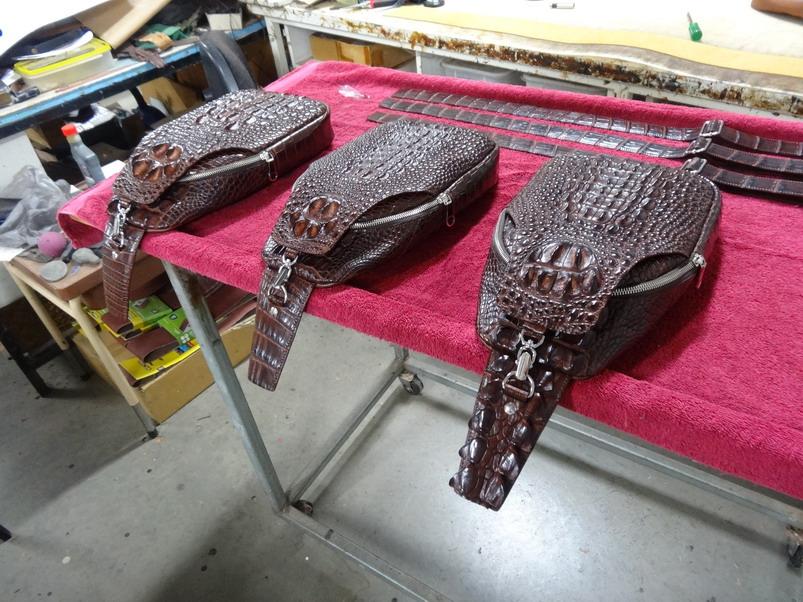
If your bag designs can use a binder it would be likely quite useful. It is very 335 style and they can be very helpful in making up to medium weight bags. These bags below I made with one.
-
I made a braided shopper bag
RockyAussie replied to Hahn's topic in Purses, Wallets, Belts and Miscellaneous Pocket Items
With out the stitching the lace would pull the sides together. The lacing is not constructional at all only decorative. Very nice work there @Hahn and thank you for sharing your work here with us. -
Thanks for the compliment. I hope to get a newer video and a little more info on the zipper tool up this week sometime. It shows how easily the links can be shortened and made to fit an application perfectly an it is done on a crocodile bag this time. Also I have been printing out heaps over the last couple of weeks and hope to get some over to the US sometime soon. Kind regards Brain
-
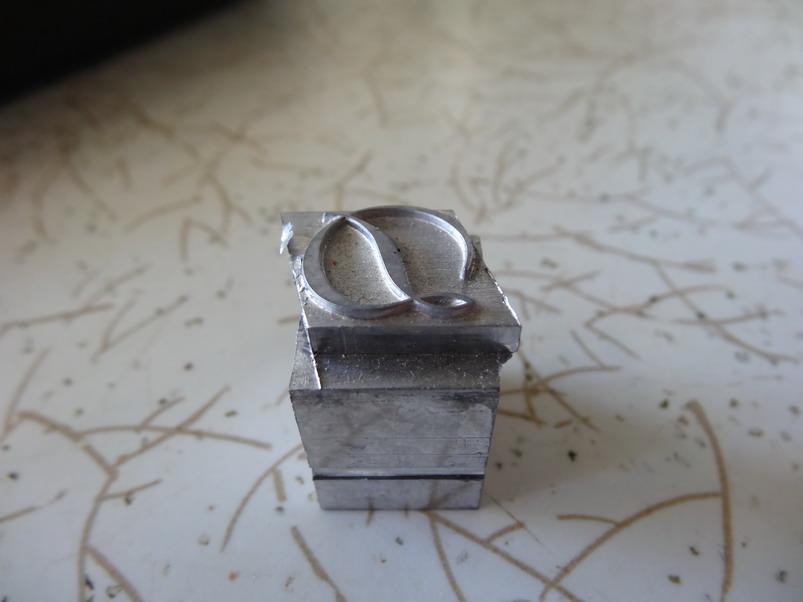
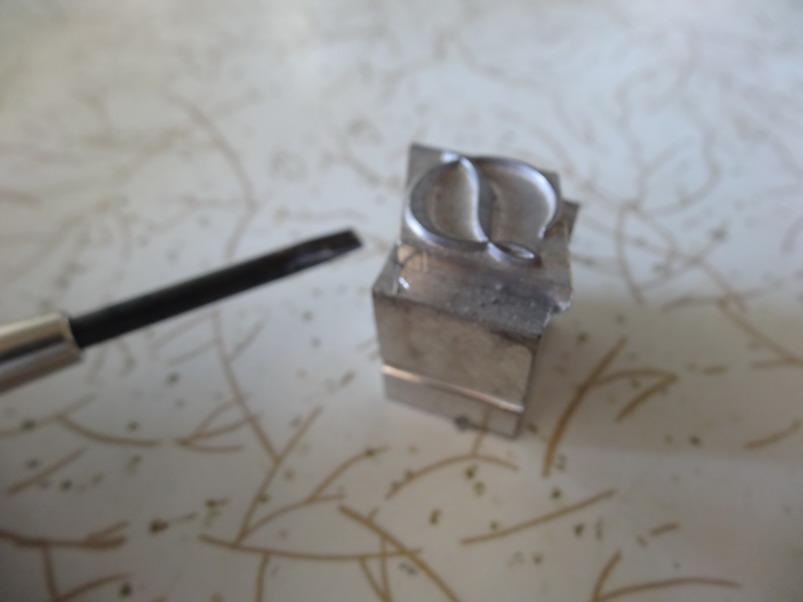
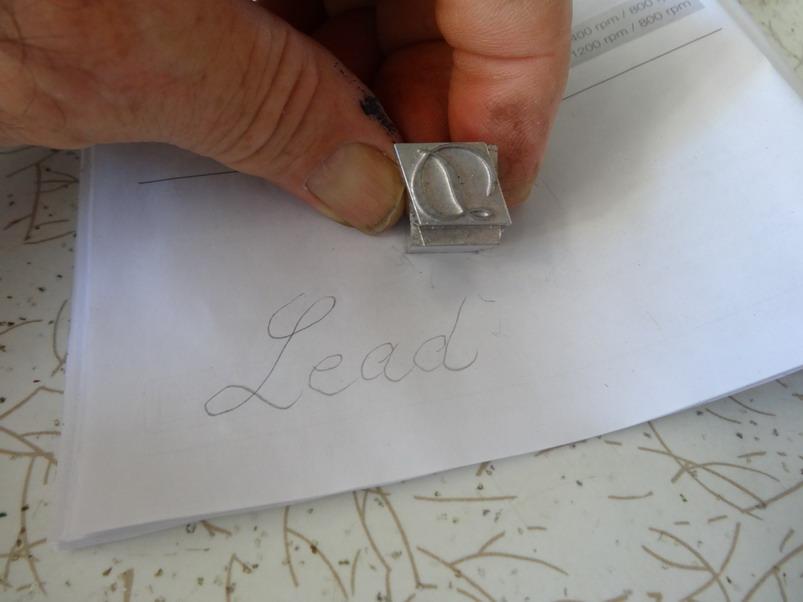
I forgot to answer this part. The Kingsley letters I use on the ring boxes is a Redwood font size 42 pt. The letters are white metal I think which I believe has some lead content but I have found to be very durable over many years of use.That particular font is very hard to find up for sale. A similar one I bought over from Howard Imprinting Machine Co. is called Mayfair and the link above of theirs will show that they make a large range of various letter sets. Unfortunately the lead content appears to be very high and the finish is a bit poor. The part where the letters touch seems fine but the edges all need to be rubbed down. I would still say better value than anything else except the second hand Kingsley sets. See pictures. This is the Mayfair set.They do not come with a separation box like this just all together. Note the unfinished edges A little rubbing with a screwdriver tip seems to work As I said the lead content is high you can use it like a pencil on paper. I probably should be wearing gloves. That's all I have for now. Hope that all helps. Brian
-
I have to admit that getting a design that prints out easily on the is something that I have yet to master and get right every time. Separating into components is often the best solution. Tip - Super glue works well on pla.
-
Finished Sheath for Customer!
RockyAussie replied to YinTx's topic in Gun Holsters, Rifle Slings and Knife Sheathes
WOW that is beautiful work and I just love it -
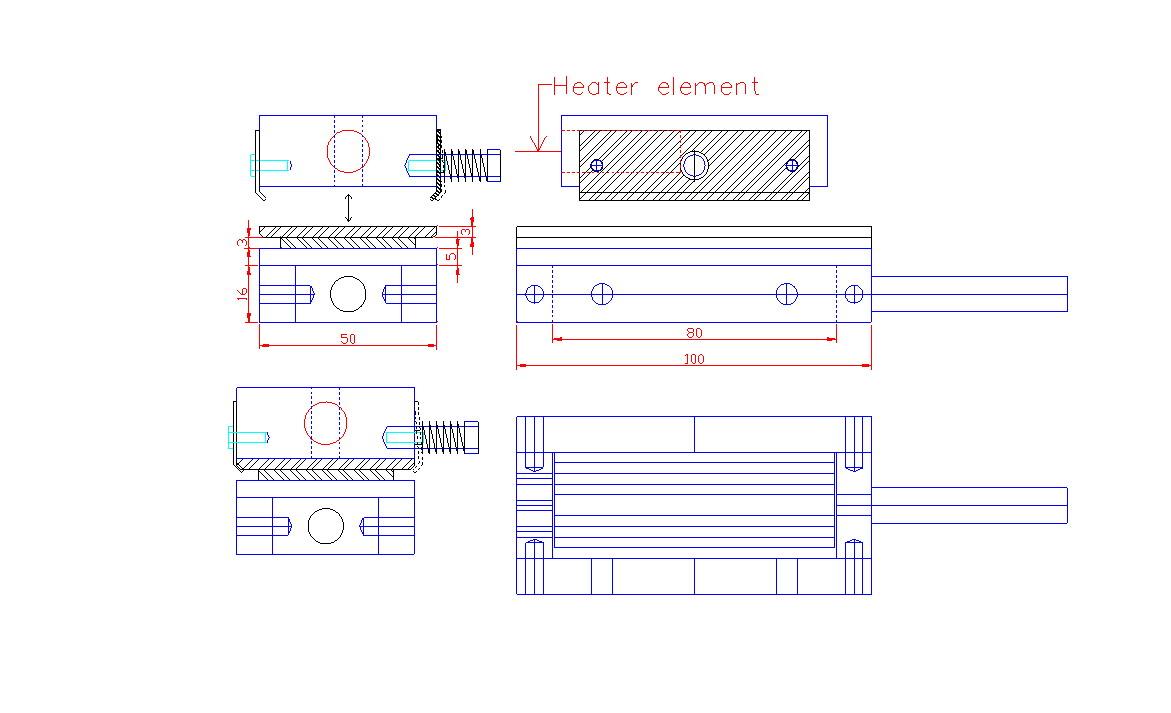
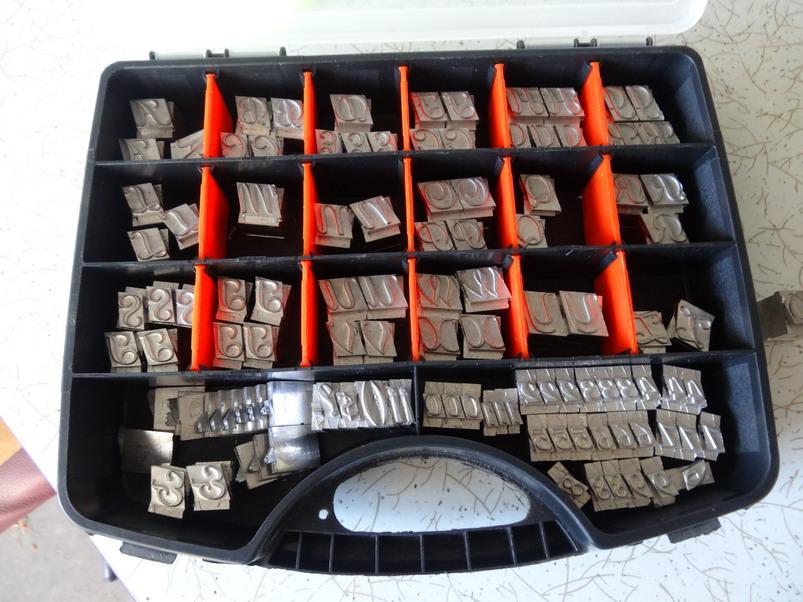
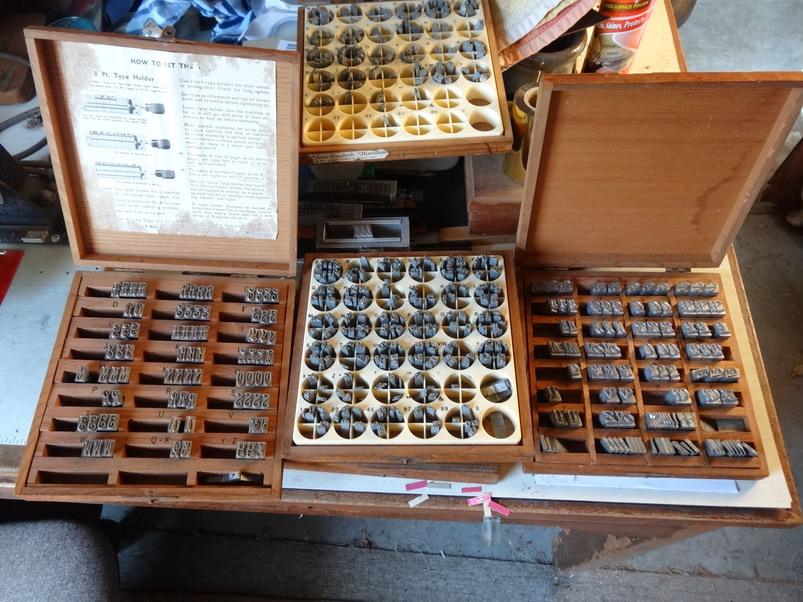
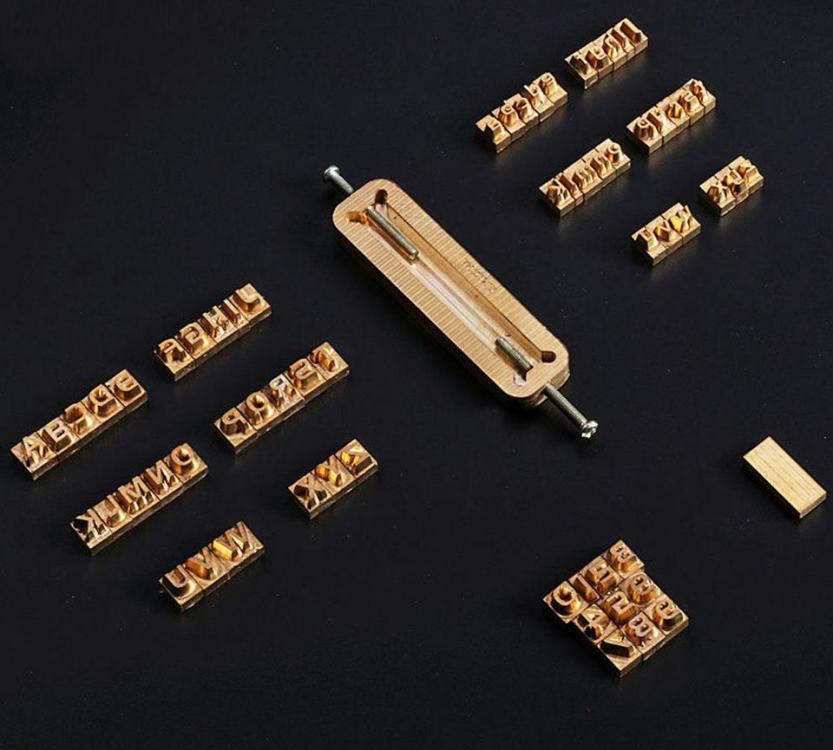
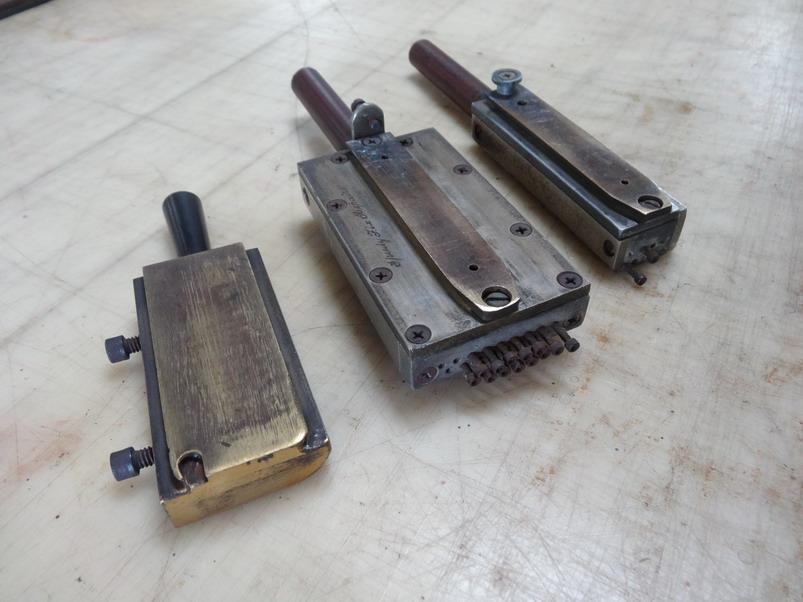
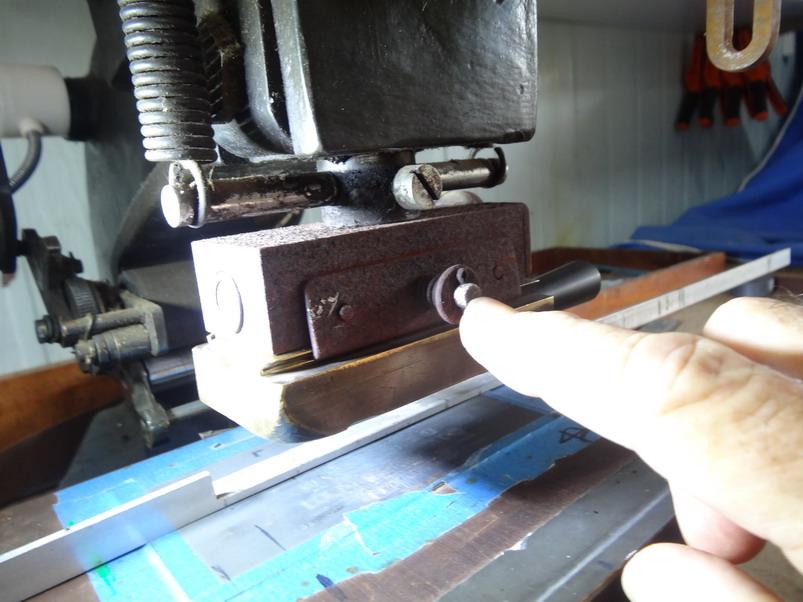
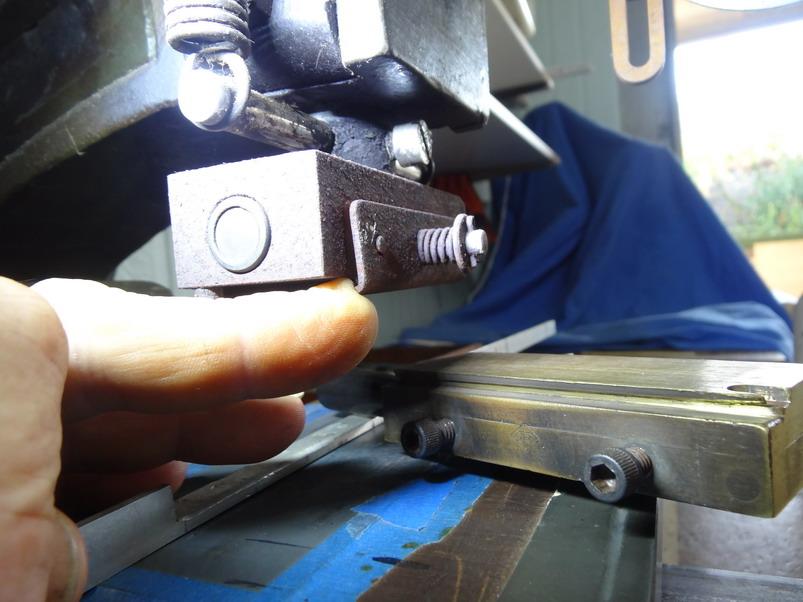
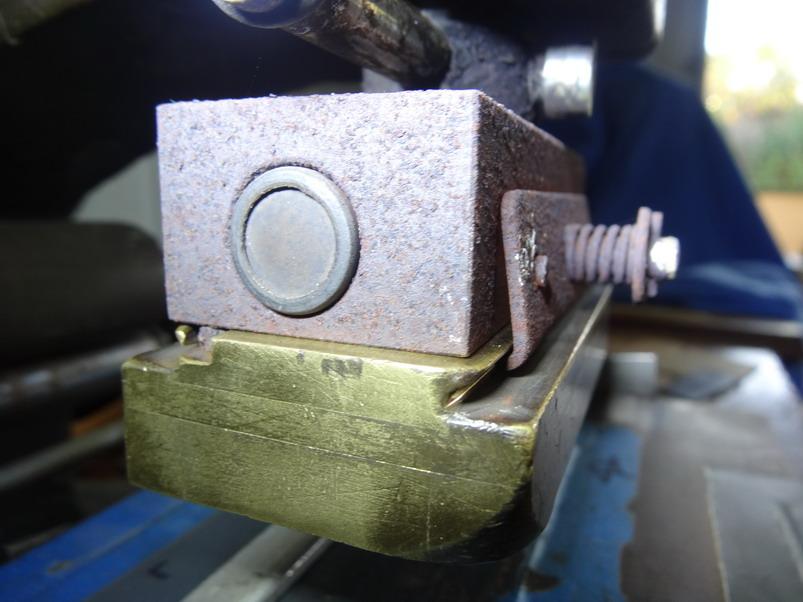
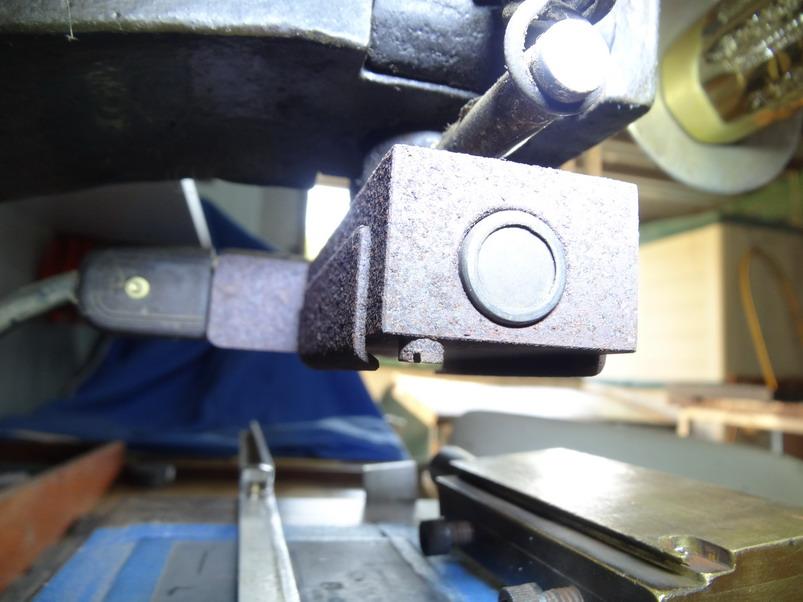
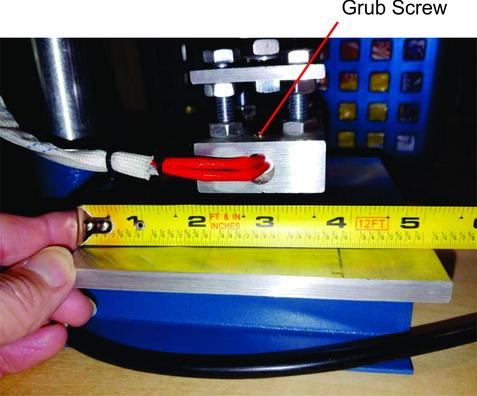
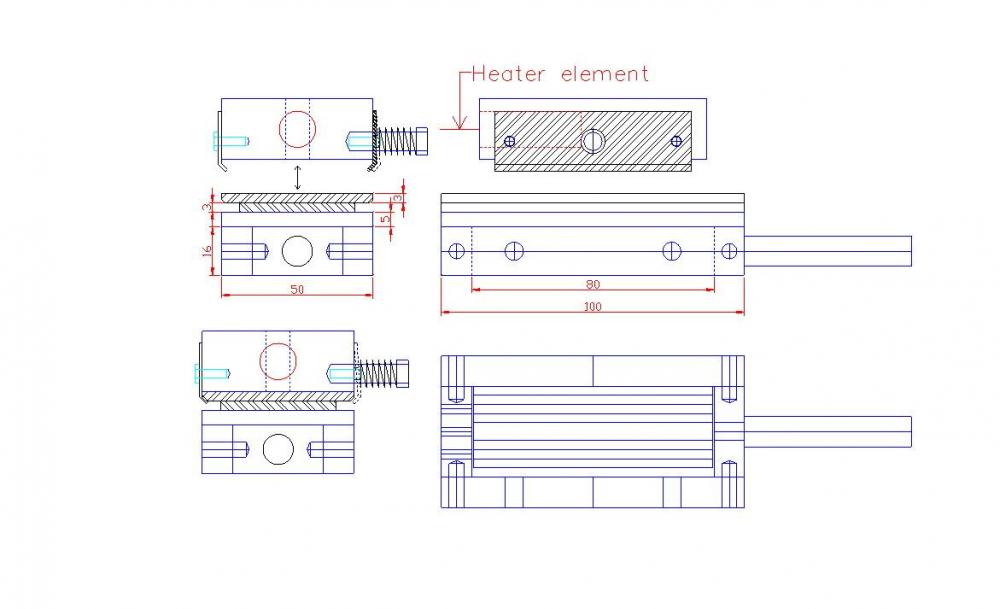
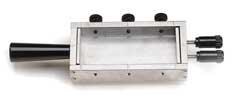
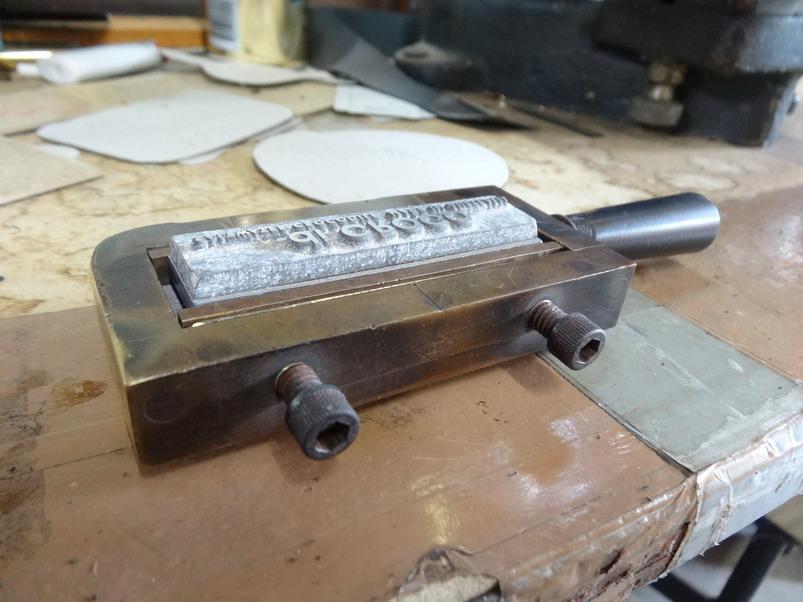
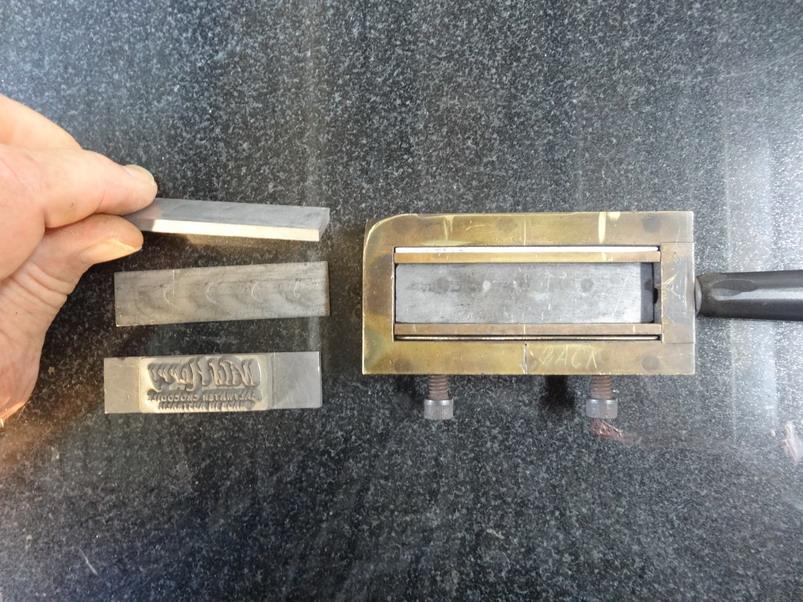
OK they are happy now. Next thing I would say is if you are thinking of doing monogramming and such to think carefully about the letter sets and the amount of letters you get in a set. Very often words and names will use the same letter (note the word letter has 2 t's and 2 e's ). I do recommend going on line and looking for the old Kingsley letters as they are well finished and do hold up well with repetitive use. Typically they will have multiple letters of the most commonly used letters and often can be bought very inexpensively when you think about the cost for each letter. Normally they also come with varying width spacers to set between words as well. See picture The Redwood font I use on the ring boxes has full stops, commas and a lot of other pieces as well which brings us to the letter set holders. Most of these letter sets are a lot taller than the WUTA letters you have ordered and the holder used with the Wuta set will not work with these sets unfortunately. Assuming you have ordered the Wuta letter set holder as in this picture below it should be possible to adapt it to fit into the same slide in holder I am getting to. This next pic shows some of the dovetail type of attachments that enable the holding block to attach to the heater blocks. Note that the large middle one has an extra tab piece secured by the handle which allows some fine adjustment of the block in and out. Now although some machines use a screw in attachment to secure the dovetail piece in I way prefer the ease of the spring in type of attachment as I am pointing to in the below picture. A better one without my finger in the way. Note that the plate at the back is screwed in tight and does not need to move as well. In the picture of your block that holds the heating element it appears to hold the element into the block with a grub screw as shown in this picture with a red line pointing to it. If you try turning this anticlockwise (very carefully) it may allow the element to slide out. DO NOT tighten this hardly at all when you put it back as these elements are not normally attached this way. They, if any at all are sort of glued in with a special paste normally. This if successful will allow you to remove the block to make the adaptations more easily. I think the pictures above should work well enough to explain but here is a drawing that may help as well. AS you see I work in metric measurements sorry. The pieces I have put in a black hatch are the main pieces to make up this set up. On the top left there is 2 plates that show one screwed into place on the left and one that is held in place by a spring with a bolt in the middle and a pin locater on either side to keep that plate straight. Under that diagram the 2 pieces shown in hatch are simply a 2" x 4" by 1/8" and a 1 1/2" x 4" by 1/8" flat plate which could be mild steel or brass if you prefer. Mild steel should be in those sizes available from the scrap at almost any steel working place. In the case with adapting a slide onto the Wuta letter set holder it will only require the one 2" plate as it it only 18mm wide and therefore will not need further clearance. As the slot is 8mm you will have 5mm either side to screw down into the block and logically some 3mm or 1/8" unc cup head bolts will be needed to attach it. I would use 4 or perhaps 6 if you dont mid doing the thread tapping part of the job. Rather than going to the trouble of making a letter set holder for holding logo's and letters to start with I would recommend buying one of this type from Howard's I do not know what sort of dovetail or method is attached to the back but I would say it could be unscrewed and a plate attached to suit the above set up. Here is a link to their web site - https://www.howardimprinting.com/index.php?main_page=product_info&cPath=7_32&products_id=395&zenid=1b5a85a34d46650fa3876a403ec905f1 They also have some spacers sets for about $18.00 and I would get some of them to help locate the letters or logos either way. I get a lot of logo's done in magnesium and they get attached to these spacer bars to help with a quick change. Pic below. That should give you a bit to chew on for now and I gotta go and do a bit of chewing now .. I will check back with a bit more later.
-
I probably should do a separate post on this subject of embossing at some stage as it is a whole big world of experience by itself. For some it is just getting down their own Logo and for some like myself it is getting down a large amount of different customers logo's and things like belt size stamping and the need for being able to quickly interchange the stamps on the run is important. In the case of your machine above as well as Treesner's machine the idea of bolting a stamp to the heating devise above is going to be very limiting and slow to allow any changes. If you are just doing the one logo and that is all it would be alright I suppose. All the machines I have, have a slide into place logo or letter set attaching method and the construction I am showing here is what I would like to have if I only had one and was starting from new. I will be back shortly as the dogs need a walk and they don't understand the word LATER it seems.
-
The drawing is excellent and idea is good. There would be some trouble though perhaps printing in the air where it curls over. You could do it with a lot of supports but better if you can design it out. Just the holes would be OK and sliding the rod through perhaps?
-
Need help from the leather community...
RockyAussie replied to hatrabbit's topic in How Do I Do That?
Now that is what I like to see. Though I thought Texas was a a bit over the other side. -
Tempting except that I don't have any problems with the thread curling around and such. Possibly if I could do a multi revolver or something along that line might be of interest. A bit along the revolving bobbin holder and revolving from the centre on its side?