RockyAussie
-
Posts
3,265 -
Joined
-
Last visited
Content Type
Profiles
Forums
Events
Blogs
Gallery
Store
Everything posted by RockyAussie
-
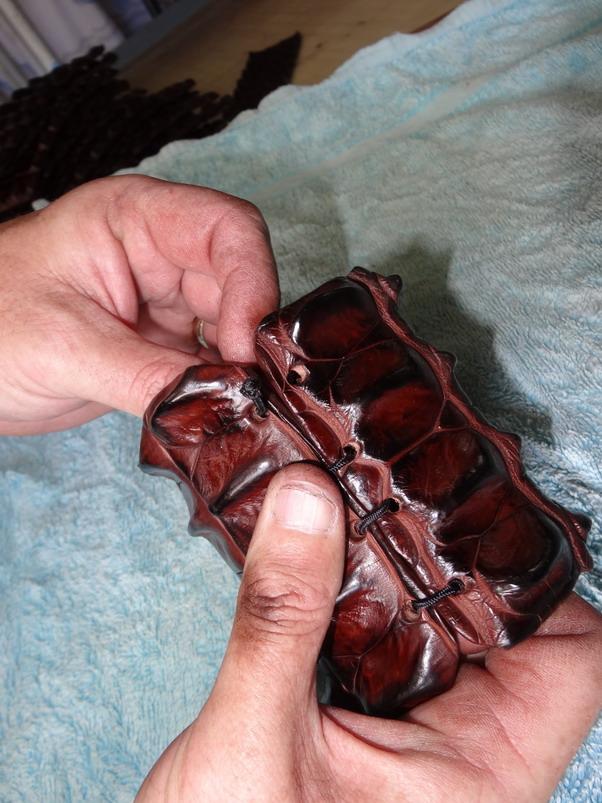
A bell knife skiver is about the only way I know of and use daily. I do warn you though that a roller on the top is almost a must with croc and ostrich. As the skin gets compressed under the adjustable thickness guide the quill mussel lump gets pushed back and creates a larger lump and then makes a hole as it progresses to the blade. Same thing with crocodile where the higher part of the scale gets pushed back and a roller helps to reduce any scratch marks on the glaze skin as well. Going for a feather edge will drive you broke and I suggest to try and use a wide but not too deep skive instead. The edges last longer as well. Feed wheel use a fine stone one. You will get better results by doing several passes when running these skins through as the skin gets more evened out and less of the bump and hole problem. If the croc aligator skin is glazed it can help to give them a light sand on the back first to sort of break the tension in it first. This allows the skin to flex more easily as it goes through. In your patterning allow some extra skin to be trimmed off after the skive is done as it will often end up more wobbly shaped. That's all I got.
-

Threaded Inserts for 3D Printed threads
RockyAussie replied to chrisash's topic in 3D Printers and Lasers
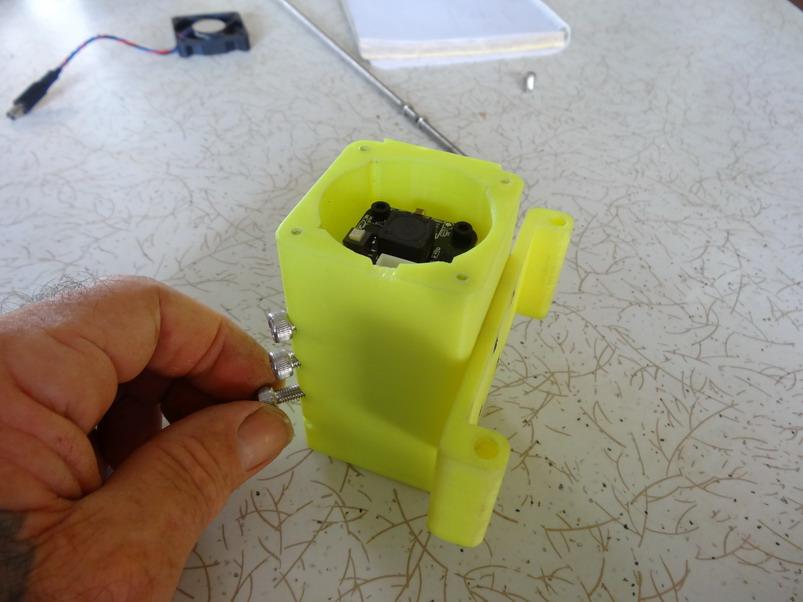
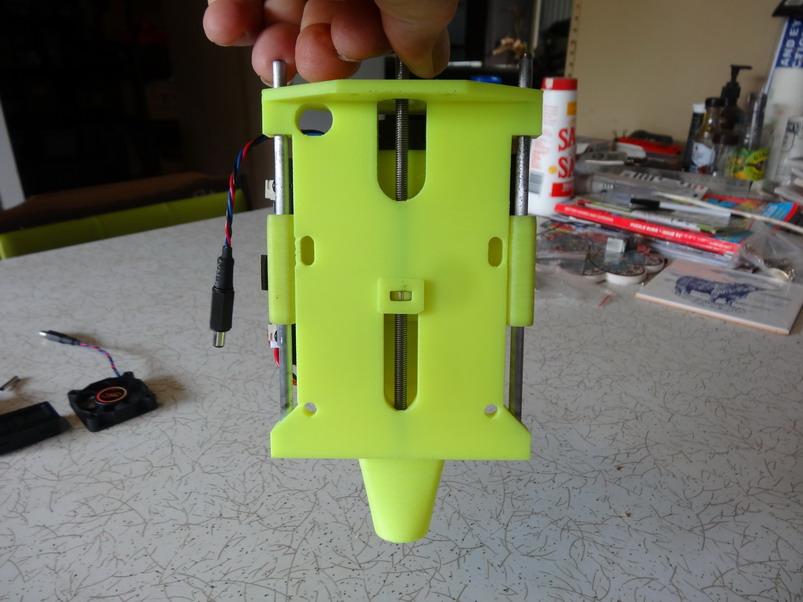
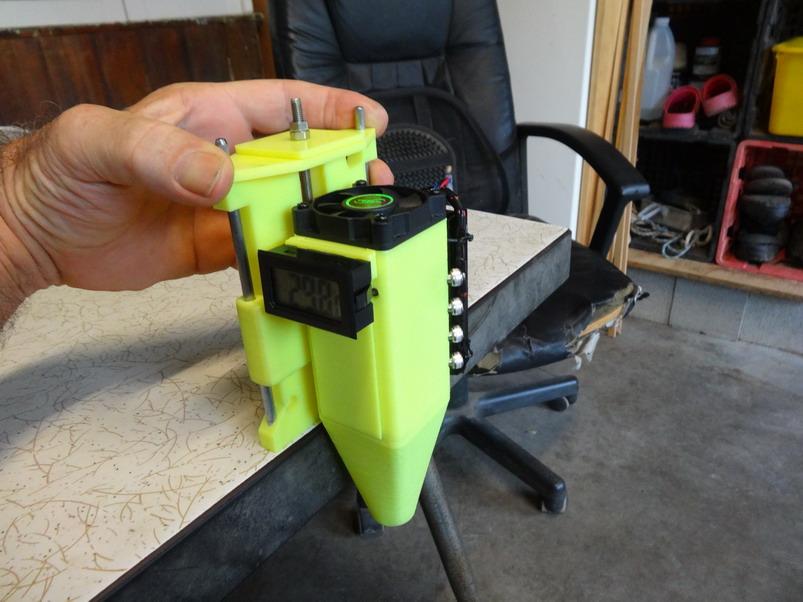
In Curra in the basic settings you have the option to make the shell thickness to the thickness you want as long as it is a multiple of the nozzle diameter. eg. if the nozzle is .4 the shell thickness can be set to .4, .8, 1.2, 1.6 and so on. As long as your drawing of a solid has holes put in it, they receive the same thickness treatment as the outside wall thickness.( sometimes I have strengthened parts that come under heavy compression by putting more holes through the part). If he had made his shell thickness more it may have made it stronger but I think if he had used say a higher density percent above the 30% he used, it would not have pulled out the full thickness of the hole and its surrounding shell as easily. NOTE: As long as you can bury a nut down in there or assessable from the back it will be stronger than any of the shown methods. I often print a tight hole for a nut and then heat the nut up and force it in and it works very well. Here in some pics below I have inserted some nuts into the housing of a shroud I have designed to improve the air flow over my diode lasers. It also marries up with a frame that allows me to have Z lift for them. Here I have inserted the diode laser and these bolts allow me to position the laser module within it at an ideal height. This pic shows where I have pushed a nut into the back of a moving block that allows the up and down Z movement.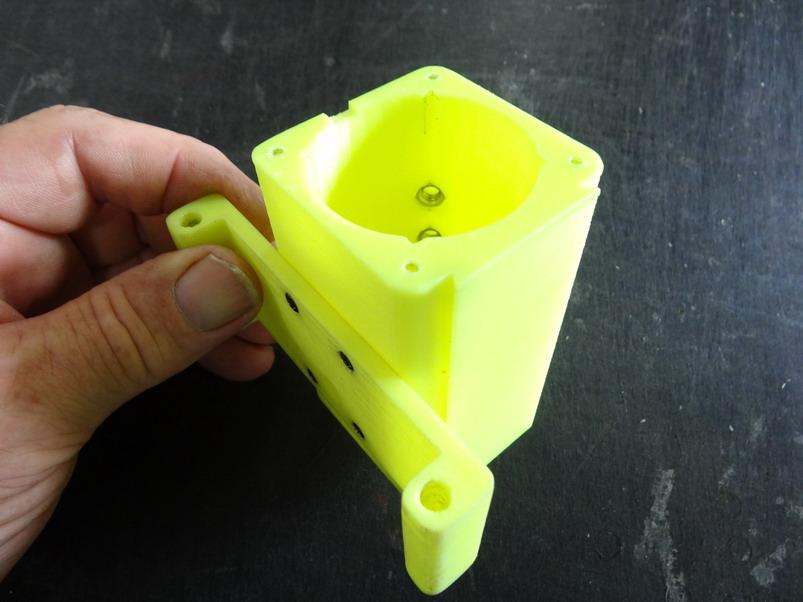
-
New Beer Growler Carrier
RockyAussie replied to garypl's topic in Purses, Wallets, Belts and Miscellaneous Pocket Items
AAAHHHHaa now it all makes more sense to me. -
New Beer Growler Carrier
RockyAussie replied to garypl's topic in Purses, Wallets, Belts and Miscellaneous Pocket Items
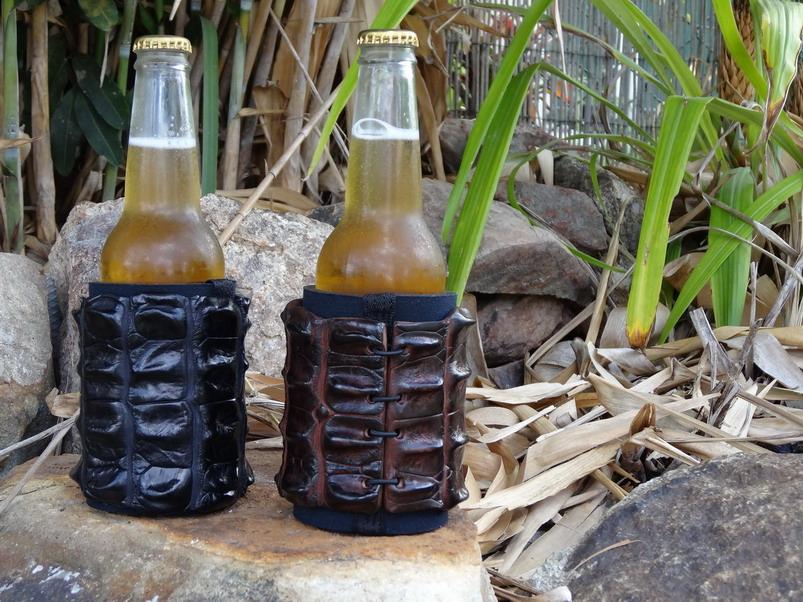
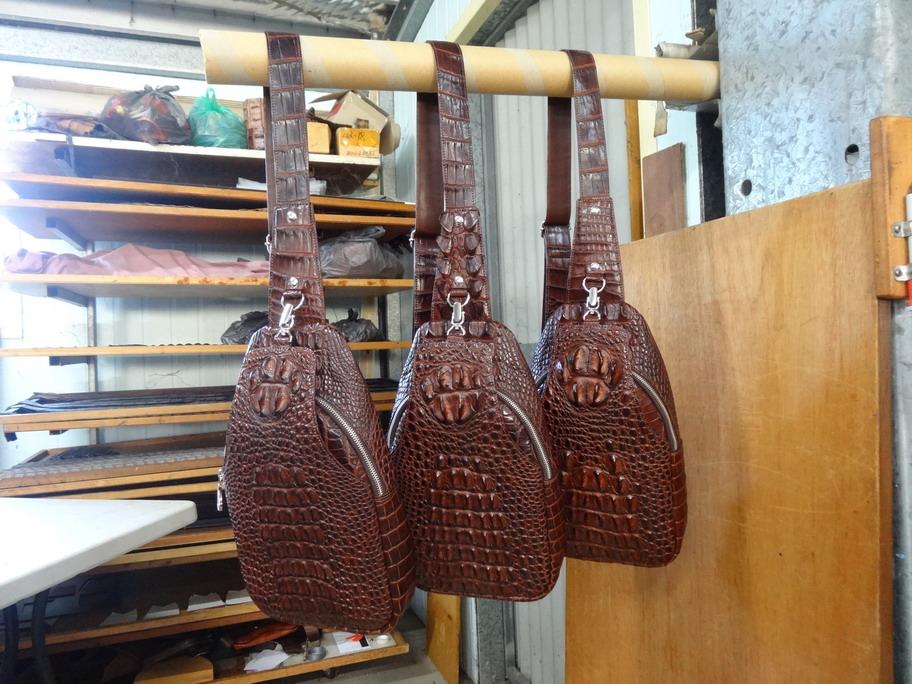
@garypl I think that is some very good looking workmanship there. Over here we like to drink them very cold and that means a fair bit of condensation has to be considered when making them. I use to quote @Handstitched " Then theres those awful foam rubber stubbie holders ( wet suit material ) , they're just plain boring and mass produced" as a liner to the croc ones I make. They are rough as guts but the demand way outstrips the available supply. The stitching method you use to attach I hope no customer of mine ever sees or I will never keep up production.(Very nice). Because of all of the variety of sizes I use an elastic cord that can expand along with the wet suit material to accommodate the size needed. Here's a couple of pics to explain -

-
Next you'll be needing another one or 2 to keep up. (Don't forget it cuts the masking tape on leather nicely).The variety of things that are possible are just mind blowing. Biggest headache so far with mine is that it is stuck cutting out product boxes nearly all of the time and I cant get to try enough of that more interesting stuff. Think I might have to make another smaller one next and try and squeeze it in somewhere...........
-
The mention of the padding in back made me recall a sling I made awhile back and posted here This type of skin cover will cover any bumps ...believe me.
-
Leather & Waxed Canvas Tote
RockyAussie replied to BattleAx's topic in Purses, Wallets, Belts and Miscellaneous Pocket Items
Well done and thanks for sharing. Cant see the Battle Ax brand on it yet though. -
If you have a decent sanding machine you could contact glue some thin weight leather over the lot and sand it down or if its not too deep toolin just sand it back some. That should give a good contact surface as well for the snake skin.
-
I agree with that mostly when I see products stitched poorly but that can be evident whether by hand or machine and I prefer to do it well enough by machine that an educated eye has difficulty telling which way it is done. NOT saying I always achieve that level I will have a look but if you have not checked out T2 laser do so as well. One of the features I have useful is being able to set it to do multiple passes with a cool down time in between passes. Sometimes cardboard or leather will lift and buckle as it is cut and by doubling the speed or halving the power you can get a chance to put down some more weights or magnets in my case. This also allows me to keep the temperature down when using full power on long jobs. Next update on mine will be a vacuum bed to keep it down flat. I hope by going to a larger blower I can share the smoke extraction with the bed vacuum in a split sort of way. Only got a talk myself into drilling about a thousand 3mm holes through about 2mm steel sheeting...
-
Firstly I will say that the cover has come out very nicely. As to your last comment I think that hardly any here, could have achieved that level of detail in the badge part without the laser process. Those that could..... would not come near to doing it for a price that all but a very few could pay you for. WELL DONE!!!
-
-
Maker's mark on 1mm kangaroo wallet
RockyAussie replied to deloid's topic in Leatherwork Conversation
A hot press embossing machine will work. The plate that the stamp presses down onto should have a firm rubbery type fabric which you should be able to get from the foil maker people. This helps lift the impression as well as resist the cutting problem. Laser will also work but not as well in my opinion and takes a lot of extra time in comparison. -
Are you able to change the software in that engraver? I have been using T2 Laser for awhile and find it fairly good. I have been doing a bit of looking into Lightburn recently as they seem to have a fairly promising forum there. Here a link- https://forum.lightburnsoftware.com/ I have not tried it yet but I remember seeing something about the reduced size problems in there somewhere. Their camera software looks very interesting as well.
-
Fortuna Skiving Machine Restoration
RockyAussie replied to lintonleather's topic in Leather Machinery
50mm will fit and is more useful overall. The rubber wheel is no better than a fine stone wheel on fine leather and as I have found is easily destroyed if it ever gets a adjusted up enough to touch the blade. A stone feed wheel can be used partly to sharpen a blade when it has a large nick in it as well. The blade will come off with a few taps at the back off the bell after the 4 screws are removed. The tools mentioned with a picture above are not needed as they are for cleaning the sharpening stone and pulling the brass deflector that sits inside the bell etc. Heat will work and the head of the screw is broad enough to use a decent set of vice grips on it if the slot is too damaged. -
How to set pearls and jewels into leather?
RockyAussie replied to Harry Marinakis's topic in How Do I Do That?
Try serching for bezel for Mabi pearl should work. -
Here is a post I did awhile back that has some links that may be useful with regards to the roller making.
-
Nice job. I reckon you could take 1/4" off the top of the base with an angle grinder pretty quick. I have shaved the sides of mine at times in order to get jobs in closer and the cast is pretty easy grinding. That would give you a little more clearance under on boxed or tubular jobs as well. You would need some right size packing washers to get back the 1/4" for some dies though.
-
HELP how do I split 6 inch wide pieces of leather
RockyAussie replied to jennifer1962's topic in How Do I Do That?
Others may say different but 5" wide veg can be difficult to get right with even a bandknife splitter of which I have 2 types. I would be shocked if the machine you have could do anything reliable wider than 2" unless fairly soft and with enough thickness. A bell knife skiver could do it with multiple passes or if that is to expensive yet a sanding machine may be an answer.Multi tool sander and adaptions for dust extraction and leather thinning.pdf -
Just did a few checks and please note that a few of the skivers in your list do not have covers for the top of the bell. I have taken the top skin off my fingers when not using one them and I do note also that Alexander's do have that feature http://www.solar-leather.com/cb801-bottom-feed-bell-knife-skiver
-
I have a Fortuna and a FAV and both are pretty useful. They both have aspirators (vacuum to assist the waste removal) and having had a non aspirated skiver I would not go without again. NO offence to Alexander intended but I believe all of the machines you list above including the FAV are potentially able to do the work to a high standard with operator experience and a roller foot which leaves next to no mark at all. I do a lot of glazed crocodile work and the scraping/scratching from standard feet is why I developed a roller foot for myself. I have done a few video's on my Fortuna skiver with roller feet and I recommend you to check out this one and maybe a couple of my others you can find from there. The video showing circular skiving is done with a roller I made for myself years ago and still use4 mostly every day. Thick leather, chrome or Veg is possible but best done in a couple of passes sometimes.
-
Just to be sure I am talking about rivets like the red glass ones in these pictures below
-
In the past I have lathed down a piece of nylon 1" rod to fit my press and the give in it works alright. Nowdays I'd probably just print them in the 3D printer which would allow me a few more various shapes/dome sizes etc.
-
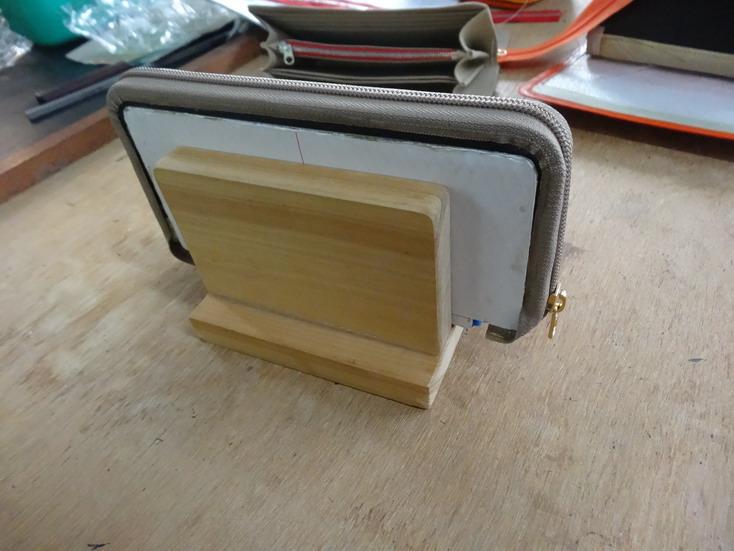
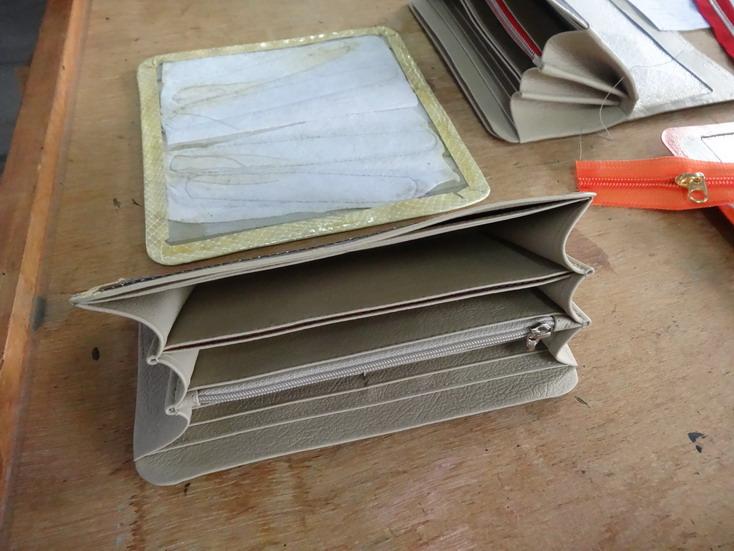
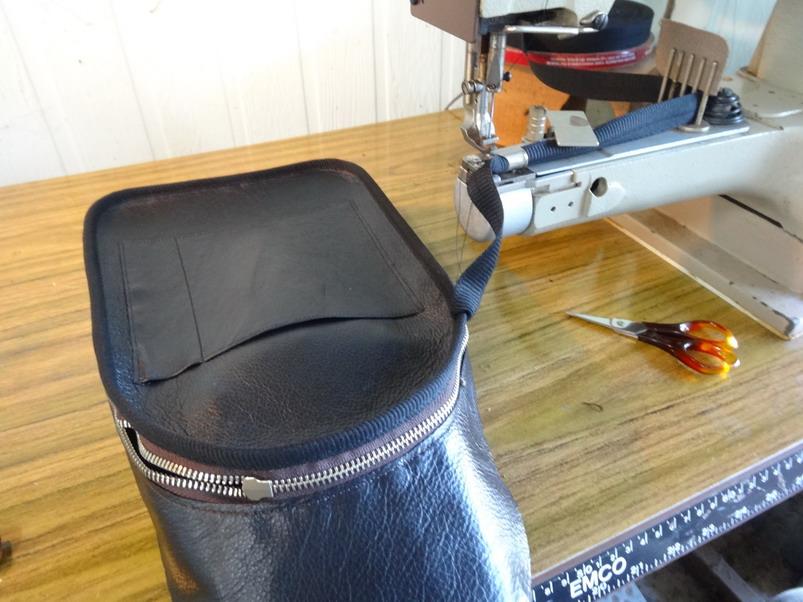
I was worried you may come back and say that. This type of product is not a piece I would recommend making early on in your leather working. You need to use a divider or something to mark a line around the perimeter. If I were to be doing this by hand I would do my line and pre punch my stitching holes around the outer fully before attaching the outer to the inner. If the pattern is correct after attaching the zip to the inside, the inside should be just showing a little larger than the outer after it is attached. This is normally less than 1mm all around on mine. See below a few pictures that may help. I would do some practice on your perimeter stitching before going back to such a difficult product piece. Regards Brian

-
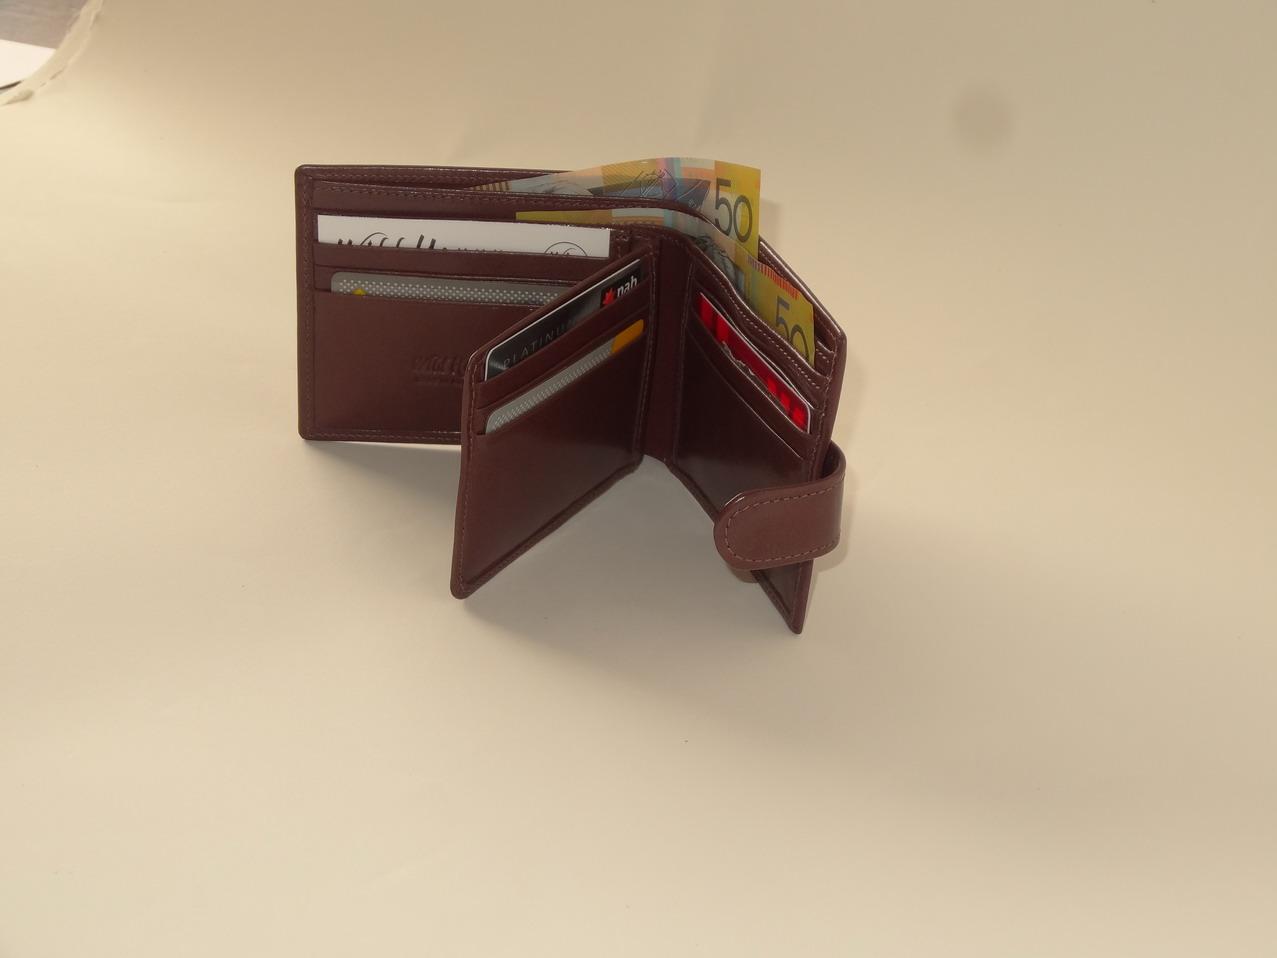
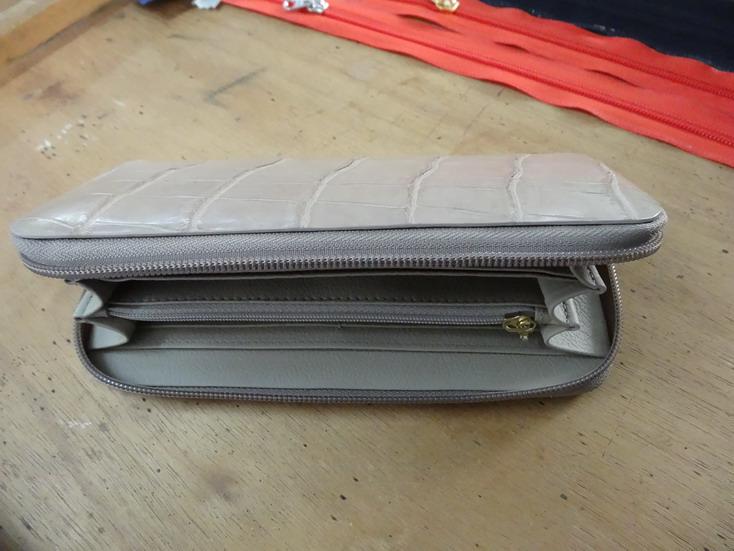
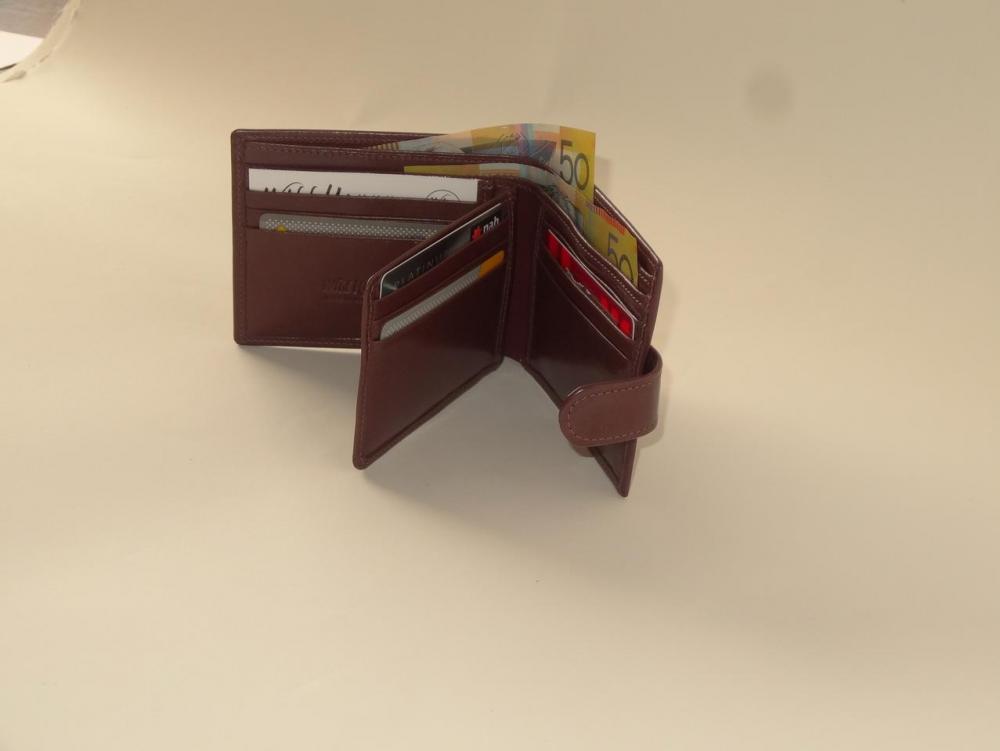
There are very different styles of wallets and small bags and I would urge you to post a couple of pictures of the style of products you want to produce. The larger machines mentioned above could easily be a disaster. If you are working on thicknesses above 3mm (1/8") Veg etc then a larger machine as mentioned may suffice. Keep in mind that leather point needles for these machines are not available in the smaller sizes below 160 and that can be a problem. 95% of the stitched product on my Wild Harry website in the link below can be done on a small cylinder arm machine like a Pfaff 335 or one of its clones. The pictures below show product that is done on a 335 style machine. The wallet shown would be next to impossible on one of the above mentioned 3200,3500 or CB 4500 machines. @bikermutt07 advice on the cowboy cb341 sounds to me a more realistic starting point.
-
Pfaff 335, Adler 69 type Cylinder arm caps.
RockyAussie replied to RockyAussie's topic in 3D Printers and Lasers
I look forward to seeing them and helping if possible. Sorry mate, I suspected you wouldn't have any probs with that and look forward to any help if needed in scaling in the slicer program for any who may request it. I do have slicer but got a bit disappointed when a couple of prints looked like they would work on the screen but did not come out as expected. Once I get used to a program and how it works I tend to stick with it often to some disadvantage. Question..... On the cap you printed does it clear the hook/shuttle stuff alright? It does on mine but I run my filament at 1.74mm and hot in order to extrude a bit heavy and this gives excellent bonding together but some times things come out a bit on the larger side.