


particle
-
Content Count
1,352 -
Joined
6 Followers


Recent Profile Visitors


-

A Little Weekend Project
particle replied to AzShooter's topic in Gun Holsters, Rifle Slings and Knife Sheathes
I never said I spent 2 hours. I did scroll through 2 years of post summaries and titles to make sure I wasn't speaking out of place (and it probably took less than 5 minutes). And I only felt it necessary because, for at least the second time, you commented "That holster looks familiar ...", inferring you were the original creator of the design I guess I'm not surprised to see yet another comment like this from you. -
A Little Weekend Project
particle replied to AzShooter's topic in Gun Holsters, Rifle Slings and Knife Sheathes
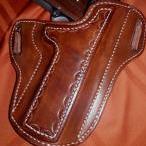
You're right, it does indeed look familiar... That's the design I came up with back in January of 2010 (the 1911 holster photo attached here) when I tried to find a different way to make an Askins Avenger. I incorporated the belt loop with the front curved wrap panel, which honestly is a terrible design since the belt loop has to be stretched so much to fit the belt. To my knowledge, NO ONE was making them that way at the time. This morning I scrolled through 2 years worth of posts from you starting when you joined on January 6, 2010 and I never saw anything from you that might indicate you were also making them this way. In February of 2010 I made one for my Kahr P9 (photo of the holster also attached here), which I filmed and posted to YouTube. If you were making them this way, I certainly never saw them! AzShooter - please feel free to contact me via my website. I'd be more than happy to help you however I can if you have any questions. -
When I spoke with my sales rep at W&C years ago, I asked about "holstered" leather, and if memory serves, she said it's an additional step to pre-compress the leather to make it more dense. I think the previous version of their website mentioned something about it as an upgrade service, but I don't see it listed on the current site. That being said - if "Holster" is listed as a common use, and not an upgrade service, I wouldn't expect any special treatment to have been applied to the leather.
-
I don't own the Glowforge, so feel free to ignore my comment. But I do own a 90W laser and have some experience using it on leather. You said you're coming up short on answers - what were your questions?
-
Client Cost Sharing for Custom Stamps
particle replied to odekami's topic in Leatherwork Conversation
I agree with what the others said. You should not be expected to eat the cost of a custom stamp that's of no additional value to you. If you want to give them a break on your labor for the first batch of coasters, that's up to you. But the stamp is a hard cost and out of your control. Do you have a press? If not, you'll probably want to add a hydraulic press to your arsenal. -
Cross draw holster & cartridge belt
particle replied to Josh Ashman's topic in Gun Holsters, Rifle Slings and Knife Sheathes
That's a great looking rig, Josh! Love the color. -
Looking for this specific vertical wallet pattern
particle replied to PalmieriLeather's topic in How Do I Do That?
https://corterleather.com/collections/patterns/products/pattern-vertical-card-wallet https://www.stockandbarrelco.com/collections/templates/products/no-52-vertical-wallet-template https://littlekinggoods.com/collections/for-the-makers/products/lkg-6-card-vertical-wallet-template-downloadable-pdf -
I think part of the issue is Fiebing hasn't done a great job of instructing people on how to properly use their products (their YouTube channel has barely any instructional content). I used Edge Kote years ago - hated it and promptly threw it away. Not sure how long it's been around (probably a while), but I recently bought & tried Fiebing's Edge Dye. I figured since it comes in a bottle with a sponge tip that it'll be easy to apply, and since it's a dye, it's bound to be better than Edge Kote! Boy was I wrong. I think it's just s diluted version of Edge Kote, so it's just another painted-on edge finish. I may be wrong, but I always assumed Edge Kote was intended to be a final edge finish. Meaning, there should be no need to wax and burnish it (which could damage & remove the coating). An acrylic sealer over the edge is fine and probably a good idea.
-
particle changed their profile photo
-
I use 1" nylon webbing. I have a huge roll of it that I bought years ago, and I don't recall where I bought it (I believe it was from a parachute supply company). If you don't already know, nylon webbing comes in different thicknesses. I would get the thinnest you can find. This is probably a good option: https://www.strapworks.com/Flat_Nylon_Webbing_p/mfnw1.htm
-
I'd go the concrete route if you're up to it so you can size it to fit your needs/space. And on the plus side, it's all the rage right now on YouTube because a lot of people are being sponsored by Quickcrete. So there's lots of great info on building forms, reinforcing, etc...
-
Here's a few that immediately come to mind: https://www.stockandbarrelco.com/collections/templates https://littlekinggoods.com/collections/for-the-makers https://makersleathersupply.com/collections/templates-and-patterns http://makesupply-leather.com/templates/free-leather-templates/ https://corterleather.com/collections/patterns https://am-leathercraft.com/collections/pdf-patterns https://www.youtube.com/channel/UCJYSHaxWbDhYgh-PH0nashw
-
Copying and copyright(ing) 'n' stuff
particle replied to JLSleather's topic in Marketing and Advertising
I’m reluctant to revive this thread, but I haven’t been here in a while and I feel I need to set a few things straight. I'm sure my words will get twisted and there will continue to be accusations and insults thrown my way like "S O F T", "MUNKY", "jackal", etc., but certain people seem to enjoy that sort of stuff, so whatever. When I first started making holsters over a decade ago, it was to replace my wife's income since we were expecting our third child. Tutorials related to concealed carry holsters were almost non-existent in 2009 (at least as far as I was aware). There was a great tutorial for a pancake style holster on a guy's website, but I've lost track of it over the years - I'd love to remember where it was so I could reach out to him and thank him for helping to get me started (I used to direct people to his site all the time because it was such a great resource). At the time, YouTube was still mostly silly cat videos. To help give back to the leatherworker.net community (and the world as a whole), and to help market my holster business and show my customers how much work was involved in making a holster, I posted my first 3-part YouTube video in February of 2010 showing how I made an Avenger style holster for my Kahr P9. To help make ends meet, I eventually started selling patterns. And yes, I did make tutorial videos that I had available via subscription on my website. I now just post new videos directly to YouTube, but the O.P. loves to make it sound like I'm forcing people to buy/rent/watch the stuff I make. I'm just trying to help others while also paying the bills! Regarding the tooling pattern shown in the Stohlman book in multiple threads - yes, I did use that design for inspiration, and yes, I did include my hand-drawn & adapted version in some of my pancake patterns. No, I never directly photocopied and distorted it with my graphics software. It was not a direct copy. Being that I hand-drew the design to fit on my reinforcement piece, I felt it had been modified enough to use on my patterns. The individual elements in the design are not unique to Stohlman, but I should not have leaned so heavily on his composition. Once it was suggested here that there might be some legal issues with such a strong resemblance to the original composition, I immediately went through all of my patterns and removed the tooling pattern from my files. Regarding my most recent YouTube video that my (not so) secret stalker referred to (showing how I made a flat-back holster for a Taurus Judge, I'd never seen the tutorial shared by Jim back in September of 2009. Or at least if I had seen it, I completely forgot about it. I've only made a hand-full of western style holsters in my decade of experience, so it wasn't something that would have interested me 10 years ago. The formula I’d used over the years usually worked very well for me (1/2 the slide thickness + one thickness of leather = stitch offset). Jason Ingle used a leather strip a while back in a class he did with Learn Leather. I've been using ‘his’ technique lately. I’m sure he's the not original creator of that technique (and I’m sure he would be the first to tell you he didn’t create the technique), but he's the only person I’ve seen use that technique. Prior to seeing Sam Andrews video on making a flat back holster, I'd never made one before and never really knew how to. His video was a great help, and I credited Sam in the video since he's the actual person I learned that particular method from. Regarding having 'legal' text at the bottom of my pattern product listings, that was simply to discourage people from distributing my holster patterns. Yes, since I had an adaptation of Stohlman’s tooling pattern in some of my files, that was a little ironic, but it was an innocent oversight, and one that I didn’t consciously see a problem at the time (again, since it wasn’t a direct copy) and I immediately removed them from the files once I realized there was a potential problem with it. So thank you for bringing that to my attention, no matter what your motives were. When I created my Avenger style pattern back in 2009 or 2010, I tried very hard to differentiate my design from the original Askins Avenger. His reinforcement band was a simple “L” shaped piece of leather that naturally worked great for making the belt slot tunnel. I made my reinforcement piece very large with an integral belt slot tunnel so I’d have room for tooling, but it made it terribly difficult to form the belt tunnel. To my knowledge, no one else was making their Avenger style reinforcements that way at the time, but now loads of people make it that way, even though it’s a less-than-ideal design. And my pancake reinforcements – I don’t remember seeing anyone making them extend down towards the muzzle the way I was doing it, but now it’s common place. Oddly enough, those that would call me out don’t see a problem with using things that were unique to my own designs at the time, though I’m sure I’ll now be accused of stealing those designs back in 2010. At the end of the day, I'm just trying to be the best dad and husband that I can be. I love sharing whatever tips and tricks that I can with anyone that asks. Making tutorial videos satisfies my need to create things with my hands and help & teach others, while also getting to do fun things with video editing software. I’m baffled that certain individuals have latched onto me and continue to throw insults and accusations my way. If I’ve rubbed people the wrong way, I’m truly sorry. If others wonder why I don’t post here anymore – well, it’s because of threads like this. -
Digital printed holsters
particle replied to justingschneider's topic in Gun Holsters, Rifle Slings and Knife Sheathes
No, we were there to look at his 3D printer and only briefly talked about the color printer. I should have taken pics so I could read up on the models. -
Digital printed holsters
particle replied to justingschneider's topic in Gun Holsters, Rifle Slings and Knife Sheathes
For what it's worth, I just visited a shop for my 8-5. The guy had multiple commercial grade 3D printers, CNC machine, laser cutter, etc. He had this swanky printer that he said would even print on oil - not exactly sure how that works. He said I could even print on my skin with it... He uses it to print graphics on all of his 3D prints, golf balls for charity events, etc. -
He was looking for a " downloadable Flat Back Pan Cake holster for my Kimber Command II 45 ACP", in his words.