


DJole
-
Posts
1,091 -
Joined
-
Last visited
Content Type
Profiles
Forums
Events
Blogs
Gallery
Everything posted by DJole
-
Okay, here's a Christmas project I did: http://djole.altervista.org/djole/Publications/Leather/NativityPix/LeatherNativity.htm

-

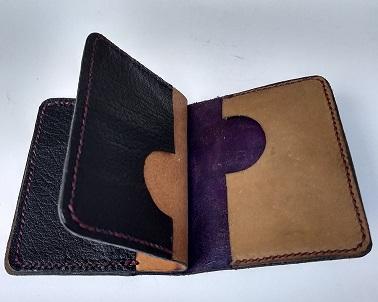
Card Wallet -- with extra pockets
DJole replied to DJole's topic in Purses, Wallets, Belts and Miscellaneous Pocket Items
Here's the inside. Very thin leather for the inside pockets! Traditional Japanese motif in the middle there. There are 6 pockets in this thing! That's a fair number of cards... Inside edges (a three layer sandwich!) sanded then painted with Fiebing's black EdgeKote. I have this on my desk at the moment, and I keep looking at it and thinking, "Hey, that's a pretty decent job! Looks nice!"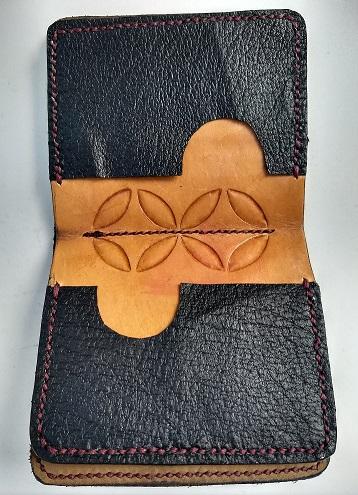
-
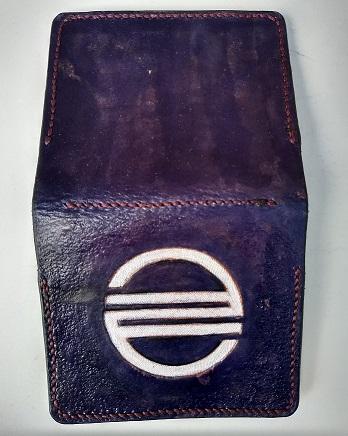
A commemorative gift for my nephew, as he starts medical school this fall. I mixed Angelus blue and purple to get this color, and that's a rare appearance of Fiebing's white dye in the reverse carved design. The design is from the flag of Sendai, Japan (near where he lived for a couple years.) The thread is burgundy Tiger (.6 thickness) using 3mm stitching chisels. I used my pebble backgrounder (Craftool M 892) to add texture, except just around the design. The outside leather here is about 2-3 mm thick. Inside leather is 1 mm. Edges burnished with black Tokonole.
-
Fiebing's USMC Black certainly does require buffing. Is there a particular reason that you are not using leather which has been dyed black at the factory, rather than dying it yourself? That could solve a lot of your problems right there.
-
I Can't Leave Tandy Without Spending 100 Bucks
DJole replied to AzShooter's topic in Leatherwork Conversation
hey, I can help you with your addiction -- if you can't leave Tandy without spending 100 bucks, just bring no credit cards and only 50 dollars cash! That'll fix your problem, right there! -
That's so nicely done! A lovely design, well executed!
-
I can't see the plate... time to get a video review of the play? ;-)
-
I can't tell what the design is. You'll have to get a photo with more contrast.
-
Getting good straight cuts and issues with stitching.
DJole replied to rckt1rcn's topic in How Do I Do That?
I suspect the half moon knife is not your friend yet, since (although I don't have one) I understand that they need to be well sharpened and well stropped to work well, and then there's a learning curve after that. A box cutter (i.e. the break-off hobby knife) will do just fine, as long as you match the blade size to the leather thickness, and use a FRESH blade for each project. Are you using a metal straight edge when you cut? Are you keeping the knife snug up against the straight edge? Are you holding the knife consistently straight up and down? Those things will greatly affect your cuts. When stitching, using the pricking irons or diamond tools or whatever you have (you didn't specify clearly), there are some things to consider: 1) Leather thickness -- thick layers don't play well with most of those stitching tools, especially if you are trying to do two layers at once. You'll have to do each layer on its own, or else take the time to learn to use a stitching awl correctly. 2) Polished chisels (which make holes, rather than pricking irons, which are meant to just mark the leather) -- if the teeth aren't polished, they don't pull out well, and your leather will stretch and bend, thus ruining your straight line. 3) Learning to hold that chisel STRAIGHT up and down when you strike it, EVERY TIME. This is a big one, which takes patience and time to learn. Go slowly! Turn your leather so you are looking along the line (as if it points away from you) rather than across the line will help you determine if it is straight up and down before striking. Developing consistency is a big step here. Many of us rush this, because it seems so simple! But you have to carefully place the tool, the same way each time, along that stitching line. If on one strike the center of the teeth is along that line, and in the next, the tool is slightly misaligned so the teeth are not centered, the line will meander. Add this to the "not perfectly vertical" problem, and you get crooked lines. 4) There are different opinions about using a groover vs. merely using a line made with wing dividers. The main school of thought for making a stitching groove is that the threads wear less, since they are below the surface of the leather. I can't vouch for this being accurate or not, but what I can say is that I haven't used my groover for a few years now, much preferring the wing divider line. But in either case, you must have STRAIGHT EDGES to run the tool along, or else you'll get curvy, wobbly stitching lines. Again, don't rush -- take the time to sand the edges flat before using the tool on them. This advice certainly helped me! -
Maybe this page, by Ian Atkinson of Leodis Leather in the UK, will help you out: https://www.ianatkinson.net/leather/leatherguide.htm Look for the "Stitch Sizes" subheading about 6/8 of the way down the webpage.
-
Bi-Fold(?) Wallet
DJole replied to ThatTallChick's topic in Purses, Wallets, Belts and Miscellaneous Pocket Items
I took a look at the Amazon kit you mentioned, and it appears that you have a set of diamond chisels, which make a diamond shaped hole in the leather. Pricking irons make an angled slit in the leather, rather than a hole. Pricking irons are meant to MARK the holes that you then pierce with a stitching awl. That's the traditional standard, and many people aspire to that. But the diamond chisels are much more forgiving, and easier to make good stitching lines with (since getting straight lines with the awl takes a lot of consistent practice). The stitching chisels should be strong enough to drive through two pieces of leather of the thickness you are using. If they are bending, then they are made of bad metal, or you're driving them into something hard. Good advice given above, to change the thing you're using underneath the leather when making the stitching lines. And if they keep bending, then the tools are bad, and you should look into replacements. I second the advice on using the wing dividers to make a stitching line (or a light, shallow stitching "groove"). I found that I can get a much better line with the wing dividers than with the groover I bought years ago. The groover sits alone, unused for a few years now. For choosing thread: take a look at some YouTube videos to help you match the thread (which will involve choosing the right size of needle and the size of stitching/pricking iron also) to the project. https://www.youtube.com/watch?v=Uc_4cZp9JDs https://www.youtube.com/watch?v=XYT9Rc2YRAk https://www.youtube.com/watch?v=X3BwpAkQlgg All that being said, that's pretty good work, and you've learned a lot! Keep it up! -
Desperately need advice for quality hand tools!
DJole replied to TravisRising's topic in Leatherwork Conversation
You may not need specific brand name tools for much of your work when starting out (except for specialty things like tooling and stamping). Perhaps Ian Atkinson can help steer you in a useful direction. His YouTube channel has some excellent videos for beginners discussing what tools they actually need, most of which don't need to come from a leather supply store. Here is a partial playlist to his videos: https://www.youtube.com/playlist?list=PLvoKYeh7ahyGB-numgnO3WxOVi3Sgkyzg -
I use a leather "canister" (like a map tube) to store my skiver and Xacto knives in. Keeps the sharp side away from my fingers!
-
I only have the TF Barge cement, like you. I've never used the "real" stuff. Before I picked it up, I used various white glues (like Tandy's EcoWeld), but I needed something stronger for other projects. I'll be interested to see comparisons.
-
You can actually stamp it after dying, as long as you haven't added any other chemical (like Resolene, for example, or other protective finishes.) What you should do first, however, is do a test run on a scrap piece of leather from the same hide: dye it, and then try casing it and stamping it. Then take another piece, stamp it and then dye it. If you're okay with the first round, then you're good to go. If you really prefer the second round, then you know what to do next time! Usually the stamping goes first because it affects the leather surface, and dye will react differently to those changes.
-
Out on the Kenai you probably don't have a leather supply store nearby, but probably a few bears around. Welcome to the forum!
-
Welcome to the forum!
-
What an absolute beast of a machine! Good to see it slowly coming back to life.
-
Tools for simple straight line pattern
DJole replied to WinddragonCraftworks's topic in Getting Started
Welcome to the forum! It's a great place full of helpful people and a goldmine of information. I did a quick Google search to find out what this journal looks like: Diary as it looks in the TV program So, now for some more questions: It doesn't appear that the lines are cut in and then tooled with a beveler, although this could be done. It appears that they are deeply embossed, with a rigid, rounded-end tool. It's even possible to make that design by forming the thin leather over shapes (like this person did). -
What you wish you had known when you were getting started
DJole replied to bigsig11010's topic in Leatherwork Conversation
How to finish edges, and how to do traditional stitching. There was no Internet when I wanted to learn all this in the mid 80s to mid 90s. I suppose I could have asked that Tandy store less than 1/4 mile away from me for instruction, or something, but it seemed like everything was Western themed, and that's not my interest. -
Thanks for posting those, Tugadude.
-
I'm looking at edge waxes, like Columbus brand, but I can't find any instructions on how they are applied: heated and applied as liquid? rubbed on like a burnisher?
-
Rally Fobs
DJole replied to oakenlander's topic in Purses, Wallets, Belts and Miscellaneous Pocket Items
Those are lovely! Nice colors, smooth and clean design. -
Any experience with the Felsted skiver? Or is that strictly limited to bookbinding leathers?
-
Well, you probably got yours in an alternate universe or something! ;-)