Dwight
-
Posts
5,257 -
Joined
-
Last visited
Content Type
Profiles
Forums
Events
Blogs
Gallery
Store
Everything posted by Dwight
-
To me, . . . the easy way would to buy both a black one and a blue one. You will get THE perfect thread that way. Take the blue one with the black thread, . . . sell it on Ebay, . . . chalk up the difference as the price of having the "blues" in your car May God bless, Dwight
-

Box Pocket--How To Neatly Trim Excess Leather Flaps?
Dwight replied to thekid77's topic in How Do I Do That?
The way I would make that item is to mold it in one piece, . . . no seam at the corner. You need to make a wooden form to do that, . . . and the first few seem hard, . . . but you should quickly catch on. Basically the male form half is the exact shape and size of the INSIDE of the piece, . . . included rounded and shaped corners. The female form half is the exact shape and size of the OUTSIDE of the piece. Be sure to sand this piece carefully so there are no burrs or ridges to leave marks on your leather. Putting the two together in your hand, . . . you should see the differenct between them as just a little over the thickness of the leather you want to use. I usually make mine out of southern yellow pine, . . . just one 8 foot 2 x 8 lasts me a long time making these forms. The most important tool you need is a good router and router blades, . . . PM me if you have any trouble figuring it out. You will really be impressed when you take your first one out. Just soak your leather really good and wet, . . . make sure to cut it plenty big, . . . lay it over the male piece, . . . squeeze the female piece down on it, . . . clamp it for an hour or two, . . . gently separate them, . . . hang it up to dry, . . . you'll love it. May God bless, Dwight
-
I have a friend whose two Boston Bull terriers would go out in the yard with their commercially made nylon collars on, . . . the ones that carry the little plastic shock boxes. These had both a buckle and a keeper under which the tongue end was kept. Usually it took them all of a few minutes to have both of them off, . . . and be running the range free of the shock boxes, . . . and seeming to enjoy it. One would bite at the loop on the other ones until they magically pulled the right way, . . and the collar & shock box hit the ground. I made him two leather collars, . . . stained with pro oil stain, . . . finished with Resolene (50/50 mix) and last time I saw them all, . . . they had not taken those collars off. Those are my only experience, . . . but they worked well. May God bless, Dwight
-
Sent pm, . . . but answer is ciminodw@gmail.com Thanks again, may God bless, Dwight
-
Not me, . . . May God bless, Dwight
-
I dip dye, . . . 9 x 14 x 2 cake pan, . . . one for browns, . . . one for black ONLY. I have very few customers who want stitching different from the belt. I make sure they know that if they get white stitching, . . . it WILL get dirty and won't look as good. When they insist, . . . dying and stitching get reversed in the order. May God bless, Dwight
-
Sorry guys, . . . should have explained. When I dye the belt, . . . all that is left to do is finish it and deliver it. I found out early on that sometimes the inner liner would like to buckle a bit if I tried to curve it after it fully dried. While it is still wet with dye, . . . wearing latex gloves, . . . and being very methodical and careful, . . . I bend the belt between my hands. That makes something like a 8 inch or so diameter curve in it, . . . end to end, . . . as I bend it, . . . then allow it to staighten out a bit. Laid out flat on a table covered by newspaper, . . . when it is done, . . . it will generally lay in a big circle with the ends even or maybe overlapping a bit. I always lay my belts down on their bottom edge on newspaper for the first hour or so after dyeing them. I'm going to someday make a "curver" to do this with less wear and tear on 68 year old hands, . . . but for now it makes the belts a better product, . . . less wrinkles in the liner, . . . and yes, . . . it also works for dog collars. Had to make a couple last year, . . . worked great. May God bless, Dwight
-
525663 10151216440747644 272043929 N
Dwight commented on Billie Jo Brause's gallery image in Gallery- Our Leatherwork
 Excellent work, . . . as a pastor, especially noted. May God bless, Dwight
 -
Google Ohio Travel Bag, . . . then Etsy. You may find something in either place, . . . but you will have to search. May God bless, Dwight
-
If you have a Hobby Lobby near by, . . . go there, . . . and ask where the "sewing" things are. When you get there, . . . you are looking for the wall with the scissors, needles, thimbles, etc. and you will find two tools there, . . . both with blue handles, . . . and they are snap setting tools. One is basically for line 24 size and the other one will do it all, . . . they look like funny shaped pliers. Either tool is about 25 bucks, . . . I have ruined maybe 6 snaps with that tool, . . . in about 8 years of using it. One tool is their sku: 304733 and they call it their gripper plier kit, . . . it is the "do em all" tool, . . . and looks almost identical to the other one. I usually find them hanging together or very close proximity of each other. You may have to skive the back of the leather, . . . I've done that before, . . . but this tool is so much better than any other tool I've seen or used. It really works. May God bless, Dwight
-
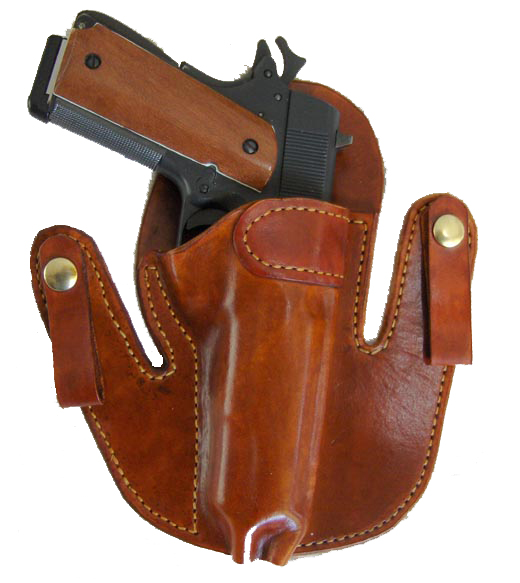
My gun belts made to carry a full size 1911, . . . 2 mags, . . . and anything else that comes around are made of two 7/8 oz layers that I try to cut side by side from the same hide. I never have to worry about skiving the ends down so the fat one matches the skinny one, . . . they take dye the exact same, . . . and they wear like iron. They're garden variety vegetable tan leather. They're contact cemented together, . . . edges sanded, . . . beveled, . . . gouged, . . . stitched, . . . dyed, . . . curved, . . . then finished and edges all dressed up real nice. No one has contacted me yet saying he wore it out. Some have said it got smaller, . . . or seemed to anyway, . . . but they just don't wear out in one life time. May God bless, Dwight
-
My first suggestion would be to get a Tippmann Boss, . . . I have one, . . . it sews a lock stitch, . . . not the same as two needles and the saddle stitch. On the other hand, . . . if money is tight, . . . a stitch wheel and a $49.99 drill press from Harbor freight will do you a real good job. Do not turn it on, . . . just chuck up the needle, . . . lay your work on a board with a hole in it, . . . and use the strength of the press as well as the fact that the needle holes will be perfectly perpindicular. If you want to get real sassy about it, . . . don't put the hole in the board and use a hard wood like oak. That way only the tip will go through, . . . you can then turn it over, . . . re punch the other way, . . . and it will be darn near impossible to tell one side from the other after you saddle stitch it. May God bless, Dwight
-
Works for me, . . . it's just easier sometimes for me to do the backup routine, . . . rather than fight with a 54 inch long, 3 inch wide belt or a flap over holster for a 44 hog leg. My stitches look the same either way, . . . doubled. May God bless, Dwight
-
Thanks, guys, . . . now to put that info into a pair of spurs with a custom strap that I can sell him,........... May God bless, Dwight
-
In the old Westerns of days past, the cowboy strolls into the dusty bar, . . . but you hear him six or eight steps before he pushes open the double swinging saloon doors. I know this is almost off topic, . . . but at least one of my spur strap customers has asked this question, . . . and I have no clue as to what to tell them. Anybody out there got a real good handle on how this is done? Speaking mostly to the real cowboys, . . . but if all you got is the hat and spurs, . . . I'd like to hear from you too. Thanks,........ Mahy God bless, Dwight
-
That is an occurrance that someday will come to all of us. You've heard the best two ideas I know. I have in the past also taken apart pieces that have dried and been used, . . . etc, . . . by putting on my cheater glasses so I could see REAL good, . . . and using a very sharp razor knife to very, very slowly and deliberately cut the layers apart. This I've had to do whenever it has also been sewn. It's work, . . . but it can be done, . . . and it is 99% of the time worth it in the end. May God bless, Dwight
-
Thanks St8Line, . . . it took me a while to find it, . . . I kept missing the part about siging up, . . . Again, I'd appreciate the PDF, . . . got 3 pairs to make by the end of June. Two pair are gifts for a couple of good friends, . . . we ride together in the July 4th parade, . . . May God bless, Dwight
-
How Do I Terminate A Start And End Stitch .... Tippmann Boss
Dwight replied to RoosterShooter's topic in Sewing Leather
What I usually do, . . . use my 6 stitches per inch wheel, . . . lay out about 6 stitches at one end of the line. Make 4 or 5 of those stitches. Your direction will be away from the center of that line. Turn the leather around, . . . and re-stitch those you just did, . . . going in the opposite direction. When you get to the end, . . . simply back stitch the same number of stitches you did to start. NOTE: after you do the first 4 or 5, . . . cut off the ends of the thread where you started. If that extra length "gets involved" with your new stitches, . . . OHHHHH, is it ugly and hard to manage. May God bless, Dwight -
Shoulder Holster Advice
Dwight replied to Steve75's topic in Gun Holsters, Rifle Slings and Knife Sheathes
Steve, . . . being this is the first one, . . . consider it a training exercise: instead of cutting a whole new piece, . . . simply lengthen it. If I lengthen a strap for some reason, . . . this is the usual method I use, . . . lacing it together. You can also later adjust the length if necessary. May God bless, Dwight
-
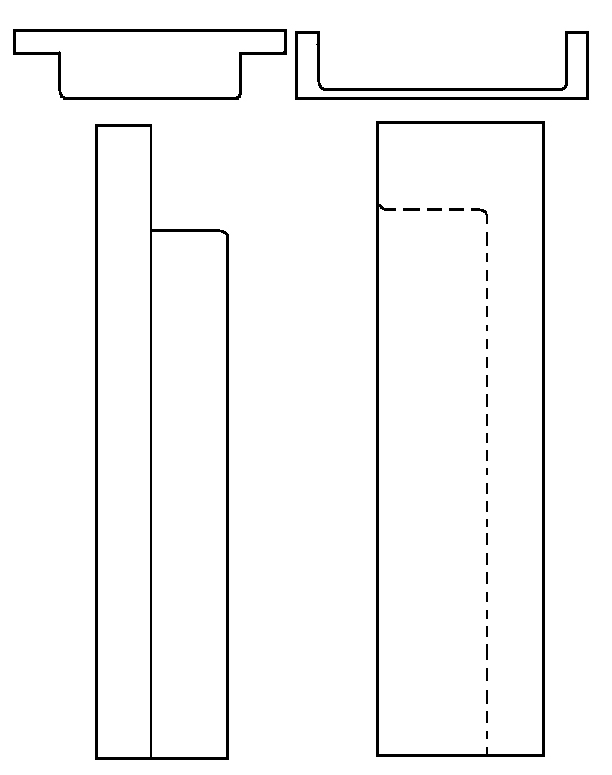
Best Way To Attach Iwb Straps
Dwight replied to glockanator's topic in Gun Holsters, Rifle Slings and Knife Sheathes
Chiefjason, . . . I too have some pull the dot snaps, . . . I think I got them from Sail Rite, . . . but I only ordered the inner male and female parts. I use the Tandy posts. I just checked and they measure right at .334 to .337 in length. Two pieces of 9 oz leather is only .281, . . . so there should be plenty of length there. I have "cheated" a time or two on the male post if it seems to be close: I go to the back side and lightly skive off a few thousandths, . . . sometimes makes all the difference in the world. May God bless, Dwight -
Best Way To Attach Iwb Straps
Dwight replied to glockanator's topic in Gun Holsters, Rifle Slings and Knife Sheathes
7 oz, . . . through the front plate of the holster and through the IWB strap, . . . put em on with a $10 rivet tool I bought at Walmart. I don't have anything against using t nuts other than I just simply chose not to use them. My reasoning is simple, . . . I lose things. If there is a nut or a bolt anywhere on my *********** that can come off and get lost, . . . it will. If you drive by a yard, . . . see the lawn mower sitting idle, . . . and the old grey haired guy walking around the yard like he is looking for something, . . . that may be me, . . . looking for parts off my mower, . . . it just happens When I put a snap on my IWB strap, . . . it isn't coming off until someone takes a pair of side cutters and cuts it off. That was the business model I chose back in '04 or so, . . . and it has been working for me ever since. May God bless, Dwight -
Best Way To Attach Iwb Straps
Dwight replied to glockanator's topic in Gun Holsters, Rifle Slings and Knife Sheathes
Uhhh, . . . no, . . . now that you ask. This is my stock and trade holster, . . . that's how I do it. May God bless, Dwight
-
Best Way To Attach Iwb Straps
Dwight replied to glockanator's topic in Gun Holsters, Rifle Slings and Knife Sheathes
I use snaps, . . . sandwiched, . . . as said before, . . . if you do it right the first time and use quality products, . . . your trouble should be minimum. I only use t nuts when putting furniture together. Leather gets snaps and rivets. May God bless, Dwight -
Good news, Jake, . . . if you can't clean it off, . . . it will be very unlikely to transfer. Why worry about it? As a last resort, . . . can you turn the bag inside out? May God bless, Dwight
-
Finish For Rough Out Holster
Dwight replied to supercub's topic in Gun Holsters, Rifle Slings and Knife Sheathes
I occasionally make roughout holsters, . . . and I just give them a coat of Resolene just like the regular ones. They are a bit abrasive at first, . . . but they are also protected, . . . which is more important to me for my customer and his long term relationship with the product I produced. May God bless, Dwight