


Dwight
-
Posts
5,247 -
Joined
-
Last visited
Content Type
Profiles
Forums
Events
Blogs
Gallery
Store
Everything posted by Dwight
-

Dipping my toe into sewing; Advice requested
Dwight replied to Sam83's topic in Leather Sewing Machines
Depending on how mechanically inclined you might be . . . a small air cylinder could be rigged for the stitching . . . a separate one for the clamp . . . would take some thinking . . . and it was my probable path until I fell into a financial help that I could not pass up . . . and got the Cowboy. May God bless, Dwight -
Dipping my toe into sewing; Advice requested
Dwight replied to Sam83's topic in Leather Sewing Machines
Given all you have said, plus my own personal experience . . . i would look into a Tippmann Boss . . . totally hand operated and currently about a thousand bucks brand new May God bless, Dwight -
Hand of God holster
Dwight replied to Bawarrior's topic in Gun Holsters, Rifle Slings and Knife Sheathes
Very good in my book . . . I make holsters . . . but I do not have the patience for that. May God bless, Dwight -
A belt for a great grand daughter
Dwight replied to doubleh's topic in Purses, Wallets, Belts and Miscellaneous Pocket Items
Far better than I would do . . . but now if they need a ccw holster . . . May God bless, Dwight -
a little something
Dwight replied to JLSleather's topic in Gun Holsters, Rifle Slings and Knife Sheathes
Lots of folks like this one . . . or the 5 shot revolvers. Have to admit I did look at it though. I need more ammo . . . and a bigger punch . . . but that's just me. Good leatherwork there my friend . . . May God bless, Dwight -
I got the table attachment with mine . . . loosened up those height adjustment bolts . . . let it ALL THE WAY DOWN. Then . . . I removed the two pedals . . . re-drilled the mounting holes for them . . . moved them as far back as I could on the platform. Got me a stool . . . and life is so much better. I also got this https://www.ebay.com/itm/164394345099?ssPageName=STRK%3AMEBIDX%3AIT&_trksid=p2060353.m2749.l2649 to hold extra spools of thread . . . was cheap enough . . . and I've got all my most used threads out front there . . . just grab the end and thread it. You'll really like that if you are any relation to me . . . one heck of a great machine. Holler at me some day if you get interested in doing some smaller stuff and start thinking about another machine. There's an attachment you can get from Australia for a hundred bucks . . . lets you do small cases with thinner thread . . . etc. Makes your machine a WHOLE BUNCH more useful. May God bless, Dwight
-
Actually you can do it either way . . . I have two different Roman armor pieces (front and back and apron) . . . the black one is molded specifically for me . . . and will be used in a one act play in our church . . . as Cornelius the centurion. I molded it first . . . then dyed it. Molding it first gave it the typical shape I wanted . . . but by later dying it . . . it became wet again . . . and when it dried the second time . . . it was a bit more solid . . . a little harder. I'm just in the process of decorating it . . . the picture shows my inspiration for it . . . Anything you mold that way that you want to be seriously hard . . . dry it with heat. DO NOT go over 140 deg F . . . I have a drying box I use for holsters and stuff . . . they dry HARD . . . Anyway . . . have fun. May God bless, Dwight

-
Actually . . . either one will work for what you want to do . . . chrome tanned leather is sometimes used for gloves . . . as it holds up to weather a bit better . . . Veg tanned leather is more for things that will be formed to a certain shape (holsters, sheaths, etc) or for stamping (saddles, belts, etc). If you were going to get a tan / brown / etc . . . putting it out in the sun will turn it about as brown as you want . . . with no problem of dye rub off. If you want black . . . vinegaroon does a good job there . . . no dye rub off. Stay away from USMC black from Tandy's . . . it rubs off for the first 100 years or so. A light coating of Resolene will stop rub off . . . but can be rough on the skin. Diluting the dye with solvent . . . and several doses of the diluted dye will also reduce run off. But if the person is sweating profusely . . . you're on your own . . . that's a tough one. May God bless, Dwight
-
Well first of all . . . if you were making a cape for batman . . . it would not make much difference . . . a bracelet for a 5 year old might. What are you interested in making . . . holsters . . . belts . . . purses . . . hats? May God bless, Dwight
-
I'd move the checkered background tool down just enough to cover it and let it go. Only you and I would ever know . . . May God bless, Dwight
-
Try these . . . they are fairly inexpensive . . . work like a champ . . . The saran wrap is for the punch . . . if you drill the hole. It would keep the punch from slipping out . . . But I didn't see where you could put something up in that shaft . . . and if this Tandy shaft would go up there . . . or in your keyless chuck . . . you'll love what you get here. And I know folks use nylon . . . other plastics . . . etc . . . but a piece of leather under the one you are punching is much better for your punch faces. Have fun . . . may God bless, Dwight https://tandyleather.com/products/mini-leather-punch-set
-
Belt Punch Dies - Looking for a die maker
Dwight replied to BeefSupreme's topic in Leather Machinery
Get yourself a cup of good strong coffee . . . and turn off the TV . . . radio . . . and send everyone out of the house. It needs to be done by you . . . and it takes serious concentration. Take a piece of a manila file folder . . . draw lines on it EXACTLY THE WIDTH of your belt or collar. Draw a line down the EXACT center. Measure off and mark EXACTLY where the left edge of each hole will be on that center line. Lay your punch on that center line . . . next to the left edge mark . . . punch out the hole in the file folder. Continue until you have all of them punched. Take a razor knife and a straight edge . . . cut the outsides of the pattern. Now all you have to do to make straight punches is lay it on the leather and very lightly lay your punch in the hole and lightly tap it to mark where the hole should be. Remove your pattern . . . punch the holes. So help me it is a whole lot better than that overpriced thing from weaver. May God bless, Dwight -
If you remove the square "arm" that travels up and down . . . you can then take it to a drill press . . . and drill a hole in it about an inch and a half deep . . . the size of the diameter of the punch handles . . . and by putting a piece of saran wrap (or 2 or 3) over it . . . it will stick in the hole. Put the leather under it . . . pull down the arm . . . presto a hole. DON'T waste time messing around with cleaning it out . . . you punch the leather . . .it'll clean itself out . . . they are designed to do that . . . and they will do that. ALSO . . . make sure there is another piece of ugly old leather under the piece you are punching. THAT is where you are probably dulling your punch. I've got punches I have never sharpened . . . have used since 2000 . . . they still punch pretty round holes . . . and I just hit em once or twice with my mallet . . . belts / sheaths / slings . . . and I've even done a couple of dog collars. May God bless, Dwight
-
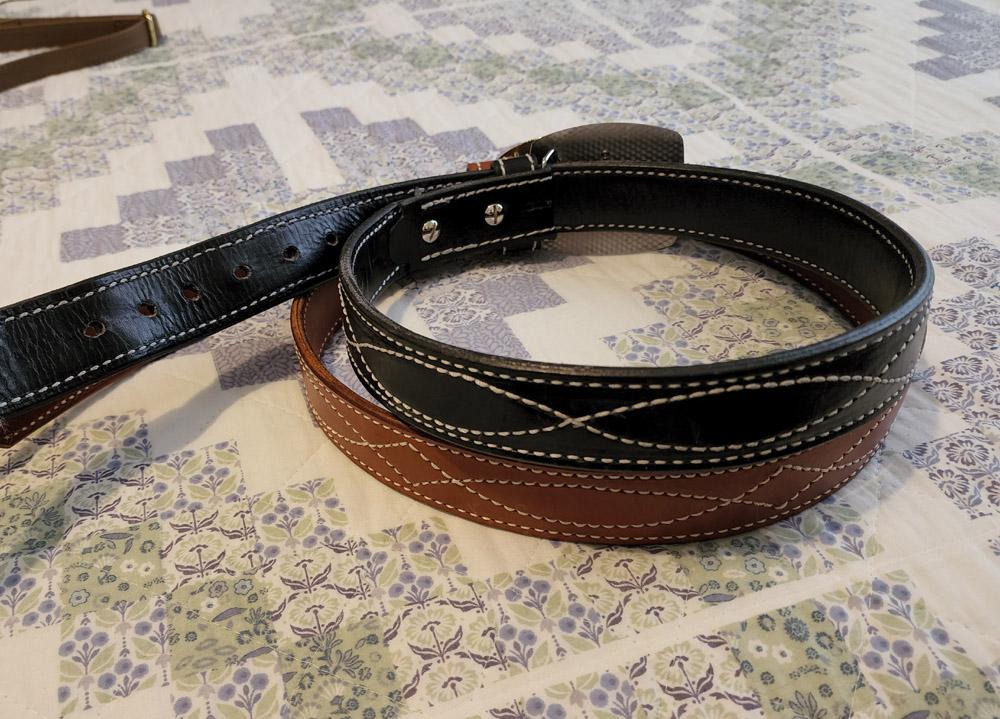
Not sure what Handstitched meant by "flexible" . . . but here are a couple of double layer belts I've made . . . both are set up for a 36 inch waist . . . and obviously I've pulled them much smaller in the picture . . . probably in the 32 inch waist category as they lay there on the bed. The brown one is a standard double layer belt. The black one is steel lined from the screws you can see by the belt keeper . . . the lining goes all the way around to about 1/2 inch from where the first buckle hole starts out. I wear both . . . the steel lined is to me quite comfortable . . . and when I get up . . . I thread a cell phone holster on the left side . . . and a 9mm holster on the right side . . . Hope this helps clear up how well a lined belt can actually be. May God bless, Dwight
-
JRodz uses nylon webbing . . . I use 3/4 inch stainless steel. They do not bend . . . or at least the ones I have access to seeing do not. Haven't tried going thru airport security with one on though yet. May God bless, Dwight
-
Uhh . . . no . . . May God bless, Dwight
-
Trying to learn video making skills... warmup video, comments welcome please!
Dwight replied to YinTx's topic in Show Off!!
Actually . . . the most important part of any video . . . is not the video itself . . . but rather the editing. It is actually the editing that MAKES the video. Anyone can set up a camera . . . run their mouth about all the great things they are doing and want to show . . . and it is not quite as boring as the democrat convention . . . but it is close. If you want to captivate your audience . . . it needs to be short . . . kill the idea of telling everyone about your great aunt's berry patch that let you into leather work 32 1/2 years ago. Stay away from long winded descriptions of this / that / and the other thing. State what you are going to do in all of about 10 seconds . . . then do it. Keep any instructional video at 5 minutes or less. Make a "Part 2" or a "Part 3" if necessary . . . you are not making 60 minutes documentaries. This is especially important if it is the same process over and over and over. For example . . . if tooling a large holster for an old black powder pistol . . . break it up into border . . . flowers . . . stems . . . fill in . . . etc. State what you are doing . . . then do it . . . and shut down. Tell interested folks to subscribe . . . that way they'll be notified of the next one. You might also look into Cyberlink Power Director 10 / 12 / 14 / or 16. They are some of the best personal use editors out there . . . there is a learning curve . . . but it is not a hard one. Cyberlink is trying to go "MicroSoft" and make the new subscribers rent their product . . . look on Ebay . . . you can buy these self contained programs at reasonable prices. PD 16 was the last full self contained . . . so if you can grab it . . . it is the best of the bunch. Finally . . . if you really . . . really . . . want to do this . . . invest in several cameras . . . at least 2 . . . 3 is a lot better . . . we use this one at our church every Sunday . . . we record on 4 cameras . . . take out the SD chips . . . go home and edit for an hour or so. https://www.ebay.com/itm/195172099088?hash=item2d7129e410:g:tt0AAOSwsEBiuedc Also if you want to put in a page of written instructions . . . use Power Point . . . you can import it directly into Power Director and drop it where ever you want. Finally . . . build an introductory screen . . . a short one . . . that tells who you are . . . and what you are doing . . . AND THEN . . . after the video is done . . . list the tools you used . . . the leather type . . . the dyes . . . the finish . . . give the customer a succinct place to come and get that info. Trying to go back and find it . . . even in a 5 minute video can be a real pain. Have fun . . . may God bless, Dwight -
Dye is a funny stuff . . . and it is a runny stuff. If and when you use it on leather . . . two things you can be sure of: if it is not sealed with something like Resolene . . . it WILL BLEED . . . and if it is properly sealed . . . it won't. You can rub a dyed piece of leather until the cows come home . . . and it will not bleed . . . then you get all hot and sweaty . . . transfer that sweat to the leather ( or just get some water on it ) and here comes the bleed. If you want to darken it . . . after you have tooled it . . . lay it outside in the sun for a day . . . two days . . . three days . . . and I guarantee it will darken . . . you may get it exactly where you want it. From there a light coat (on the hair side ONLY ) of neatsfoot oil . . . followed by a good rubbing of saddle soap and buffing . . . you will have a beautiful and useable sling. I do dye mine . . . then I put a light coat of resolene on them . . . and it works every bit as good . . . other than it will be somewhat stiffer. May God bless, Dwight
-
On jeans belts . . . the loop free floats between two chicago screws . . . the ends of it sewn together in a loop. On a gun belt . . . I put the bottom end of the loop in place . . . and sew 3 or 4 stitch holes in front of the loop . . . thru the loop and one hole past . . . but there is no thread in the machine . . . it is just punching holes. I then thread the machine . . . sew the belt all the way around to the loop on the other side . . . stop the machine . . . pull out about 18 inches of thread from the spool and from the bobbin . . . then I basically saddle stitch the loop in . . . plus 4 or 5 stitches on the other side . . . Have never had one come apart on me yet . . . that I know of. May God bless, Dwight
-
OK . . . I'll bite . . . why does it have to be one piece? May God bless, Dwight
-
Here you are . . . double layer belt . . . The next step would be to sew them . . . that is what the whole conversation has been about . . . May God bless, Dwight
-
Add to it . . . Toledo industrial did me right. The servo motor on my 4500 will go so slow that I can move the leather so it goes EXACTLY where I want it . . . which was the one thing I truly loved about my Tippmann Boss. Bob tops it off with a couple spools of thread and a two spool thread holder . . . Had a couple screws come up missing . . . called Bob . . . they were in the mail . . . wicky wicky. May God bless, Dwight
-
With a double layer belt . . . you have to cut both pieces . . . then cut the stitches . . . so you can slip something between the pieces so you can cut the under side piece . . . and then you cut it off square . . . so it looks dorky the rest of it's adult life . . . plus you will then also have to re stitch each end over top of the place you cut . . . so the threads don't come out. All in all . . . I'm thinking the tongue end has to be faster unless you sew them up to say a 36 . . . and you get a guy coming in who wants that 47 . . . which means you have to hand sew about 61 inches of belt altogether. He would get his belt in the mail. May God bless, Dwight
-
Well . . . you could stitch the top and bottom up to a certain point . . . in my case if I did it . . . most of my customers are in the 38 inch or bigger category . . . so I would stitch them up to maybe where the next to the end hole . . . and tie them off. Then you only have to stitch the tongue area. If you are careful in how you do it . . . saddle stitching with only one piece of thread . . . your knots would be on the bottom . . . mostly un-noticeable if you are careful . . . Secondary part is . . . that is a very good way to do the tongue . . . you could also impress them with the extra effort you are putting in to their product. But like Lobo said . . . no matter what we do . . . we'll wind up with "extras" in the shop . . . I had to make one for a girl the other day . . . 3 times . . . and her sister ate a couple extra pizzas or something between fitting and delivery . . . hers was not as well fitting as the others. But that is all part of the belt industry . . . Have fun . . . may God bless, Dwight
-
Now that you ask . . . yes, got a Boss . . . and yes I can do a belt in 30 minutes with it . . . but I'd much rather do it on my Cowboy 4500. If you want to do that . . . pre dye your belts . . . glue em together . . . fix the buckle end ready to go . . . For me . . . I would cut them a 56 inch long belt blank . . . the way I do it . . . that would give me a 47 inch belt blank. My first hole for the buckle is 4 inches in from the end . . . and there are 7 holes following it . . . at 1 inch intervals. If I were going to a fair or something like that using a Boss or Outlaw . . . I'd stitch the first 34 inches of the bottom side of each belt. Tie off the stitches but don't double them. Then when your customer picks his belt . . . all you have to do is cut the end . . . punch the holes . . . finish sewing the bottom . . . make the turn . . . and sew the top side. With my boss . . . I can easily do that in a half hour. And . . . your customer gets to see exactly what his/her belt will look like. AND . . . don't discount the curiosity folks . . . sometimes folks will stand there and watch you . . . just to see how it is done . . . then brag to their peers what they saw. May God bless, Dwight